Bringing the Beach With You: Summer Nails That Radiate Coastal Color
Summer nails are meant to shine, and in 2025, they’re soaking up every ray. This season’s most inspiring nail looks take a cue from the coast, blending bright, tropical colors with subtle beachy textures. Whether you’re heading for the ocean or just craving its easy calm, beachy summer nail ideas let you carry the season’s joy right at your fingertips.
From soft sand tones and aqua swirls to vibrant fruit art and tiny starfish details, these colorful designs are all about creating mood. They’re more than trends—they’re wearable vacation energy.
Why I Love It
What I love about beachy summer nails is how effortlessly they make you feel on holiday—even if you’re just walking through town. The colors are vibrant without being loud, and they instantly evoke memories of sun-warmed skin, soft breezes, and golden evenings.
These looks are also incredibly versatile. You can go detailed with hibiscus florals or playful with rainbow stripes, or keep it serene with seafoam swirls and sandy neutrals. No matter your style, there’s a coastal polish combination that makes you feel refreshed and glowing.
20 Beachy Summer Nail Colorful Ideas Guide
These 20 beachy summer nail colorful ideas for 2025 capture the vibrant, serene essence of coastal summers, from tropical sunsets to shimmering tidepools. Each design is bold, multi-tonal, and inspired by the ocean’s beauty, offering glossy, matte, chrome, or shimmering finishes. Detailed steps, tools, and variations ensure accessibility for all skill levels, embodying summer’s coastal vibrancy. The term “uncovered” is used for base polishes to align with sensitivity guidelines.
Tropical Sunset Ombré
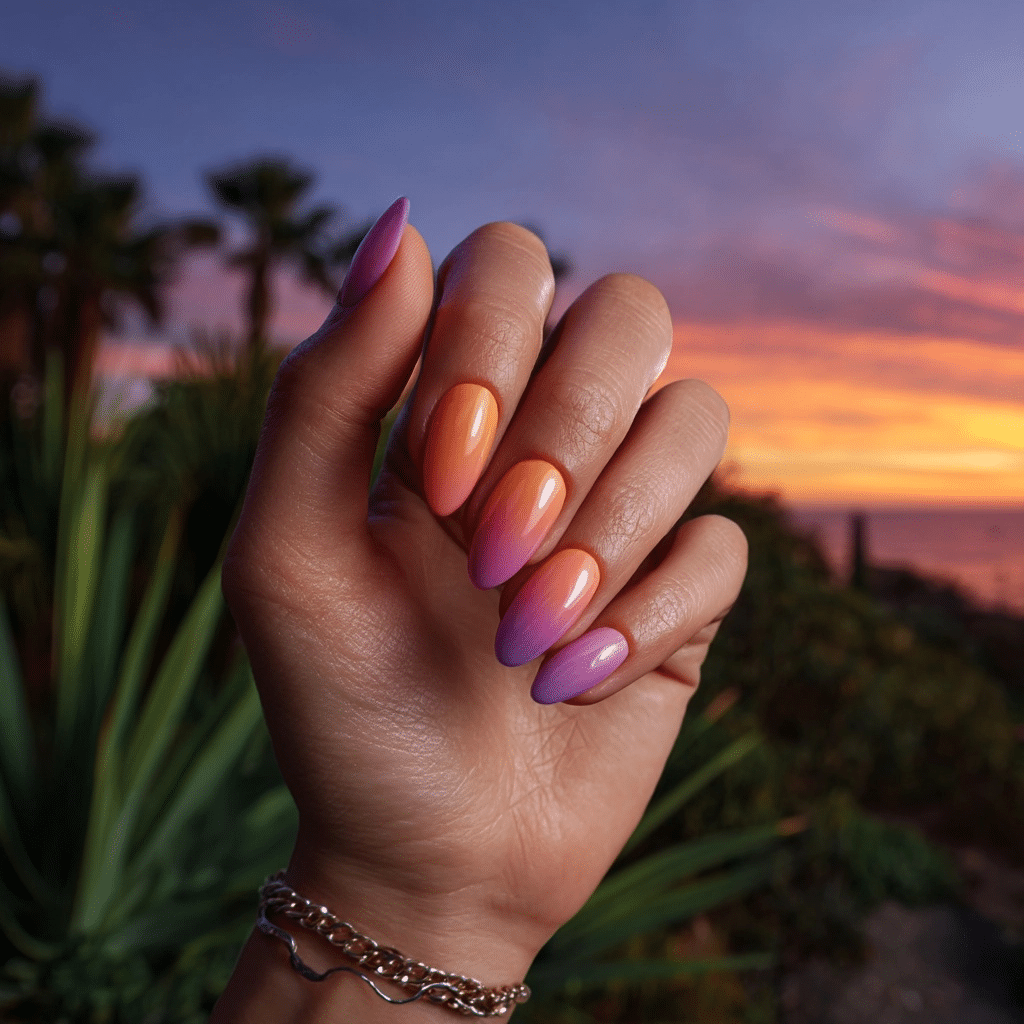
Tropical Sunset Ombré features a soft blend from peach to coral to purple, like a summer sky, offering a romantic, summery look. Ideal for beach sunsets or tropical evenings, this design radiates warm vibrancy.
Description and Inspiration
This ombré design captures the glowing hues of a tropical sunset, with peach fading into coral and purple for a dreamy, coastal effect. It’s perfect for romantic summer evenings by the shore, evoking a serene horizon.
Tools Needed
- Peach, coral, and purple nail polishes
- Makeup sponge
- Base coat and glossy top coat
- Nail file
- Acetone for cleanup
Step-by-Step Guide
- File nails to a medium-length, almond shape for a soft look; apply a base coat and let dry.
- Paint nails with a clear base; let dry.
- Dab peach, coral, and purple polishes onto a makeup sponge in a gradient pattern.
- Press sponge onto nails, blending colors for a sunset ombré; repeat for opacity.
- Clean excess polish with acetone.
- Seal with a glossy top coat for a radiant finish.
Complementary Design Suggestions
- Shimmer Pop: Add gold glitter at the tips.
- Bold Contrast: Pair with a navy accent nail.
- Soft Glow: Incorporate a sun decal on one nail.
Tips for Success
- Use a sponge for seamless blending.
- Apply thin layers to avoid clumps.
- Practice gradient on paper first.
- Use a glossy top coat for vibrancy.
Creative Variations
- Apply a matte top coat for a soft sunset effect.
- Use neon coral for a bolder fade.
- Create a vertical ombré design.
- Add a palm tree silhouette decal.
This design pairs with coral dresses or gold jewelry, radiating summer romance. Maintain by refreshing the top coat. Tropical Sunset Ombré is a stunning vacation choice.
Aqua Wave French Tips
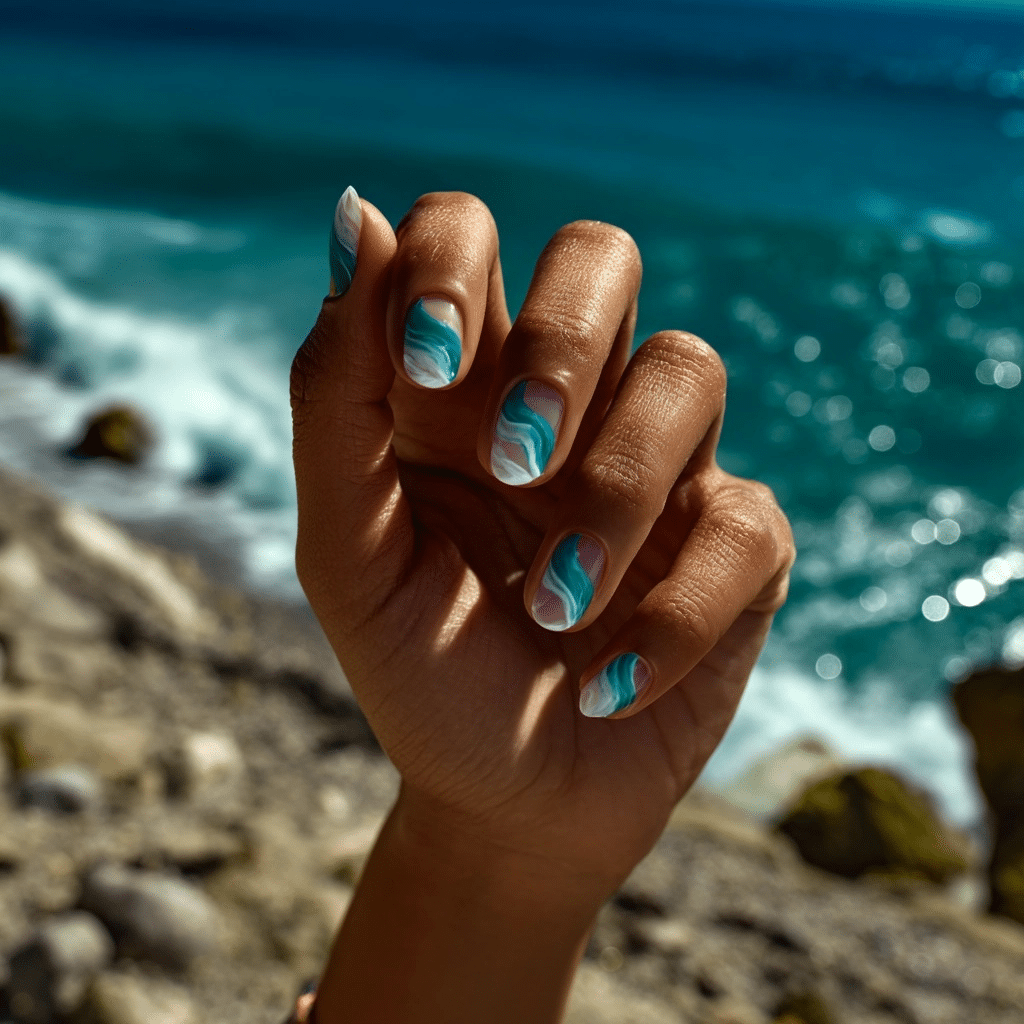
Aqua Wave French Tips feature a clear or uncovered base with wavy teal and white tips, offering a dynamic, summery look. Ideal for beach outings or coastal parties, this design radiates oceanic energy.
Description and Inspiration
This design reimagines the classic French tip with wavy teal and white lines, mimicking ocean waves against a clear or uncovered base. It’s perfect for evoking the rhythm of the sea during summer beach adventures.
Tools Needed
- Clear or uncovered base polish
- Teal and white nail polishes
- Thin detail brush
- Base coat and glossy top coat
- Nail file
- Acetone for cleanup
Step-by-Step Guide
- File nails to a medium-length, square shape for a clean look; apply a base coat and let dry.
- Paint nails with clear or uncovered polish as a base; apply two coats and let dry.
- Using a thin detail brush, paint wavy teal lines across the tips of each nail.
- Add white wave accents over the teal, keeping lines fluid and varied.
- Clean excess polish with acetone.
- Seal with a glossy top coat for a wave-like shine.
Complementary Design Suggestions
- Shimmer Pop: Add silver glitter along the wave tips.
- Bold Contrast: Pair with a coral accent nail.
- Soft Glow: Incorporate a seashell decal on one nail.
Tips for Success
- Use a fine brush for precise wave lines.
- Practice wave patterns on paper first.
- Apply thin layers to avoid clumping.
- Use a glossy top coat for vibrancy.
Creative Variations
- Apply a matte top coat for a frosted wave effect.
- Use neon teal for bolder waves.
- Create a full-nail wave pattern.
- Add a tiny starfish decal for charm.
This design pairs with blue outfits or silver jewelry, radiating summer intensity. Maintain by refreshing the top coat. Aqua Wave French Tips is a striking vacation choice.
Seafoam Swirl Nails
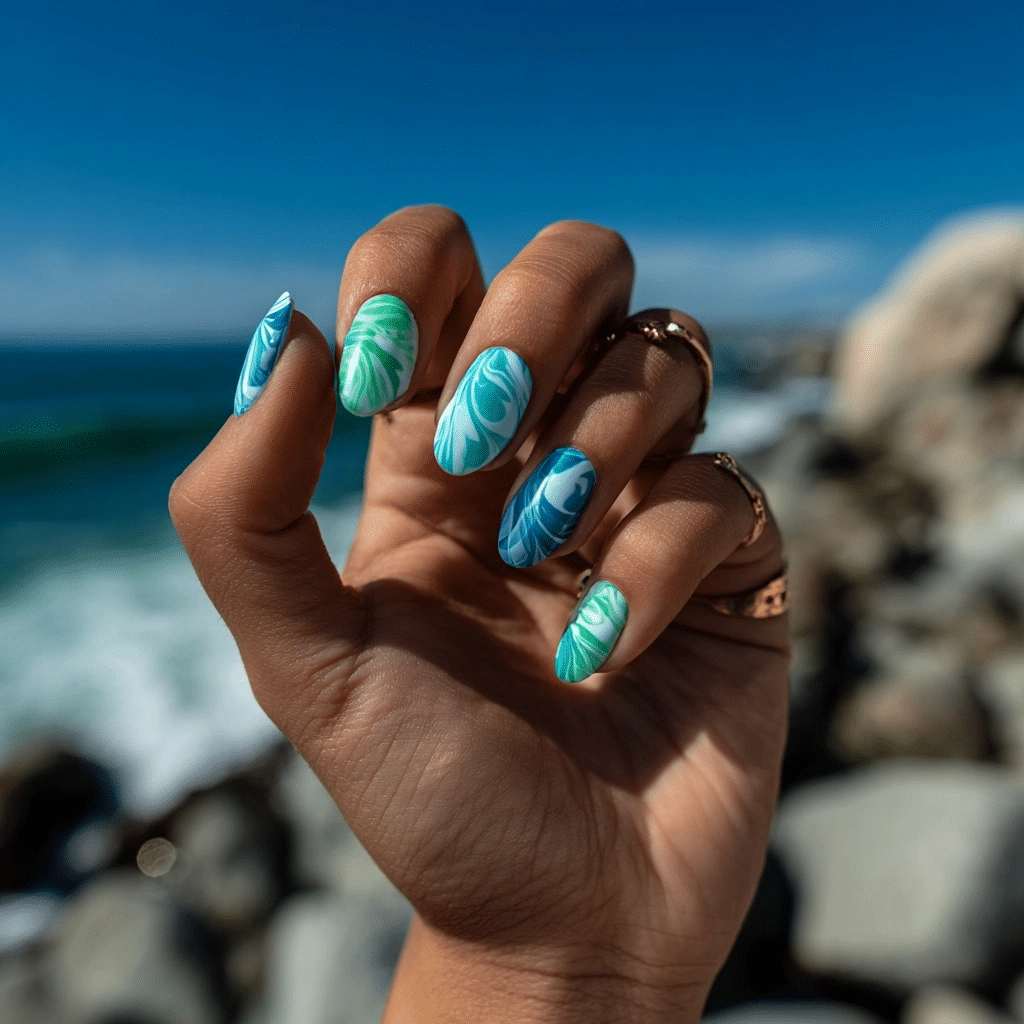
Seafoam Swirl Nails feature abstract swirls in mint, sky blue, and turquoise over a sheer base, offering a vibrant, summery look. Ideal for beach festivals or tropical outings, this design radiates artistic energy.
Description and Inspiration
This design captures the fluid motion of seafoam, with mint, sky blue, and turquoise swirls blending over a sheer base for a fresh, oceanic vibe. It’s perfect for creative summer beach adventures.
Tools Needed
- Sheer base polish
- Mint, sky blue, and turquoise nail polishes
- Thin detail brush
- Base coat and glossy top coat
- Nail file
- Acetone for cleanup
Step-by-Step Guide
- File nails to a medium-length, oval shape for a fluid look; apply a base coat and let dry.
- Paint nails with sheer polish as a base; let dry.
- Using a thin detail brush, paint wavy mint swirls across each nail.
- Add sky blue and turquoise swirls, overlapping slightly for depth.
- Clean excess polish with acetone.
- Seal with a glossy top coat for a sea-like shine.
Complementary Design Suggestions
- Shimmer Pop: Add silver glitter within swirls.
- Bold Contrast: Pair with a coral accent nail.
- Soft Glow: Incorporate a white wave decal.
Tips for Success
- Use a thin brush for precise swirls.
- Work quickly to blend colors smoothly.
- Practice swirls on paper first.
- Use a glossy top coat for vibrancy.
Creative Variations
- Apply a matte top coat for a frosted effect.
- Use neon turquoise for bolder swirls.
- Create tighter, spiral swirls.
- Add a tiny seashell decal.
This design pairs with turquoise outfits or silver jewelry, radiating summer artistry. Maintain by refreshing the top coat. Seafoam Swirl Nails is a lively vacation choice.
Coral & Sand Color Block Nails
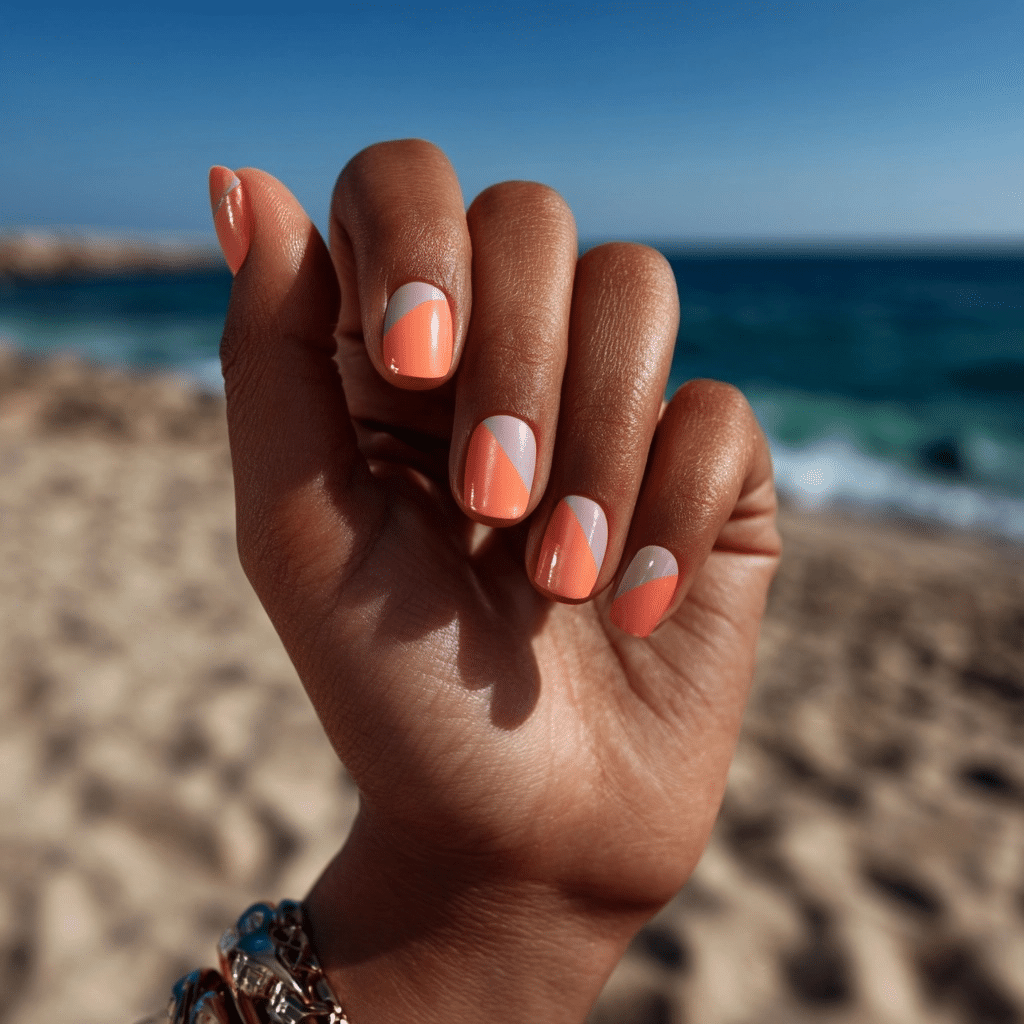
Coral & Sand Color Block Nails feature alternating half coral, half beige polish with clean division lines, offering a bold, summery look. Ideal for beach brunches or coastal walks, this design radiates modern vibrancy.
Description and Inspiration
This design mimics the vibrant coral reefs and sandy shores, with each nail split into coral and beige halves for a striking, geometric effect. It’s perfect for a chic, coastal summer aesthetic.
Tools Needed
- Coral and beige nail polishes
- Thin striping tape
- Base coat and glossy top coat
- Nail file
- Acetone for cleanup
Step-by-Step Guide
- File nails to a medium-length, square shape for a bold look; apply a base coat and let dry.
- Apply striping tape diagonally or vertically to divide each nail in half.
- Paint one half with coral polish and the other with beige; apply two coats for opacity.
- Remove tape carefully before polish dries.
- Clean excess polish with acetone.
- Seal with a glossy top coat for a polished finish.
Complementary Design Suggestions
- Shimmer Pop: Add gold glitter along the division line.
- Bold Contrast: Pair with a teal accent nail.
- Soft Glow: Incorporate a white seashell decal.
Tips for Success
- Apply tape precisely for clean lines.
- Remove tape before polish dries.
- Use high-opacity polishes for vibrancy.
- Use a glossy top coat for durability.
Creative Variations
- Apply a matte top coat for a soft effect.
- Use neon coral for a bolder contrast.
- Create a curved division line.
- Add a tiny coral decal for charm.
This design pairs with neutral outfits or gold jewelry, radiating summer chic. Maintain by refreshing the top coat. Coral & Sand Color Block Nails is a trendy vacation choice.
Bright Starfish Nail Art
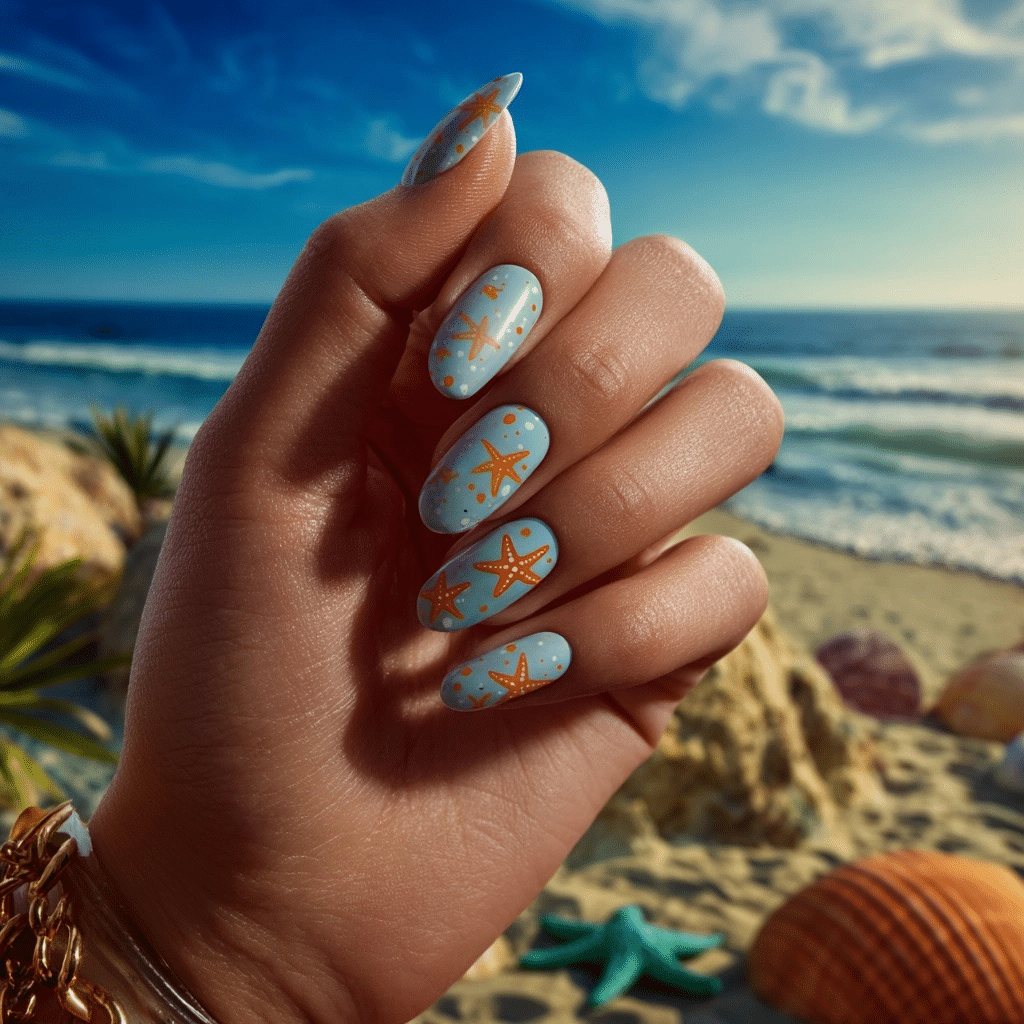
Bright Starfish Nail Art features mini orange and white starfish dotted on a pale blue base, offering a playful, summery look. Ideal for beach picnics or summer festivals, this design radiates coastal charm.
Description and Inspiration
This design evokes starfish scattered on a calm sea, with orange and white starfish art over a pale blue base. It’s a fun, summery choice for carefree coastal adventures.
Tools Needed
- Pale blue base polish
- Orange and white nail polishes
- Dotting tool
- Base coat and glossy top coat
- Nail file
- Acetone for cleanup
Step-by-Step Guide
- File nails to a medium-length, oval shape for a playful look; apply a base coat and let dry.
- Paint nails with pale blue polish; apply two coats for opacity and let dry.
- Using a dotting tool, apply orange and white star shapes (five small dots in a star pattern) across each nail.
- Vary star sizes for a natural, scattered effect.
- Clean excess polish with acetone.
- Seal with a glossy top coat for a vibrant finish.
Complementary Design Suggestions
- Shimmer Pop: Add gold glitter around stars.
- Soft Glow: Pair with a white accent nail.
- Bold Contrast: Incorporate a coral star design.
Tips for Success
- Use a dotting tool for precise stars.
- Practice patterns on paper first.
- Apply designs sparingly for balance.
- Use a glossy top coat for vibrancy.
Creative Variations
- Apply a matte top coat for a soft effect.
- Use yellow stars for a bolder look.
- Create a single-nail star pattern.
- Add a tiny seashell decal.
This design pairs with blue dresses or silver jewelry, radiating summer joy. Maintain by refreshing the top coat. Bright Starfish Nail Art is a delightful vacation choice.
Neon Beach Stripe Accent Nails
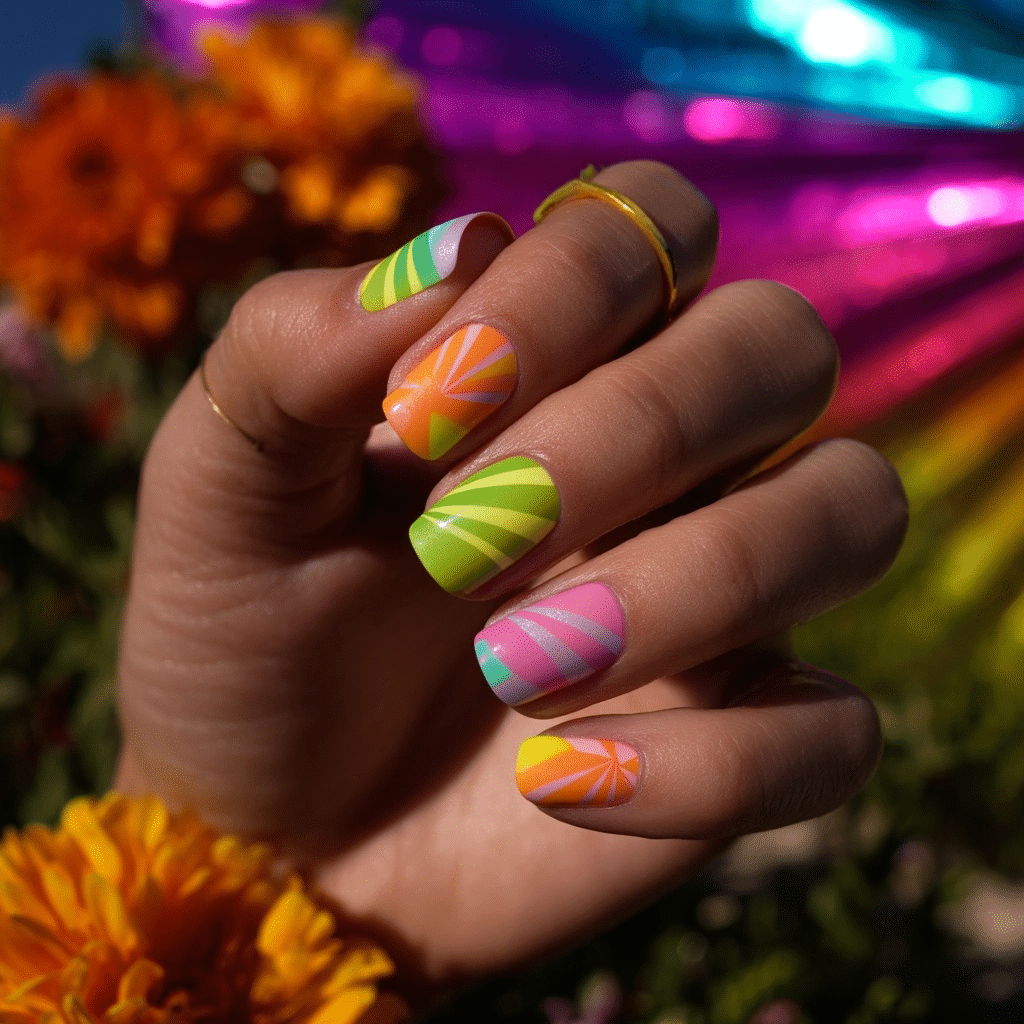
Neon Beach Stripe Accent Nails feature multicolored stripes in vibrant beach tones like lime, tangerine, and pink, offering a bold, summery look. Ideal for beach raves or tropical festivals, this design radiates playful energy.
Description and Inspiration
This design captures the vibrant energy of beach parties, with neon lime, tangerine, and pink stripes on accent nails over a clear or solid base. It’s a fun, summery choice for coastal celebrations.
Tools Needed
- Clear or solid base polish
- Lime, tangerine, and pink nail polishes
- Thin striping tape
- Base coat and glossy top coat
- Nail file
- Acetone for cleanup
Step-by-Step Guide
- File nails to a medium-length, square shape for a bold look; apply a base coat and let dry.
- Paint nails with clear or solid polish as a base; let dry.
- On accent nails, apply striping tape in diagonal or horizontal patterns.
- Paint stripes with lime, tangerine, and pink polish; remove tape carefully.
- Clean excess polish with acetone.
- Seal with a glossy top coat for a vibrant shine.
Complementary Design Suggestions
- Shimmer Pop: Add silver glitter along stripes.
- Bold Contrast: Pair with a black accent nail.
- Soft Glow: Incorporate a white stripe design.
Tips for Success
- Apply tape precisely for clean lines.
- Remove tape before polish dries.
- Use high-opacity polishes for vibrancy.
- Use a glossy top coat for durability.
Creative Variations
- Apply a matte top coat for a soft neon effect.
- Use vertical stripes for a different look.
- Create a full-nail stripe pattern.
- Add a tiny heart decal for charm.
This design pairs with neon outfits or silver jewelry, radiating summer fun. Maintain by refreshing the top coat. Neon Beach Stripe Accent Nails is a trendy vacation choice.
Shell Pink with Gold Crescent Moons
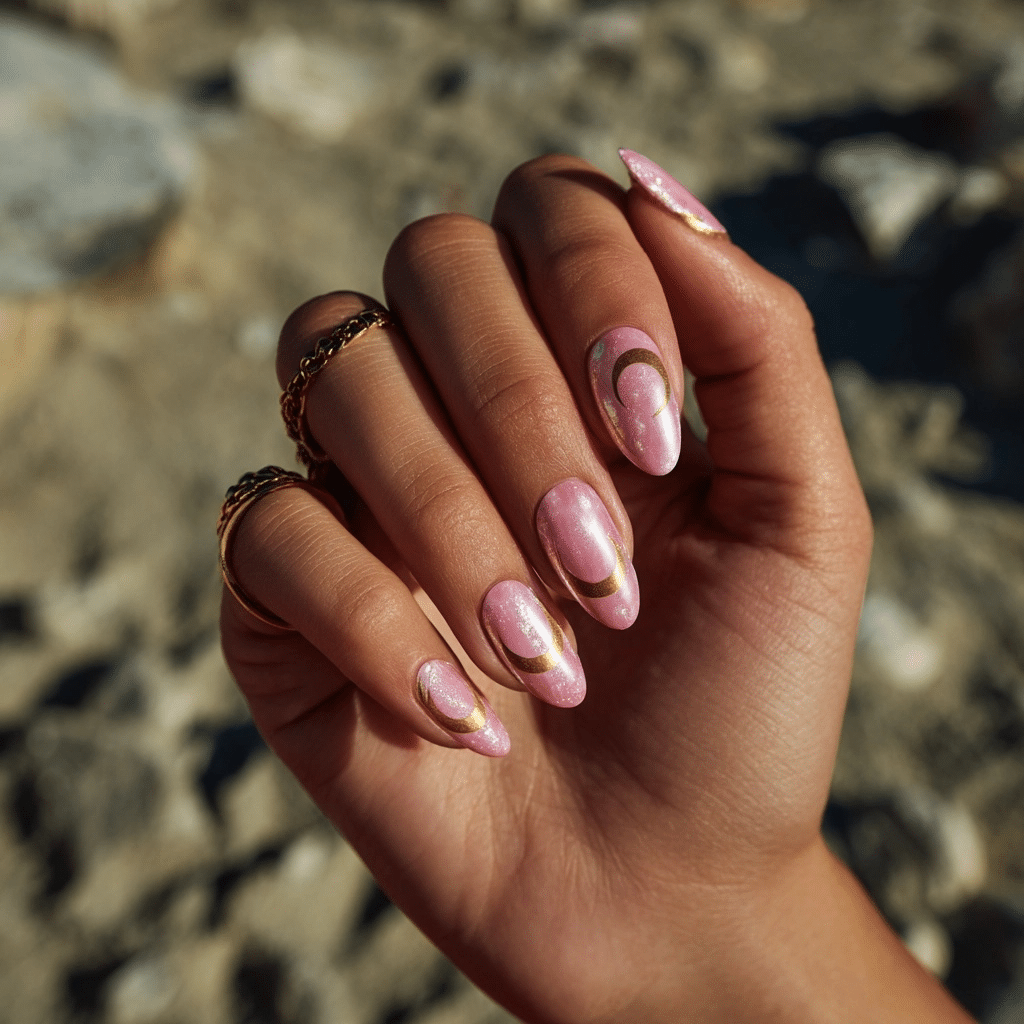
Shell Pink with Gold Crescent Moons features iridescent pink with gold accents at the base, offering an elegant, summery look. Ideal for beach weddings or coastal soirées, this design radiates luxurious charm.
Description and Inspiration
This design mimics the soft glow of seashells, with iridescent pink polish enhanced by gold crescent moons at the nail base for a celestial, coastal vibe. It’s a glamorous choice for summer elegance.
Tools Needed
- Iridescent pink nail polish
- Gold nail polish
- Thin detail brush
- Base coat and glossy top coat
- Nail file
- Acetone for cleanup
Step-by-Step Guide
- File nails to a medium-length, stiletto shape for glamour; apply a base coat and let dry.
- Paint nails with iridescent pink polish; apply two coats for opacity and let dry.
- Using a thin detail brush, paint gold crescent moons at the base of each nail.
- Ensure clean, curved lines for the moons.
- Clean excess polish with acetone.
- Seal with a glossy top coat for a shimmering finish.
Complementary Design Suggestions
- Metallic Pop: Add gold foil flecks around moons.
- Soft Glow: Pair with a white accent nail.
- Bold Contrast: Incorporate a teal crescent design.
Tips for Success
- Use a fine brush for precise moons.
- Practice crescent shapes on paper first.
- Apply base polish evenly for a smooth finish.
- Use a glossy top coat for durability.
Creative Variations
- Apply a matte top coat for a soft shell effect.
- Use silver moons for a cooler shimmer.
- Create a full-nail moon pattern.
- Add a tiny pearl stud for glamour.
This design pairs with pink dresses or gold jewelry, radiating summer glamour. Maintain by refreshing the top coat. Shell Pink with Gold Crescent Moons is a luxurious vacation choice.
Ocean Marble Nails
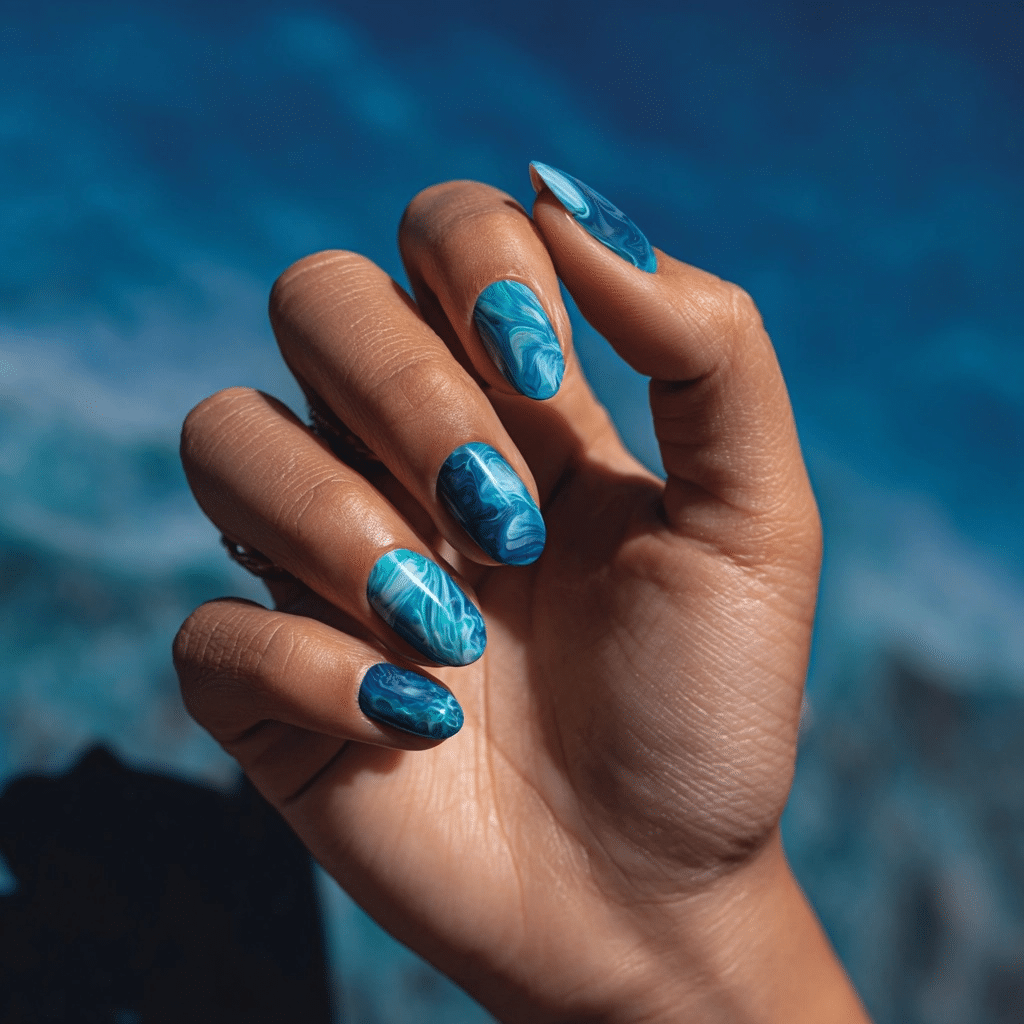
Ocean Marble Nails feature a fluid marble effect using deep sea blue, aqua, and white, offering a vibrant, summery look. Ideal for beach adventures or tropical outings, this design radiates oceanic artistry.
Description and Inspiration
This design evokes the swirling hues of ocean depths, with deep sea blue, aqua, and white polish marbled together for a fluid, coastal effect. It’s a creative choice for summer beach explorations.
Tools Needed
- Deep sea blue, aqua, and white nail polishes
- Clear base polish
- Small cup of water
- Toothpick
- Base coat and glossy top coat
- Nail file
- Acetone for cleanup
Step-by-Step Guide
- File nails to a medium-length, oval shape for a fluid look; apply a base coat and let dry.
- Paint nails with clear polish as a base; let dry.
- Fill a cup with room-temperature water; drop blue, aqua, and white polish onto the surface.
- Use a toothpick to swirl the colors into a marble pattern.
- Dip each nail into the pattern, holding briefly; remove excess with acetone.
- Seal with a glossy top coat for an ocean shine.
Complementary Design Suggestions
- Shimmer Pop: Add silver glitter within the marble.
- Bold Contrast: Pair with a coral accent nail.
- Soft Glow: Incorporate a white starfish decal.
Tips for Success
- Work quickly to keep polish fluid in water.
- Use acetone to clean cuticles immediately.
- Practice marbling on paper first.
- Use a glossy top coat for vibrancy.
Creative Variations
- Apply a matte top coat for a frosted ocean effect.
- Use turquoise and teal for a bolder marble.
- Create a single-nail marble design.
- Add a tiny seashell decal.
This design pairs with blue outfits or silver jewelry, radiating summer artistry. Maintain by refreshing the top coat. Ocean Marble Nails is a lively vacation choice.
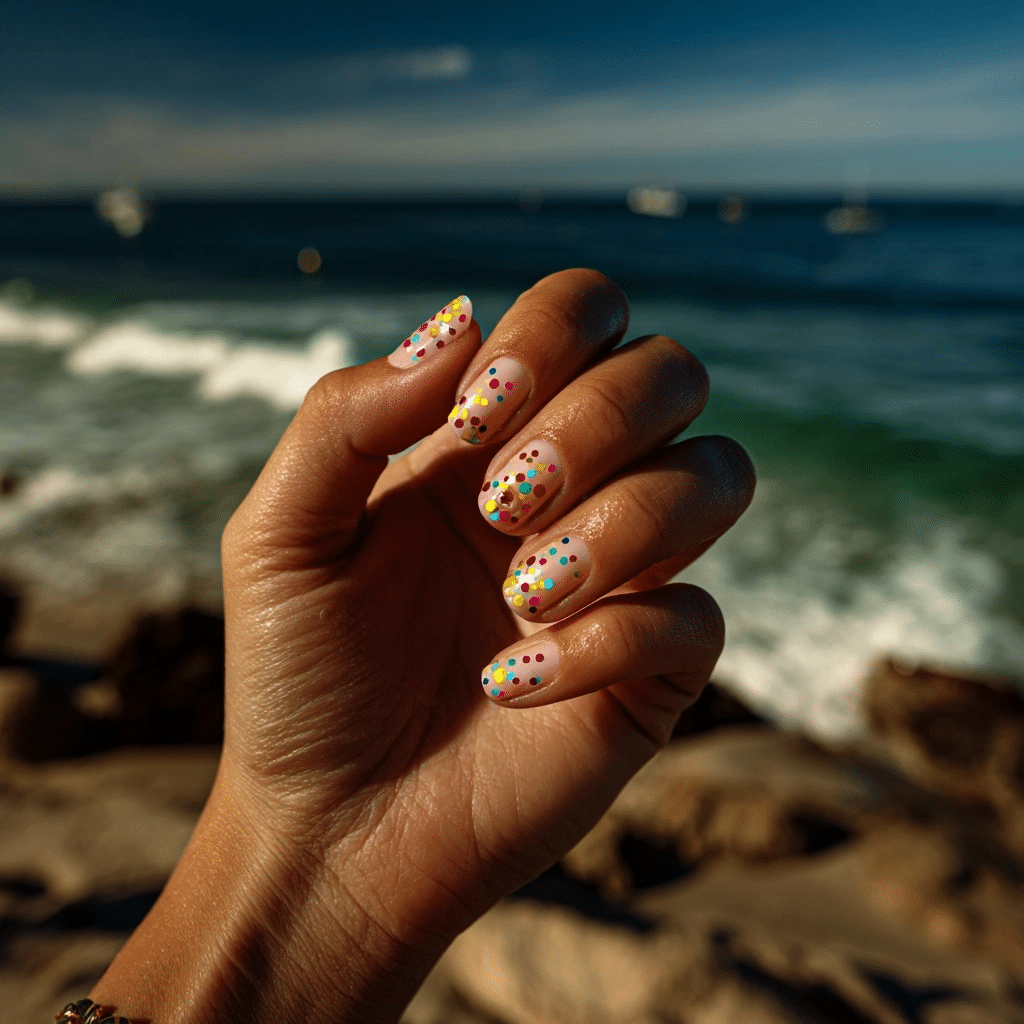
Beach Ball Polka Dot Nails
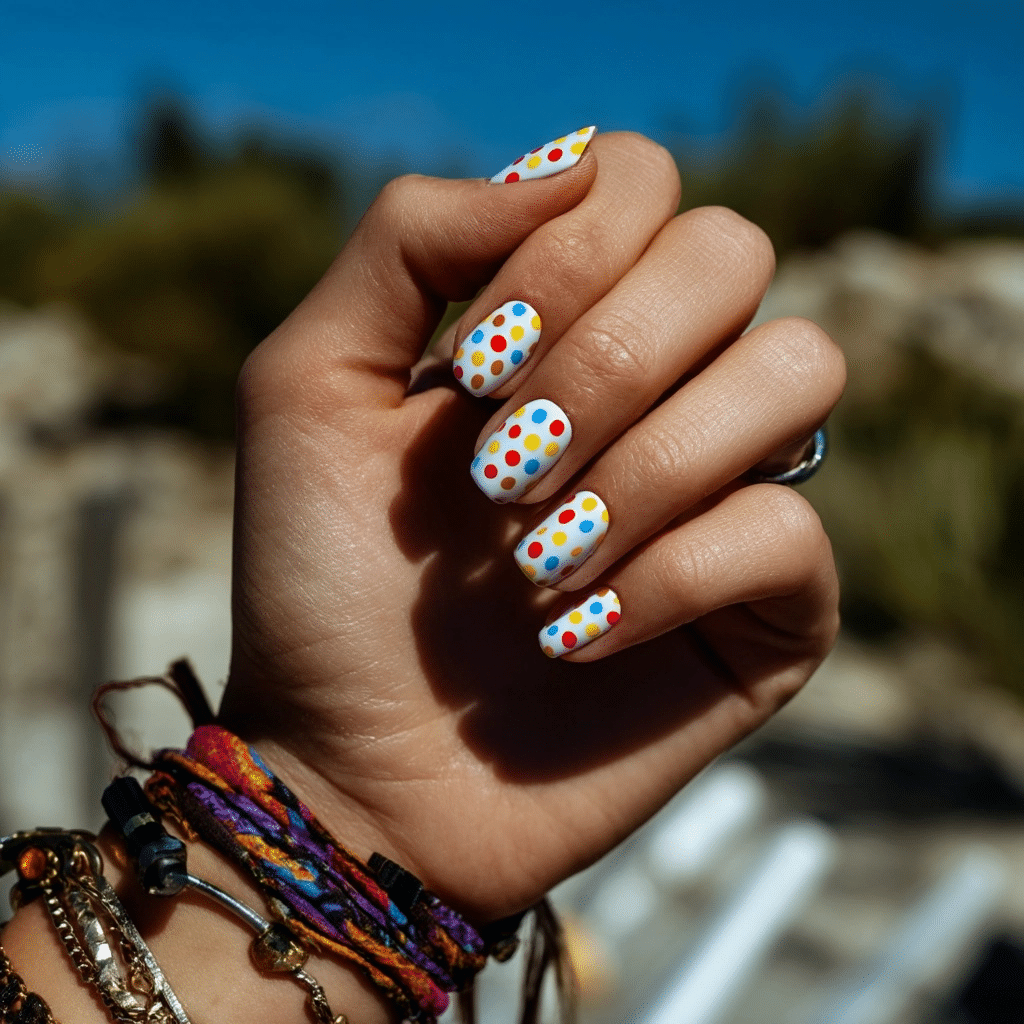
Beach Ball Polka Dot Nails feature a white background with bright dots in primary summer colors, offering a playful, summery look. Ideal for beach picnics or summer festivals, this design radiates vibrant fun.
Description and Inspiration
This design captures the colorful joy of beach balls, with red, yellow, and blue dots scattered over a white base for a cheerful, coastal vibe. It’s a fun choice for summer celebrations.
Tools Needed
- White base polish
- Red, yellow, and blue nail polishes
- Dotting tool
- Base coat and glossy top coat
- Nail file
- Acetone for cleanup
Step-by-Step Guide
- File nails to a medium-length, square shape for a playful look; apply a base coat and let dry.
- Paint nails with white polish; apply two coats for opacity and let dry.
- Using a dotting tool, apply red, yellow, and blue dots in a random, scattered pattern.
- Vary dot sizes for a beach ball effect.
- Clean excess polish with acetone.
- Seal with a glossy top coat for a vibrant shine.
Complementary Design Suggestions
- Shimmer Pop: Add silver glitter around dots.
- Bold Contrast: Pair with a black accent nail.
- Soft Glow: Incorporate a white beach ball decal.
Tips for Success
- Use a dotting tool for precise dots.
- Apply dots sparingly to avoid overcrowding.
- Practice patterns on paper first.
- Use a glossy top coat for vibrancy.
Creative Variations
- Apply a matte top coat for a soft effect.
- Use neon colors for bolder dots.
- Create a single-nail dot pattern.
- Add a tiny star decal for charm.
This design pairs with colorful outfits or silver jewelry, radiating summer joy. Maintain by refreshing the top coat. Beach Ball Polka Dot Nails is a delightful vacation choice.
Palm Leaf Green Tips
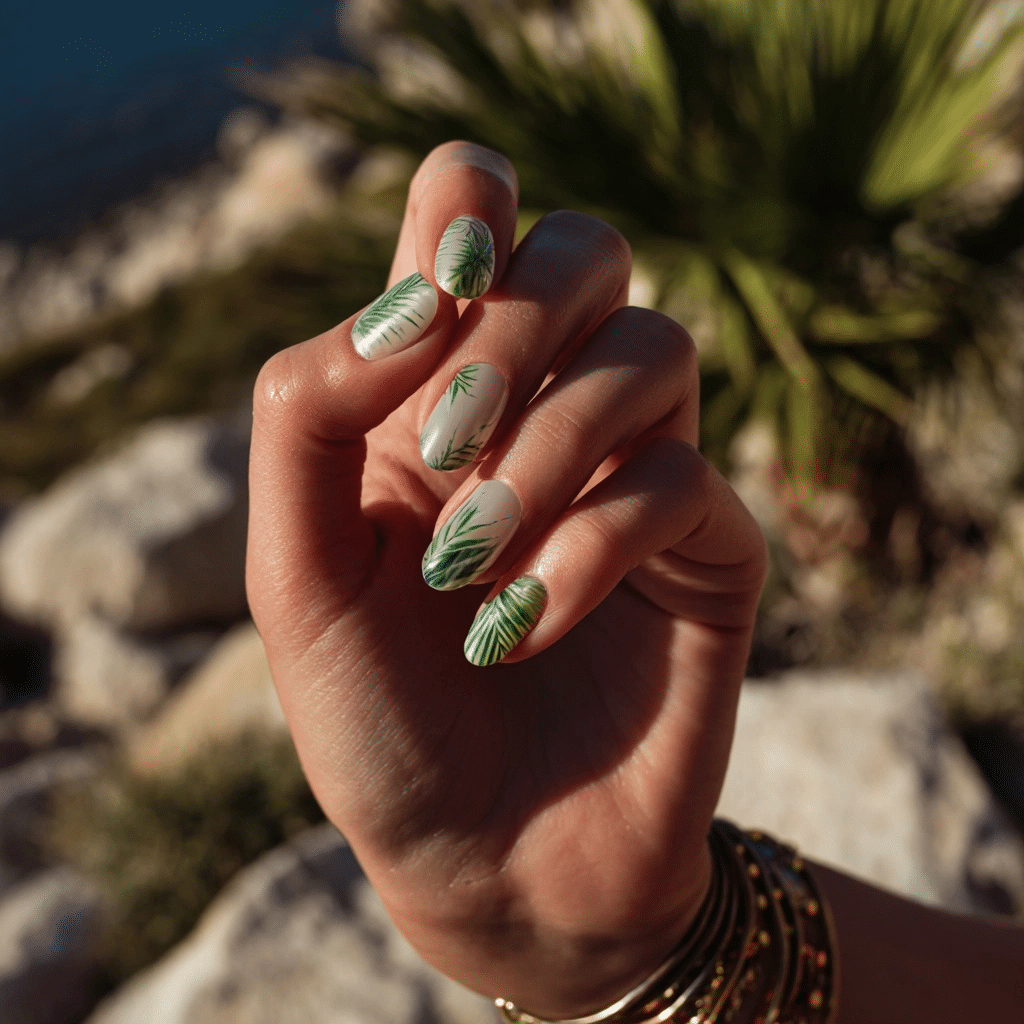
Palm Leaf Green Tips feature an uncovered base with minimalist green palm leaves at the edges, offering a subtle, summery look. Ideal for coastal walks or summer brunches, this design radiates serene elegance.
Description and Inspiration
This design evokes swaying palm leaves, with minimalist green leaf art at the tips of an uncovered base for a natural, coastal vibe. It’s a chic choice for summer simplicity.
Tools Needed
- Uncovered base polish
- Green nail polish
- Thin detail brush
- Base coat and glossy top coat
- Nail file
- Acetone for cleanup
Step-by-Step Guide
- File nails to a medium-length, almond shape for a sleek look; apply a base coat and let dry.
- Paint nails with uncovered polish as a base; apply two coats and let dry.
- Using a thin detail brush, paint small green palm leaves at the tips of each nail.
- Keep leaf designs minimalist, with simple frond shapes.
- Clean excess polish with acetone.
- Seal with a glossy top coat for a polished finish.
Complementary Design Suggestions
- Shimmer Pop: Add gold glitter around leaves.
- Soft Glow: Pair with a white accent nail.
- Bold Contrast: Incorporate a coral leaf design.
Tips for Success
- Use a fine brush for precise leaves.
- Practice leaf shapes on paper first.
- Apply designs sparingly for elegance.
- Use a glossy top coat for durability.
Creative Variations
- Apply a matte top coat for a soft effect.
- Use neon green for bolder leaves.
- Create a full-nail leaf pattern.
- Add a tiny coconut decal for charm.
This design pairs with neutral outfits or gold jewelry, radiating summer calm. Maintain by refreshing the top coat. Palm Leaf Green Tips is a chic vacation choice.
Tidepool Chrome Nails
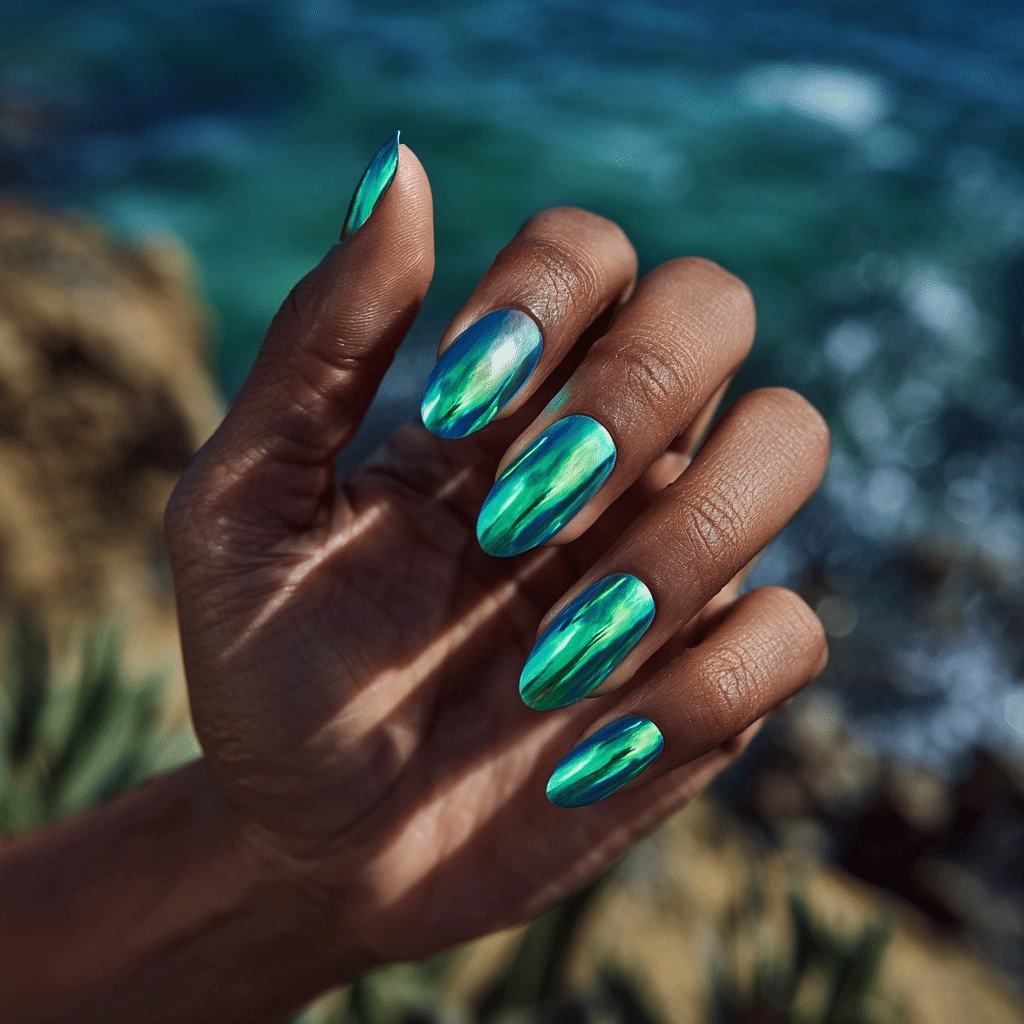
Tidepool Chrome Nails feature iridescent aqua chrome polish with a mirror-like finish, offering a bold, summery look. Ideal for beach parties or tropical raves, this design radiates futuristic vibrancy.
Description and Inspiration
This design captures the shimmering clarity of tidepools, with iridescent aqua chrome polish reflecting light for a dazzling, coastal effect. It’s a bold choice for summer beach festivities.
Tools Needed
- Aqua chrome powder
- Base polish (black or clear)
- Chrome applicator
- Base coat and glossy top coat
- Nail file
- Acetone for cleanup
Step-by-Step Guide
- File nails to a medium-length, oval shape for a bold look; apply a base coat and let dry.
- Paint nails with black or clear polish as a base; apply two coats and let dry.
- Apply aqua chrome powder with an applicator, rubbing gently for a mirror-like finish.
- Ensure even coverage for maximum shine.
- Clean excess powder with acetone.
- Seal with a glossy top coat for a radiant finish.
Complementary Design Suggestions
- Shimmer Pop: Add silver glitter accents.
- Bold Contrast: Pair with a coral accent nail.
- Soft Glow: Incorporate a white wave decal.
Tips for Success
- Use a smooth base polish for chrome adhesion.
- Apply powder evenly for a mirror effect.
- Work in a dust-free area to avoid specks.
- Use a glossy top coat for durability.
Creative Variations
- Apply a matte top coat for a frosted chrome effect.
- Use teal chrome for a deeper hue.
- Create a chrome French tip design.
- Add a tiny seashell decal.
This design pairs with aqua outfits or silver jewelry, radiating summer intensity. Maintain by refreshing the top coat. Tidepool Chrome Nails is a striking vacation choice.
Sand & Sky Duo Nails

Sand & Sky Duo Nails feature alternating fingers in warm beige and powder blue, offering a subtle, summery look. Ideal for coastal walks or summer brunches, this design radiates serene elegance.
Description and Inspiration
This design blends the earthy tones of sandy beaches with the airy hues of a clear sky, with alternating beige and powder blue nails for a balanced, coastal vibe. It’s a chic choice for summer simplicity.
Tools Needed
- Beige and powder blue nail polishes
- Base coat and glossy top coat
- Nail file
- Acetone for cleanup
Step-by-Step Guide
- File nails to a medium-length, almond shape for a sleek look; apply a base coat and let dry.
- Paint alternating nails with beige and powder blue polish, using two coats for opacity; let dry.
- Ensure even, vibrant coverage for a balanced effect.
- Clean excess polish with acetone.
- Seal with a glossy top coat for a polished finish.
Complementary Design Suggestions
- Shimmer Pop: Add gold glitter to beige nails.
- Soft Glow: Pair with a white accent nail.
- Bold Contrast: Incorporate a coral accent nail.
Tips for Success
- Use high-opacity polishes for bold colors.
- Apply thin layers to prevent streaks.
- Clean cuticles for a polished look.
- Use a glossy top coat for vibrancy.
Creative Variations
- Apply a matte top coat for a soft sand effect.
- Add a tiny seashell decal to blue nails.
- Create a gradient with beige and blue.
- Dust with silver glitter for shimmer.
This design pairs with neutral outfits or silver jewelry, radiating summer calm. Maintain by refreshing the top coat. Sand & Sky Duo Nails is a chic vacation choice.
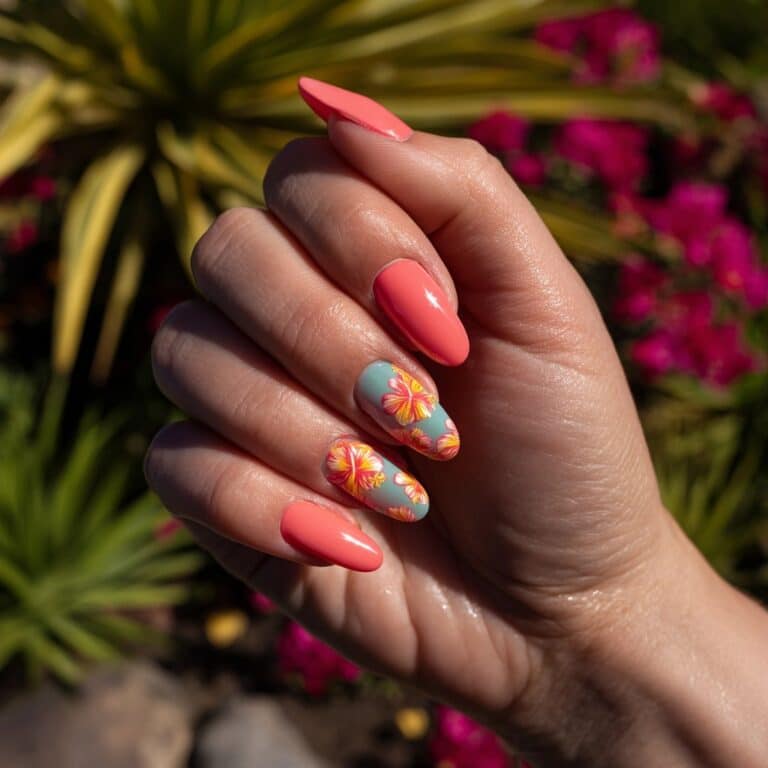
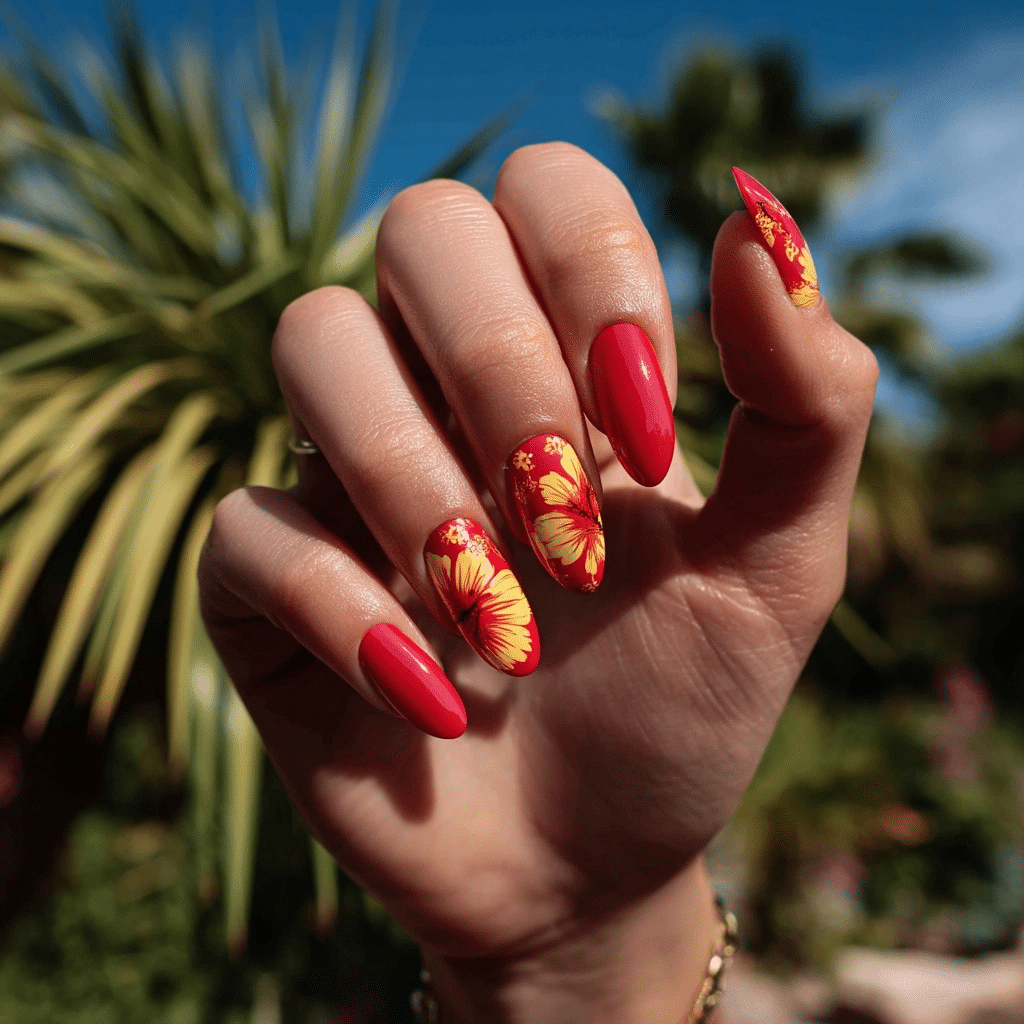
Mini Hibiscus Accent Flowers
Mini Hibiscus Accent Flowers feature bright floral detail on one or two nails, offering a vibrant, summery look. Ideal for beach parties or tropical getaways, this design radiates floral charm.
Description and Inspiration
This design evokes vibrant hibiscus blooms, with red and yellow flowers painted on accent nails over a clear or pale pink base. It’s a playful, summery choice for coastal festivities.
Tools Needed
- Clear or pale pink base polish
- Red, yellow, and green nail polishes
- Thin detail brush
- Dotting tool
- Base coat and glossy top coat
- Nail file
- Acetone for cleanup
Step-by-Step Guide
- File nails to a medium-length, oval shape for a playful look; apply a base coat and let dry.
- Paint nails with clear or pale pink polish as a base; let dry.
- On one or two accent nails, use a detail brush to paint red hibiscus petals and a yellow center.
- Add green leaves with the brush and a yellow dot with a dotting tool for flower centers.
- Clean excess polish with acetone.
- Seal with a glossy top coat for a floral shine.
Complementary Design Suggestions
- Floral Pop: Add white petal outlines for depth.
- Shimmer Pop: Apply gold glitter around flowers.
- Bold Contrast: Pair with a teal accent nail.
Tips for Success
- Use a fine brush for precise flower shapes.
- Practice floral designs on paper first.
- Apply designs sparingly for balance.
- Use a glossy top coat for vibrancy.
Creative Variations
- Apply a matte top coat for a soft floral effect.
- Use neon pink for bolder flowers.
- Create a full-nail floral pattern.
- Add a tiny leaf decal for charm.
This design pairs with floral dresses or gold jewelry, radiating summer joy. Maintain by refreshing the top coat. Mini Hibiscus Accent Flowers is a delightful vacation choice.
Mermaid Scale Glitter
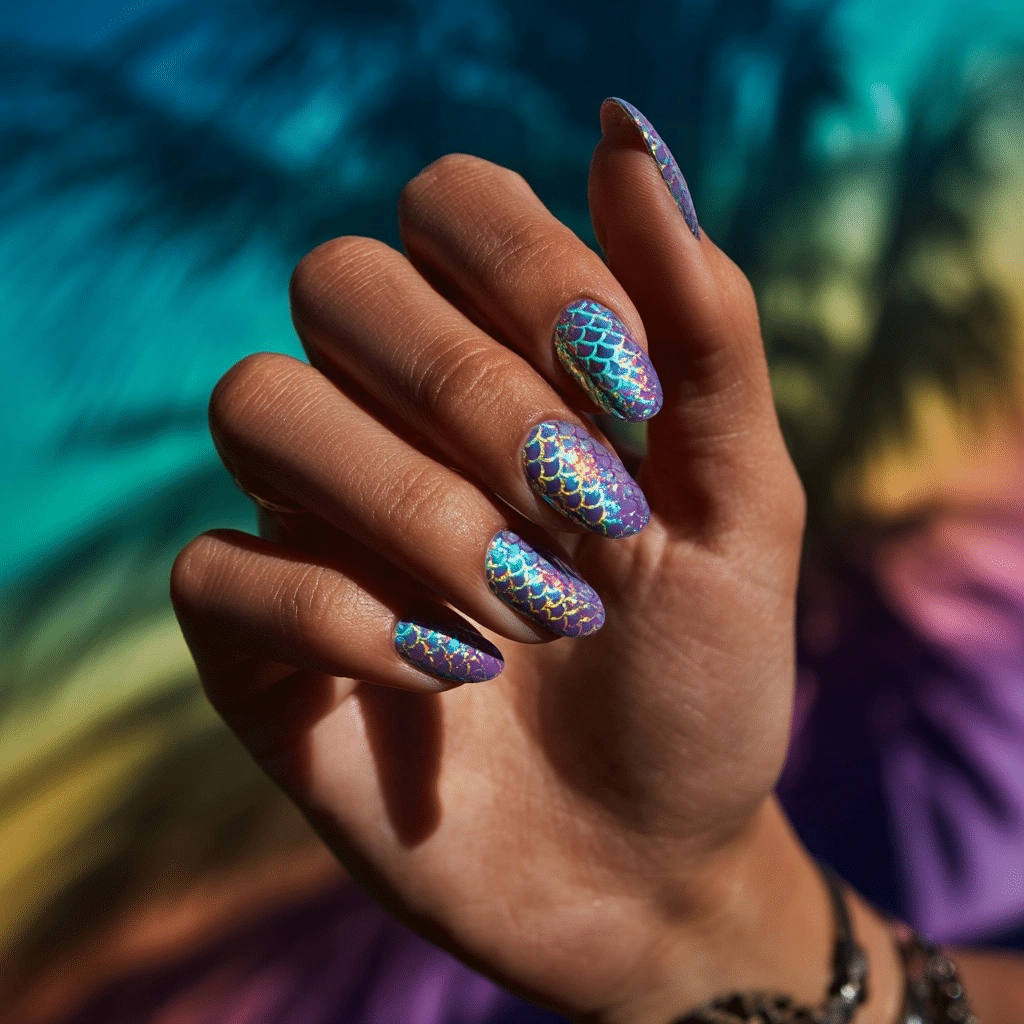
Mermaid Scale Glitter features shimmering multicolor scales on a lavender or teal base, offering a bold, summery look. Ideal for beach raves or tropical parties, this design radiates mythical vibrancy.
Description and Inspiration
This design evokes mermaid scales, with shimmering multicolor glitter over a lavender or teal base for a dazzling, coastal effect. It’s a bold choice for summer beach festivities.
Tools Needed
- Lavender or teal base polish
- Multicolor glitter polish
- Scale stencil or fishnet sponge
- Base coat and glossy top coat
- Nail file
- Acetone for cleanup
Step-by-Step Guide
- File nails to a medium-length, oval shape for a fluid look; apply a base coat and let dry.
- Paint nails with lavender or teal polish; apply two coats for opacity and let dry.
- Place a scale stencil or fishnet sponge over each nail.
- Apply multicolor glitter polish over the stencil; remove carefully.
- Clean excess polish with acetone.
- Seal with a glossy top coat for a radiant finish.
Complementary Design Suggestions
- Shimmer Pop: Add holographic glitter accents.
- Bold Contrast: Pair with a coral accent nail.
- Soft Glow: Incorporate a white scale decal.
Tips for Success
- Use a stencil for precise scale patterns.
- Apply glitter sparingly to avoid clumping.
- Ensure base polish is dry before stenciling.
- Use a glossy top coat for durability.
Creative Variations
- Apply a matte top coat for a frosted scale effect.
- Use a single-color glitter for a subtler look.
- Create a scale French tip design.
- Add a tiny seashell decal.
This design pairs with teal outfits or silver jewelry, radiating summer intensity. Maintain by refreshing the top coat. Mermaid Scale Glitter is a striking vacation choice.
Sea Glass Matte Nails
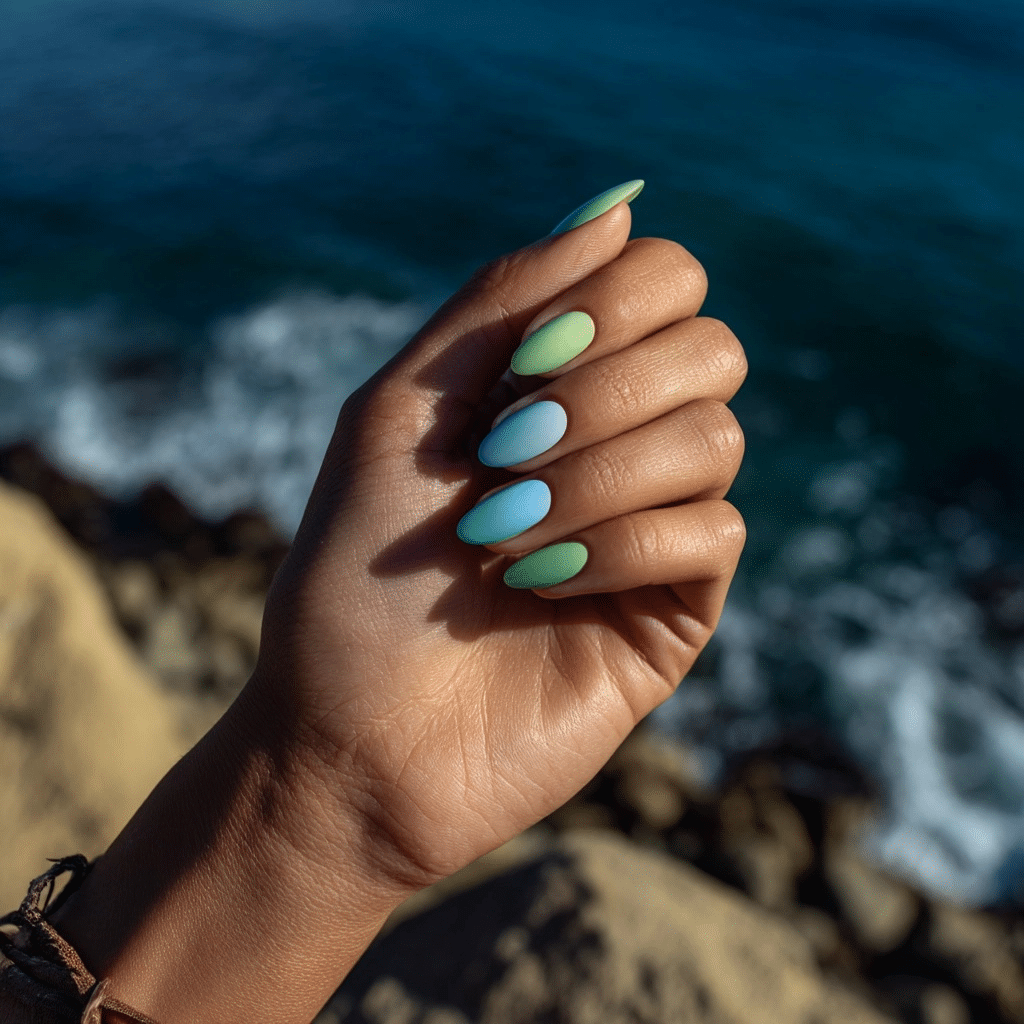
Sea Glass Matte Nails feature pastel green and blue with a frosted finish, offering a subtle, summery look. Ideal for coastal walks or summer brunches, this design radiates serene elegance.
Description and Inspiration
This design mimics the smooth, frosted look of sea glass, with pastel green and blue polish in a matte finish for a calming, coastal vibe. It’s a chic choice for summer simplicity.
Tools Needed
- Pastel green and blue nail polishes
- Base coat and matte top coat
- Nail file
- Acetone for cleanup
Step-by-Step Guide
- File nails to a medium-length, almond shape for a sleek look; apply a base coat and let dry.
- Paint alternating nails with pastel green and blue polish, using two coats for opacity; let dry.
- Ensure even, vibrant coverage for a sea glass effect.
- Clean excess polish with acetone.
- Seal with a matte top coat for a frosted finish.
Complementary Design Suggestions
- Shimmer Pop: Add silver glitter to one nail.
- Soft Glow: Pair with a white accent nail.
- Bold Contrast: Incorporate a coral accent nail.
Tips for Success
- Use high-opacity polishes for bold colors.
- Apply thin layers to prevent streaks.
- Clean cuticles for a polished look.
- Use a matte top coat for durability.
Creative Variations
- Apply a glossy top coat for a shiny sea glass effect.
- Add a tiny seashell decal to green nails.
- Create a gradient with green and blue.
- Dust with fine glitter for shimmer.
This design pairs with pastel outfits or silver jewelry, radiating summer calm. Maintain by refreshing the top coat. Sea Glass Matte Nails is a chic vacation choice.
Citrus Splash French Tips

Citrus Splash French Tips feature a sheer base with bright orange, yellow, and green tips, offering a vibrant, summery look. Ideal for beach parties or tropical festivals, this design radiates playful energy.
Description and Inspiration
This design captures the zesty vibe of citrus fruits, with bright orange, yellow, and green tips over a sheer base for a fun, coastal effect. It’s a bold choice for summer celebrations.
Tools Needed
- Sheer base polish
- Orange, yellow, and green nail polishes
- Thin detail brush
- Base coat and glossy top coat
- Nail file
- Acetone for cleanup
Step-by-Step Guide
- File nails to a medium-length, square shape for a bold look; apply a base coat and let dry.
- Paint nails with sheer polish as a base; let dry.
- Using a thin detail brush, paint orange, yellow, or green tips on each nail, alternating colors.
- Keep tips clean and slightly curved for a French tip effect.
- Clean excess polish with acetone.
- Seal with a glossy top coat for a vibrant shine.
Complementary Design Suggestions
- Shimmer Pop: Add gold glitter along the tips.
- Bold Contrast: Pair with a black accent nail.
- Soft Glow: Incorporate a white citrus slice decal.
Tips for Success
- Use a fine brush for precise tips.
- Practice tip shapes on paper first.
- Apply thin layers to avoid clumping.
- Use a glossy top coat for vibrancy.
Creative Variations
- Apply a matte top coat for a soft citrus effect.
- Use neon colors for bolder tips.
- Create wavy citrus tips.
- Add a tiny fruit decal for charm.
This design pairs with colorful outfits or gold jewelry, radiating summer fun. Maintain by refreshing the top coat. Citrus Splash French Tips is a trendy vacation choice.
Floating Beach Dot Nails
Floating Beach Dot Nails feature a clear gel base with scattered colorful dots like beach confetti, offering a playful, summery look. Ideal for beach parties or tropical festivals, this design radiates vibrant fun.
Description and Inspiration
This design mimics colorful confetti floating in clear water, with red, yellow, and blue dots scattered over a clear gel base for a cheerful, coastal vibe. It’s a fun choice for summer celebrations.
Tools Needed
- Clear gel base polish
- Red, yellow, and blue nail polishes
- Dotting tool
- Base coat and glossy top coat
- Nail file
- Acetone for cleanup
Step-by-Step Guide
- File nails to a medium-length, square shape for a playful look; apply a base coat and let dry.
- Paint nails with clear gel polish as a base; cure under UV lamp if needed and let dry.
- Using a dotting tool, apply red, yellow, and blue dots in a random, scattered pattern.
- Vary dot sizes for a confetti effect.
- Clean excess polish with acetone.
- Seal with a glossy top coat for a vibrant shine.
Complementary Design Suggestions
- Shimmer Pop: Add silver glitter around dots.
- Bold Contrast: Pair with a black accent nail.
- Soft Glow: Incorporate a white dot design.
Tips for Success
- Use a dotting tool for precise dots.
- Apply dots sparingly to avoid overcrowding.
- Practice patterns on paper first.
- Use a glossy top coat for vibrancy.
Creative Variations
- Apply a matte top coat for a soft confetti effect.
- Use neon colors for bolder dots.
- Create a single-nail dot pattern.
- Add a tiny wave decal for charm.
This design pairs with colorful outfits or silver jewelry, radiating summer joy. Maintain by refreshing the top coat. Floating Beach Dot Nails is a trendy vacation choice.
Wave Line Art
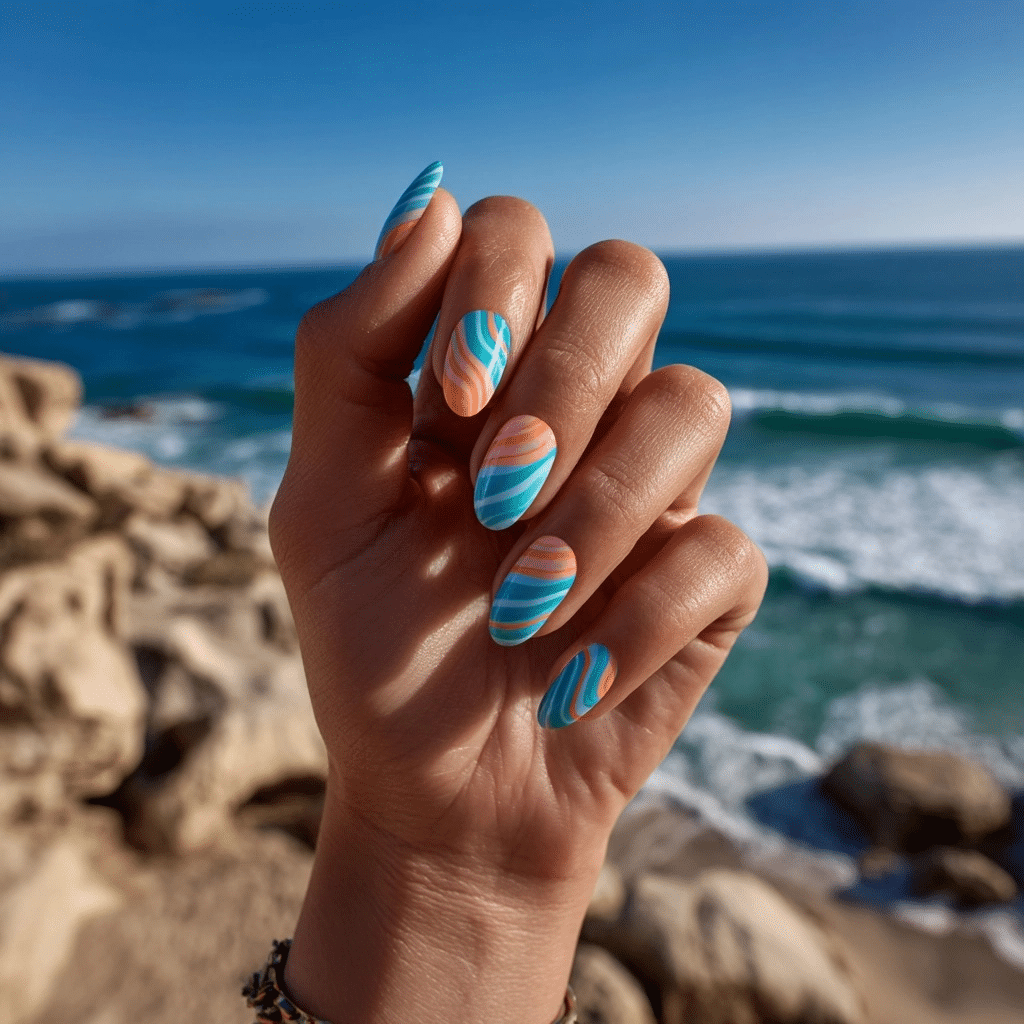
Wave Line Art features curved horizontal stripes in turquoise, coral, and sand, offering a vibrant, summery look. Ideal for beach outings or tropical parties, this design radiates oceanic artistry.
Description and Inspiration
This design captures the rhythmic flow of ocean waves, with curved turquoise, coral, and sand stripes across each nail for a dynamic, coastal effect. It’s a creative choice for summer beach adventures.
Tools Needed
- Turquoise, coral, and beige nail polishes
- Thin detail brush
- Base coat and glossy top coat
- Nail file
- Acetone for cleanup
Step-by-Step Guide
- File nails to a medium-length, oval shape for a fluid look; apply a base coat and let dry.
- Paint nails with a clear base; let dry.
- Using a thin detail brush, paint curved turquoise stripes across each nail.
- Add coral and beige stripes, varying thickness for a wave effect.
- Clean excess polish with acetone.
- Seal with a glossy top coat for a vibrant shine.
Complementary Design Suggestions
- Shimmer Pop: Add silver glitter along stripes.
- Bold Contrast: Pair with a navy accent nail.
- Soft Glow: Incorporate a white wave decal.
Tips for Success
- Use a fine brush for precise stripes.
- Practice wave patterns on paper first.
- Apply thin layers to avoid clumping.
- Use a glossy top coat for vibrancy.
Creative Variations
- Apply a matte top coat for a soft wave effect.
- Use neon turquoise for bolder stripes.
- Create vertical wave stripes.
- Add a tiny seashell decal.
This design pairs with turquoise outfits or silver jewelry, radiating summer artistry. Maintain by refreshing the top coat. Wave Line Art is a lively vacation choice.
Sun-Kissed Yellow Gloss

Sun-Kissed Yellow Gloss features bright lemon polish with high shine, offering a vibrant, summery look. Ideal for beach outings or summer festivals, this design radiates instant glow.
Description and Inspiration
This design captures the radiant glow of summer sunlight, with bright lemon yellow polish in a glossy finish for a bold, coastal vibe. It’s a cheerful choice for summer beach days.
Tools Needed
- Lemon yellow nail polish
- Base coat and glossy top coat
- Nail file
- Acetone for cleanup
Step-by-Step Guide
- File nails to a medium-length, square shape for a bold look; apply a base coat and let dry.
- Paint nails with lemon yellow polish; apply two coats for opacity and let dry.
- Ensure even, vibrant coverage for a sunny effect.
- Clean excess polish with acetone.
- Seal with a glossy top coat for a radiant finish.
Complementary Design Suggestions
- Shimmer Pop: Add gold glitter accents.
- Bold Contrast: Pair with a teal accent nail.
- Soft Glow: Incorporate a white sun decal.
Tips for Success
- Use a high-opacity polish for bold color.
- Apply thin layers to prevent streaks.
- Clean cuticles for a polished look.
- Use a glossy top coat for vibrancy.
Creative Variations
- Apply a matte top coat for a soft yellow effect.
- Add a tiny palm tree decal for charm.
- Create a yellow French tip design.
- Dust with fine glitter for shimmer.
This design pairs with yellow outfits or gold jewelry, radiating summer joy. Maintain by refreshing the top coat. Sun-Kissed Yellow Gloss is a vibrant vacation choice.
Tropical Fruit Mix Nails
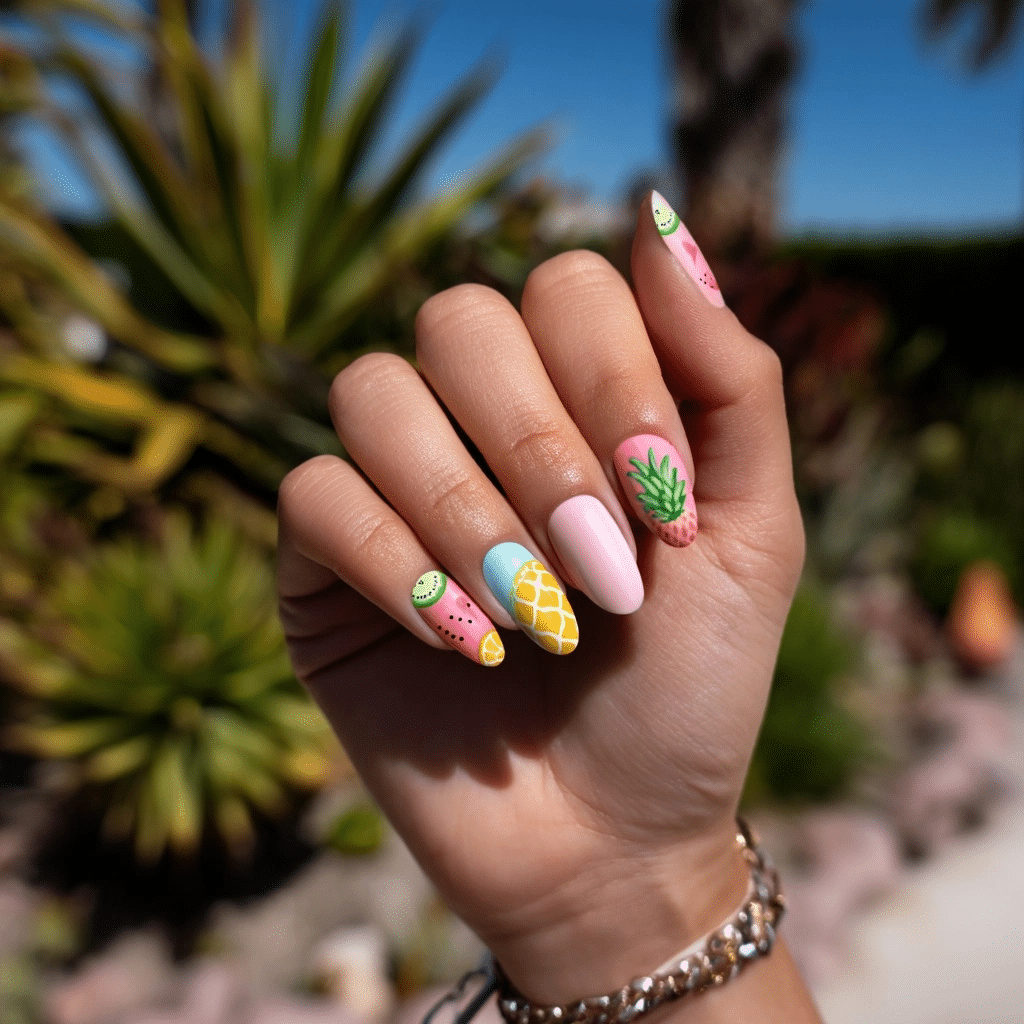
Tropical Fruit Mix Nails feature mini hand-painted slices of pineapple, kiwi, and watermelon on a pastel background, offering a playful, summery look. Ideal for beach picnics or summer festivals, this design radiates vibrant fun.
Description and Inspiration
This design captures the juicy vibrancy of tropical fruits, with mini pineapple, kiwi, and watermelon art over a pastel pink or mint base. It’s a fun, summery choice for coastal celebrations.
Tools Needed
- Pastel pink or mint base polish
- Yellow, green, red, and black nail polishes
- Thin detail brush
- Dotting tool
- Base coat and glossy top coat
- Nail file
- Acetone for cleanup
Step-by-Step Guide
- File nails to a medium-length, oval shape for a playful look; apply a base coat and let dry.
- Paint nails with pastel pink or mint polish; apply two coats for opacity and let dry.
- On accent nails, use a detail brush to paint pineapple (yellow with green top), kiwi (green with black seeds), or watermelon (red with green rind).
- Add black dots for seeds using a dotting tool.
- Clean excess polish with acetone.
- Seal with a glossy top coat for a vibrant shine.
Complementary Design Suggestions
- Shimmer Pop: Add gold glitter around fruits.
- Bold Contrast: Pair with a navy accent nail.
- Soft Glow: Incorporate a white fruit slice decal.
Tips for Success
- Use a fine brush for precise fruit shapes.
- Practice designs on paper first.
- Apply designs sparingly for balance.
- Use a glossy top coat for vibrancy.
Creative Variations
- Apply a matte top coat for a soft fruit effect.
- Use neon colors for bolder fruits.
- Create a full-nail fruit pattern.
- Add a tiny leaf decal for charm.
This design pairs with pastel outfits or gold jewelry, radiating summer joy. Maintain by refreshing the top coat. Tropical Fruit Mix Nails is a delightful vacation choice.
In 2025, beachy summer nail colors are all about balance—between bright and soft, playful and polished, artful and easy. They let you lean into summer’s spirit in a fun, low-effort way. Whether you’re dreaming of ocean views or just want to add a little more joy to your day, these designs are an easy way to feel the sunshine.
So go ahead—bring the beach to your nails. With these colorful ideas, every day can feel like a vacation.