Celebrating Color: How Summer Nail Art Brings Your Style to Life
Summer is the ultimate season for self-expression, and few beauty choices embody that freedom more than a well-crafted manicure. As the days get longer and our calendars fill with beach outings, brunch dates, and sunset strolls, our nails become miniature canvases for creativity. Summer nail art takes this idea to heart, offering a spectrum of design options—from bold and graphic to soft and natural—all united by a common theme: celebration. It’s the perfect time to step outside the ordinary and embrace colors, textures, and motifs that channel the warmth and joy of the season.
Far from being a passing trend, summer nail art has become a recurring ritual—an artistic statement and a mood enhancer. Whether you’re the type who changes polish every week or prefers one perfect design to last the month, summer encourages experimentation. The options are as vibrant and diverse as the season itself, making your nails not just a finishing touch, but a focal point of your summer look.
Why I Love Summer Nail Art
There’s something inherently joyful about summer nail art. What draws me in each year is the playfulness of it all—the excuse to try colors I wouldn’t normally wear or to bring tiny, wearable works of art into my daily life. I love how a fun manicure can lift your mood or spark conversation, and how easy it is to match your nails with seasonal outfits, sunglasses, or even your favorite beach towel.
Summer nails also feel like a celebration of nature and energy. From florals and waves to fruit motifs and tropical shades, these designs often reflect the world blooming around us. It’s the one time of year when even the most minimalist among us are tempted by a pop of neon or a flash of chrome. And yet, summer nail art doesn’t have to be loud to be striking—some of the most beautiful looks feature sheer bases, pastel gradients, or subtle shimmer. It’s this range that makes summer nail design so endlessly enjoyable and inclusive.
Gorgeous Summer Nail Art Designs
These 25 gorgeous summer nail designs capture the season’s warmth, color, and fun with vibrant, wearable styles. Each manicure blends bold hues and playful patterns, perfect for beach days, festivals, or sunny outings. Detailed steps, tools, and variations ensure accessibility, embodying summer’s lively spirit.
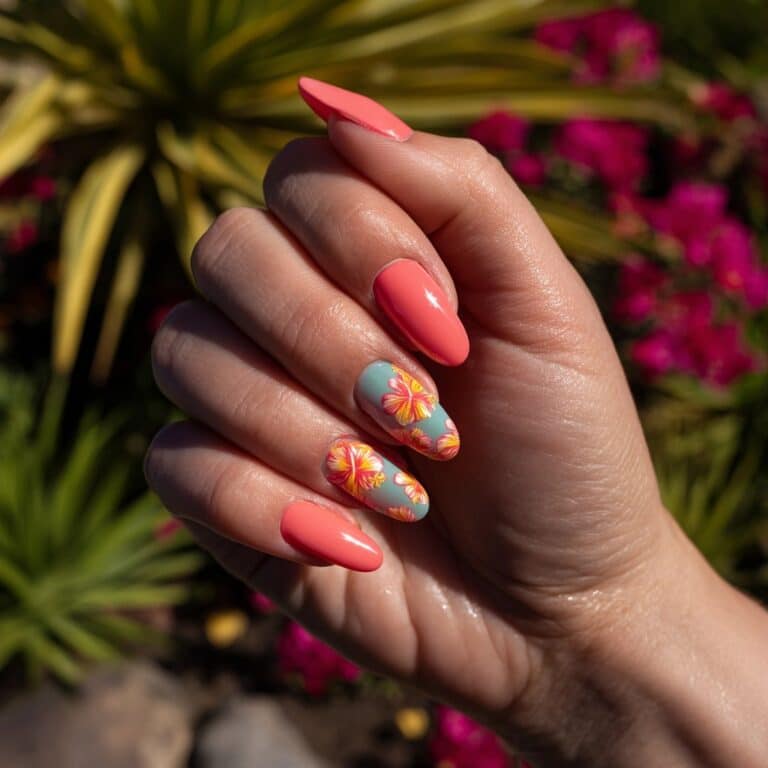
Tangerine Tips
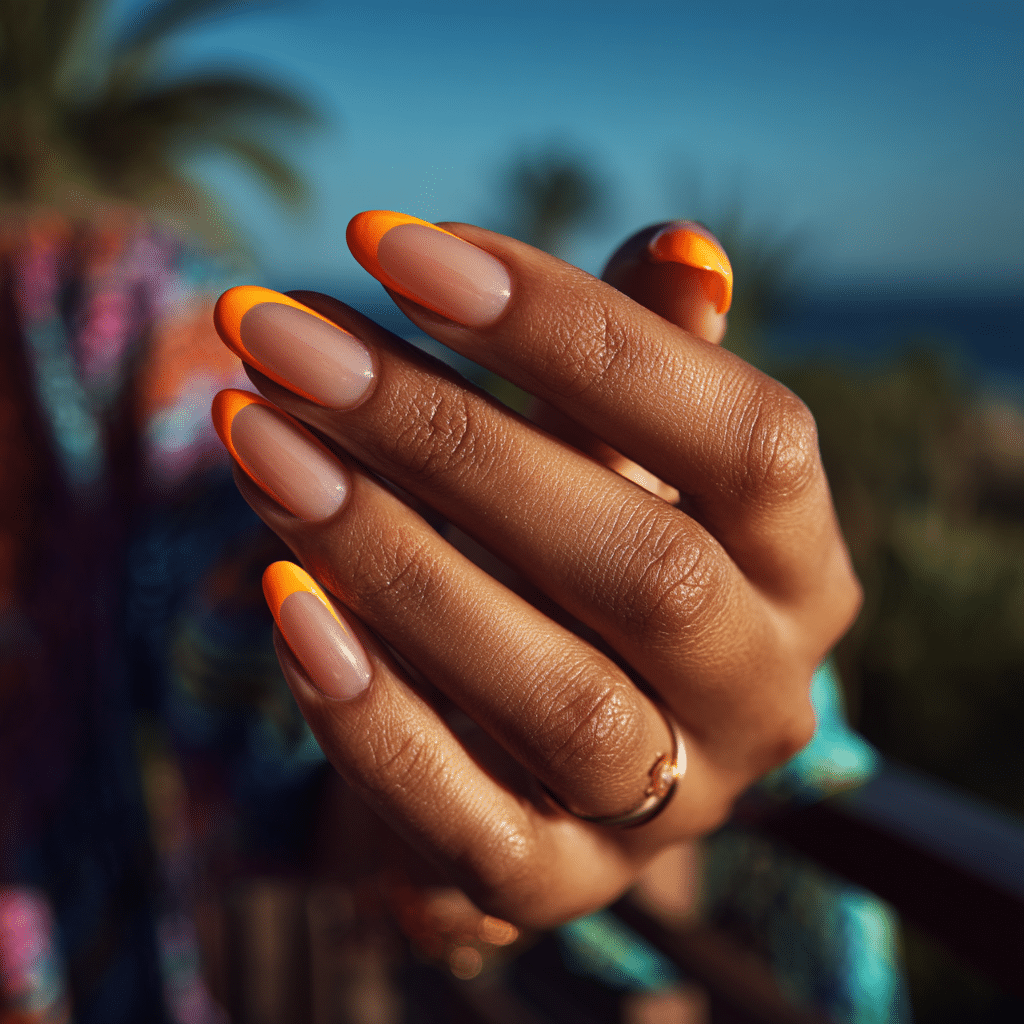
Tangerine Tips offer a vibrant twist on the French manicure, featuring bright orange tips on a nude base. This bold, summery design radiates citrus energy, perfect for beach outings or casual summer gatherings, adding a pop of color to any look.
Tools Needed
- Nude nail polish
- Tangerine nail polish
- Striping tape or fine brush
- Base coat and glossy top coat
- Acetone for cleanup
Step-by-Step Guide
- Apply a base coat and let dry.
- Paint nails with nude polish, using two coats; let dry.
- Use striping tape or a fine brush to paint tangerine tips.
- Apply two layers for vibrancy, keeping lines clean.
- Remove tape before polish dries; clean excess with acetone.
- Seal with a glossy top coat for shine.
Color Suggestions
- Citrus Pop: Nude with tangerine tips.
- Soft Glow: Beige with coral tips.
- Bold Contrast: Pinkish nude with neon orange tips.
Tips for Success
- Use tape for precise tip lines.
- Apply thin polish layers for evenness.
- Practice tip placement on paper.
- Use a quick-dry top coat to avoid smudges.
Creative Variations
- Add glitter to tangerine tips.
- Use a matte nude base.
- Create double tips on one nail.
- Apply tips only on accent nails.
This manicure pairs with white dresses or bold accessories, enhancing summer’s vibrancy. Maintain by touching up tips and refreshing the top coat every few days. Tangerine Tips deliver a fresh, playful summer look.
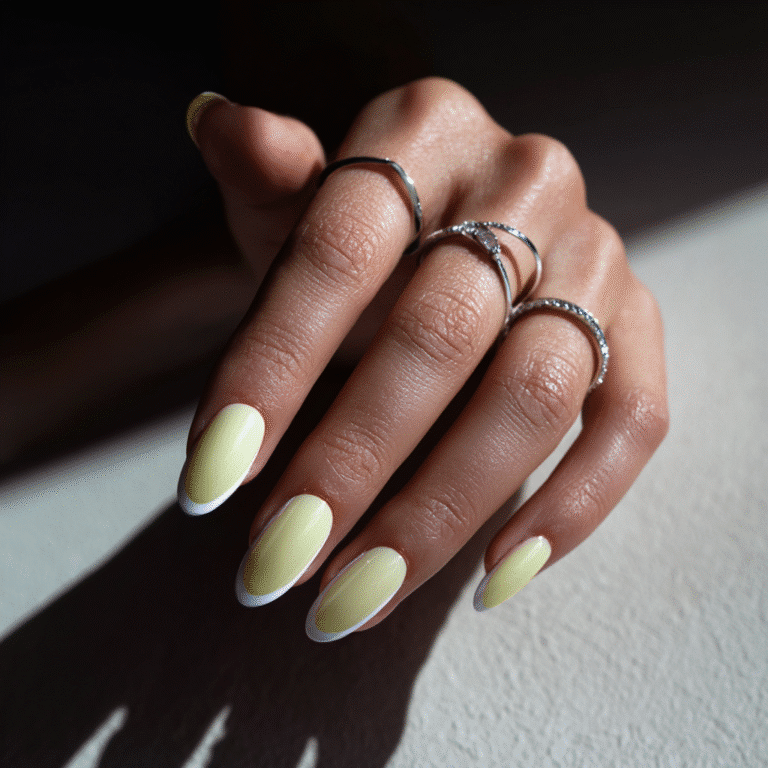
Lemonade Ombre
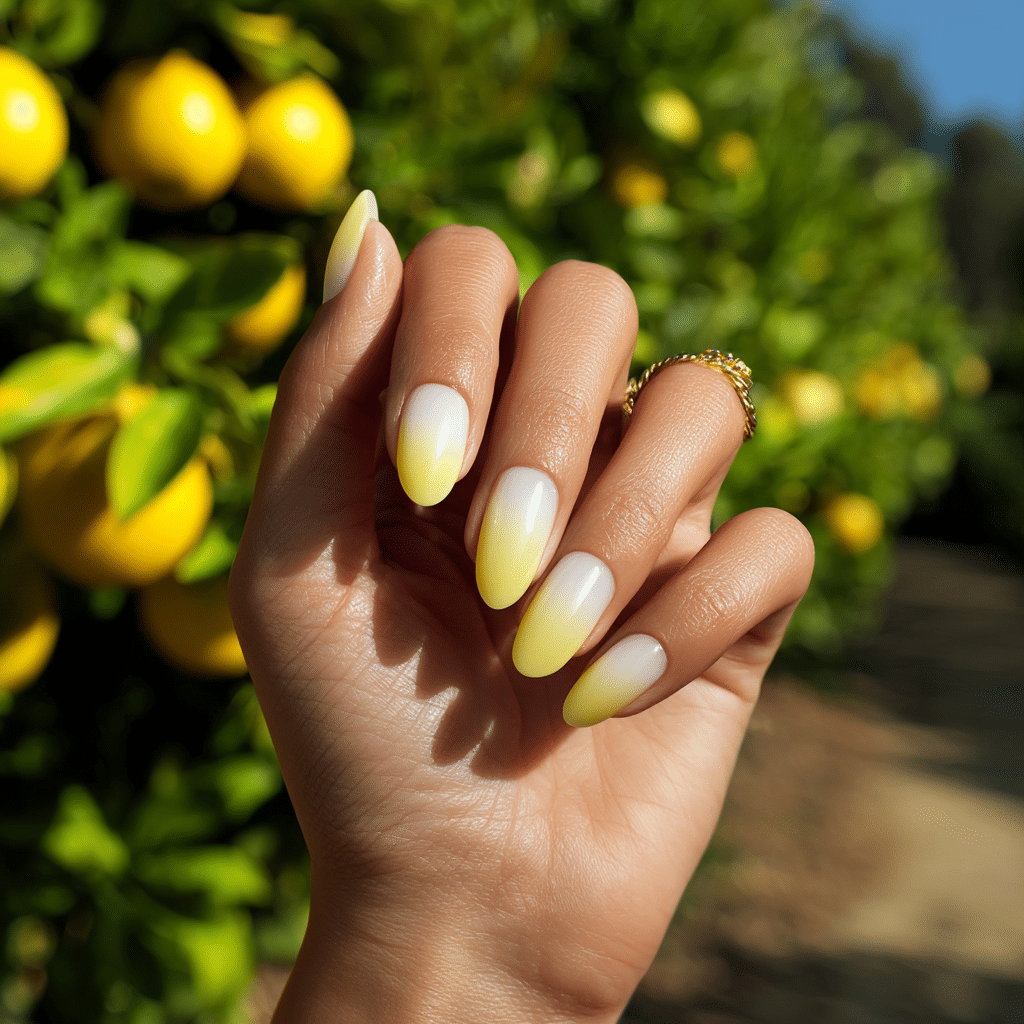
Lemonade Ombre features a soft gradient from pastel yellow to white, evoking refreshing summer drinks. This light, airy manicure is perfect for picnics or beach days, offering a cheerful, sunlit aesthetic that complements any summer outfit.
Tools Needed
- Pastel yellow and white nail polishes
- Makeup sponge
- Base coat and glossy top coat
- Acetone for cleanup
Step-by-Step Guide
- Apply a base coat and let dry.
- Paint nails with a nude base for opacity; let dry.
- Dab yellow and white polish onto a sponge, overlapping slightly.
- Press sponge onto nails, blending yellow at the base to white at the tip.
- Repeat for a smooth gradient; let dry.
- Clean excess polish with acetone.
- Seal with a glossy top coat.
Color Suggestions
- Sunny Fade: Pastel yellow to white.
- Citrus Twist: Lemon yellow to cream.
- Soft Pop: Pale yellow to ivory.
Tips for Success
- Use a sponge for seamless blending.
- Apply thin layers to avoid clumps.
- Practice gradient on paper.
- Use a quick-dry top coat.
Creative Variations
- Add glitter in the gradient’s middle.
- Use a matte top coat for contrast.
- Create a diagonal ombre.
- Add a rhinestone at the base.
This design pairs with pastel outfits or gold jewelry, radiating summer’s warmth. Maintain by reapplying the top coat regularly. Lemonade Ombre is a refreshing, elegant summer choice.
Neon Abstract Swirls
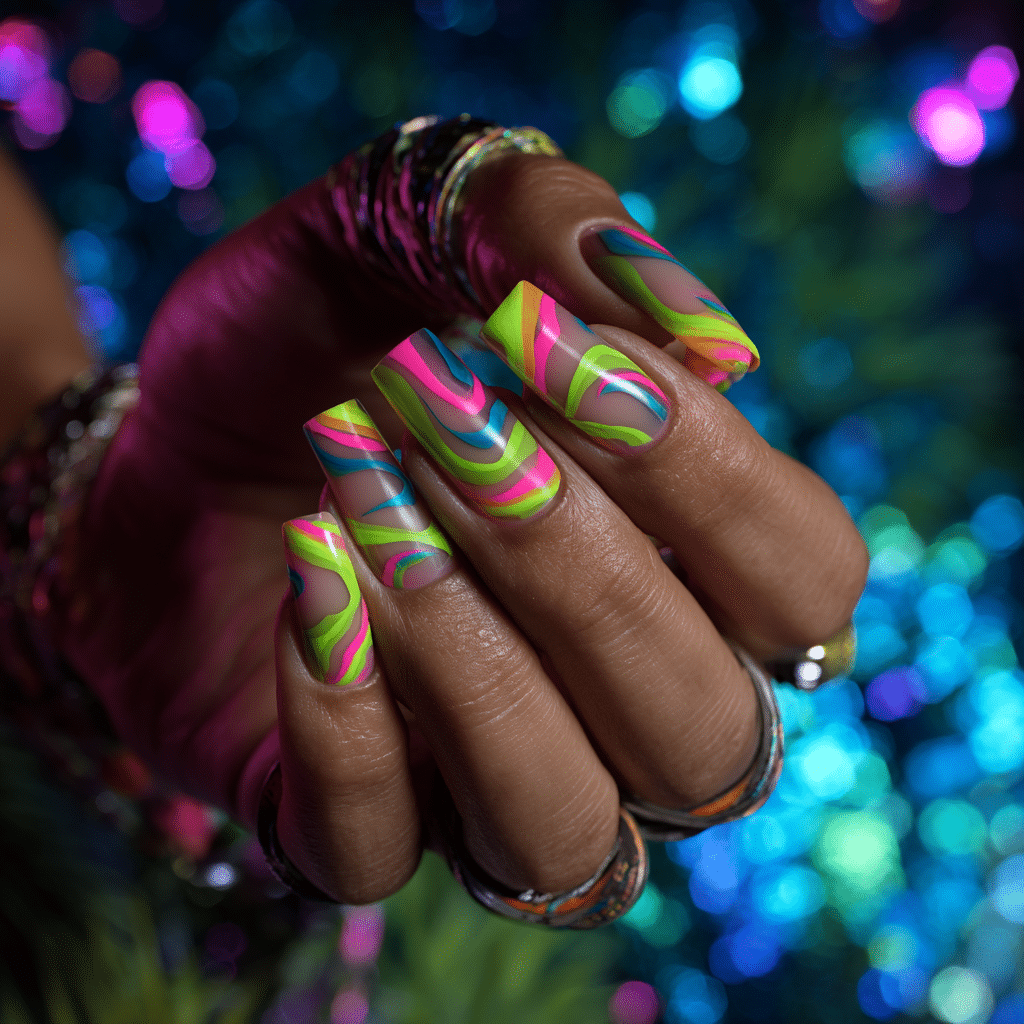
Neon Abstract Swirls feature wavy designs in hot pink, lime green, and electric blue over a clear background. This bold, playful manicure captures summer’s energy, perfect for festivals or vibrant summer nights, adding artistic flair to any look.
Tools Needed
- Clear nail polish
- Neon pink, green, and blue nail polishes
- Fine nail art brush
- Base coat and glossy top coat
- Acetone for cleanup
Step-by-Step Guide
- Apply a base coat and let dry.
- Paint nails with clear polish, using 2-3 coats; let dry.
- Use a fine brush to paint neon swirls in pink, green, and blue.
- Create varied, wavy patterns across nails.
- Clean excess polish with acetone.
- Seal with a glossy top coat.
Color Suggestions
- Vibrant Pop: Pink, green, and blue swirls.
- Tropical Mix: Orange, yellow, and pink swirls.
- Cool Neon: Blue, purple, and green swirls.
Tips for Success
- Practice swirl patterns on paper.
- Use a fine brush for precision.
- Apply thin layers to maintain clarity.
- Use a glossy top coat for shine.
Creative Variations
- Add swirls to accent nails only.
- Use glitter polish for swirls.
- Create geometric swirls.
- Pair with a matte base.
This manicure pairs with bold outfits or neon accessories, embodying summer’s fun. Maintain by touching up swirls and refreshing the top coat. Neon Abstract Swirls are a dynamic summer choice.
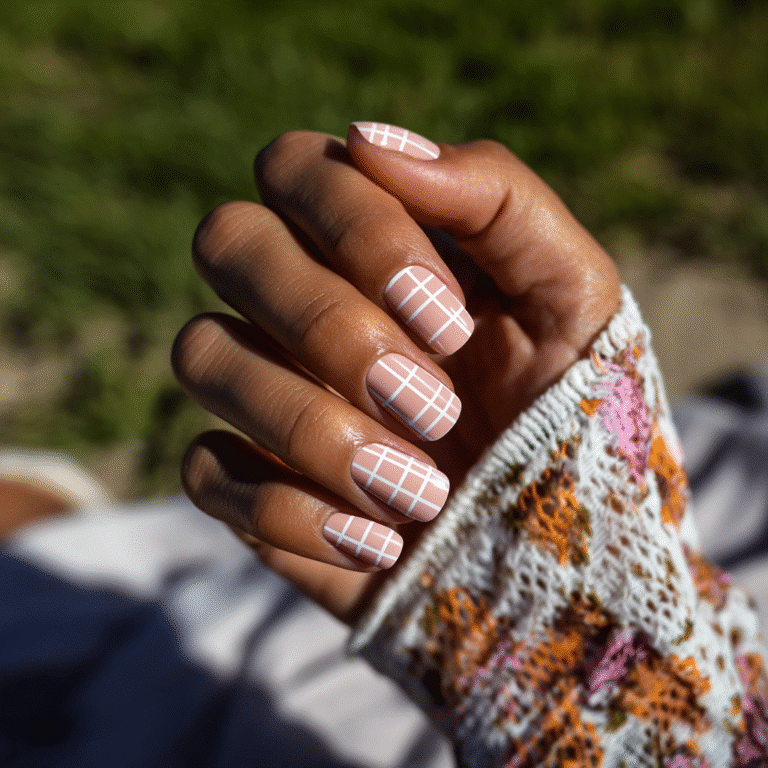
Coral and Peach Checkerboard Accent
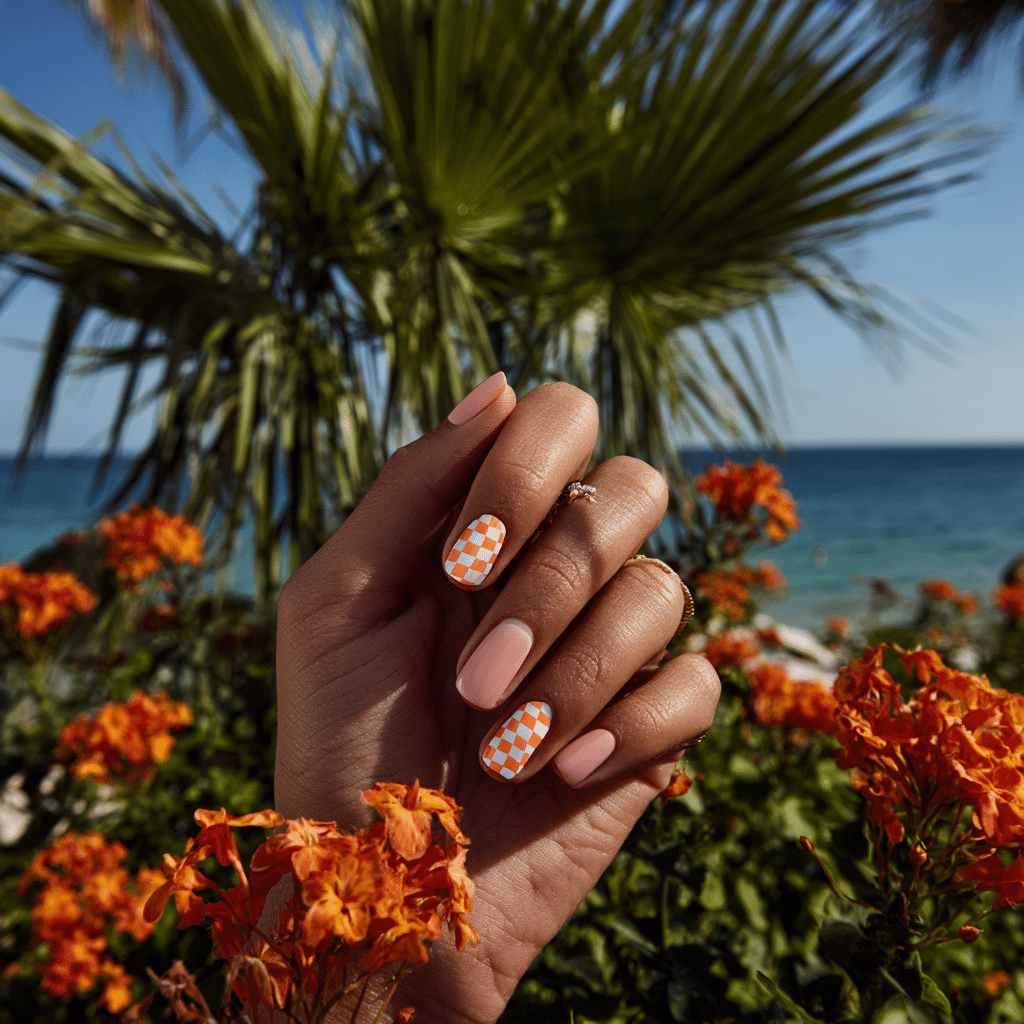
Coral and Peach Checkerboard Accent features a playful checkered pattern on one or two nails, using two summery tones against a neutral base. This vibrant design is perfect for beach parties or casual outings, blending fun with sophistication.
Tools Needed
- Coral and peach nail polishes
- Neutral nail polish
- Fine nail art brush or tape
- Base coat and glossy top coat
- Acetone for cleanup
Step-by-Step Guide
- Apply a base coat and let dry.
- Paint nails with neutral polish, using two coats; let dry.
- On accent nails, use a fine brush or tape to create a coral and peach checkerboard.
- Ensure lines are even and precise.
- Clean excess polish with acetone.
- Seal with a glossy top coat.
Color Suggestions
- Summer Duo: Coral and peach checkers.
- Bold Pop: Coral and orange checkers.
- Soft Glow: Peach and pink checkers.
Tips for Success
- Practice checkers on paper for precision.
- Use tape for clean lines.
- Apply thin polish layers for clarity.
- Use a glossy top coat for shine.
Creative Variations
- Add checkers to all nails.
- Use glitter polish for checkers.
- Create a diagonal checker pattern.
- Pair with a matte base.
This manicure pairs with tropical prints or white outfits, adding playful charm. Maintain by touching up the pattern and refreshing the top coat. Coral and Peach Checkerboard Accent is a lively summer choice.
Watermelon Slices
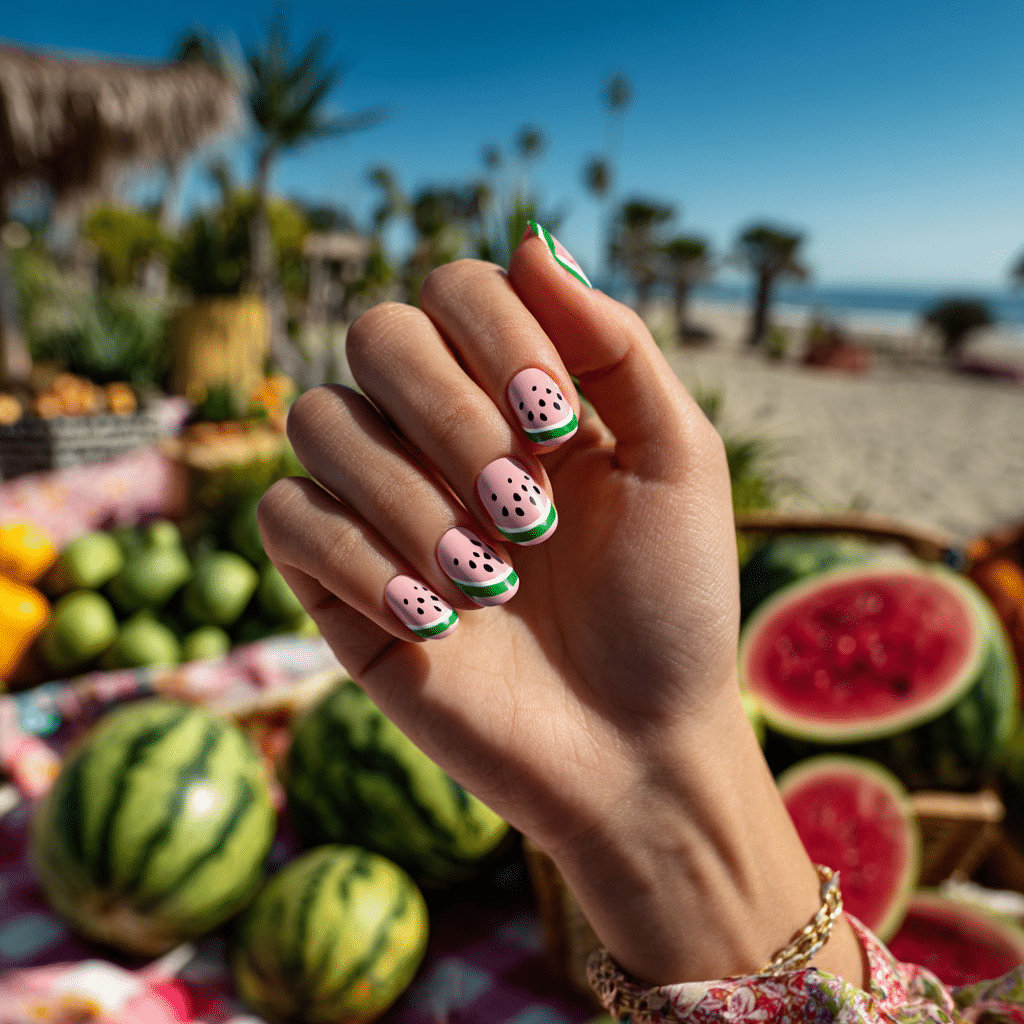
Watermelon Slices feature tiny fruit art with green tips, pink centers, and black seed dots, creating a cute, iconic summer manicure. Perfect for picnics or beach days, this playful design brings a burst of seasonal fun to your nails.
Tools Needed
- Green, pink, and black nail polishes
- Nude nail polish
- Fine nail art brush and dotting tool
- Base coat and glossy top coat
- Acetone for cleanup
Step-by-Step Guide
- Apply a base coat and let dry.
- Paint nails with nude polish, using two coats; let dry.
- Use a fine brush to paint green tips, adding a thin white stripe below.
- Paint pink below the white stripe to form watermelon slices.
- Add black seed dots with a dotting tool.
- Clean excess polish with acetone.
- Seal with a glossy top coat.
Color Suggestions
- Classic Fruit: Green, pink, and black watermelon.
- Soft Pop: Mint green and blush pink watermelon.
- Bold Contrast: Neon green and hot pink watermelon.
Tips for Success
- Practice watermelon art on paper.
- Use a fine brush for precision.
- Keep designs small for detail.
- Use a glossy top coat for shine.
Creative Variations
- Add watermelon to accent nails only.
- Use glitter in the pink section.
- Create half-moon watermelons.
- Pair with green leaf details.
This manicure pairs with bright outfits or fruit-themed accessories, radiating summer joy. Maintain by touching up details and refreshing the top coat. Watermelon Slices are a delightful summer choice.
Seashell Pearl Nails
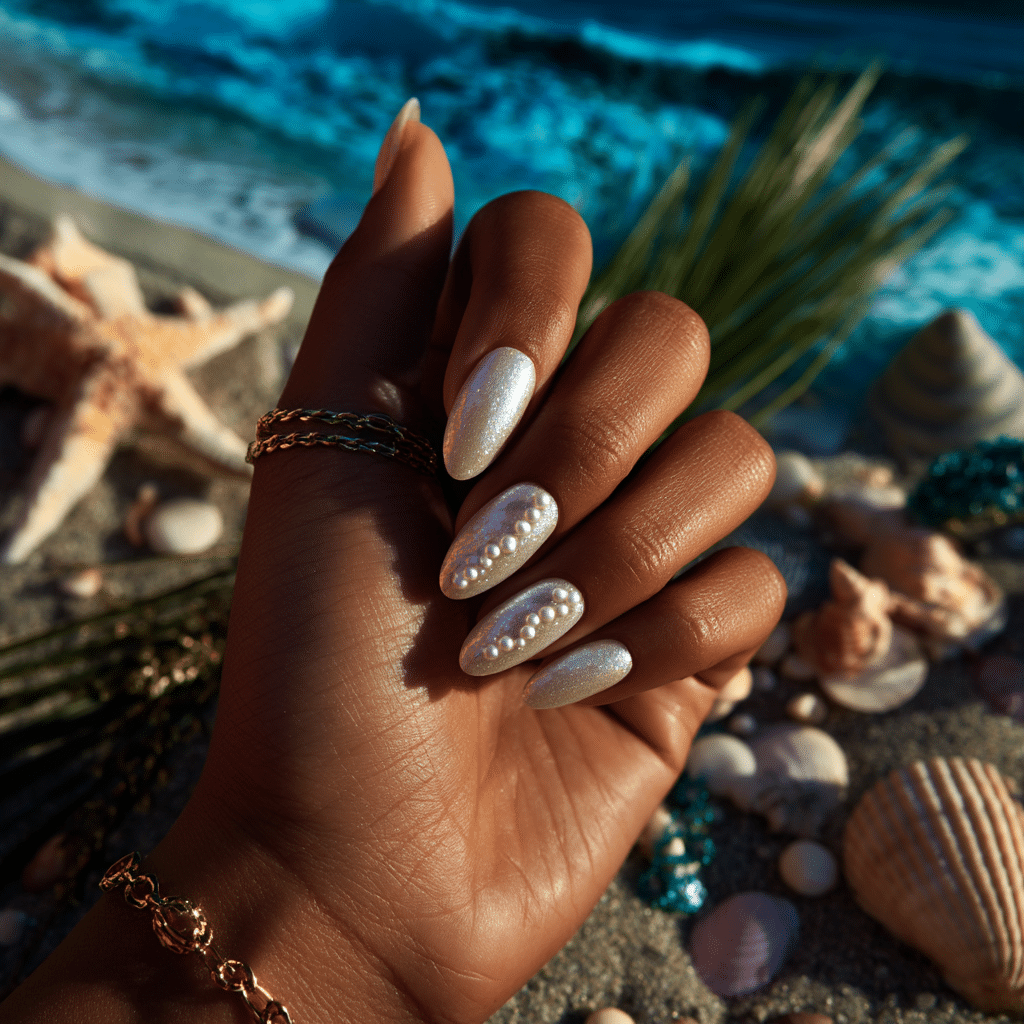
Seashell Pearl Nails feature shimmery white polish with micro pearls at the cuticle, evoking an ocean-inspired summer look. This elegant, luminous manicure is perfect for beach weddings or coastal getaways, adding a touch of seaside glamour.
Tools Needed
- Shimmery white nail polish
- Micro pearls
- Tweezers and nail glue
- Base coat and glossy top coat
- Acetone for cleanup
Step-by-Step Guide
- Apply a base coat and let dry.
- Paint nails with shimmery white polish, using two coats; let dry.
- Apply a dot of glue near each nail’s cuticle.
- Use tweezers to place micro pearls.
- Press gently to secure; let dry.
- Clean excess polish with acetone.
- Seal with a glossy top coat.
Color Suggestions
- Ocean Glow: Shimmery white with white pearls.
- Soft Shine: Pearl white with silver pearls.
- Warm Pop: Ivory shimmer with gold pearls.
Tips for Success
- Use micro pearls for subtlety.
- Apply glue sparingly to avoid mess.
- Practice placement on paper.
- Secure pearls with top coat.
Creative Variations
- Cluster pearls on accent nails.
- Use colored pearls.
- Add a matte top coat for contrast.
- Pair with seashell decals.
This manicure pairs with white dresses or silver jewelry, enhancing coastal elegance. Maintain by checking pearl adhesion and refreshing the top coat. Seashell Pearl Nails are a radiant summer choice.
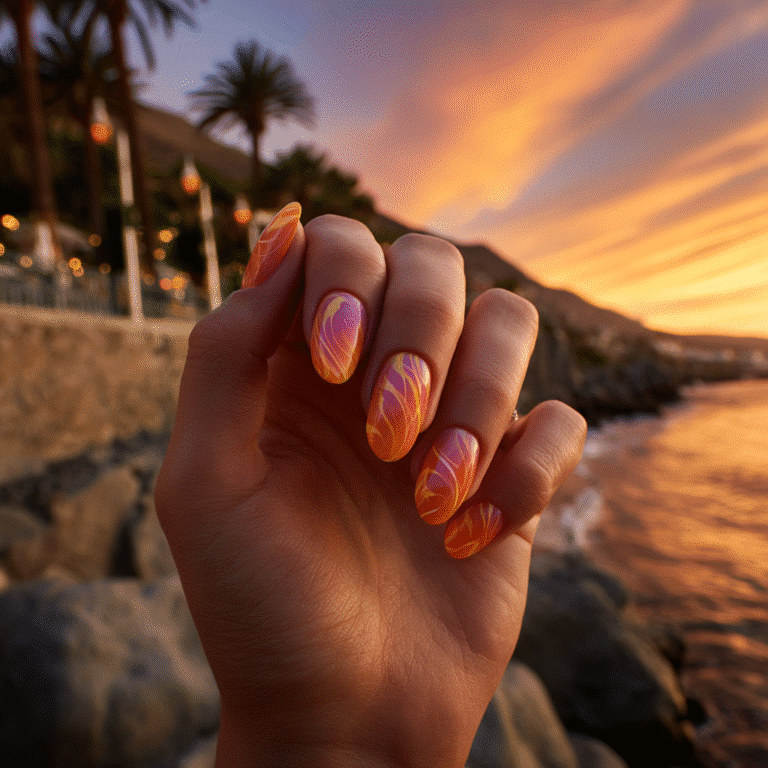
Tropical Sunset Gradient

Tropical Sunset Gradient features a bold fade from orange to magenta to deep purple, mimicking a beach sunset. This vibrant, eye-catching manicure is perfect for summer festivals or evening beach parties, radiating warmth and color.
Tools Needed
- Orange, magenta, and purple nail polishes
- Makeup sponge
- Base coat and glossy top coat
- Acetone for cleanup
Step-by-Step Guide
- Apply a base coat and let dry.
- Paint nails with a nude base; let dry.
- Dab orange, magenta, and purple polish onto a sponge, overlapping slightly.
- Press sponge onto nails, blending colors for a sunset effect.
- Repeat for a smooth gradient; let dry.
- Clean excess polish with acetone.
- Seal with a glossy top coat.
Color Suggestions
- Sunset Glow: Orange, magenta, purple.
- Warm Fade: Red, pink, orange.
- Cool Sunset: Pink, purple, blue.
Tips for Success
- Use a sponge for smooth blending.
- Apply thin layers to avoid clumps.
- Practice gradient on paper.
- Use a glossy top coat for vibrancy.
Creative Variations
- Add glitter in the gradient.
- Use a matte top coat for contrast.
- Create a vertical gradient.
- Add a palm silhouette on one nail.
This manicure pairs with bold prints or gold accessories, capturing summer’s heat. Maintain by reapplying the top coat. Tropical Sunset Gradient is a stunning summer choice.
Palm Leaf Silhouettes
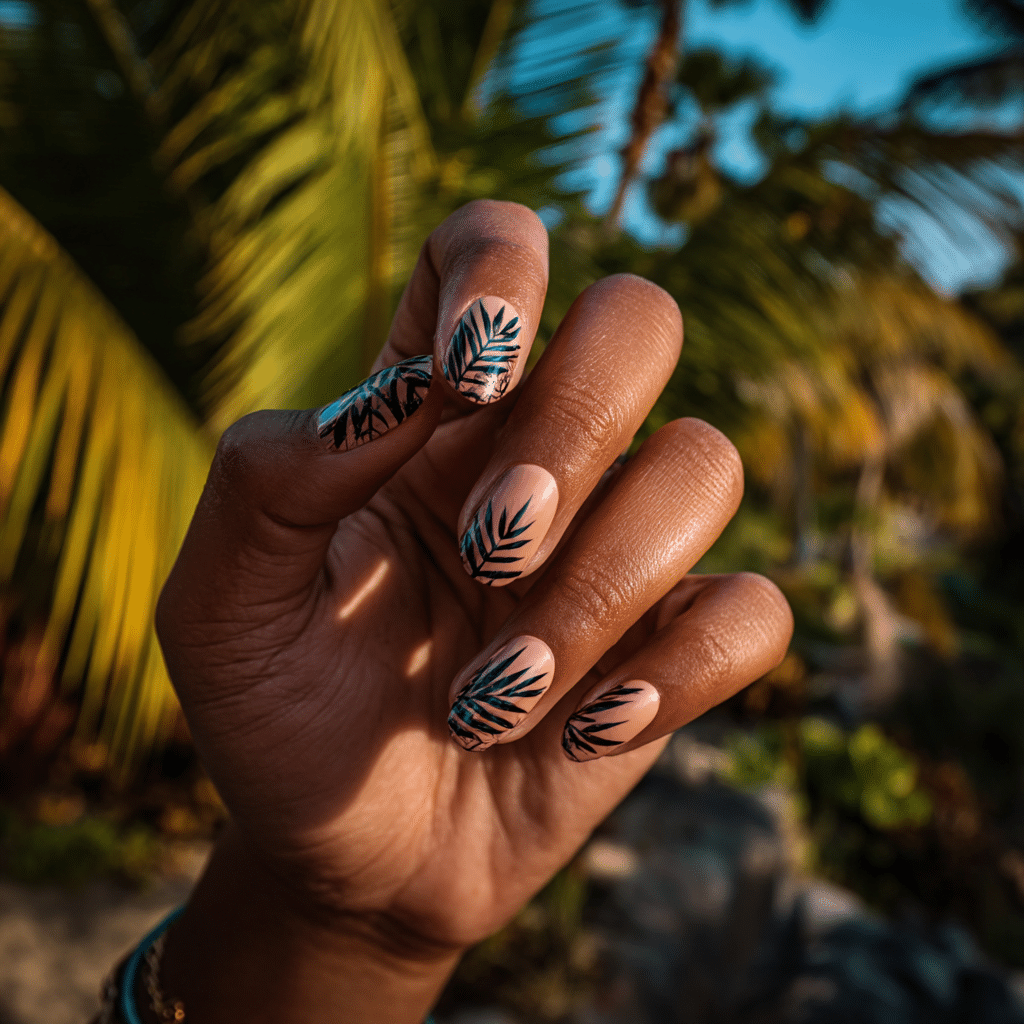
Palm Leaf Silhouettes feature fine black palm leaf art on a nude or peachy background, evoking tropical elegance. This sophisticated summer manicure is perfect for beach vacations or garden parties, blending nature with style.
Tools Needed
- Nude or peach nail polish
- Black nail polish
- Fine nail art brush
- Base coat and glossy top coat
- Acetone for cleanup
Step-by-Step Guide
- Apply a base coat and let dry.
- Paint nails with nude or peach polish, using two coats; let dry.
- Use a fine brush to paint black palm leaf silhouettes.
- Keep leaves delicate and minimal.
- Clean excess polish with acetone.
- Seal with a glossy top coat.
Color Suggestions
- Tropical Chic: Nude with black palm leaves.
- Bold Contrast: Peach with green palm leaves.
- Soft Glow: Beige with gold palm leaves.
Tips for Success
- Practice leaf shapes on paper.
- Use a fine brush for precision.
- Apply thin layers for clarity.
- Use a glossy top coat for shine.
Creative Variations
- Add leaves to accent nails only.
- Use glitter polish for leaves.
- Create a gradient base.
- Pair with tiny flower details.
This manicure pairs with tropical outfits or earthy tones, enhancing summer’s vibe. Maintain by touching up leaves and refreshing the top coat. Palm Leaf Silhouettes are a chic summer choice.
Sky Blue with Cloud Art
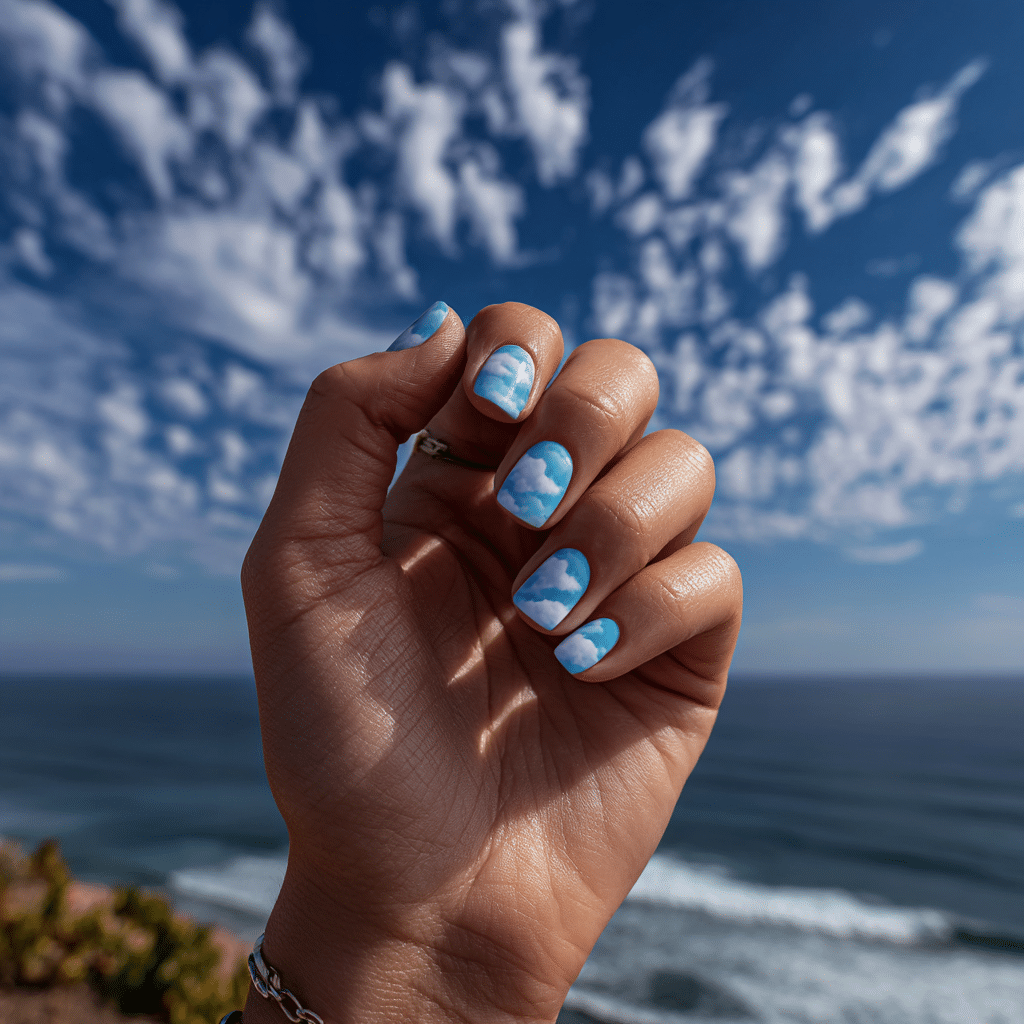
Sky Blue with Cloud Art features soft clouds hand-painted on a bright blue base, creating a dreamy summer manicure. Perfect for beach days or casual outings, this design captures the carefree essence of a clear summer sky.
Tools Needed
- Sky blue nail polish
- White nail polish
- Fine nail art brush
- Base coat and glossy top coat
- Acetone for cleanup
Step-by-Step Guide
- Apply a base coat and let dry.
- Paint nails with sky blue polish, using two coats; let dry.
- Use a fine brush to paint fluffy white clouds on accent nails.
- Keep clouds soft and minimal.
- Clean excess polish with acetone.
- Seal with a glossy top coat.
Color Suggestions
- Dreamy Sky: Sky blue with white clouds.
- Soft Pop: Baby blue with ivory clouds.
- Bold Contrast: Navy blue with white clouds.
Tips for Success
- Practice cloud shapes on paper.
- Use a fine brush for precision.
- Apply thin layers for clarity.
- Use a glossy top coat for shine.
Creative Variations
- Add clouds to all nails.
- Use glitter polish for clouds.
- Create a gradient blue base.
- Pair with tiny star decals.
This manicure pairs with white outfits or silver jewelry, evoking summer’s serenity. Maintain by touching up clouds and refreshing the top coat. Sky Blue with Cloud Art is a whimsical summer choice.
Daisy Chains
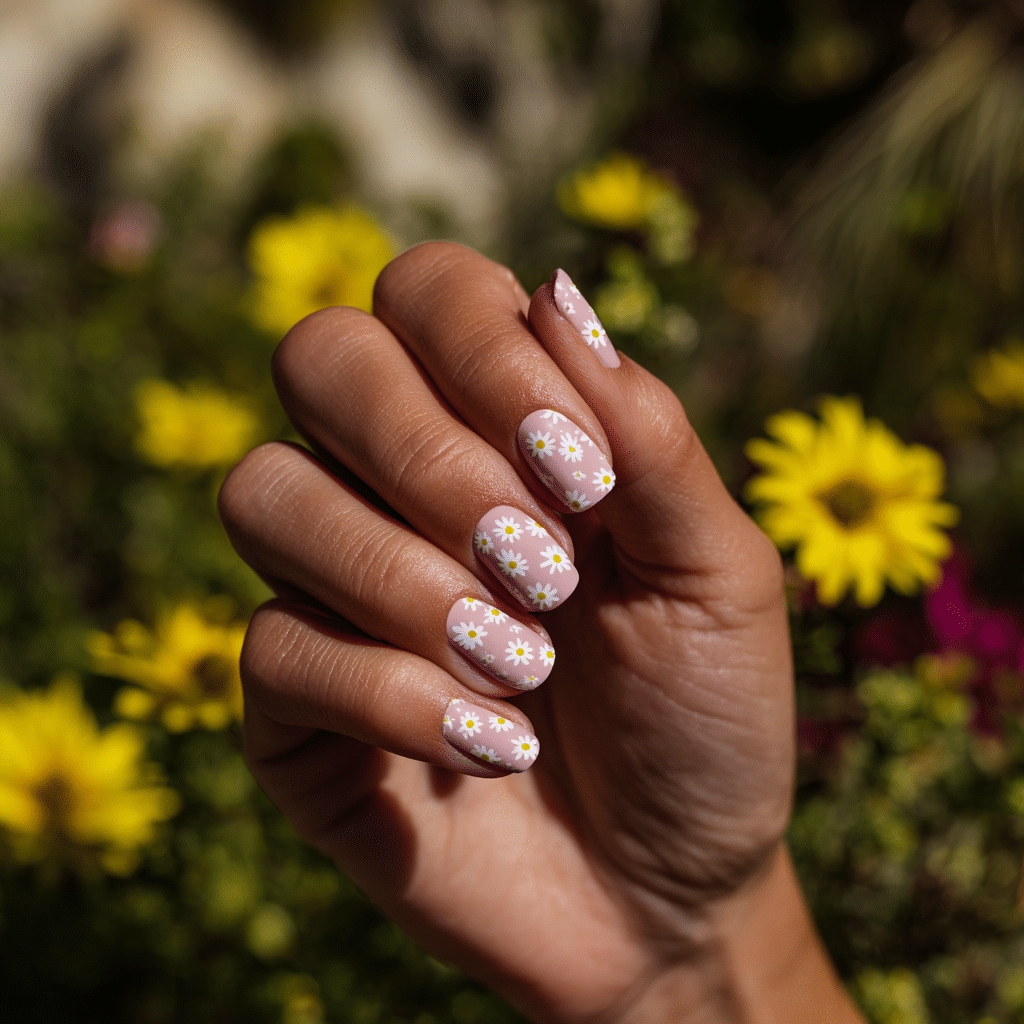
Daisy Chains feature small white daisies scattered across a blush base, creating a delicate, cheerful summer manicure. Perfect for picnics or garden parties, this design adds a playful floral touch to your summer style.
Tools Needed
- Blush nail polish
- White and yellow nail polishes
- Fine nail art brush and dotting tool
- Base coat and glossy top coat
- Acetone for cleanup
Step-by-Step Guide
- Apply a base coat and let dry.
- Paint nails with blush polish, using two coats; let dry.
- Use a fine brush to paint white daisy petals on accent nails.
- Add yellow centers with a dotting tool.
- Clean excess polish with acetone.
- Seal with a glossy top coat.
Color Suggestions
- Floral Charm: Blush with white daisies.
- Soft Pop: Peach with ivory daisies.
- Bold Contrast: Pink with yellow daisies.
Tips for Success
- Practice daisy shapes on paper.
- Keep daisies small for elegance.
- Use a fine brush for precision.
- Use a glossy top coat for shine.
Creative Variations
- Add daisies to all nails.
- Use glitter in daisy centers.
- Create a gradient blush base.
- Pair with green leaf details.
This manicure pairs with floral dresses or pastels, radiating summer joy. Maintain by touching up daisies and refreshing the top coat. Daisy Chains are a delightful summer choice.
Mint and Lavender Color Block
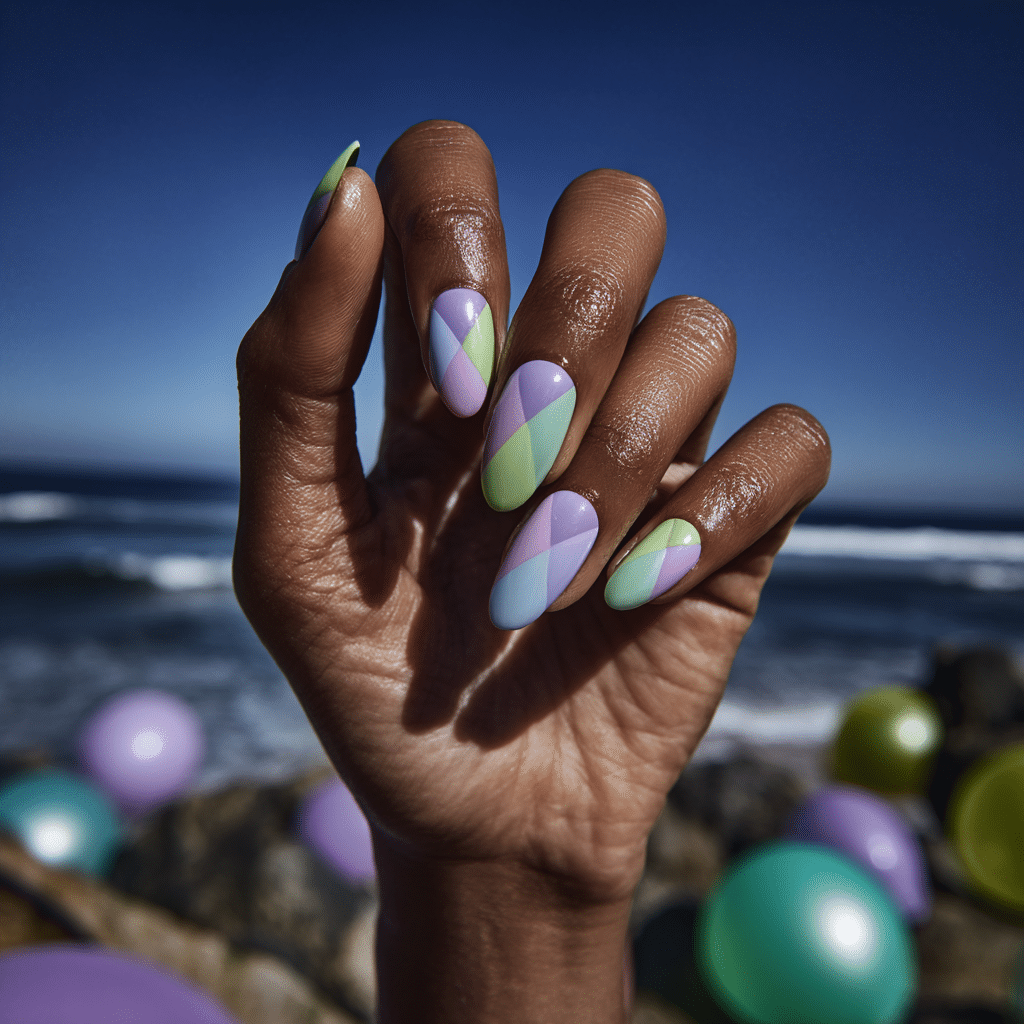
Mint and Lavender Color Block splits nails diagonally or vertically with two soft pastel shades, creating a modern summer manicure. Perfect for casual outings or festivals, this design blends playful color with chic simplicity.
Tools Needed
- Mint and lavender nail polishes
- Striping tape
- Base coat and glossy top coat
- Acetone for cleanup
Step-by-Step Guide
- Apply a base coat and let dry.
- Paint nails with mint polish, using two coats; let dry.
- Apply striping tape diagonally or vertically on each nail.
- Paint the uncovered section with lavender polish.
- Remove tape before polish dries; clean excess with acetone.
- Seal with a glossy top coat.
Color Suggestions
- Pastel Duo: Mint and lavender.
- Cool Pop: Mint and baby blue.
- Warm Glow: Lavender and peach.
Tips for Success
- Use tape for clean lines.
- Apply thin polish layers for evenness.
- Practice tape placement on paper.
- Use a glossy top coat for shine.
Creative Variations
- Create a curved color block.
- Use glitter polish for one color.
- Add a matte top coat for contrast.
- Apply blocks to accent nails only.
This manicure pairs with pastel outfits or bold prints, adding summery flair. Maintain by touching up lines and refreshing the top coat. Mint and Lavender Color Block is a stylish summer choice.
Clear Nails with Neon Dot Tips
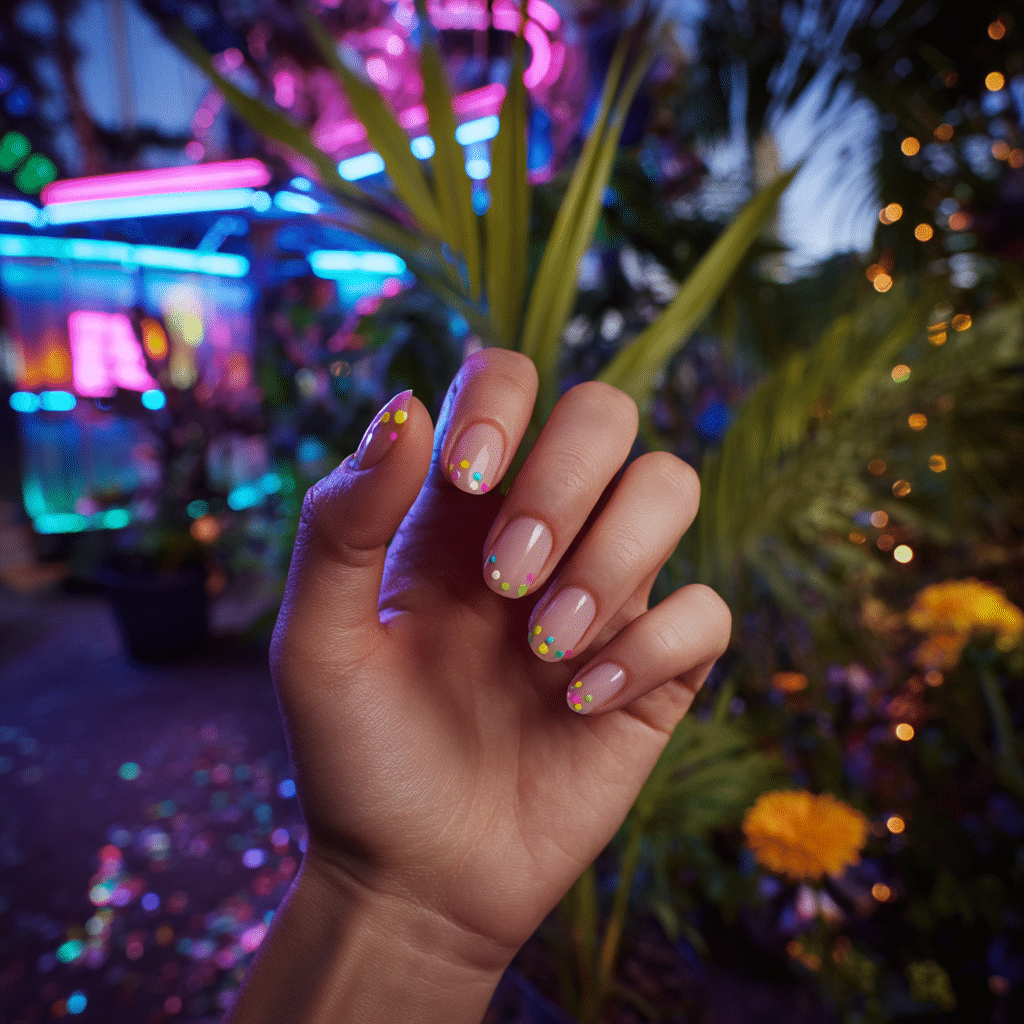
Clear Nails with Neon Dot Tips feature a transparent base with tiny neon dots along the nail edges, creating a vibrant, minimalist summer manicure. Perfect for festivals or beach parties, this design adds a playful pop of color.
Tools Needed
- Clear nail polish
- Neon nail polishes (pink, yellow, green)
- Dotting tool
- Base coat and glossy top coat
- Acetone for cleanup
Step-by-Step Guide
- Apply a base coat and let dry.
- Paint nails with clear polish, using 2-3 coats; let dry.
- Use a dotting tool to place neon dots along nail tips.
- Mix colors (pink, yellow, green) for variety.
- Clean excess polish with acetone.
- Seal with a glossy top coat.
Color Suggestions
- Neon Pop: Pink, yellow, green dots.
- Bold Mix: Orange, blue, pink dots.
- Cool Neon: Blue, green, purple dots.
Tips for Success
- Use a small dotting tool for precision.
- Practice dot placement on paper.
- Apply thin layers to maintain clarity.
- Use a glossy top coat for shine.
Creative Variations
- Add dots across entire nail.
- Use glitter polish for dots.
- Create a gradient dot pattern.
- Pair with a matte base.
This manicure pairs with neon accessories or white outfits, radiating summer energy. Maintain by touching up dots and refreshing the top coat. Clear Nails with Neon Dot Tips are a fun summer choice.
Watercolor Splash
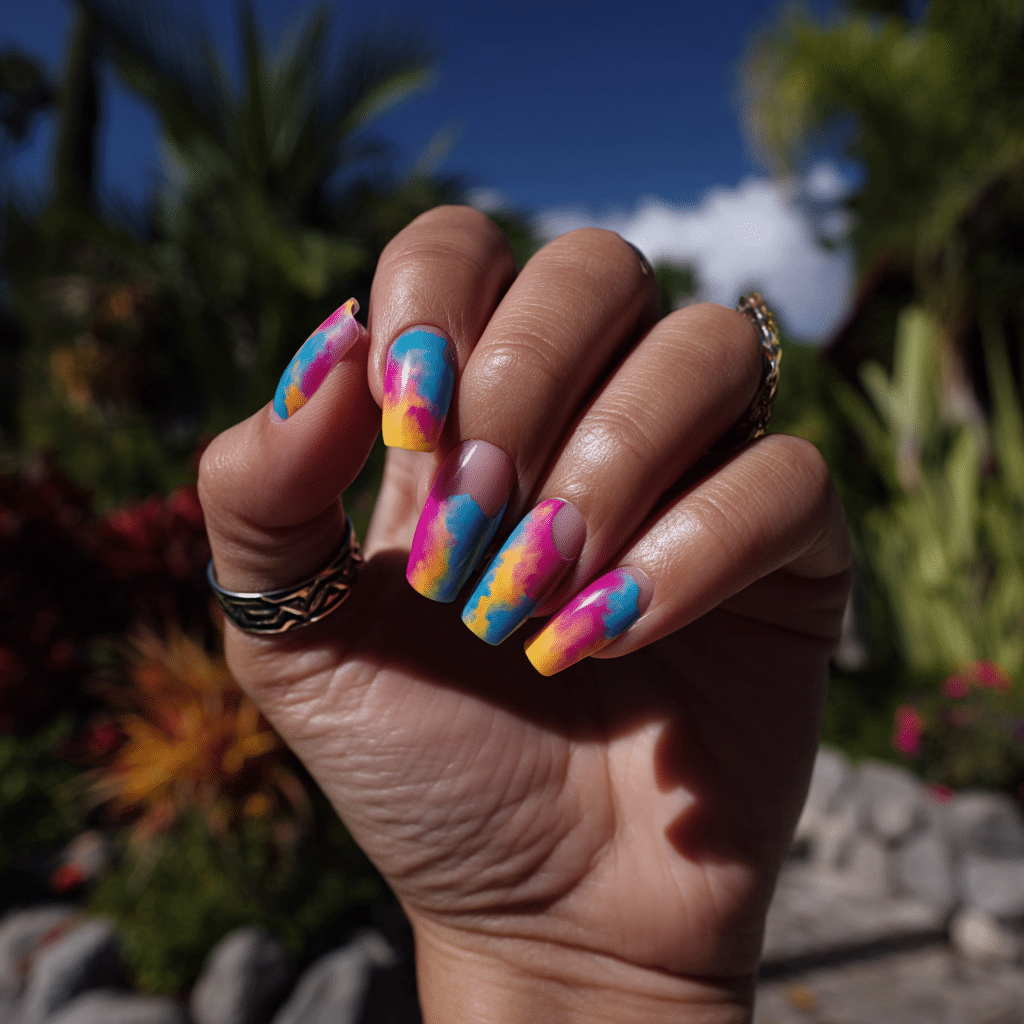
Watercolor Splash blends bright summer tones like pink, blue, and yellow in a painted-on watercolor effect, creating an artistic summer manicure. Perfect for creative events or casual outings, this design captures summer’s vibrant spirit.
Tools Needed
- Clear nail polish
- Pink, blue, and yellow nail polishes
- Makeup sponge or fine brush
- Base coat and glossy top coat
- Acetone for cleanup
Step-by-Step Guide
- Apply a base coat and let dry.
- Paint nails with clear polish, using 2-3 coats; let dry.
- Dilute pink, blue, and yellow polishes with acetone on a sponge.
- Dab sponge onto nails, blending colors for a watercolor effect.
- Repeat for desired vibrancy; let dry.
- Clean excess polish with acetone.
- Seal with a glossy top coat.
Color Suggestions
- Vibrant Splash: Pink, blue, yellow.
- Tropical Mix: Orange, green, pink.
- Cool Blend: Blue, purple, green.
Tips for Success
- Dilute polish for a translucent effect.
- Use a sponge for soft blending.
- Practice on paper for control.
- Use a glossy top coat for shine.
Creative Variations
- Add splashes to accent nails only.
- Use glitter polish for splashes.
- Create a gradient base.
- Pair with a matte top coat.
This manicure pairs with bold outfits or artistic accessories, embodying summer’s creativity. Maintain by reapplying the top coat. Watercolor Splash is a vibrant summer choice.
Iridescent Mermaid Scales
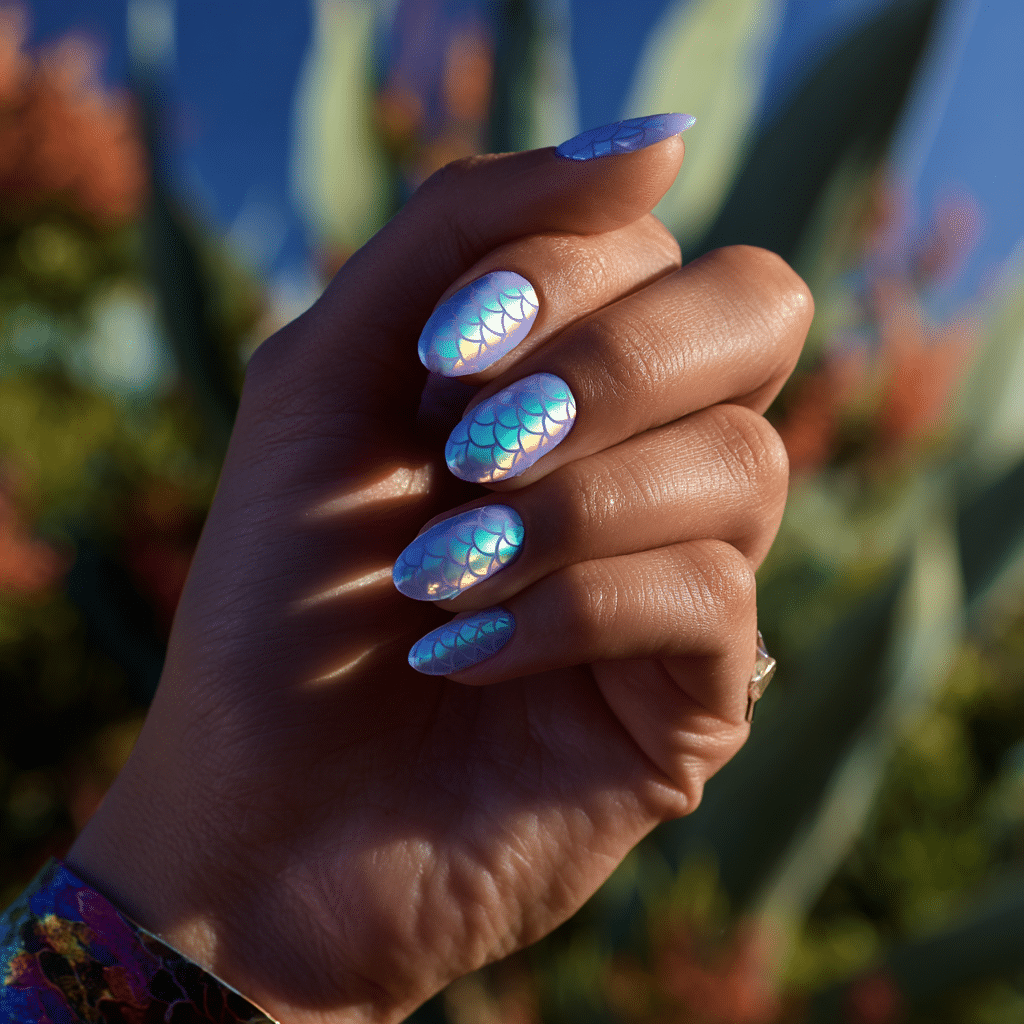
Iridescent Mermaid Scales feature holographic stamping over a light blue or lavender base, creating a magical, ocean-inspired summer manicure. Perfect for beach trips or festivals, this design shimmers with summery enchantment.
Tools Needed
- Light blue or lavender nail polish
- Holographic stamping polish
- Stamping plate and stamper
- Base coat and glossy top coat
- Acetone for cleanup
Step-by-Step Guide
- Apply a base coat and let dry.
- Paint nails with light blue or lavender polish, using two coats; let dry.
- Apply holographic stamping polish to a scale-patterned plate.
- Transfer the pattern to nails using a stamper.
- Clean excess polish with acetone.
- Seal with a glossy top coat.
Color Suggestions
- Mermaid Glow: Light blue with holographic scales.
- Soft Shine: Lavender with iridescent scales.
- Bold Pop: Mint with holographic scales.
Tips for Success
- Practice stamping on paper.
- Use a firm stamper for precision.
- Apply thin polish layers for clarity.
- Use a glossy top coat for shine.
Creative Variations
- Add scales to accent nails only.
- Use glitter polish for scales.
- Create a gradient base.
- Pair with pearl accents.
This manicure pairs with beachwear or silver jewelry, evoking oceanic magic. Maintain by reapplying the top coat. Iridescent Mermaid Scales are a dazzling summer choice.
Hot Pink with Gold Foil
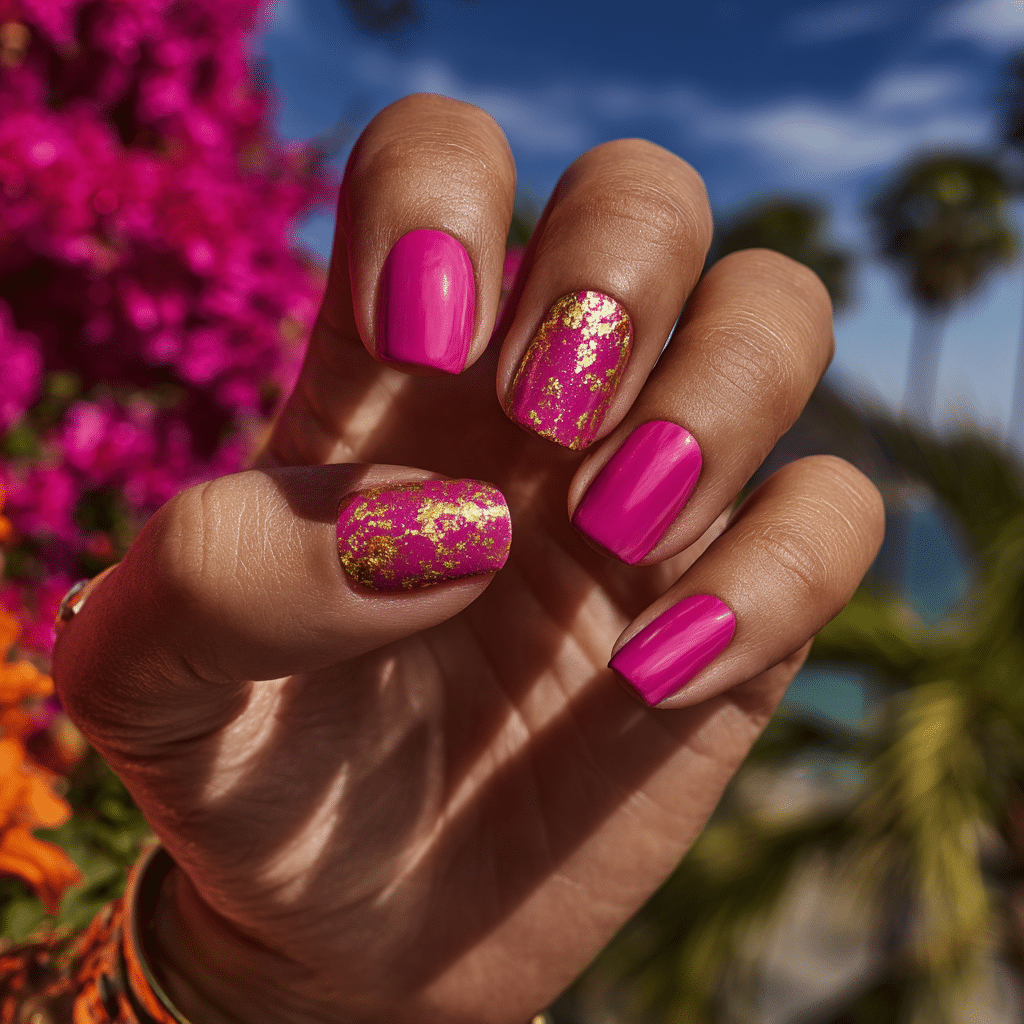
Hot Pink with Gold Foil combines classic summer pink with luxe gold foil flecks, creating a bold, glamorous manicure. Perfect for parties or vibrant summer nights, this design radiates confidence and sparkle.
Tools Needed
- Hot pink nail polish
- Gold foil sheets and foil glue
- Tweezers
- Base coat and glossy top coat
- Acetone for cleanup
Step-by-Step Guide
- Apply a base coat and let dry.
- Paint nails with hot pink polish, using two coats; let dry.
- Apply foil glue in random patterns on accent nails.
- Wait until glue is tacky; press gold foil with tweezers.
- Peel back foil to reveal the design.
- Clean excess polish with acetone.
- Seal with a glossy top coat.
Color Suggestions
- Bold Glam: Hot pink with gold foil.
- Soft Shine: Coral pink with silver foil.
- Warm Pop: Fuchsia with rose gold foil.
Tips for Success
- Apply foil glue sparingly for subtlety.
- Practice foil placement on paper.
- Use a glossy top coat for shine.
- Handle foil gently to avoid tearing.
Creative Variations
- Create geometric foil patterns.
- Use a matte pink base.
- Add a rhinestone near foil.
- Place foil on all nails.
This manicure pairs with gold accessories or bold prints, adding summery glamour. Maintain by reapplying the top coat. Hot Pink with Gold Foil is a striking summer choice.
Butterfly Wings
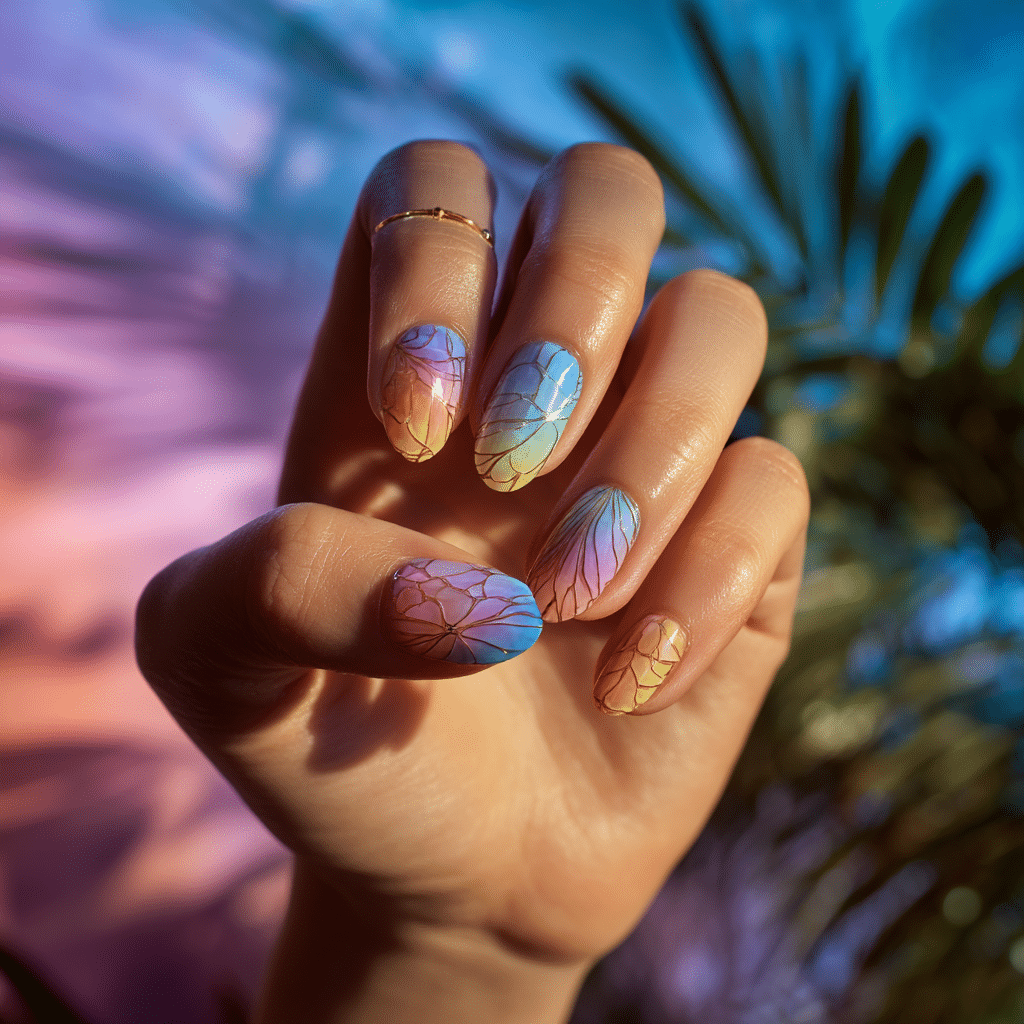
Butterfly Wings feature a single wing pattern across both hands or on accent nails, creating a whimsical summer manicure. Perfect for festivals or romantic outings, this design adds delicate beauty to your summer style.
Tools Needed
- Nude nail polish
- Multicolored nail polishes (blue, yellow, pink)
- Fine nail art brush
- Base coat and glossy top coat
- Acetone for cleanup
Step-by-Step Guide
- Apply a base coat and let dry.
- Paint nails with nude polish, using two coats; let dry.
- Use a fine brush to paint butterfly wing patterns on accent nails.
- Blend blue, yellow, and pink for vibrant wings.
- Clean excess polish with acetone.
- Seal with a glossy top coat.
Color Suggestions
- Whimsical Glow: Blue, yellow, pink wings.
- Soft Pop: Pastel blue, pink, white wings.
- Bold Contrast: Black, orange, yellow wings.
Tips for Success
- Practice wing patterns on paper.
- Use a fine brush for precision.
- Keep designs delicate for elegance.
- Use a glossy top coat for shine.
Creative Variations
- Add wings to all nails.
- Use glitter polish for wings.
- Create a gradient base.
- Pair with tiny flower details.
This manicure pairs with floral dresses or bold accessories, radiating summer charm. Maintain by touching up wings and refreshing the top coat. Butterfly Wings are a magical summer choice.
Matte Lime Green
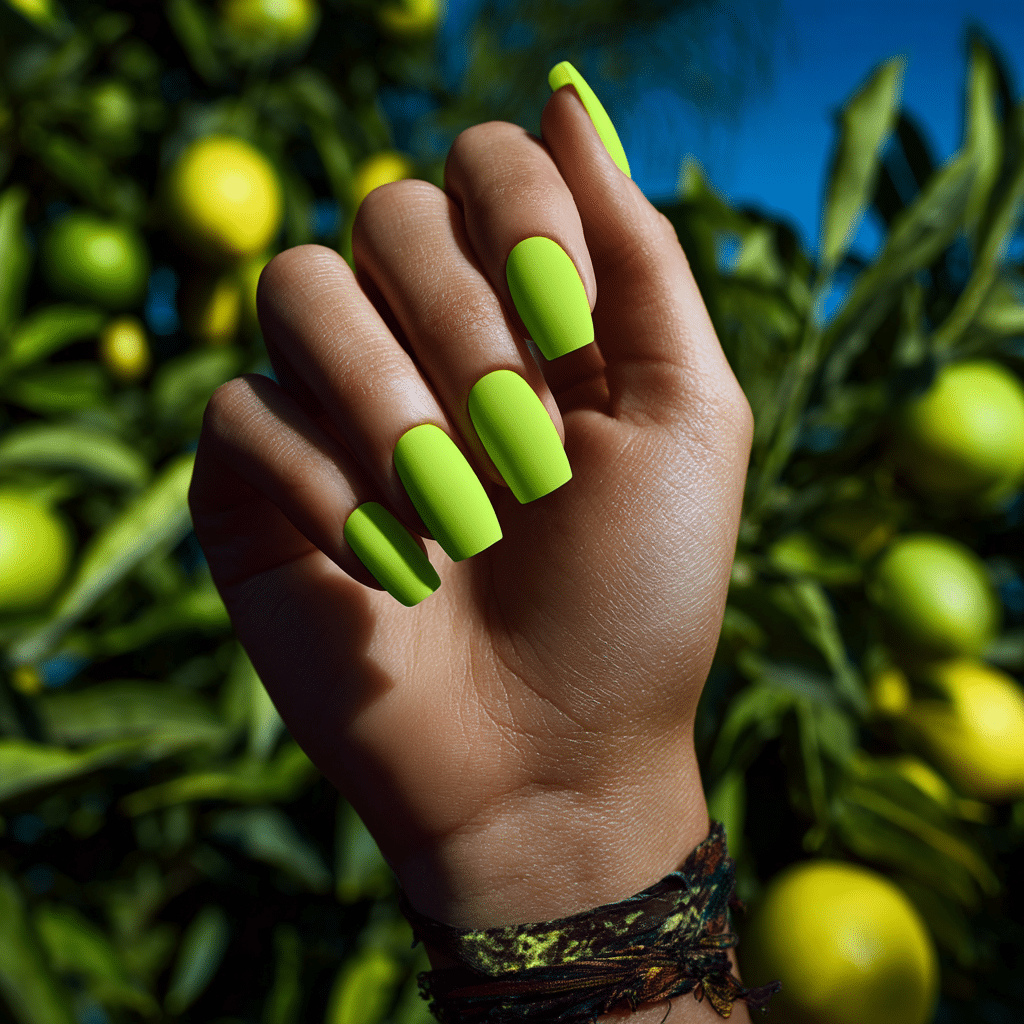
Matte Lime Green is a bold, fresh summer manicure with a velvety matte finish. Surprisingly wearable, this vibrant design is perfect for festivals or casual outings, adding a pop of color to your summer look.
Tools Needed
- Lime green nail polish
- Matte top coat
- Base coat
- Nail file
- Acetone for cleanup
Step-by-Step Guide
- File nails to desired shape; apply a base coat and let dry.
- Paint nails with lime green polish, using two coats; let dry.
- Apply a matte top coat evenly across all nails.
- Let dry completely for a velvety finish.
- Clean excess polish with acetone.
- Check for even matte coverage.
Color Suggestions
- Vibrant Pop: Lime green with matte finish.
- Soft Glow: Mint green with matte finish.
- Bold Contrast: Neon green with matte finish.
Tips for Success
- Apply thin polish layers for smoothness.
- Use a matte top coat sparingly.
- Clean cuticles for a polished look.
- File nails evenly for uniformity.
Creative Variations
- Add a glossy top coat to one nail.
- Use a gradient green shade.
- Apply a single rhinestone.
- Create a subtle pattern on one nail.
This manicure pairs with white outfits or bold prints, radiating summer energy. Maintain by refreshing the matte top coat. Matte Lime Green is a daring summer choice.
Cherry Red French Tips
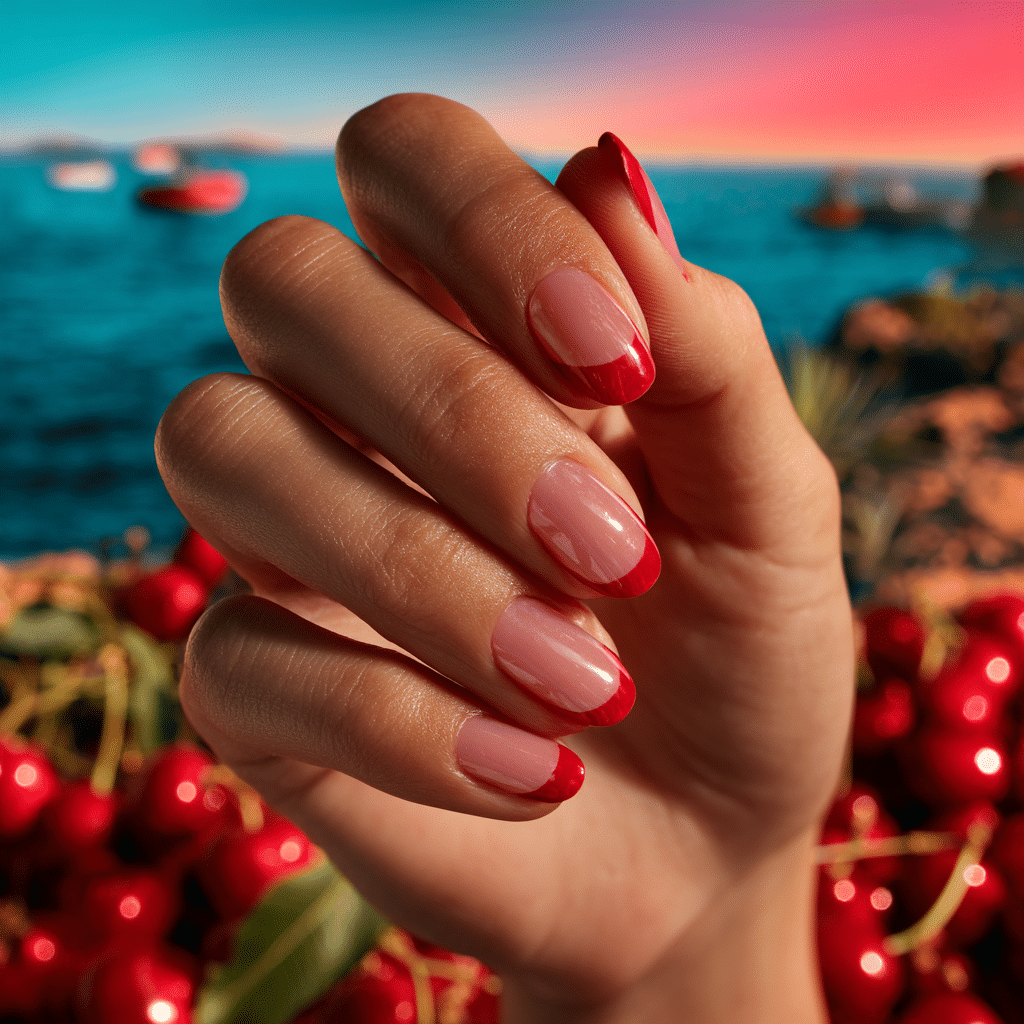
Cherry Red French Tips swap white tips for vibrant red on a natural nail base, creating a fruity twist on the classic French manicure. Perfect for summer parties or casual outings, this design adds playful elegance.
Tools Needed
- Natural or nude nail polish
- Cherry red nail polish
- Striping tape or fine brush
- Base coat and glossy top coat
- Acetone for cleanup
Step-by-Step Guide
- Apply a base coat and let dry.
- Paint nails with nude polish, using two coats; let dry.
- Use striping tape or a fine brush to paint cherry red tips.
- Apply two layers for vibrancy.
- Remove tape; clean excess with acetone.
- Seal with a glossy top coat.
Color Suggestions
- Fruity Pop: Nude with cherry red tips.
- Soft Glow: Beige with coral red tips.
- Bold Contrast: Pinkish nude with deep red tips.
Tips for Success
- Use tape for clean tip lines.
- Apply thin polish layers for evenness.
- Practice tip placement on paper.
- Use a glossy top coat for shine.
Creative Variations
- Add glitter to red tips.
- Use a matte nude base.
- Create double red tips.
- Apply tips to accent nails only.
This manicure pairs with bold outfits or gold jewelry, adding summery flair. Maintain by touching up tips and refreshing the top coat. Cherry Red French Tips are a vibrant summer choice.
Sunflower Nails
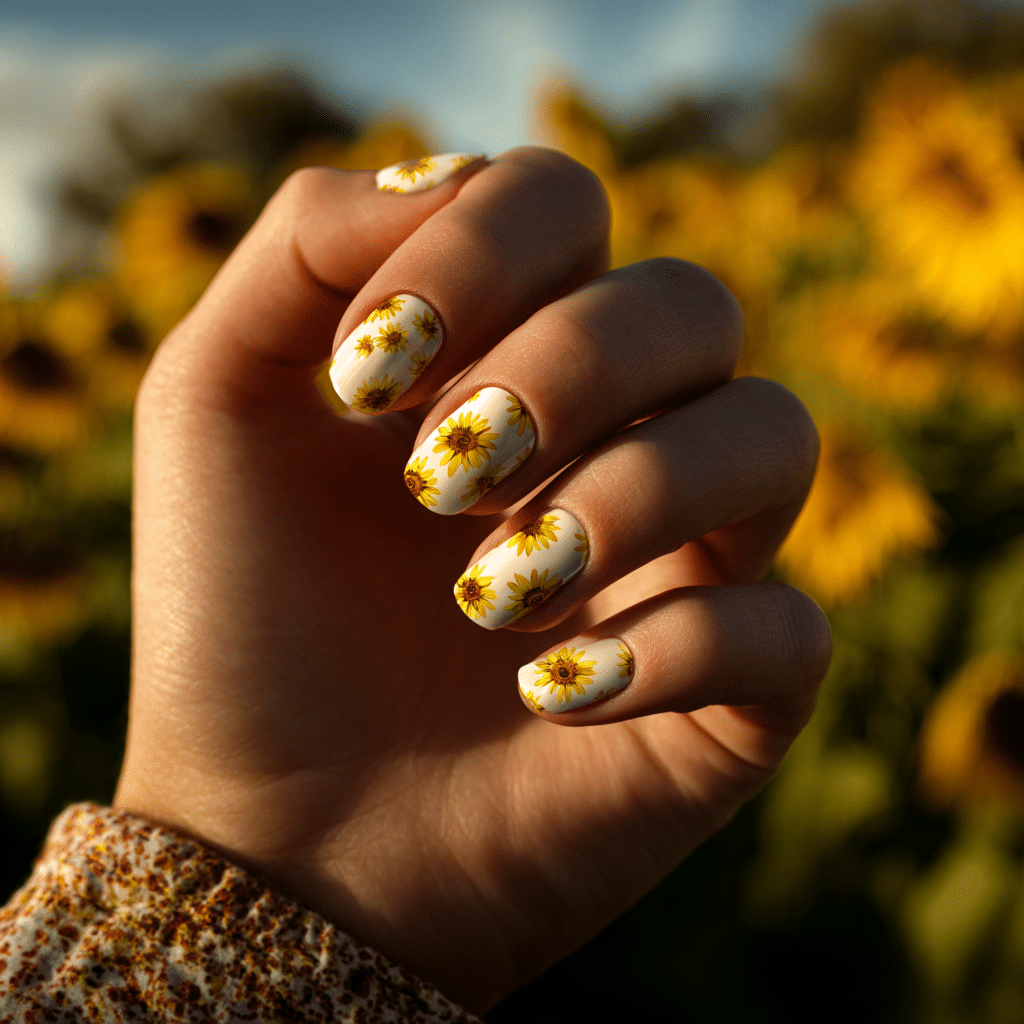
Sunflower Nails feature yellow petals and brown centers on a creamy background, creating a cheerful summer manicure. Perfect for picnics or festivals, this floral design brings sunny warmth to your summer style.
Tools Needed
- Cream nail polish
- Yellow and brown nail polishes
- Fine nail art brush and dotting tool
- Base coat and glossy top coat
- Acetone for cleanup
Step-by-Step Guide
- Apply a base coat and let dry.
- Paint nails with cream polish, using two coats; let dry.
- Use a fine brush to paint yellow sunflower petals on accent nails.
- Add brown centers with a dotting tool.
- Clean excess polish with acetone.
- Seal with a glossy top coat.
Color Suggestions
- Sunny Bloom: Cream with yellow sunflowers.
- Soft Pop: Ivory with pale yellow sunflowers.
- Bold Contrast: Beige with orange sunflowers.
Tips for Success
- Practice sunflower shapes on paper.
- Keep flowers small for elegance.
- Use a fine brush for precision.
- Use a glossy top coat for shine.
Creative Variations
- Add sunflowers to all nails.
- Use glitter in sunflower centers.
- Create a gradient cream base.
- Pair with green leaf details.
This manicure pairs with yellow outfits or earthy tones, radiating summer joy. Maintain by touching up sunflowers and refreshing the top coat. Sunflower Nails are a bright summer choice.
Citrus Slices Art
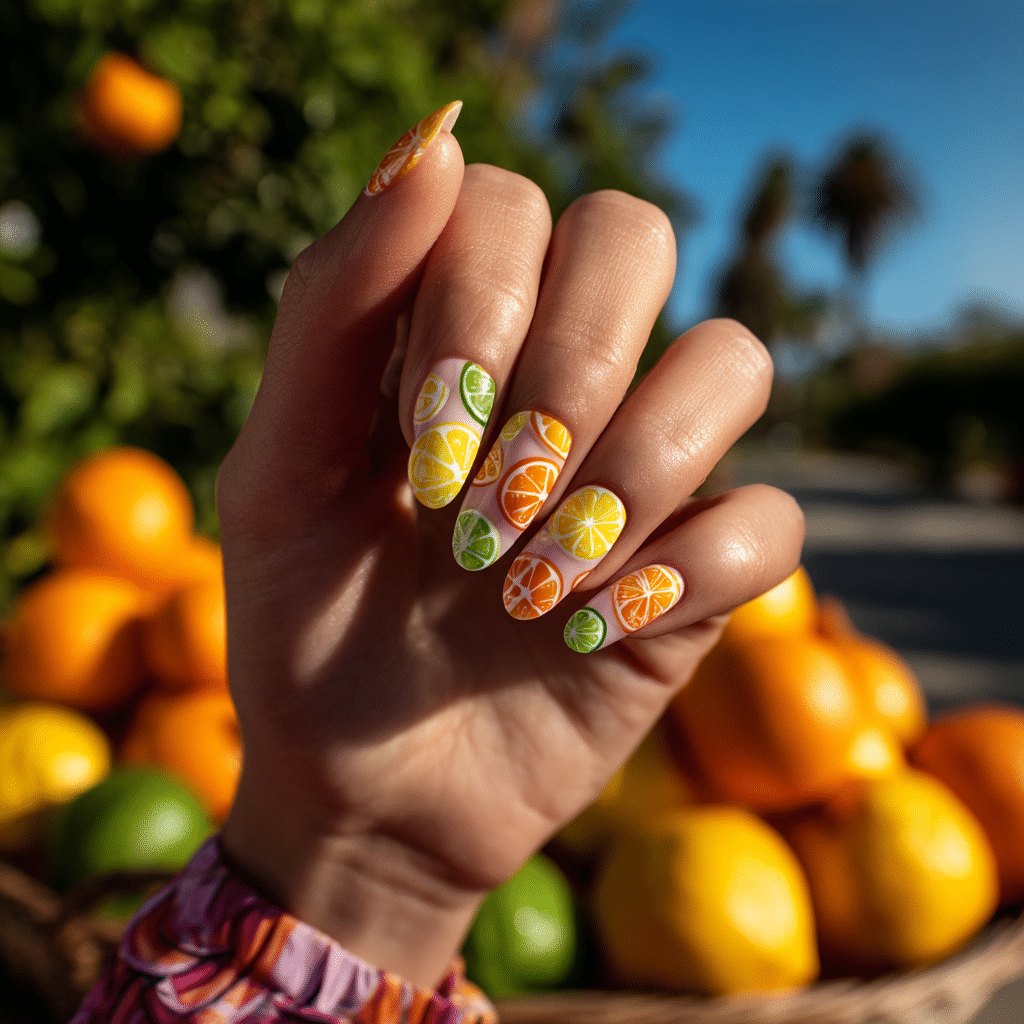
Citrus Slices Art features tiny orange, lemon, and lime slices painted in bright clusters, creating a zesty summer manicure. Perfect for beach days or picnics, this design adds a playful, fruity vibe to your nails.
Tools Needed
- Nude nail polish
- Orange, yellow, and green nail polishes
- Fine nail art brush
- Base coat and glossy top coat
- Acetone for cleanup
Step-by-Step Guide
- Apply a base coat and let dry.
- Paint nails with nude polish, using two coats; let dry.
- Use a fine brush to paint small citrus slices (orange, lemon, lime).
- Add white accents for realism.
- Clean excess polish with acetone.
- Seal with a glossy top coat.
Color Suggestions
- Fruity Mix: Orange, yellow, green slices.
- Soft Pop: Pastel orange, yellow, mint slices.
- Bold Contrast: Neon orange, yellow, green slices.
Tips for Success
- Practice slice shapes on paper.
- Use a fine brush for precision.
- Keep designs small for detail.
- Use a glossy top coat for shine.
Creative Variations
- Add slices to accent nails only.
- Use glitter polish for slices.
- Create a gradient base.
- Pair with tiny flower details.
This manicure pairs with bright outfits or fruit-themed accessories, adding summer zest. Maintain by touching up slices and refreshing the top coat. Citrus Slices Art is a lively summer choice.
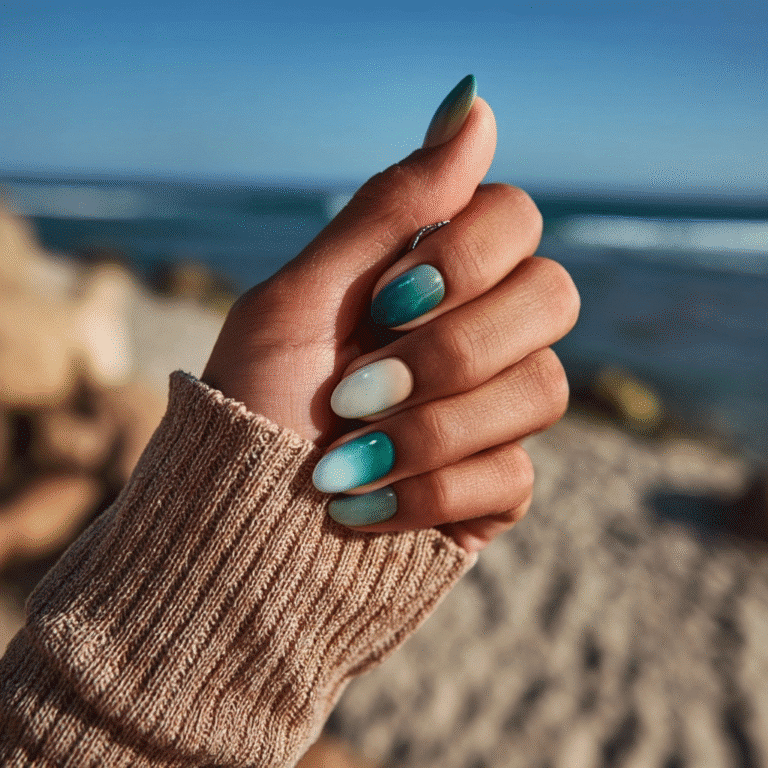
Ocean Wave Texture
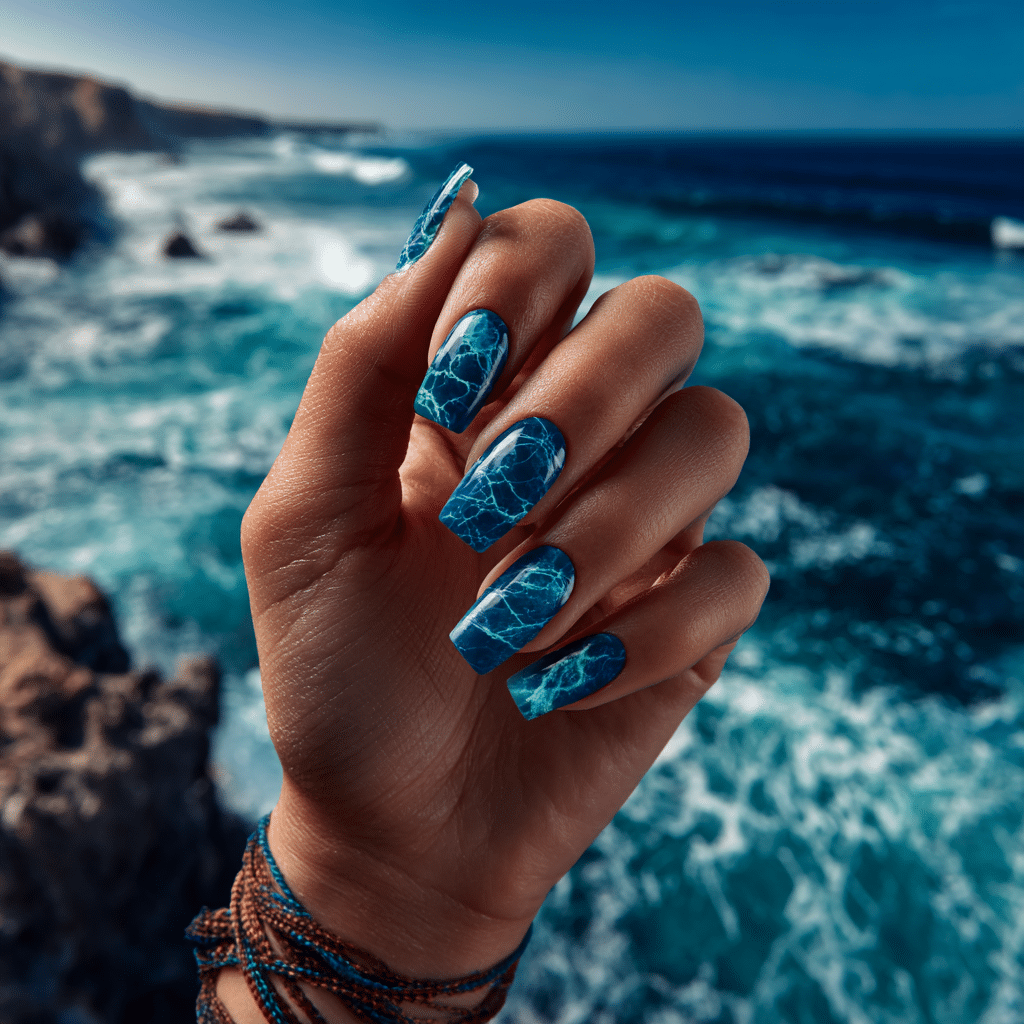
Ocean Wave Texture features textured blue polish or 3D gel art resembling sea ripples, creating a dynamic summer manicure. Perfect for beach trips or coastal events, this design captures the ocean’s movement and beauty.
Tools Needed
- Blue nail polish or 3D gel
- Textured polish or gel brush
- Base coat and glossy top coat
- Acetone for cleanup
Step-by-Step Guide
- Apply a base coat and let dry.
- Paint nails with blue polish, using two coats; let dry.
- Apply textured polish or use gel to create wave-like ripples.
- Sculpt waves with a brush for 3D effect.
- Cure gel if used; clean excess with acetone.
- Seal with a glossy top coat.
Color Suggestions
- Ocean Vibe: Turquoise blue waves.
- Soft Pop: Baby blue waves.
- Bold Contrast: Navy blue waves.
Tips for Success
- Practice wave textures on paper.
- Use a gel brush for precision.
- Apply thin layers for control.
- Use a glossy top coat for shine.
Creative Variations
- Add waves to accent nails only.
- Use glitter polish for waves.
- Create a gradient blue base.
- Pair with pearl accents.
This manicure pairs with beachwear or silver jewelry, evoking coastal charm. Maintain by reapplying the top coat. Ocean Wave Texture is a captivating summer choice.
Pastel Rainbow Tips

Pastel Rainbow Tips feature each nail with a different pastel tip in a soft rainbow sequence, creating a playful summer manicure. Perfect for festivals or casual outings, this design adds a cheerful, colorful touch.
Tools Needed
- Nude nail polish
- Pastel nail polishes (pink, blue, yellow, green, purple)
- Striping tape or fine brush
- Base coat and glossy top coat
- Acetone for cleanup
Step-by-Step Guide
- Apply a base coat and let dry.
- Paint nails with nude polish, using two coats; let dry.
- Use tape or a fine brush to paint pastel tips (one color per nail).
- Apply two layers for vibrancy.
- Remove tape; clean excess with acetone.
- Seal with a glossy top coat.
Color Suggestions
- Rainbow Pop: Pink, blue, yellow, green, purple tips.
- Soft Glow: Pastel peach, mint, lavender, lemon, coral tips.
- Cool Mix: Blue, green, lavender, pink, mint tips.
Tips for Success
- Use tape for clean tip lines.
- Apply thin polish layers for evenness.
- Practice tip placement on paper.
- Use a glossy top coat for shine.
Creative Variations
- Add glitter to pastel tips.
- Use a matte nude base.
- Create double tips on one nail.
- Apply tips to accent nails only.
This manicure pairs with white outfits or colorful accessories, radiating summer joy. Maintain by touching up tips and refreshing the top coat. Pastel Rainbow Tips are a vibrant summer choice.
Popsicle Drips
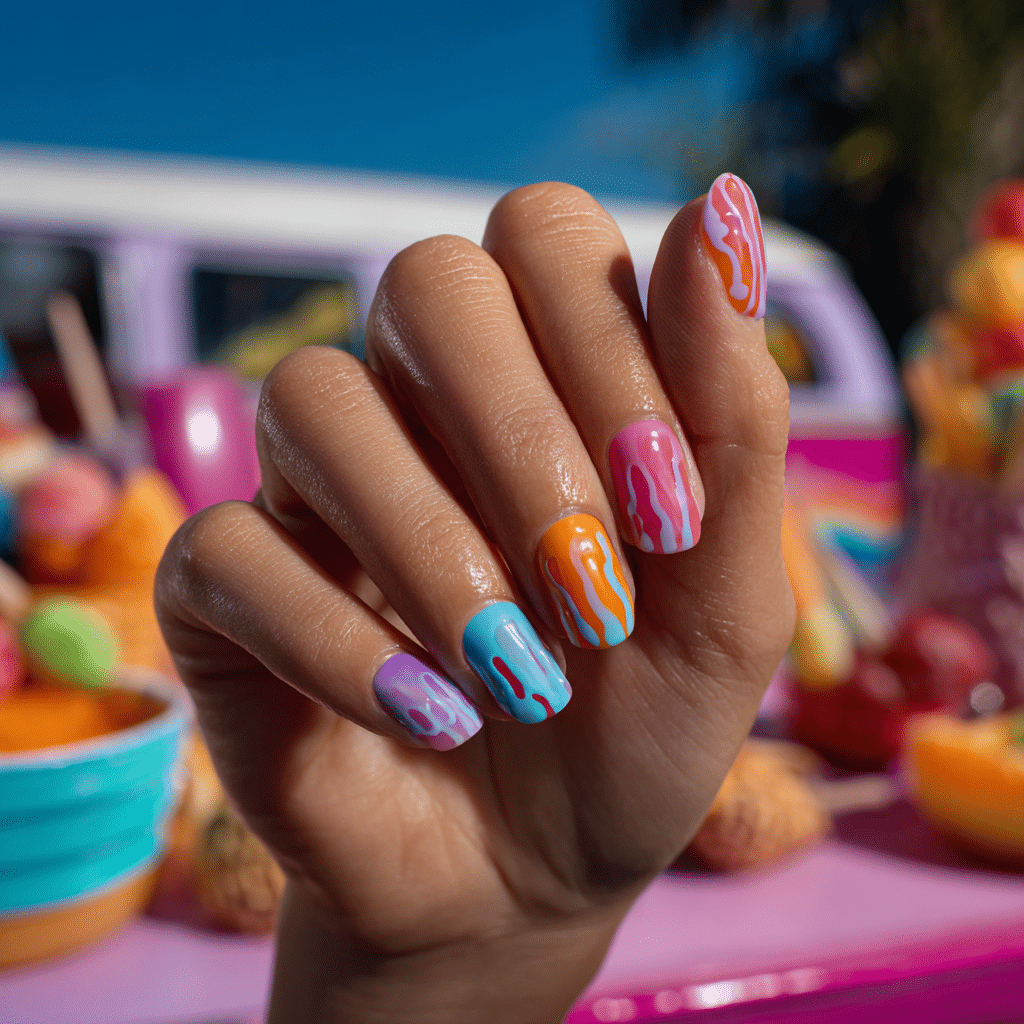
Popsicle Drips feature drippy polish effects in candy tones like pink, orange, and blue, creating a fun, festive summer manicure. Perfect for beach parties or casual outings, this design captures summer’s playful spirit.
Tools Needed
- Nude nail polish
- Pink, orange, and blue nail polishes
- Fine nail art brush
- Base coat and glossy top coat
- Acetone for cleanup
Step-by-Step Guide
- Apply a base coat and let dry.
- Paint nails with nude polish, using two coats; let dry.
- Use a fine brush to paint drippy patterns in pink, orange, and blue.
- Create uneven, melting effects from the tips.
- Clean excess polish with acetone.
- Seal with a glossy top coat.
Color Suggestions
- Candy Pop: Pink, orange, blue drips.
- Soft Glow: Pastel pink, peach, mint drips.
- Bold Contrast: Neon pink, yellow, green drips.
Tips for Success
- Practice drip patterns on paper.
- Use a fine brush for precision.
- Keep drips varied for realism.
- Use a glossy top coat for shine.
Creative Variations
- Add drips to accent nails only.
- Use glitter polish for drips.
- Create a gradient base.
- Pair with tiny sprinkle decals.
This manicure pairs with bright outfits or playful accessories, adding summer fun. Maintain by touching up drips and refreshing the top coat. Popsicle Drips are a whimsical summer choice.
Tropical Fruit Pattern
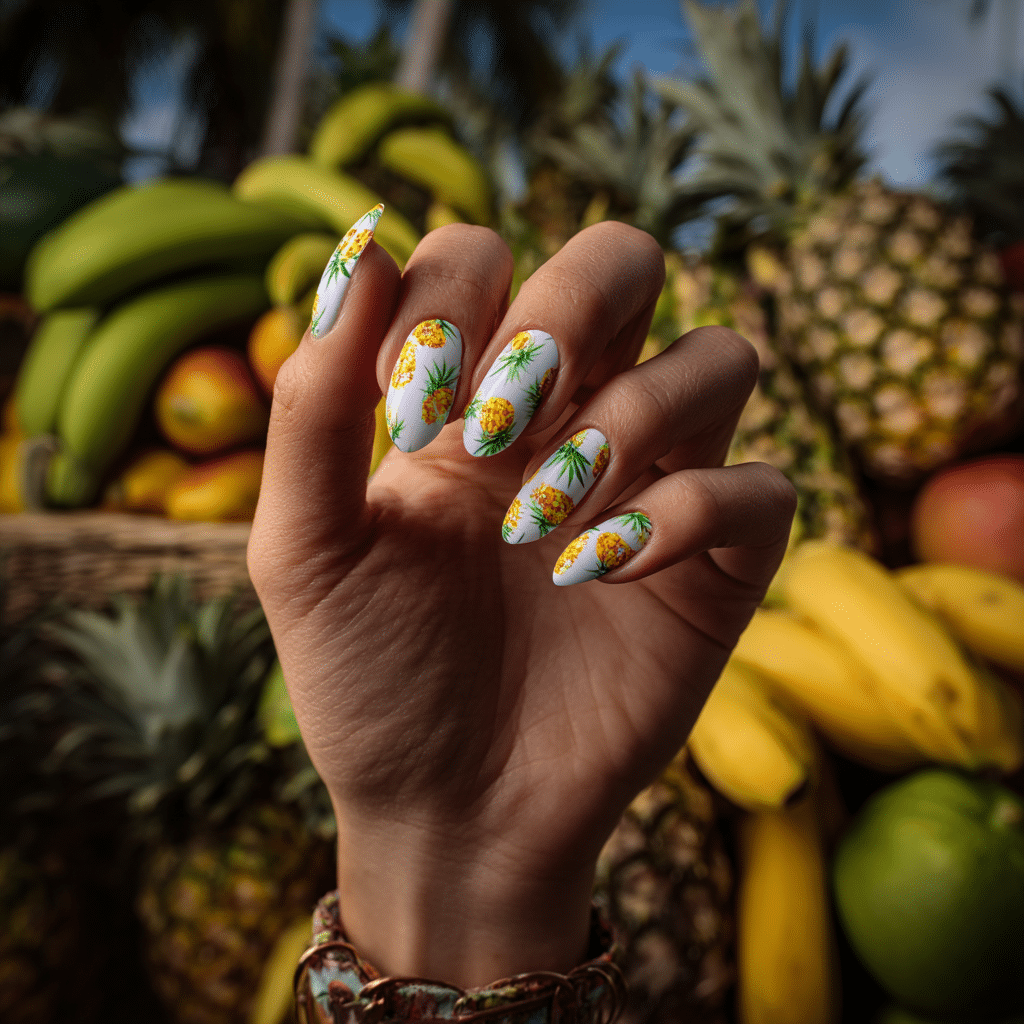
Tropical Fruit Pattern features mini pineapples, papayas, or bananas over a white or mint base, creating a vibrant summer manicure. Perfect for beach vacations or festivals, this design adds a playful, fruity flair.
Tools Needed
- White or mint nail polish
- Yellow, orange, and green nail polishes
- Fine nail art brush
- Base coat and glossy top coat
- Acetone for cleanup
Step-by-Step Guide
- Apply a base coat and let dry.
- Paint nails with white or mint polish, using two coats; let dry.
- Use a fine brush to paint mini pineapples, papayas, or bananas.
- Add details like green leaves or brown lines.
- Clean excess polish with acetone.
- Seal with a glossy top coat.
Color Suggestions
- Fruity Pop: White with pineapples.
- Soft Glow: Mint with papayas.
- Bold Contrast: White with bananas.
Tips for Success
- Practice fruit shapes on paper.
- Use a fine brush for precision.
- Keep designs small for detail.
- Use a glossy top coat for shine.
Creative Variations
- Add fruit to accent nails only.
- Use glitter polish for fruit.
- Create a gradient base.
- Pair with tiny flower details.
This manicure pairs with tropical prints or bright accessories, radiating summer energy. Maintain by touching up fruit and refreshing the top coat. Tropical Fruit Pattern is a lively summer choice.
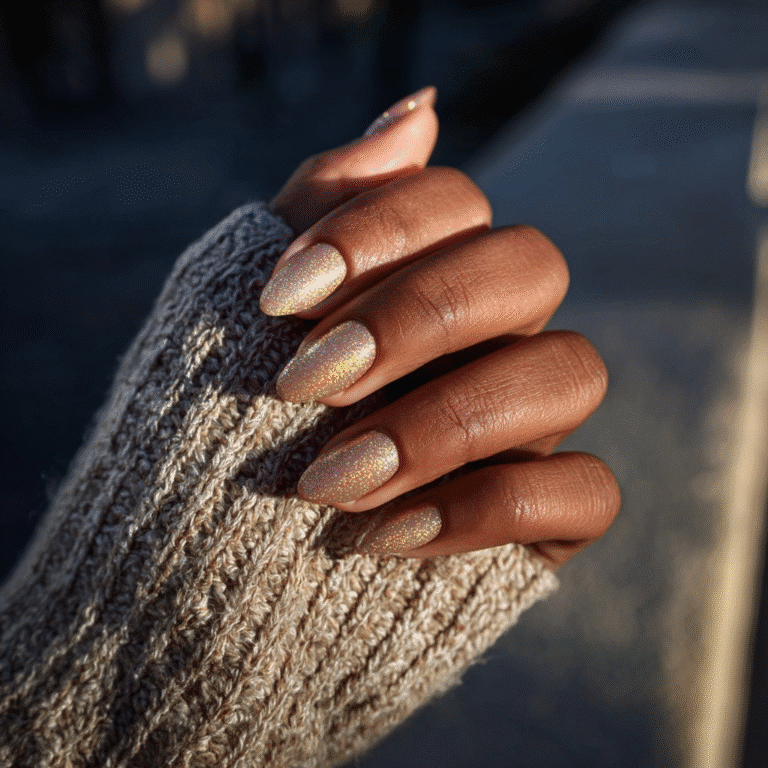
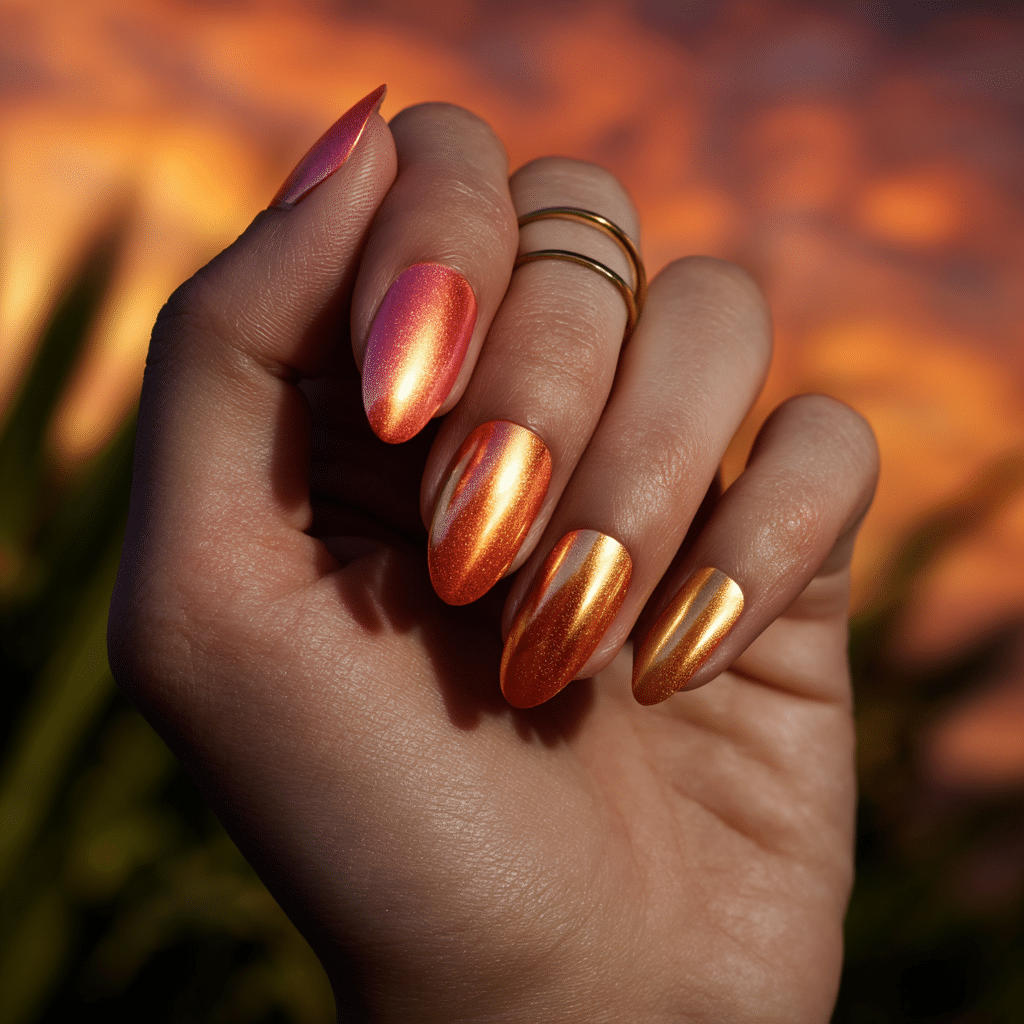
Sunset Chrome
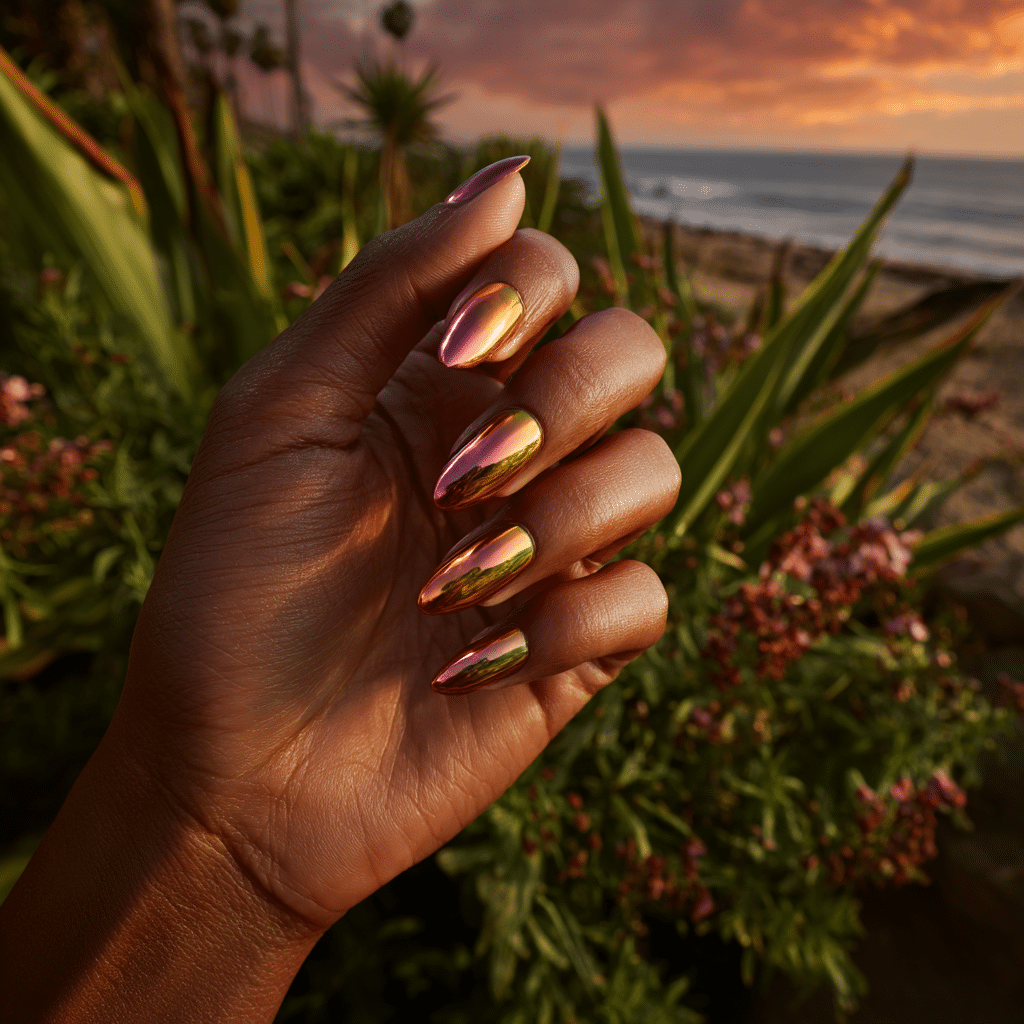
Sunset Chrome features a metallic fade in gold, coral, and pink, creating a sun-kissed summer manicure. Perfect for evening events or beach parties, this design shimmers with summery glamour and warmth.
Tools Needed
- Gold, coral, and pink chrome polishes
- Sponge applicator
- Base coat and glossy top coat
- Acetone for cleanup
Step-by-Step Guide
- Apply a base coat and let dry.
- Paint nails with a nude base; let dry.
- Apply gold, coral, and pink chrome polish to a sponge.
- Dab sponge onto nails, blending for a metallic fade.
- Repeat for intensity; let dry.
- Clean excess polish with acetone.
- Seal with a glossy top coat.
Color Suggestions
- Sunset Shine: Gold, coral, pink chrome.
- Warm Glow: Orange, peach, gold chrome.
- Cool Pop: Pink, purple, silver chrome.
Tips for Success
- Use a sponge for smooth blending.
- Apply thin layers for control.
- Practice fade on paper.
- Use a glossy top coat for shine.
Creative Variations
- Add glitter in the fade.
- Use a matte top coat for contrast.
- Create a vertical chrome fade.
- Pair with a single rhinestone.
This manicure pairs with bold outfits or gold jewelry, capturing summer’s radiance. Maintain by reapplying the top coat. Sunset Chrome is a dazzling summer choice.
Summer invites us to live boldly, and our nail choices can echo that energy. Whether you’re lounging poolside, dancing at a festival, or simply enjoying a warm afternoon with friends, your manicure can be an extension of your seasonal joy. The beauty of summer nail art lies in its flexibility—it can be flashy or understated, trendy or classic, detailed or delightfully simple.
In a season full of color, sunshine, and spontaneous fun, let your nails reflect that same sense of freedom and play. From sophisticated neutrals with a twist to bold, scene-stealing designs, summer nail art reminds us that beauty is about enjoying the moment and expressing ourselves, one detail at a time.