Escaping in Color: How Tropical Nail Art Brings Vacation to Your Fingertips
There’s something unmistakably freeing about tropical-inspired beauty. It’s joyful, bold, and rooted in nature’s most vibrant color palette. While not everyone can jet off to a beach paradise at a moment’s notice, the right nail design can offer a visual getaway—one that brings the spirit of island life right to your fingertips. Tropical nail art is more than just pretty polish—it’s a warm, visual escape, a sun-soaked expression of mood and place.
These designs are lush with color and detail. Think flamingo pinks, ocean blues, sun-kissed corals, and leafy greens. From exotic fruit motifs to tiny palm trees dancing across your nails, tropical styles are inherently cheerful. They’re the beauty world’s version of a beach soundtrack: colorful, transportive, and endlessly fun.
Why I Love It
What I love most about tropical nail designs is how they instantly lift my mood. Even when I’m nowhere near a beach, a coral-pink polish with a mini palm decal gives me the same feeling as stepping onto warm sand. These nails remind me of vacations I’ve taken, or ones I’m still dreaming of. They’re mini mood boards for joy, color, and ease.
I also love how versatile tropical designs are. You can go maximalist with fruit slices and ombré sunsets, or minimalist with a sleek aloe green or subtle shell shimmer. Whether your style is playful, artistic, or polished, there’s a tropical take that makes it feel uniquely yours.
23 Tropical Nails That Will Transport You to Paradise
These 23 tropical nail designs for summer 2025 capture the vibrant, lush essence of paradise, perfect for beach escapes, island adventures, or tropical festivals. Each design blends bold colors, natural motifs, and artistic flair to evoke the spirit of a tropical getaway. Detailed steps, tools, and variations ensure accessibility for all skill levels, embodying summer’s radiant energy. The term “uncovered” is used for base polishes to align with sensitivity guidelines.
Palm Tree Sunset Silhouettes
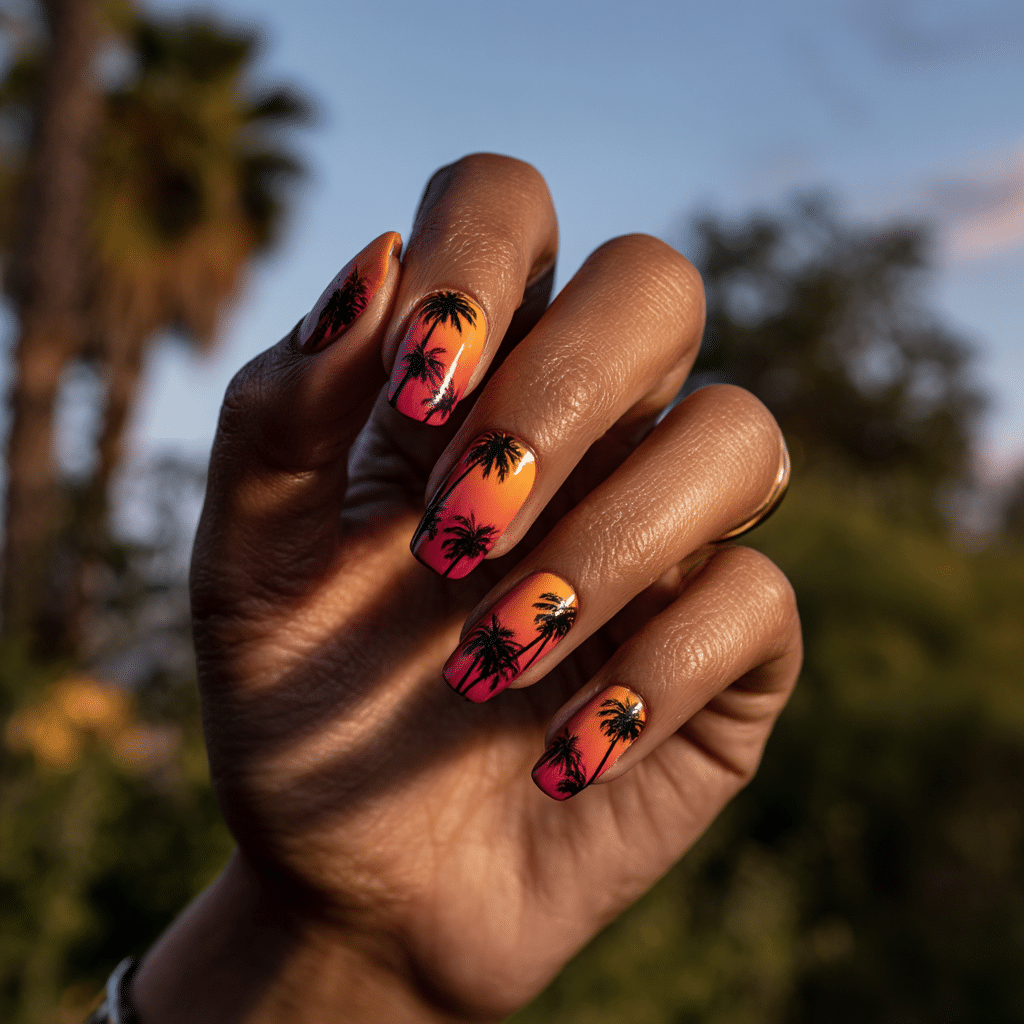
Palm Tree Sunset Silhouettes feature painted black palm trees over an orange-pink ombré, evoking golden hour on the beach. Perfect for sunset cruises or tropical parties, this vibrant manicure radiates summery warmth.
Tools Needed
- Orange, pink, and black nail polishes
- Makeup sponge
- Fine nail art brush
- Base coat and glossy top coat
- Acetone for cleanup
Step-by-Step Guide
- Apply a base coat and let dry.
- Dab orange and pink polish onto a sponge, blending slightly.
- Press sponge onto nails, creating a smooth ombré; let dry.
- Use a fine brush to paint black palm tree silhouettes on each nail.
- Clean excess polish with acetone.
- Seal with a glossy top coat.
Color Suggestions
- Golden Hour: Orange-pink ombré with black palms.
- Soft Pop: Peach-coral ombré with dark gray palms.
- Bold Contrast: Red-orange ombré with gold palms.
Tips for Success
- Use a sponge for seamless gradients.
- Practice palm tree shapes on paper.
- Apply thin polish layers for evenness.
- Use a glossy top coat for shine.
Creative Variations
- Add glitter to the ombré base.
- Paint palms on accent nails only.
- Use a matte top coat for contrast.
- Pair with a tiny sun decal.
This manicure pairs with vibrant dresses or gold jewelry, radiating tropical allure. Maintain by touching up silhouettes and refreshing the top coat. Palm Tree Sunset Silhouettes are a captivating vacation choice.
Pineapple Pattern Nails
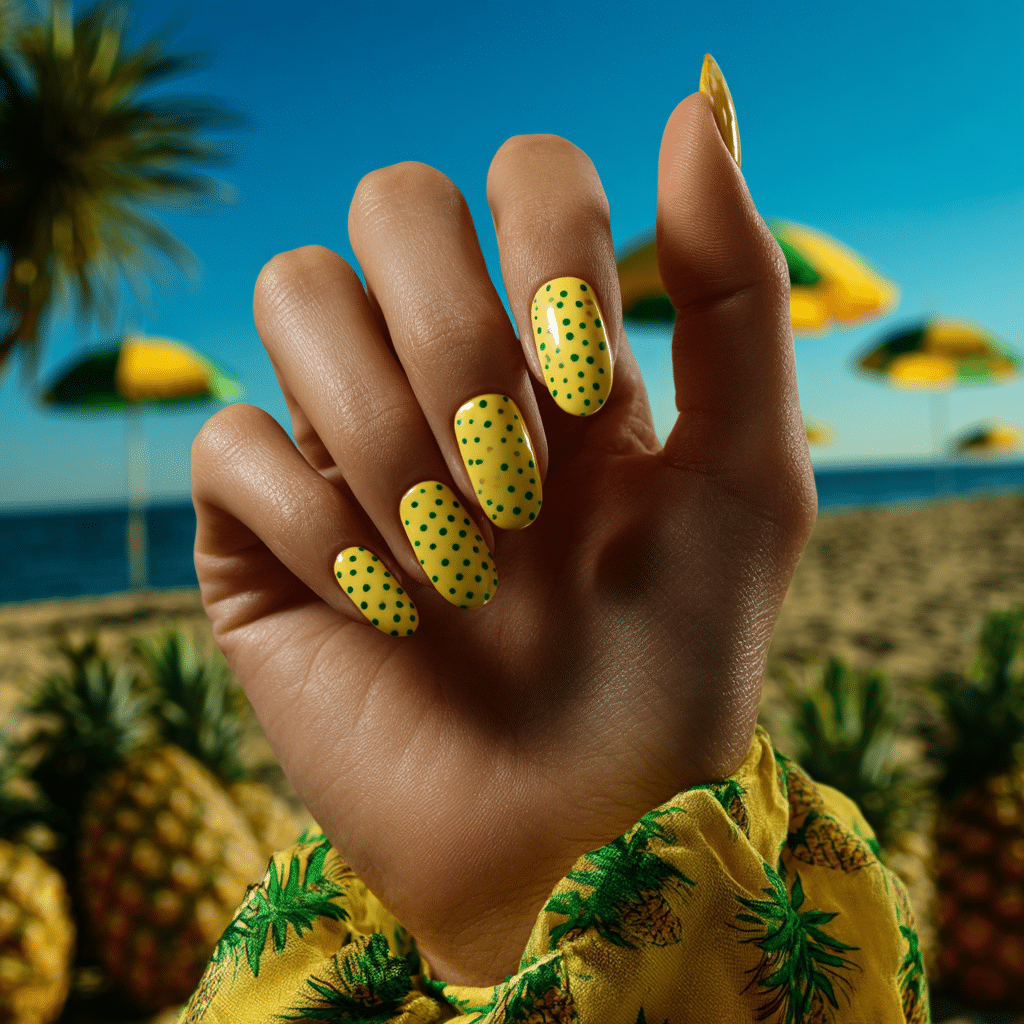
Pineapple Pattern Nails feature bright yellow nails dotted with cute green pineapple crowns, offering a playful, fruity look. Ideal for beach picnics or tropical markets, this cheerful manicure exudes summery fun.
Tools Needed
- Yellow and green nail polishes
- Fine nail art brush or dotting tool
- Base coat and glossy top coat
- Acetone for cleanup
Step-by-Step Guide
- Apply a base coat and let dry.
- Paint nails with yellow polish, using two coats; let dry.
- Use a fine brush or dotting tool to create green pineapple crowns on each nail.
- Add small lines for texture and realism.
- Clean excess polish with acetone.
- Seal with a glossy top coat.
Color Suggestions
- Fruity Pop: Bright yellow with green crowns.
- Soft Pop: Pastel yellow with mint crowns.
- Bold Contrast: Neon yellow with dark green crowns.
Tips for Success
- Practice crown shapes on paper.
- Use a fine brush for precision.
- Keep designs small for charm.
- Use a glossy top coat for vibrancy.
Creative Variations
- Add crowns to accent nails only.
- Use glitter polish for crowns.
- Create a gradient yellow base.
- Pair with a tiny pineapple decal.
This manicure pairs with colorful outfits or silver accessories, radiating summer zest. Maintain by touching up crowns and refreshing the top coat. Pineapple Pattern Nails are a delightful vacation choice.
Tropical Leaf Tips
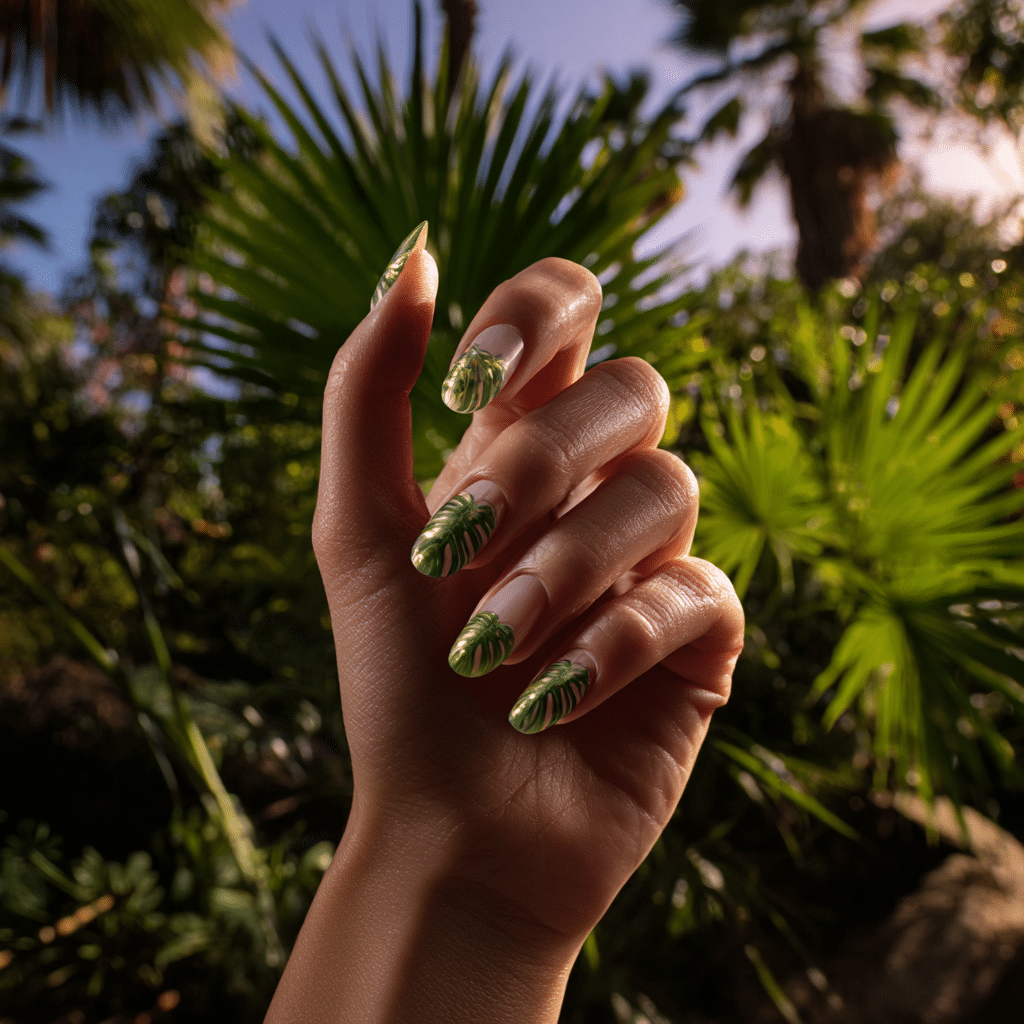
Tropical Leaf Tips feature clear or uncovered nails with lush green monstera leaves framing the tips, offering an earthy, tropical look. Perfect for jungle hikes or beach brunches, this artistic manicure exudes natural elegance.
Tools Needed
- Clear or uncovered nail polish
- Green nail polish
- Fine nail art brush
- Base coat and glossy top coat
- Acetone for cleanup
Step-by-Step Guide
- Apply a base coat and let dry.
- Paint nails with clear or uncovered polish, using two coats; let dry.
- Use a fine brush to paint green monstera leaves framing the nail tips.
- Add leaf details like splits for realism.
- Clean excess polish with acetone.
- Seal with a glossy top coat.
Color Suggestions
- Jungle Charm: Clear with green leaf tips.
- Soft Pop: Uncovered with mint leaf tips.
- Bold Contrast: Clear with neon green leaf tips.
Tips for Success
- Practice leaf shapes on paper.
- Use a fine brush for precision.
- Keep leaves delicate for elegance.
- Use a glossy top coat for shine.
Creative Variations
- Add leaves to accent nails only.
- Use glitter polish for leaves.
- Create a gradient clear base.
- Pair with a tiny flower decal.
This manicure pairs with neutral outfits or gold jewelry, radiating tropical sophistication. Maintain by touching up leaves and refreshing the top coat. Tropical Leaf Tips are a refined vacation choice.
Coral Hibiscus Blooms
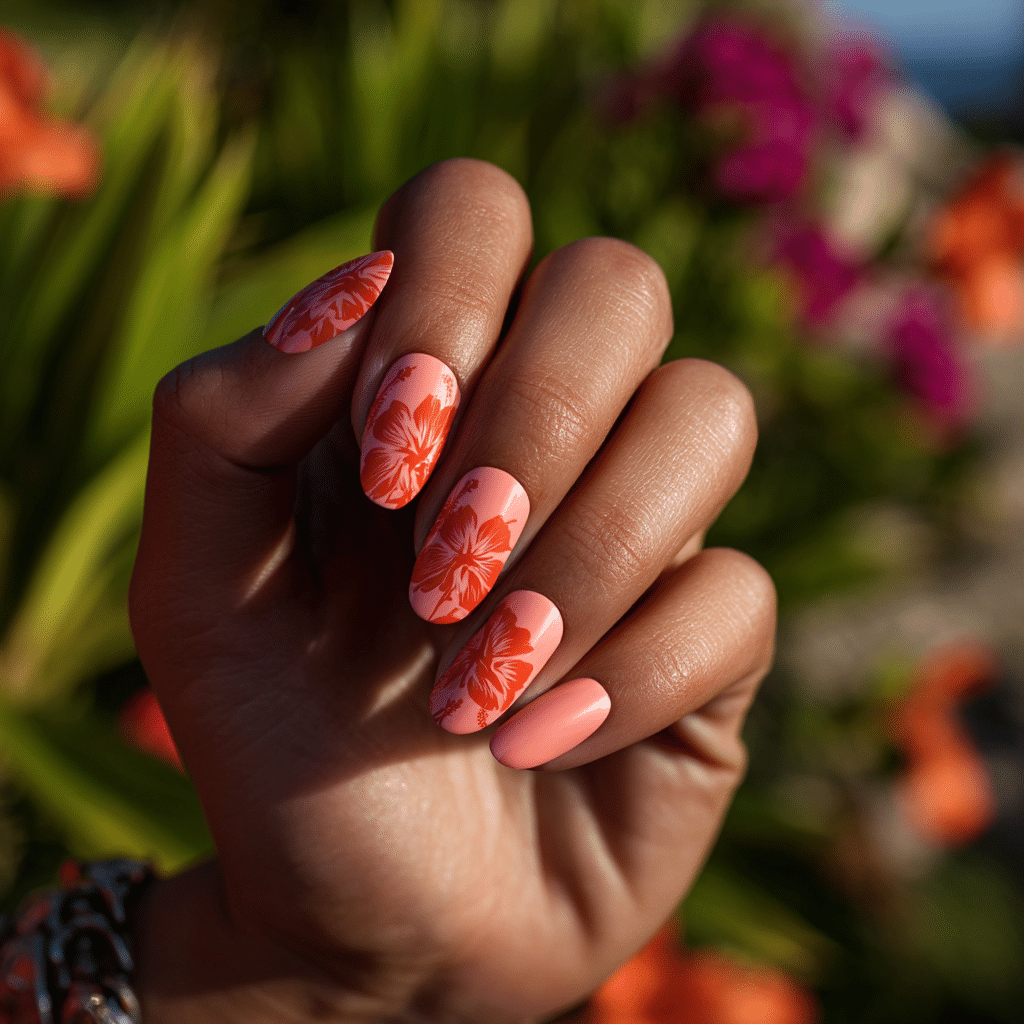
Coral Hibiscus Blooms feature hand-drawn hibiscus flowers in coral red over a soft peach base, offering a vibrant, floral look. Perfect for beach weddings or tropical festivals, this romantic manicure radiates summery charm.
Tools Needed
- Peach and coral red nail polishes
- Yellow and green nail polishes
- Fine nail art brush
- Base coat and glossy top coat
- Acetone for cleanup
Step-by-Step Guide
- Apply a base coat and let dry.
- Paint nails with peach polish, using two coats; let dry.
- Use a fine brush to paint coral red hibiscus flowers on each nail.
- Add yellow centers and green leaves for detail.
- Clean excess polish with acetone.
- Seal with a glossy top coat.
Color Suggestions
- Floral Glow: Peach with coral hibiscus.
- Soft Pop: Blush with pink hibiscus.
- Bold Contrast: Peach with red hibiscus.
Tips for Success
- Practice flower shapes on paper.
- Use a fine brush for precision.
- Keep flowers balanced for beauty.
- Use a glossy top coat for shine.
Creative Variations
- Add flowers to accent nails only.
- Use glitter polish for flower centers.
- Create a gradient peach base.
- Pair with a tiny leaf decal.
This manicure pairs with floral dresses or gold jewelry, radiating tropical romance. Maintain by touching up flowers and refreshing the top coat. Coral Hibiscus Blooms are a dreamy vacation choice.
Coconut Cream White Gloss
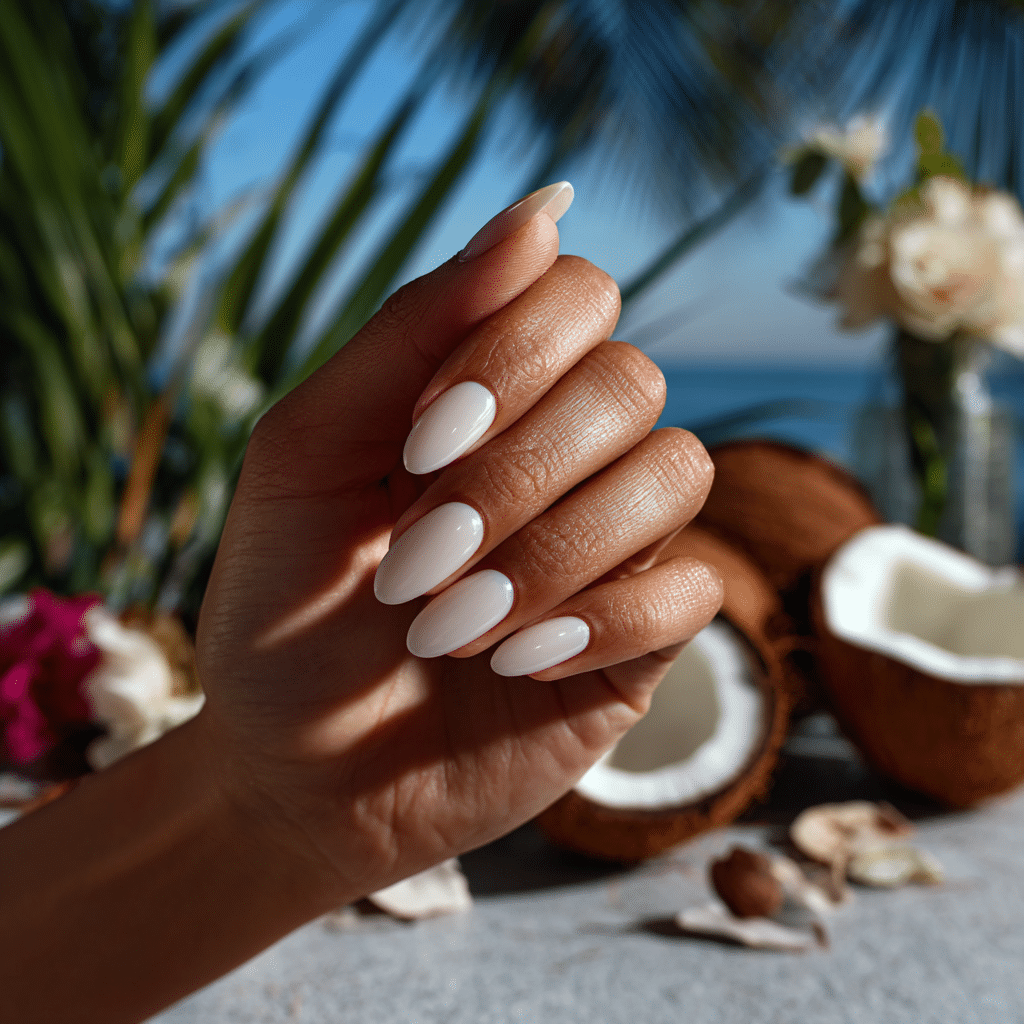
Coconut Cream White Gloss features smooth, semi-translucent white polish with high shine, offering a beachy minimalist vibe. Perfect for beach dinners or island retreats, this sleek manicure exudes understated elegance.
Tools Needed
- Semi-translucent white nail polish
- Base coat and glossy top coat
- Nail file
- Acetone for cleanup
Step-by-Step Guide
- File nails to desired shape; apply a base coat and let dry.
- Paint nails with semi-translucent white polish, using two coats; let dry.
- Apply a second layer if needed for opacity.
- Check for even, glossy coverage.
- Clean excess polish with acetone.
- Seal with a glossy top coat.
Color Suggestions
- Beachy Chic: Semi-translucent white gloss.
- Soft Pop: Ivory white gloss.
- Bold Shine: Pearl white gloss.
Tips for Success
- Apply thin polish layers for translucency.
- Use a glossy top coat for vibrancy.
- Clean cuticles for a polished look.
- File nails evenly for uniformity.
Creative Variations
- Add a matte top coat for contrast.
- Apply silver glitter to accent nails.
- Create a white French tip.
- Pair with a single shell decal.
This manicure pairs with neutral outfits or silver jewelry, radiating summery sophistication. Maintain by refreshing the top coat. Coconut Cream White Gloss is a timeless vacation choice.
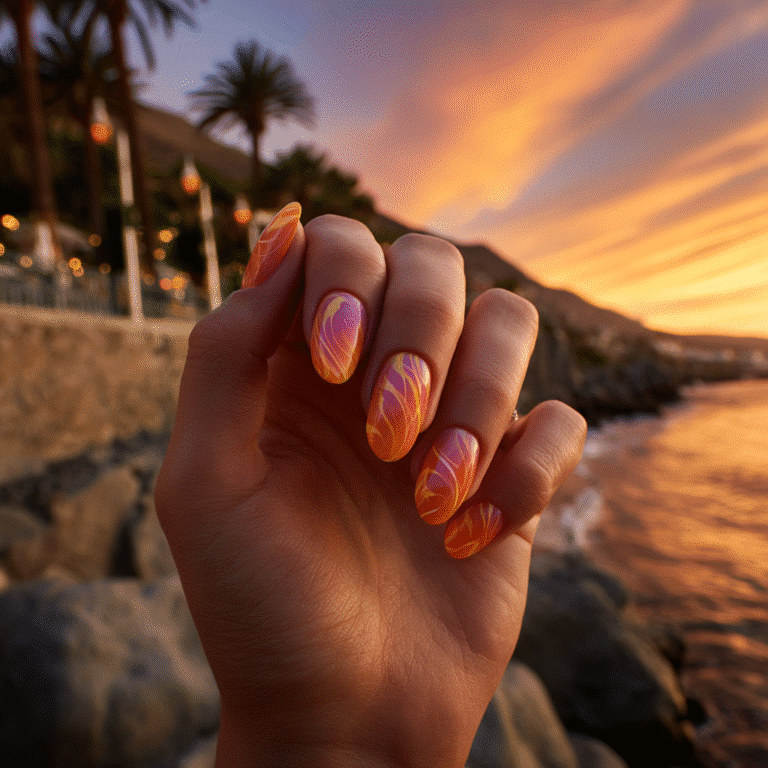
Mango Ombre Fade
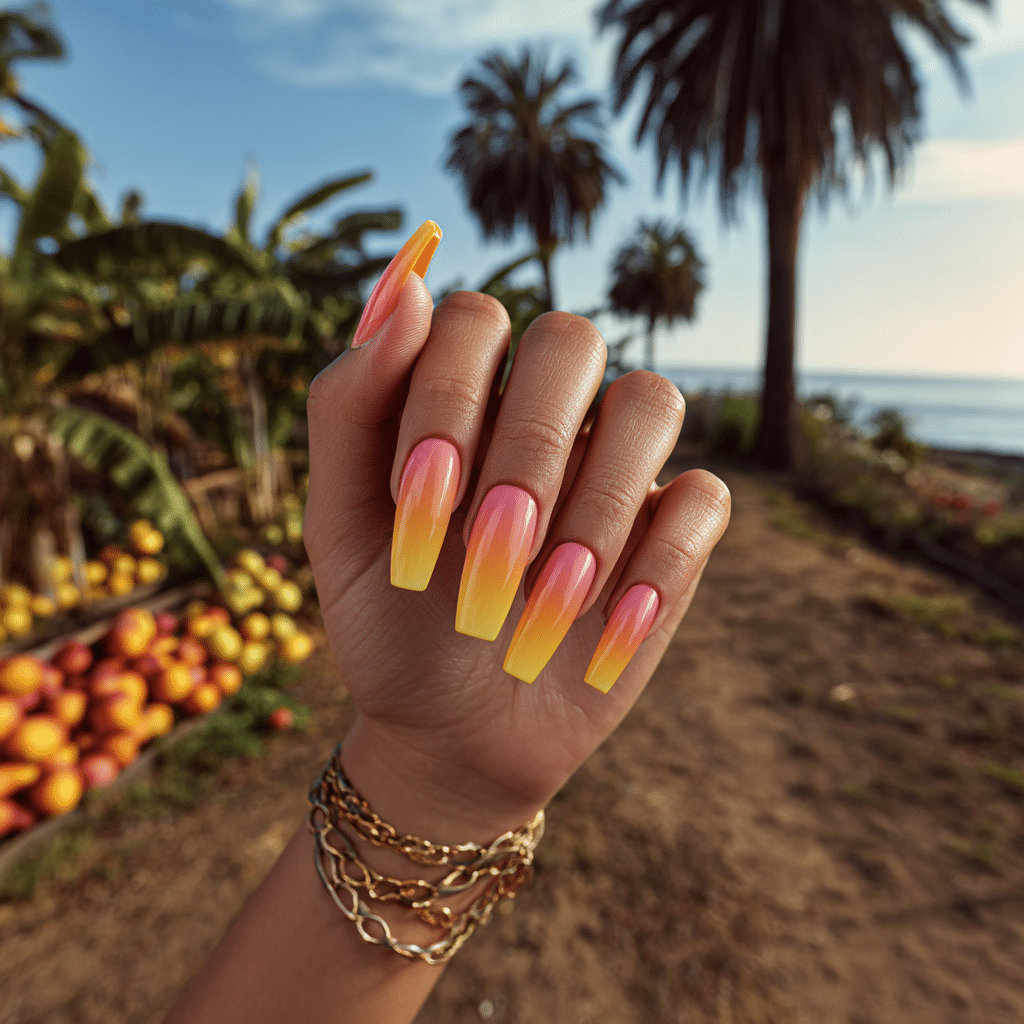
Mango Ombre Fade features a warm gradient of yellow-orange-pink, mimicking a tropical sunrise. Perfect for beach mornings or tropical brunches, this radiant manicure exudes summery vibrancy.
Tools Needed
- Yellow, orange, and pink nail polishes
- Makeup sponge
- Base coat and glossy top coat
- Acetone for cleanup
Step-by-Step Guide
- Apply a base coat and let dry.
- Paint nails with a clear base; let dry.
- Dab yellow, orange, and pink polish onto a sponge, blending slightly.
- Press sponge onto nails, creating a smooth gradient.
- Repeat for a seamless ombré effect; let dry.
- Clean excess polish with acetone.
- Seal with a glossy top coat.
Color Suggestions
- Sunrise Glow: Yellow-orange-pink ombré.
- Soft Pop: Lemon-peach-blush ombré.
- Bold Blend: Neon yellow-coral-red ombré.
Tips for Success
- Use a sponge for smooth blending.
- Apply thin layers to avoid clumps.
- Practice gradient on paper.
- Use a glossy top coat for shine.
Creative Variations
- Add glitter in the ombré.
- Use a matte top coat for contrast.
- Create a vertical ombré.
- Pair with a tiny sun decal.
This manicure pairs with colorful dresses or gold jewelry, radiating tropical energy. Maintain by reapplying the top coat. Mango Ombre Fade is a vibrant vacation choice.
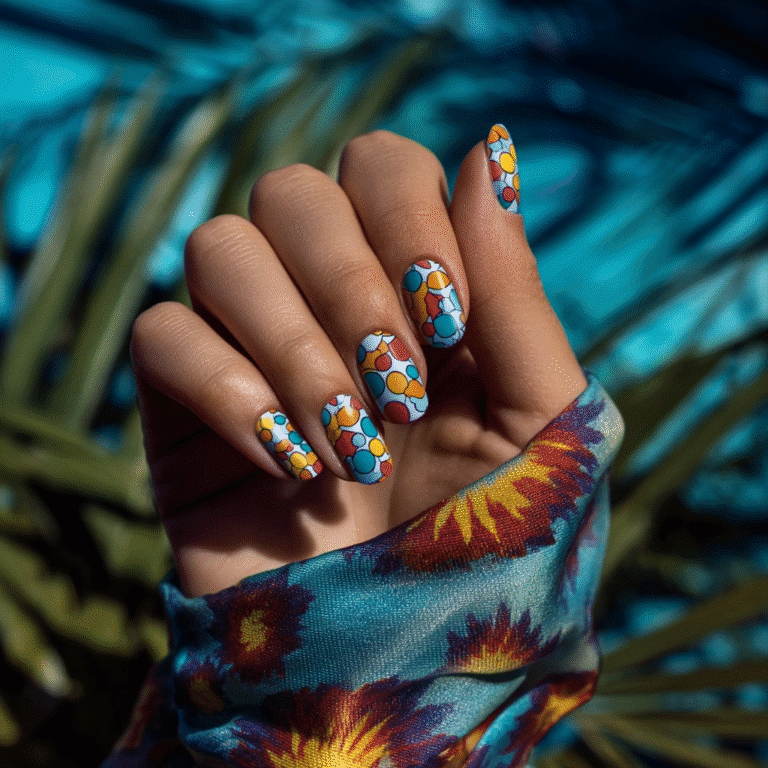
Tropical Fruit Confetti
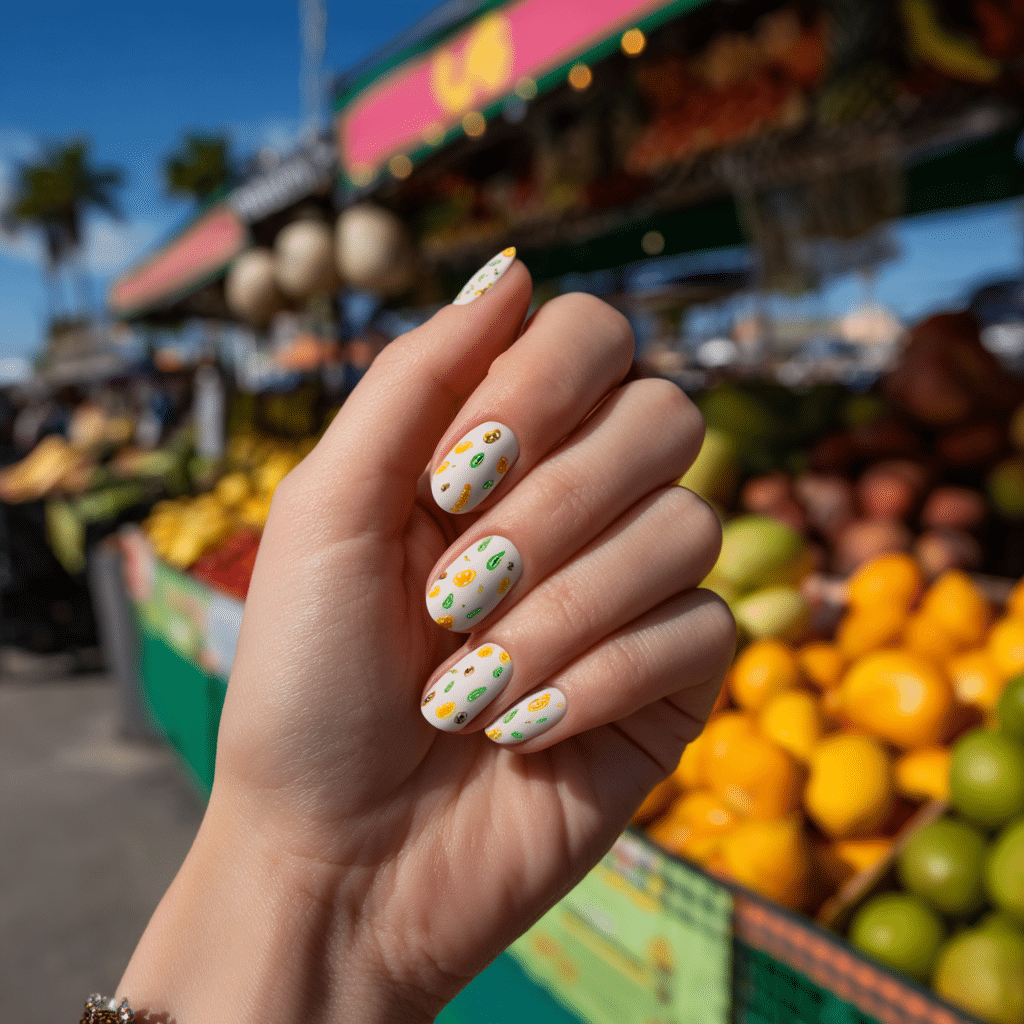
Tropical Fruit Confetti features tiny decals of kiwi, papaya, and passionfruit scattered on a pale base, offering a playful, summery look. Perfect for beach festivals or tropical markets, this whimsical manicure radiates fun.
Tools Needed
- Pale nail polish
- Fruit decals (kiwi, papaya, passionfruit)
- Tweezers
- Base coat and glossy top coat
- Acetone for cleanup
Step-by-Step Guide
- Apply a base coat and let dry.
- Paint nails with pale polish, using two coats; let dry.
- Use tweezers to place tiny fruit decals randomly on nails.
- Press gently to secure decals.
- Clean excess polish with acetone.
- Seal with a glossy top coat.
Color Suggestions
- Fruity Fun: Pale pink with fruit decals.
- Soft Pop: Pale peach with fruit decals.
- Bold Contrast: Pale yellow with fruit decals.
Tips for Success
- Use tweezers for precise decal placement.
- Keep decals sparse for whimsy.
- Practice layout on paper.
- Use a glossy top coat for shine.
Creative Variations
- Add decals to accent nails only.
- Use glitter polish as a base.
- Create a gradient pale base.
- Pair with a single fruit decal.
This manicure pairs with bright outfits or silver accessories, radiating summer zest. Maintain by checking decal adhesion and refreshing the top coat. Tropical Fruit Confetti is a lively vacation choice.
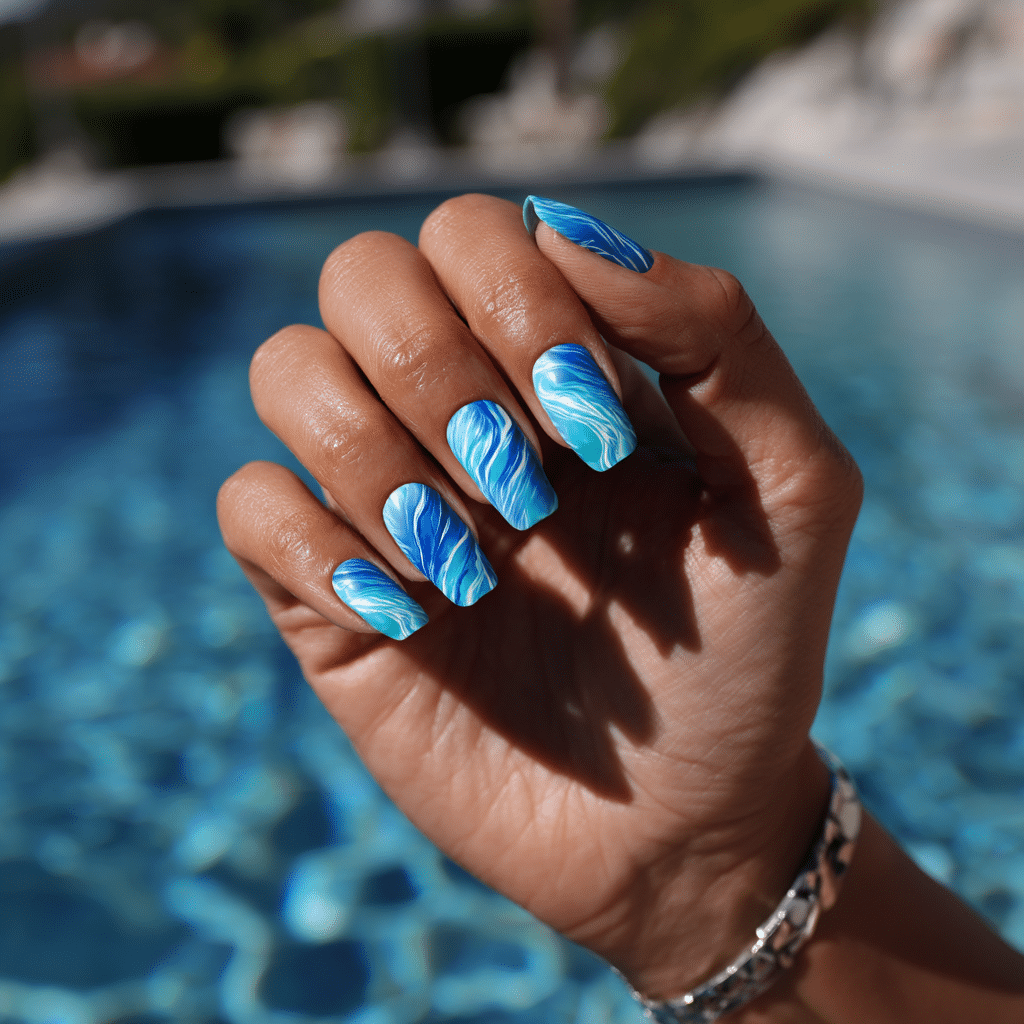
Blue Ocean Wave Nails
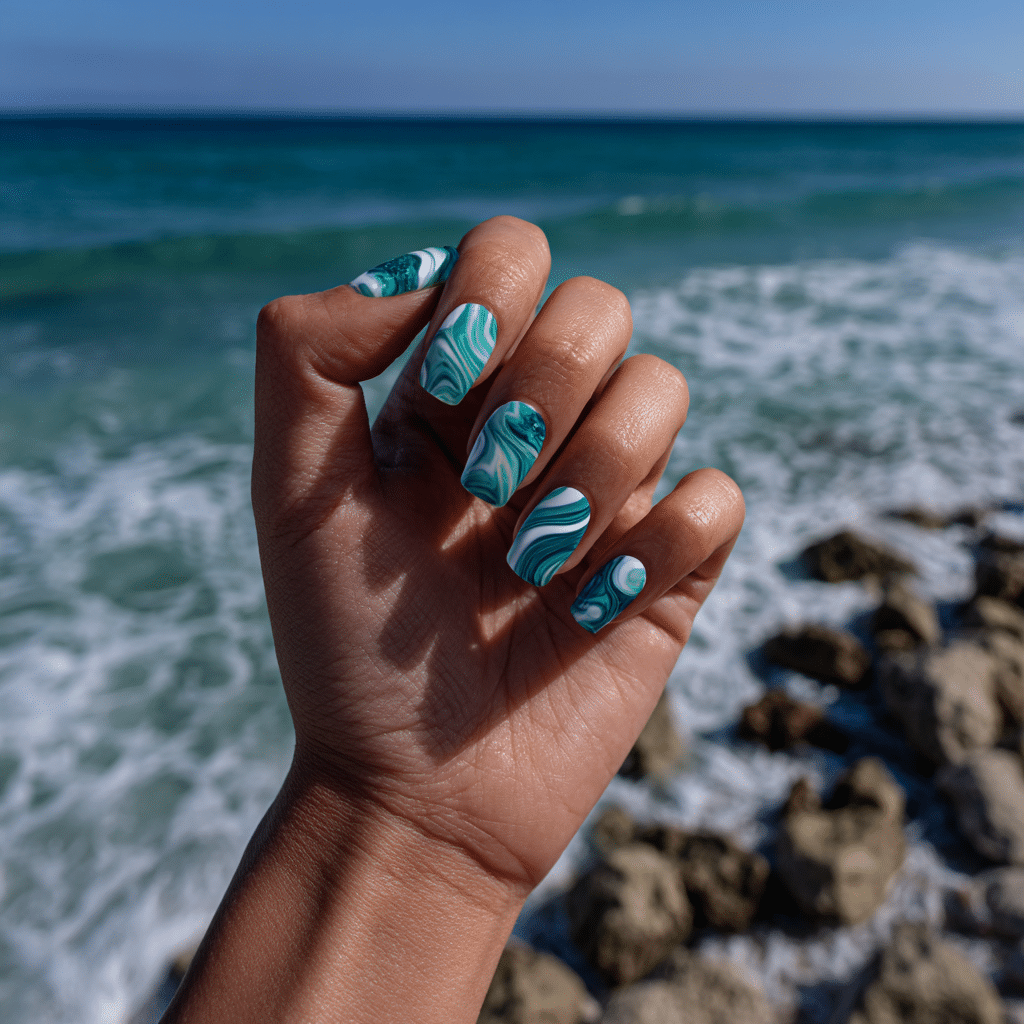
Blue Ocean Wave Nails feature swirling layers of teal, white, and aqua resembling seafoam, offering a dynamic, coastal look. Perfect for beach swims or tropical adventures, this artistic manicure radiates aquatic beauty.
Tools Needed
- Teal, white, and aqua nail polishes
- Fine nail art brush
- Base coat and glossy top coat
- Acetone for cleanup
Step-by-Step Guide
- Apply a base coat and let dry.
- Paint nails with a clear base; let dry.
- Use a fine brush to paint swirling teal, white, and aqua waves on each nail.
- Create overlapping, wavy patterns for a seafoam effect.
- Clean excess polish with acetone.
- Seal with a glossy top coat.
Color Suggestions
- Seafoam Swirl: Teal-white-aqua waves.
- Soft Pop: Mint-ivory-turquoise waves.
- Bold Contrast: Navy-white-teal waves.
Tips for Success
- Practice wave patterns on paper.
- Use a fine brush for precision.
- Keep swirls dynamic for artistry.
- Use a glossy top coat for shine.
Creative Variations
- Add waves to accent nails only.
- Use glitter polish for waves.
- Create a gradient blue base.
- Pair with a tiny bubble decal.
This manicure pairs with swimwear or silver accessories, radiating coastal allure. Maintain by touching up waves and refreshing the top coat. Blue Ocean Wave Nails are a captivating vacation choice.
Flamingo Accents on Pink Polish
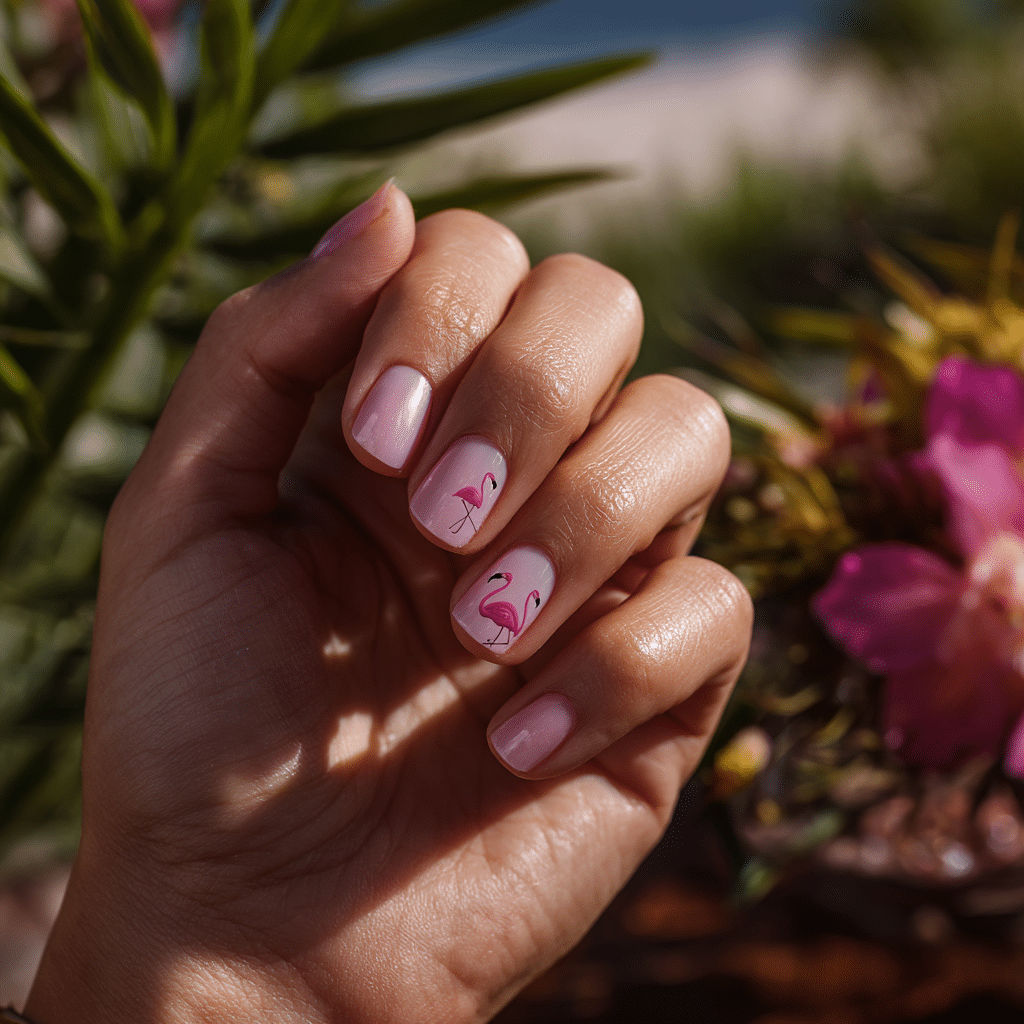
Flamingo Accents on Pink Polish feature light pink polish with delicate flamingo icons on a feature nail, offering a subtle, playful look. Perfect for beach strolls or tropical brunches, this charming manicure exudes summery elegance.
Tools Needed
- Light pink nail polish
- Pink and black nail polishes
- Fine nail art brush
- Base coat and glossy top coat
- Acetone for cleanup
Step-by-Step Guide
- Apply a base coat and let dry.
- Paint nails with light pink polish, using two coats; let dry.
- Use a fine brush to paint a pink flamingo with black details on one accent nail.
- Keep the flamingo small and centered.
- Clean excess polish with acetone.
- Seal with a glossy top coat.
Color Suggestions
- Playful Charm: Light pink with pink flamingo.
- Soft Pop: Blush with coral flamingo.
- Bold Contrast: Light pink with neon pink flamingo.
Tips for Success
- Practice flamingo shapes on paper.
- Use a fine brush for precision.
- Keep the design minimal for elegance.
- Use a glossy top coat for shine.
Creative Variations
- Add flamingos to two accent nails.
- Use glitter polish for the flamingo.
- Create a gradient pink base.
- Pair with a tiny palm decal.
This manicure pairs with pastel outfits or gold jewelry, radiating tropical sophistication. Maintain by touching up the flamingo and refreshing the top coat. Flamingo Accents on Pink Polish are a serene vacation choice.
Seashell Pearl Chrome

Seashell Pearl Chrome features shiny opal-toned polish with a pearlescent seashell feel, offering a glamorous, coastal look. Perfect for beach weddings or tropical galas, this radiant manicure exudes ethereal beauty.
Tools Needed
- Opal chrome nail polish
- Base coat and glossy top coat
- Nail file
- Acetone for cleanup
Step-by-Step Guide
- File nails to desired shape; apply a base coat and let dry.
- Paint nails with opal chrome polish, using two coats; let dry.
- Apply a second layer for full pearlescent effect.
- Check for even, shimmering finish.
- Clean excess polish with acetone.
- Seal with a glossy top coat.
Color Suggestions
- Shell Shine: Opal chrome.
- Soft Pop: Pearl white chrome.
- Bold Glow: Iridescent silver chrome.
Tips for Success
- Apply thin polish layers for smoothness.
- Use a glossy top coat for vibrancy.
- Clean cuticles for a polished look.
- Use a quick-dry top coat.
Creative Variations
- Add a matte top coat for contrast.
- Apply glitter to accent nails.
- Create a chrome French tip.
- Pair with a single pearl decal.
This manicure pairs with evening dresses or silver jewelry, radiating coastal allure. Maintain by refreshing the top coat. Seashell Pearl Chrome is a dreamy vacation choice.
Rainforest Green Matte
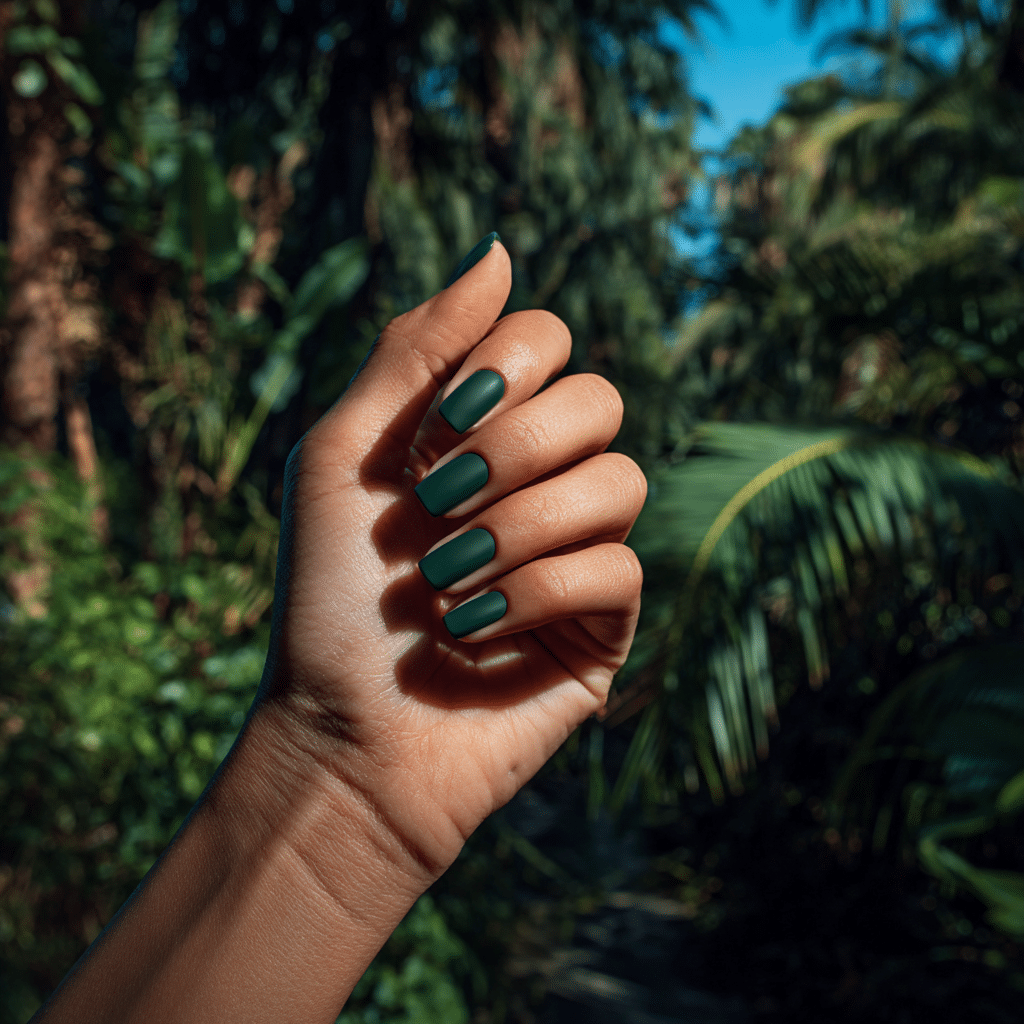
Rainforest Green Matte features deep jungle green polish with a silky matte finish, offering a bold, earthy look. Perfect for jungle treks or tropical retreats, this striking manicure exudes natural intensity.
Tools Needed
- Jungle green nail polish
- Matte top coat
- Base coat
- Nail file
- Acetone for cleanup
Step-by-Step Guide
- File nails to desired shape; apply a base coat and let dry.
- Paint nails with jungle green polish, using two coats; let dry.
- Apply a matte top coat evenly across all nails.
- Check for smooth, non-glossy finish.
- Clean excess polish with acetone.
- Let dry to preserve matte effect.
Color Suggestions
- Jungle Depth: Deep green matte.
- Soft Pop: Olive green matte.
- Bold Contrast: Emerald green matte.
Tips for Success
- Apply thin polish layers for evenness.
- Use a matte top coat evenly.
- Clean cuticles for a polished look.
- File nails evenly for uniformity.
Creative Variations
- Add a glossy top coat to one nail.
- Apply gold glitter to accent nails.
- Create a green French tip.
- Pair with a tiny leaf decal.
This manicure pairs with neutral outfits or gold jewelry, radiating tropical strength. Maintain by refreshing the matte top coat. Rainforest Green Matte is a bold vacation choice.
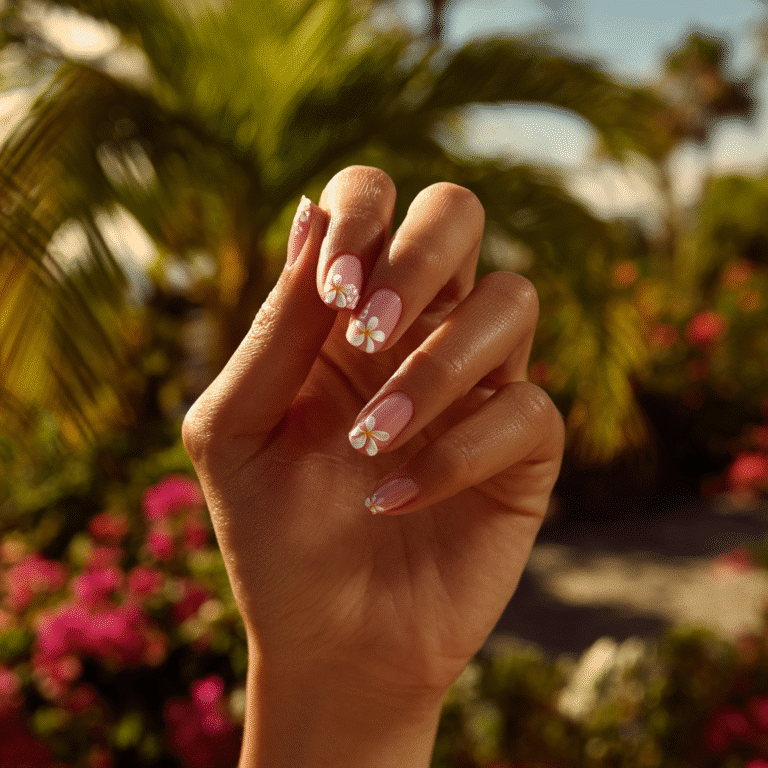
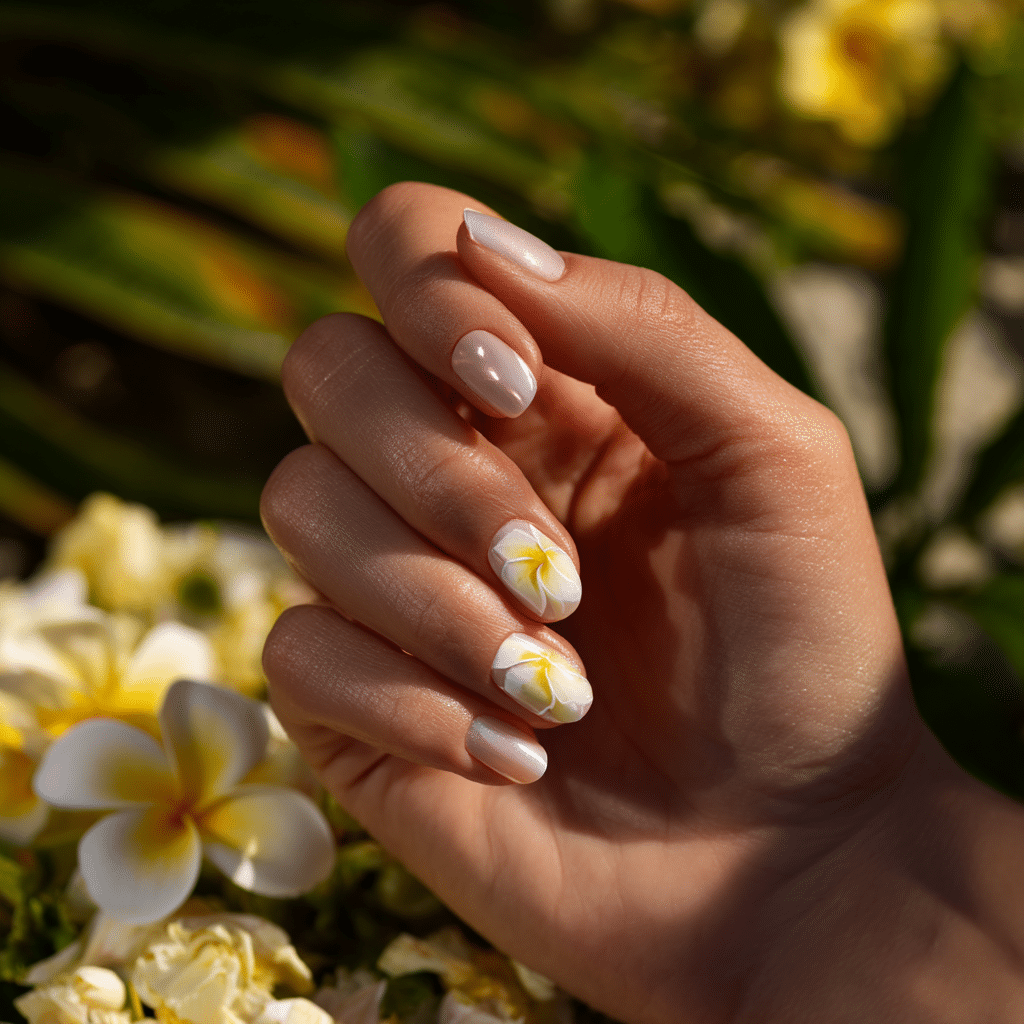
Plumeria Nail Art
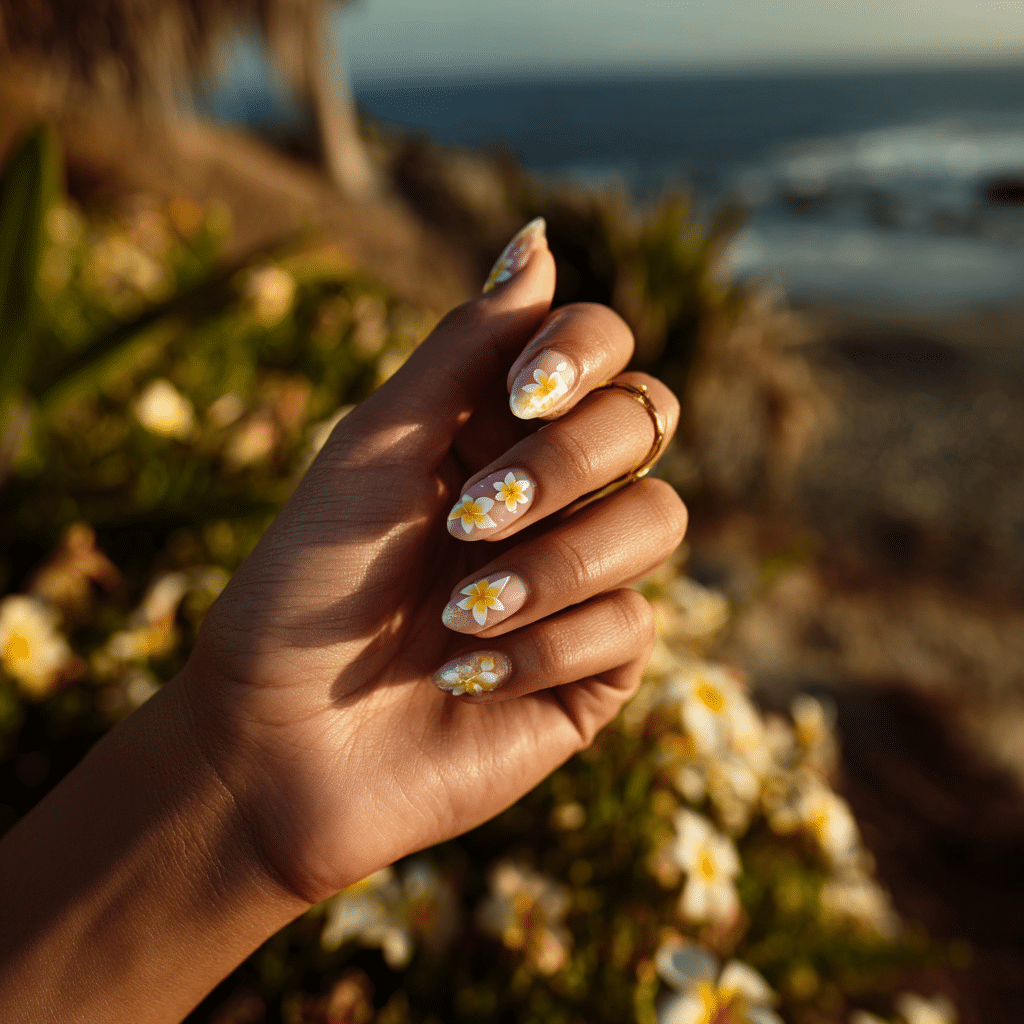
Plumeria Nail Art features white and yellow plumeria flowers painted delicately over uncovered nails, offering a romantic, floral look. Perfect for beach weddings or tropical evenings, this delicate manicure radiates summery charm.
Tools Needed
- Uncovered nail polish
- White, yellow, and green nail polishes
- Fine nail art brush
- Base coat and glossy top coat
- Acetone for cleanup
Step-by-Step Guide
- Apply a base coat and let dry.
- Paint nails with uncovered polish, using two coats; let dry.
- Use a fine brush to paint white plumeria flowers with yellow centers on each nail.
- Add green leaves for detail.
- Clean excess polish with acetone.
- Seal with a glossy top coat.
Color Suggestions
- Floral Elegance: Uncovered with white-yellow plumeria.
- Soft Pop: Sheer pink with ivory-yellow plumeria.
- Bold Contrast: Uncovered with neon yellow plumeria.
Tips for Success
- Practice flower shapes on paper.
- Use a fine brush for precision.
- Keep flowers delicate for beauty.
- Use a glossy top coat for shine.
Creative Variations
- Add flowers to accent nails only.
- Use glitter polish for flower centers.
- Create a gradient uncovered base.
- Pair with a tiny leaf decal.
This manicure pairs with floral dresses or silver jewelry, radiating tropical romance. Maintain by touching up flowers and refreshing the top coat. Plumeria Nail Art is a dreamy vacation choice.
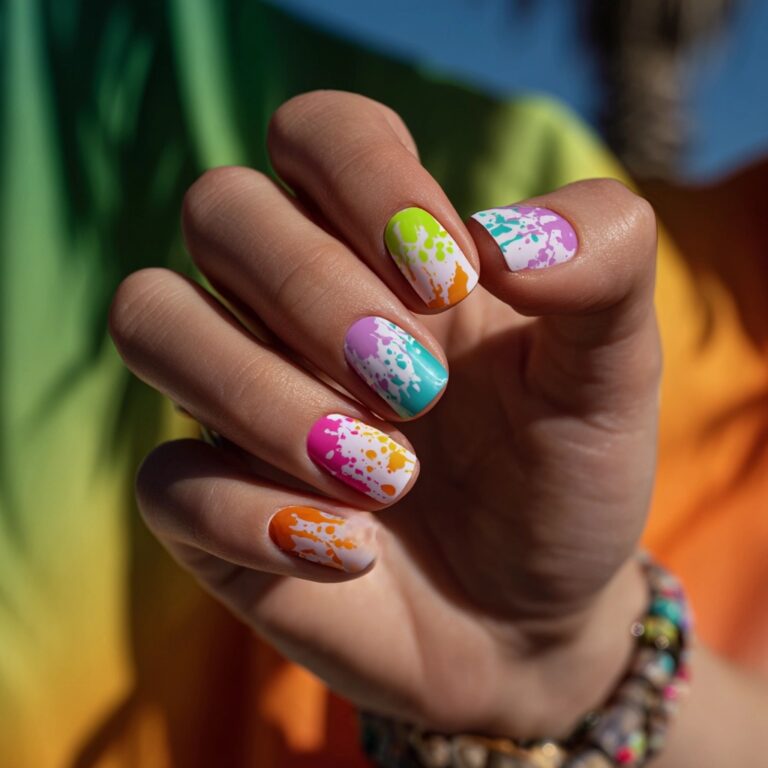
Dragon Fruit Nails
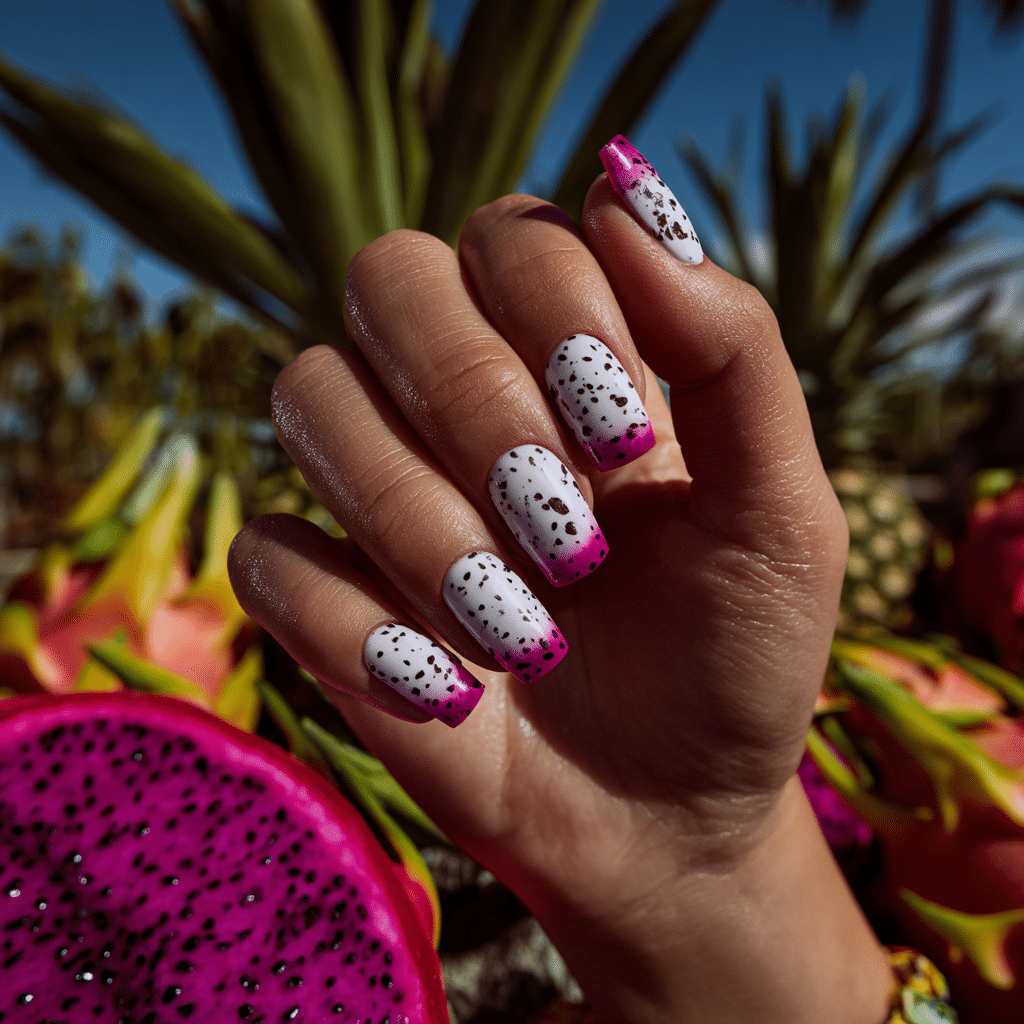
Dragon Fruit Nails feature white polish with black speckles and hot pink tips, mimicking tropical fruit. Perfect for beach parties or tropical festivals, this bold manicure radiates playful energy.
Tools Needed
- White, black, and hot pink nail polishes
- Dotting tool or fine nail art brush
- Base coat and glossy top coat
- Acetone for cleanup
Step-by-Step Guide
- Apply a base coat and let dry.
- Paint nails with white polish, using two coats; let dry.
- Use a dotting tool or fine brush to create black speckles on each nail.
- Paint hot pink tips using a fine brush.
- Clean excess polish with acetone.
- Seal with a glossy top coat.
Color Suggestions
- Fruity Pop: White with black speckles and pink tips.
- Soft Pop: Ivory with gray speckles and coral tips.
- Bold Contrast: White with black speckles and neon pink tips.
Tips for Success
- Practice speckle patterns on paper.
- Use a dotting tool for even speckles.
- Keep tips clean for contrast.
- Use a glossy top coat for shine.
Creative Variations
- Add speckles to accent nails only.
- Use glitter polish for tips.
- Create a gradient white base.
- Pair with a tiny fruit decal.
This manicure pairs with vibrant outfits or silver accessories, radiating summer fun. Maintain by touching up speckles and refreshing the top coat. Dragon Fruit Nails are a lively vacation choice.
Tiki Pattern Accent Nails
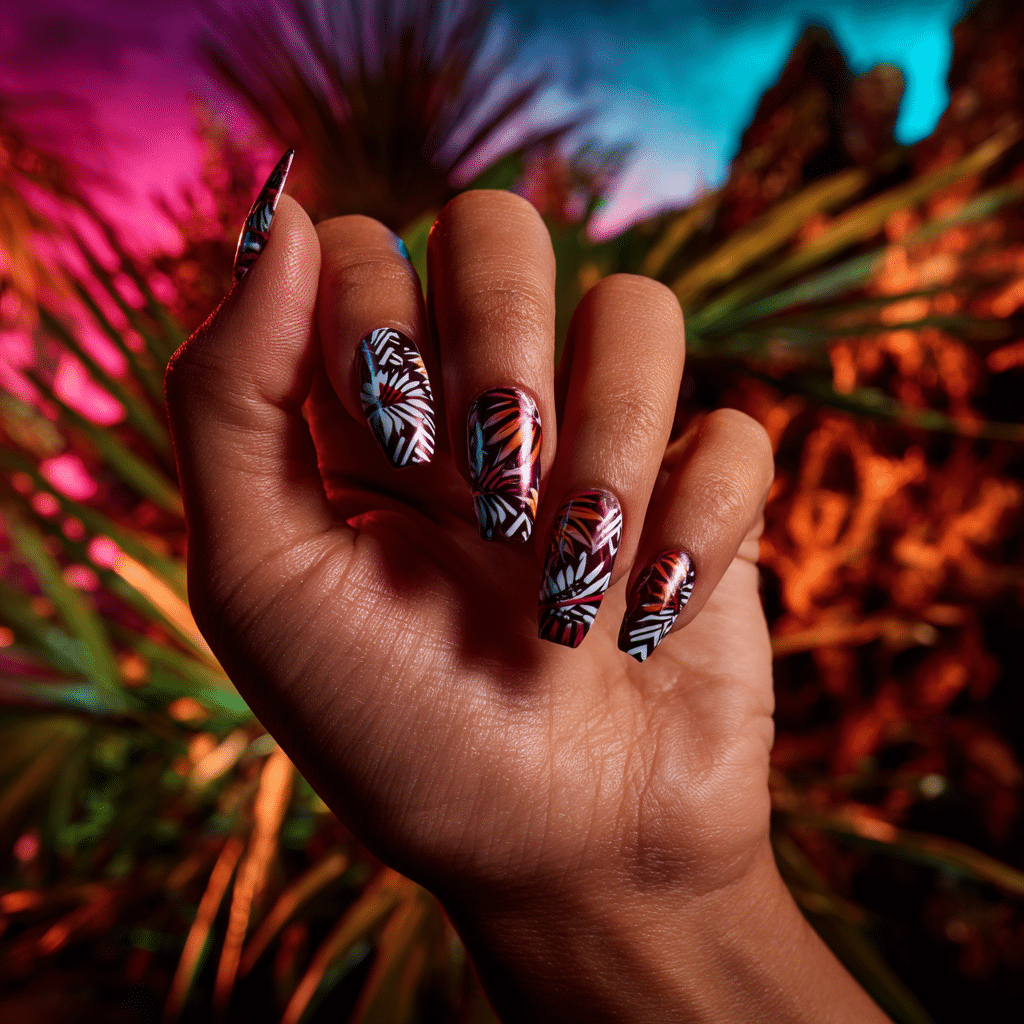
Tiki Pattern Accent Nails feature graphic tribal or tiki prints on one or two nails, offering cultural flair. Perfect for beach luaus or tropical festivals, this artistic manicure exudes bold tradition.
Tools Needed
- Uncovered nail polish
- Black, white, and red nail polishes
- Fine nail art brush
- Base coat and glossy top coat
- Acetone for cleanup
Step-by-Step Guide
- Apply a base coat and let dry.
- Paint nails with uncovered polish, using two coats; let dry.
- Use a fine brush to paint tiki patterns (e.g., tribal lines or masks) in black, white, or red on accent nails.
- Keep patterns intricate yet clear.
- Clean excess polish with acetone.
- Seal with a glossy top coat.
Color Suggestions
- Cultural Flair: Uncovered with black tiki patterns.
- Soft Pop: Sheer pink with white tiki patterns.
- Bold Contrast: Uncovered with red tiki patterns.
Tips for Success
- Practice tiki designs on paper.
- Use a fine brush for precision.
- Keep patterns bold for impact.
- Use a glossy top coat for shine.
Creative Variations
- Add patterns to all nails.
- Use glitter polish for patterns.
- Create a gradient uncovered base.
- Pair with a tiny torch decal.
This manicure pairs with tropical outfits or gold jewelry, radiating cultural vibrancy. Maintain by touching up patterns and refreshing the top coat. Tiki Pattern Accent Nails are a striking vacation choice.
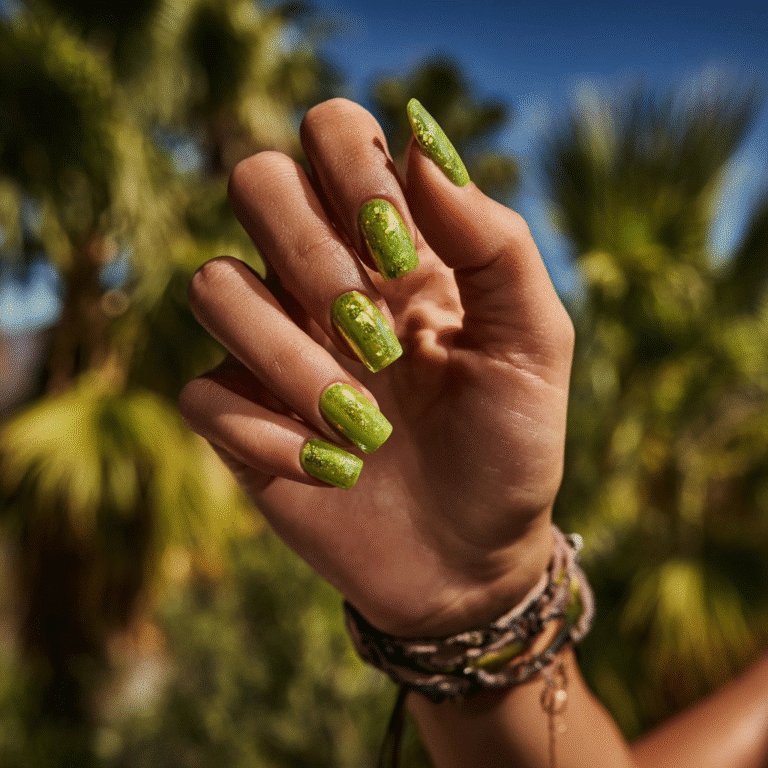
Aloe Green Gloss
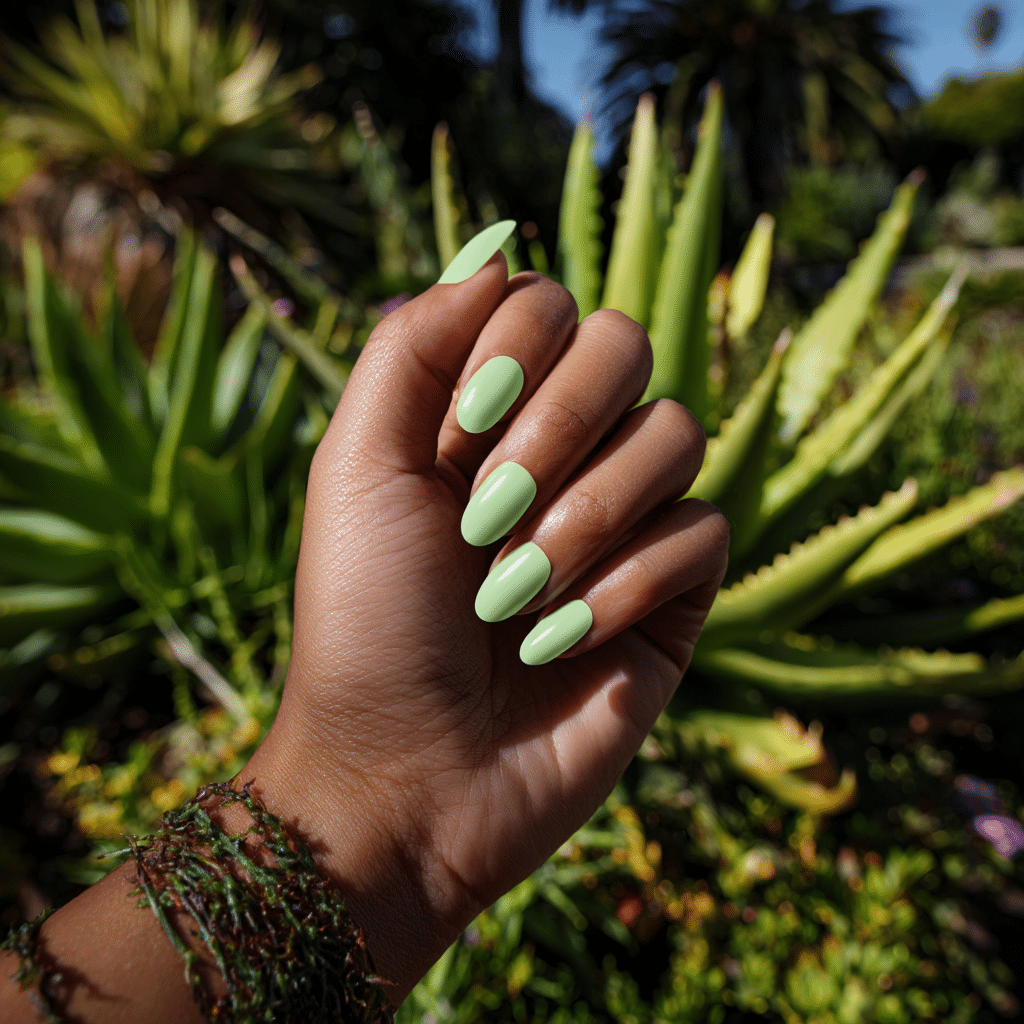
Aloe Green Gloss features soft, natural green polish inspired by tropical flora, offering a fresh, summery look. Perfect for beach picnics or tropical retreats, this serene manicure exudes earthy elegance.
Tools Needed
- Aloe green nail polish
- Base coat and glossy top coat
- Nail file
- Acetone for cleanup
Step-by-Step Guide
- File nails to desired shape; apply a base coat and let dry.
- Paint nails with aloe green polish, using two coats; let dry.
- Apply a second layer if needed for opacity.
- Check for even, glossy coverage.
- Clean excess polish with acetone.
- Seal with a glossy top coat.
Color Suggestions
- Flora Glow: Aloe green gloss.
- Soft Pop: Mint green gloss.
- Bold Shine: Lime green gloss.
Tips for Success
- Apply thin polish layers for smoothness.
- Use a glossy top coat for vibrancy.
- Clean cuticles for a polished look.
- File nails evenly for uniformity.
Creative Variations
- Add a matte top coat for contrast.
- Apply silver glitter to accent nails.
- Create a green French tip.
- Pair with a tiny leaf decal.
This manicure pairs with neutral outfits or silver jewelry, radiating summery elegance. Maintain by refreshing the top coat. Aloe Green Gloss is a refined vacation choice.
Bold Coral Short Nails
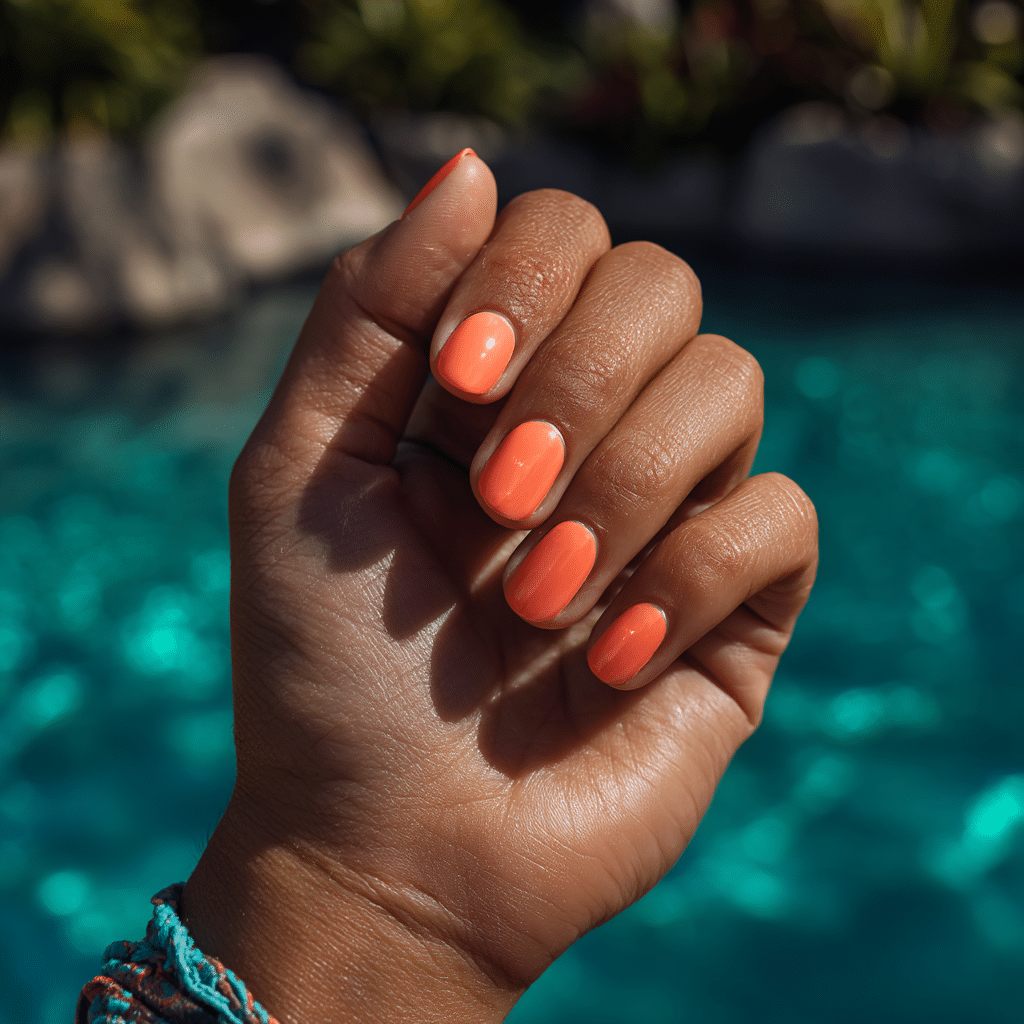
Bold Coral Short Nails feature striking coral polish for a punch of color, perfect for poolside glamour. Ideal for beach parties or tropical outings, this vibrant manicure radiates summery energy.
Tools Needed
- Coral nail polish
- Base coat and glossy top coat
- Nail file
- Acetone for cleanup
Step-by-Step Guide
- File nails to short, rounded shape; apply a base coat and let dry.
- Paint nails with coral polish, using two coats; let dry.
- Apply a second layer if needed for vibrancy.
- Check for even, bold coverage.
- Clean excess polish with acetone.
- Seal with a glossy top coat.
Color Suggestions
- Vibrant Pop: Coral gloss.
- Soft Pop: Peach coral gloss.
- Bold Shine: Neon coral gloss.
Tips for Success
- Apply thin polish layers for smoothness.
- Use a glossy top coat for vibrancy.
- Clean cuticles for a polished look.
- Keep nails short for impact.
Creative Variations
- Add a matte top coat for contrast.
- Apply gold glitter to accent nails.
- Create a coral French tip.
- Pair with a single rhinestone.
This manicure pairs with bold outfits or gold jewelry, radiating summer glamour. Maintain by refreshing the top coat. Bold Coral Short Nails are a striking vacation choice.
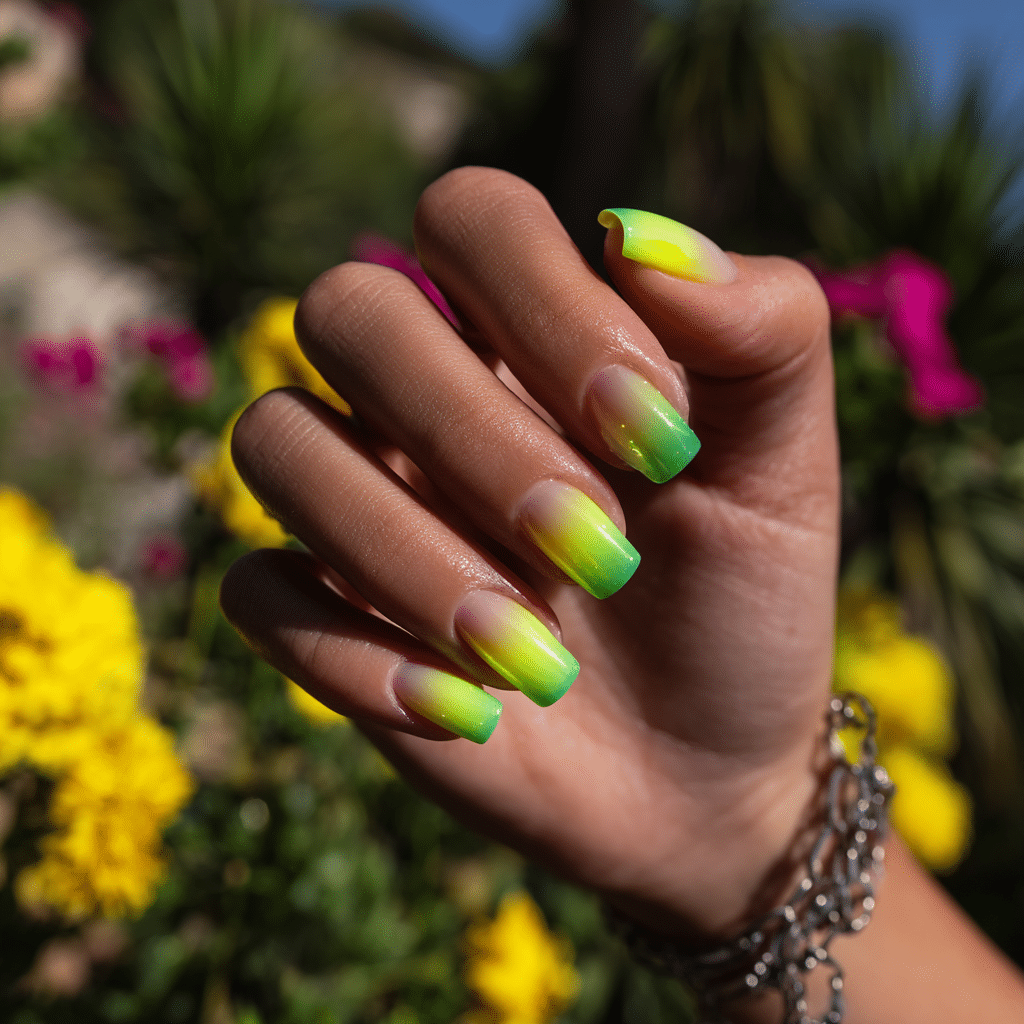
Tropical Gradient French
Tropical Gradient French features French tips that fade from neon yellow to lime green or aqua, offering a bold, summery look. Perfect for beach raves or tropical nightlife, this vibrant manicure radiates modern energy.
Tools Needed
- Neon yellow, lime green, or aqua nail polishes
- Makeup sponge
- Fine nail art brush
- Base coat and glossy top coat
- Acetone for cleanup
Step-by-Step Guide
- Apply a base coat and let dry.
- Paint nails with a clear base; let dry.
- Dab neon yellow and lime green or aqua polish onto a sponge, blending slightly.
- Press sponge onto nail tips, creating a gradient French tip.
- Use a fine brush to refine tip edges.
- Clean excess polish with acetone.
- Seal with a glossy top coat.
Color Suggestions
- Tropical Pop: Neon yellow to lime green tips.
- Soft Pop: Lemon to mint tips.
- Bold Contrast: Yellow to aqua tips.
Tips for Success
- Use a sponge for smooth gradients.
- Apply thin layers to avoid clumps.
- Practice tip placement on paper.
- Use a glossy top coat for shine.
Creative Variations
- Add glitter to gradient tips.
- Use a matte top coat for contrast.
- Create double gradient tips on one nail.
- Pair with a tiny star decal.
This manicure pairs with neon outfits or silver accessories, radiating party vibes. Maintain by touching up tips and refreshing the top coat. Tropical Gradient French is a trendy vacation choice.
Frangipani Flower Detail
Frangipani Flower Detail features a single white and yellow bloom painted on an accent nail, offering a delicate, tropical look. Perfect for beach weddings or tropical brunches, this romantic manicure exudes summery elegance.
Tools Needed
- Uncovered nail polish
- White, yellow, and green nail polishes
- Fine nail art brush
- Base coat and glossy top coat
- Acetone for cleanup
Step-by-Step Guide
- Apply a base coat and let dry.
- Paint nails with uncovered polish, using two coats; let dry.
- Use a fine brush to paint a white frangipani with a yellow center on one accent nail.
- Add green leaves for detail.
- Clean excess polish with acetone.
- Seal with a glossy top coat.
Color Suggestions
- Romantic Charm: Uncovered with white-yellow frangipani.
- Soft Pop: Sheer pink with ivory-yellow frangipani.
- Bold Contrast: Uncovered with neon yellow frangipani.
Tips for Success
- Practice flower shapes on paper.
- Use a fine brush for precision.
- Keep the design minimal for elegance.
- Use a glossy top coat for shine.
Creative Variations
- Add frangipani to two accent nails.
- Use glitter polish for the flower.
- Create a gradient uncovered base.
- Pair with a tiny leaf decal.
This manicure pairs with floral dresses or silver jewelry, radiating tropical romance. Maintain by touching up the flower and refreshing the top coat. Frangipani Flower Detail is a dreamy vacation choice.
Lava Lamp Neon Swirls
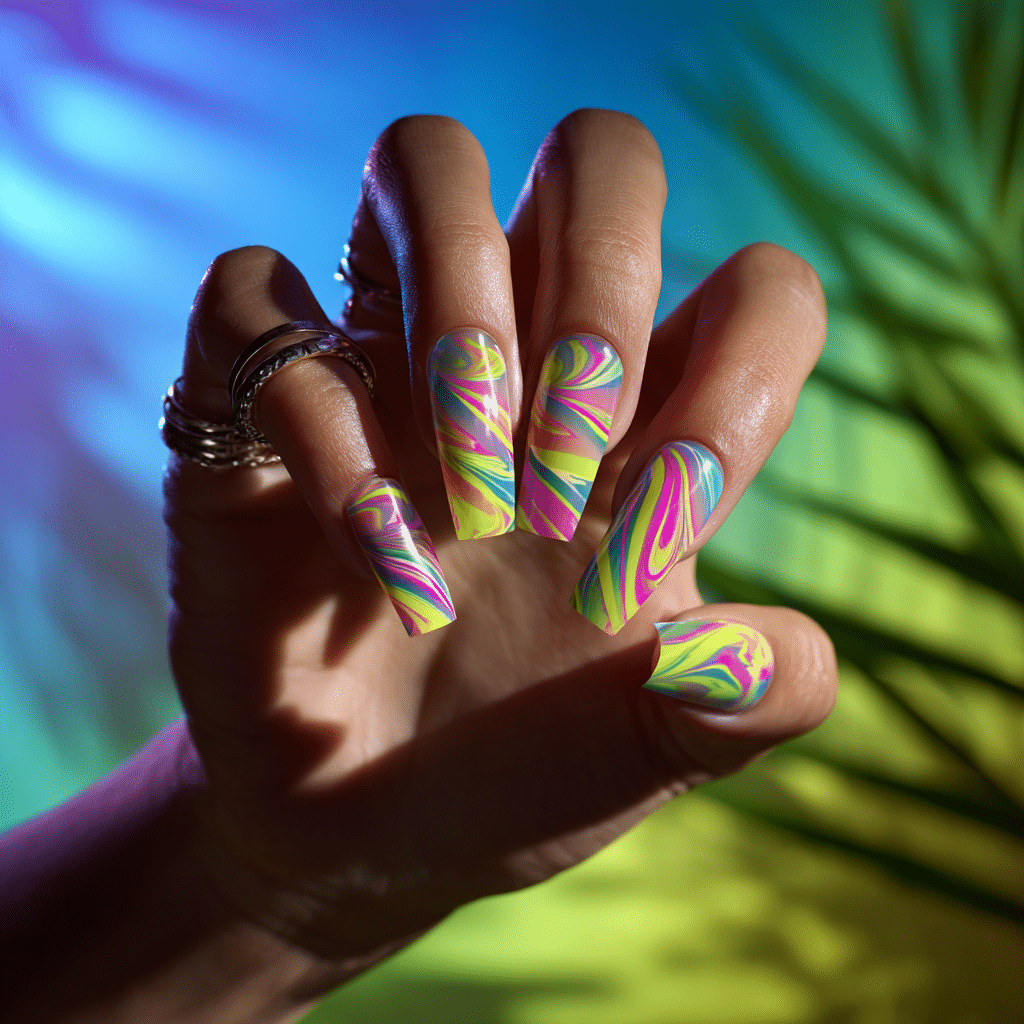
Lava Lamp Neon Swirls feature bright, melted rainbow swirls for a psychedelic tropical twist. Perfect for beach festivals or tropical raves, this bold manicure radiates vibrant energy.
Tools Needed
- Neon pink, yellow, green, and blue nail polishes
- Fine nail art brush
- Base coat and glossy top coat
- Acetone for cleanup
Step-by-Step Guide
- Apply a base coat and let dry.
- Paint nails with a clear base; let dry.
- Use a fine brush to paint neon pink, yellow, green, and blue swirls on each nail.
- Create overlapping, melted patterns for a lava lamp effect.
- Clean excess polish with acetone.
- Seal with a glossy top coat.
Color Suggestions
- Psychedelic Pop: Neon rainbow swirls.
- Soft Pop: Pastel pink, yellow, green swirls.
- Bold Contrast: Neon pink, orange, blue swirls.
Tips for Success
- Practice swirl patterns on paper.
- Use a fine brush for precision.
- Keep swirls dynamic for artistry.
- Use a glossy top coat for shine.
Creative Variations
- Add swirls to accent nails only.
- Use glitter polish for swirls.
- Create a gradient base.
- Pair with a tiny star decal.
This manicure pairs with neon outfits or silver accessories, radiating summer fun. Maintain by touching up swirls and refreshing the top coat. Lava Lamp Neon Swirls are a lively vacation choice.
Tiny Toucan Art
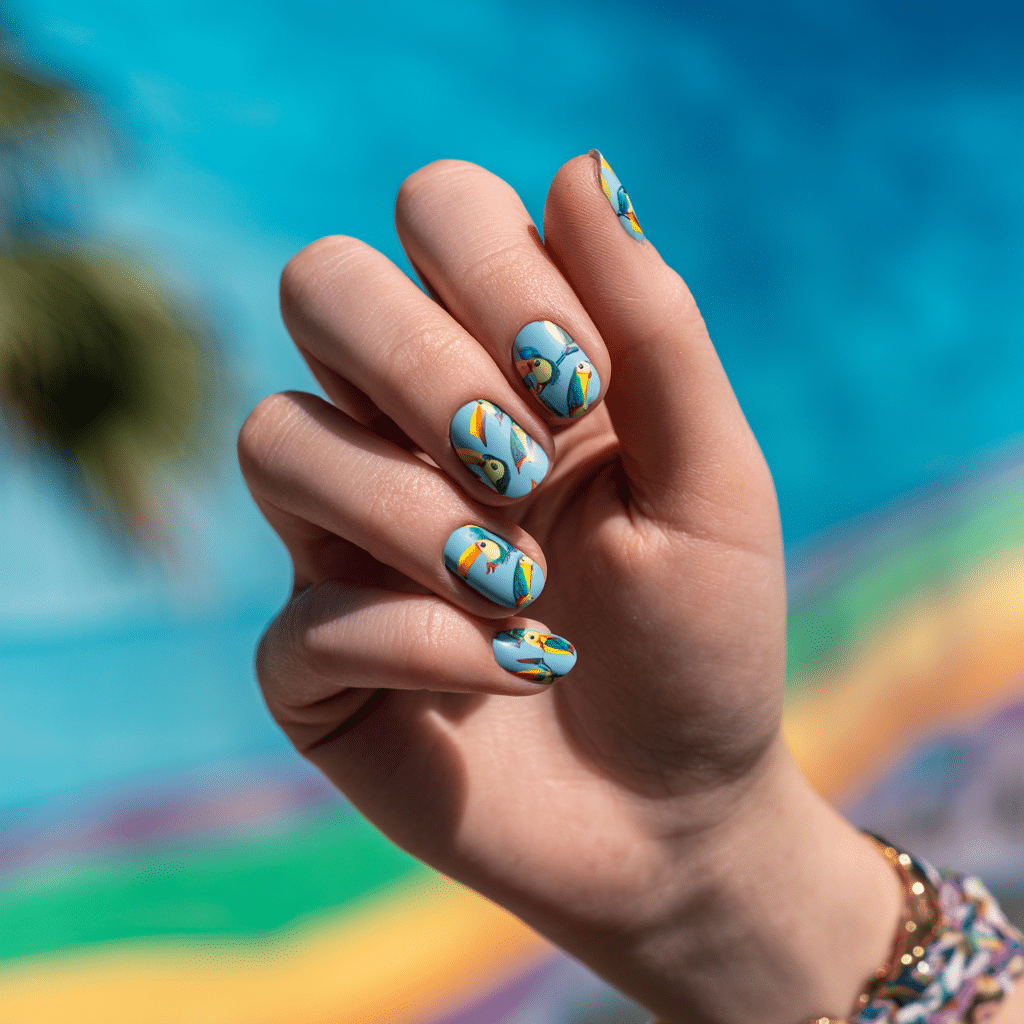
Tiny Toucan Art features miniature toucans painted on clear or baby blue backgrounds, offering a whimsical, tropical look. Perfect for beach outings or tropical adventures, this playful manicure radiates summery charm.
Tools Needed
- Clear or baby blue nail polish
- Black, yellow, red, and green nail polishes
- Fine nail art brush
- Base coat and glossy top coat
- Acetone for cleanup
Step-by-Step Guide
- Apply a base coat and let dry.
- Paint nails with clear or baby blue polish, using two coats; let dry.
- Use a fine brush to paint tiny toucans in black, yellow, red, and green on accent nails.
- Keep toucans small and detailed.
- Clean excess polish with acetone.
- Seal with a glossy top coat.
Color Suggestions
- Whimsical Charm: Clear with colorful toucans.
- Soft Pop: Baby blue with pastel toucans.
- Bold Contrast: Clear with neon toucans.
Tips for Success
- Practice toucan shapes on paper.
- Use a fine brush for precision.
- Keep designs small for charm.
- Use a glossy top coat for shine.
Creative Variations
- Add toucans to two accent nails.
- Use glitter polish for toucan beaks.
- Create a gradient blue base.
- Pair with a tiny leaf decal.
This manicure pairs with colorful outfits or silver jewelry, radiating tropical fun. Maintain by touching up toucans and refreshing the top coat. Tiny Toucan Art is a delightful vacation choice.
Sand Texture Nails

Sand Texture Nails feature beige-toned matte polish with a subtle grainy finish, like walking barefoot on the beach. Perfect for beach strolls or tropical retreats, this unique manicure exudes coastal simplicity.
Tools Needed
- Beige nail polish
- Textured top coat
- Matte top coat
- Base coat
- Nail file
- Acetone for cleanup
Step-by-Step Guide
- File nails to desired shape; apply a base coat and let dry.
- Paint nails with beige polish, using two coats; let dry.
- Apply a textured top coat for a grainy sand effect.
- Apply a matte top coat evenly across all nails.
- Clean excess polish with acetone.
- Let dry to preserve matte finish.
Color Suggestions
- Coastal Simplicity: Beige with sand texture.
- Soft Pop: Ivory with sand texture.
- Bold Contrast: Taupe with sand texture.
Tips for Success
- Apply textured top coat sparingly.
- Use a matte top coat evenly.
- Clean cuticles for a polished look.
- File nails evenly for uniformity.
Creative Variations
- Add a glossy top coat to one nail.
- Use a gradient beige base.
- Apply a single shell decal.
- Create a subtle wave pattern.
This manicure pairs with beachwear or silver jewelry, radiating coastal charm. Maintain by refreshing the matte top coat. Sand Texture Nails are a unique vacation choice.
Ocean Ripple Gel Nails
Ocean Ripple Gel Nails feature gel polish layered to mimic ocean wave movement with light reflection, offering a dynamic, coastal look. Perfect for beach swims or tropical cruises, this artistic manicure radiates aquatic beauty.
Tools Needed
- Blue, white, and aqua gel nail polishes
- Fine nail art brush
- UV lamp for gel curing
- Base coat and glossy top coat
- Acetone for cleanup
Step-by-Step Guide
- Apply a base coat and let dry.
- Apply a thin layer of clear gel polish; cure under UV lamp.
- Use a fine brush to paint blue, white, and aqua ripple layers, curing each layer.
- Create wavy, reflective patterns for an ocean effect.
- Clean excess polish with acetone.
- Seal with a glossy top coat.
Color Suggestions
- Ocean Ripple: Blue-white-aqua ripples.
- Soft Pop: Aqua-ivory-turquoise ripples.
- Bold Contrast: Navy-white-teal ripples.
Tips for Success
- Practice ripple patterns on paper.
- Use a fine brush for precision.
- Cure each layer fully for texture.
- Use a glossy top coat for shine.
Creative Variations
- Add ripples to accent nails only.
- Use glitter gel for ripples.
- Create a gradient gel base.
- Pair with a tiny bubble decal.
This manicure pairs with swimwear or silver accessories, radiating coastal allure. Maintain by checking gel adhesion and refreshing the top coat. Ocean Ripple Gel Nails are a captivating vacation choice.
Papaya Stripe Tips
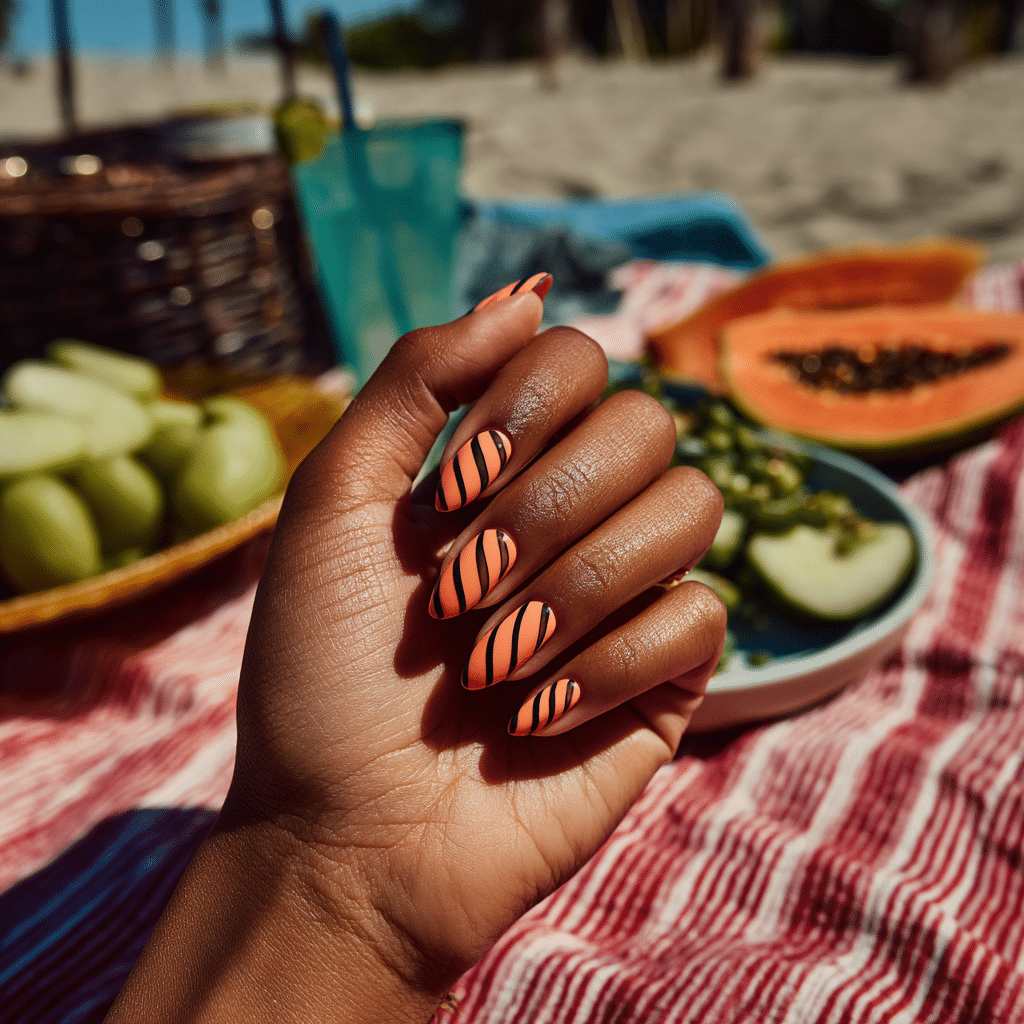
Papaya Stripe Tips feature striped orange and black tips over a creamy uncovered background, inspired by ripe papaya. Perfect for beach picnics or tropical markets, this playful manicure radiates summery zest.
Tools Needed
- Uncovered, orange, and black nail polishes
- Fine nail art brush
- Base coat and glossy top coat
- Acetone for cleanup
Step-by-Step Guide
- Apply a base coat and let dry.
- Paint nails with uncovered polish, using two coats; let dry.
- Use a fine brush to paint orange and black striped tips on each nail.
- Alternate stripes for a papaya-inspired effect.
- Clean excess polish with acetone.
- Seal with a glossy top coat.
Color Suggestions
- Fruity Zest: Uncovered with orange-black stripes.
- Soft Pop: Sheer pink with peach-gray stripes.
- Bold Contrast: Uncovered with neon orange-black stripes.
Tips for Success
- Practice stripe patterns on paper.
- Use a fine brush for precision.
- Keep stripes clean for contrast.
- Use a glossy top coat for shine.
Creative Variations
- Add stripes to accent nails only.
- Use glitter polish for stripes.
- Create a gradient uncovered base.
- Pair with a tiny fruit decal.
This manicure pairs with bright outfits or gold jewelry, radiating tropical fun. Maintain by touching up stripes and refreshing the top coat. Papaya Stripe Tips are a lively vacation choice.
Tropical nails are more than just a summer trend—they’re a wearable celebration of warmth, color, and escapism. They remind us to slow down, enjoy the beauty around us, and bring joy into the smallest details of our daily routine. Whether you’re on a beach or just dreaming of one, tropical nail art offers an effortless way to channel vacation vibes all season long.
So the next time you sit down for a manicure, choose a design that takes you somewhere: to a hammock under palm trees, a fruit stand in the sun, or the cool, blue waters of a hidden cove. Your nails might just become your favorite passport to paradise.