Bright Energy, Bold Style: Nail Designs That Capture the Spirit of Summer
As the sun shines stronger and the days stretch longer, summer invites us to live out loud—and what better way to reflect that mood than through our nails? This year’s bright summer nail designs are bursting with personality. From juicy corals and neon greens to playful fruit art and swirled gradients, each look is made to complement the joy, warmth, and lightness of the season.
Bright nails aren’t just a fashion statement—they’re an energy. A feeling. A way to wear your mood in vivid, creative color. These designs combine nostalgic fun with modern shapes, creating manicures that are expressive, Instagram-ready, and wearable from the pool to a rooftop brunch.
Why I Love It ?
What I love about bright summer nails is how effortlessly they make you feel polished and present. You don’t need layers of accessories or a loud outfit—sometimes a neon yellow manicure or a bubblegum-pink swirl is all the personality your look needs. They’re bold, yes, but they’re also joyful. Even a simple dot of color or abstract wave can change the way you carry your hands and how you feel when you look down at them.
These designs are fun without being childish. They’re creative, polished, and full of small surprises—whether it’s a chrome finish that catches the sun or a fruity detail that makes people smile. Bright nails turn something small into something personal.
23 Bright Summer Nail Designs Guide
These 23 bright summer nail designs for 2025 capture the vibrant, playful essence of beach outings, tropical escapes, and sunny festivals. Each design is bold, colorful, and designed to elevate your summer style with glossy, matte, or chrome finishes. Detailed steps, tools, and variations ensure accessibility for all skill levels, embodying summer’s lively energy. The term “uncovered” is used for base polishes to align with sensitivity guidelines.
Neon French Fade
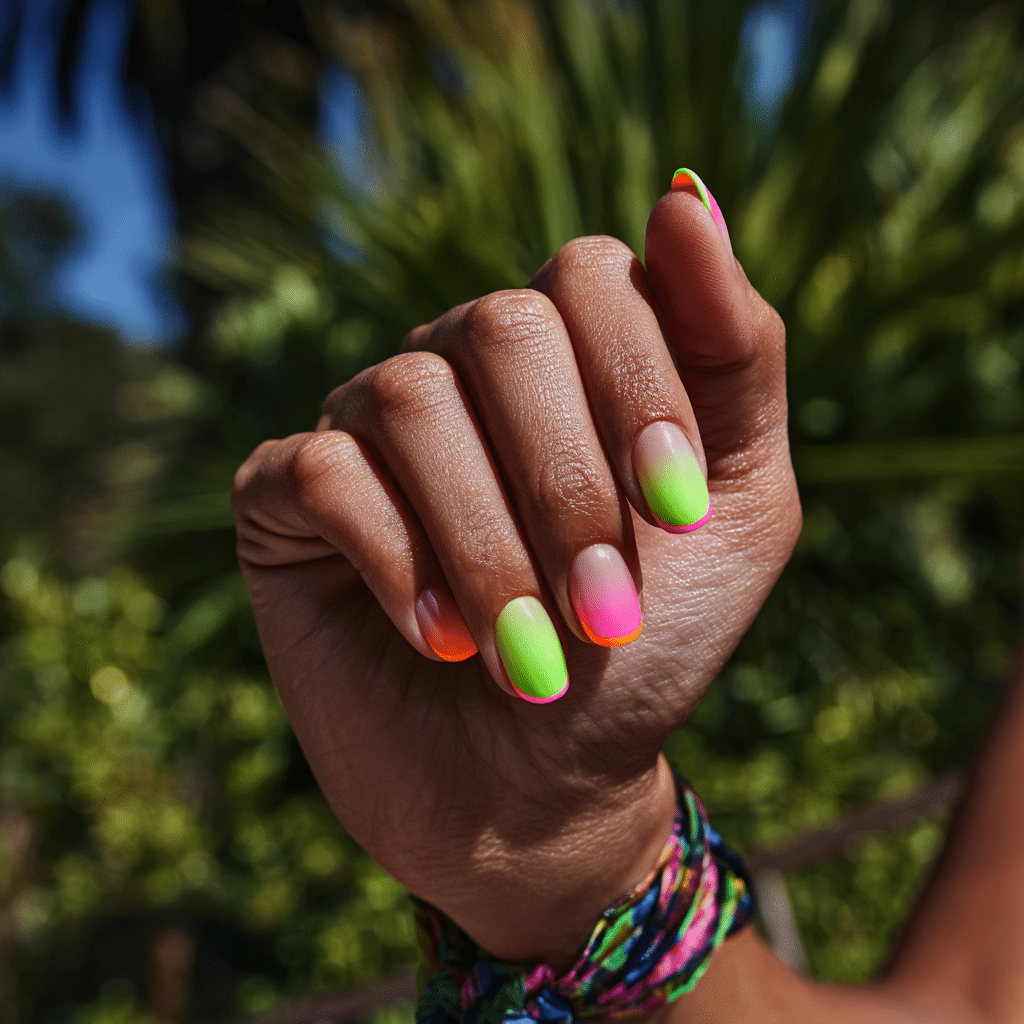
Neon French Fade is a vibrant ombré from a natural base to electric pink, green, or orange tips, offering a bold, summery look. Ideal for beach raves or summer festivals, this design radiates dynamic energy.
Tools Needed
- Uncovered base polish
- Neon pink, green, or orange polish
- Makeup sponge
- Base coat and glossy top coat
- Nail file
- Acetone for cleanup
Step-by-Step Guide
- File nails to a medium-length, square shape; apply a base coat and let dry.
- Paint nails with uncovered polish as a base; let dry completely.
- Dab neon polish (e.g., pink) onto a makeup sponge, focusing on the tip area.
- Press sponge gently onto nail tips, blending upward for a smooth gradient; repeat for vibrancy.
- Clean excess polish around cuticles with acetone.
- Seal with a glossy top coat for a radiant finish.
Complementary Color Suggestions
- Vivid Pop: Neon pink tips with white dot accents.
- Soft Glow: Pair with pastel yellow for a tri-color ombré.
- Bold Contrast: Use neon green tips with purple base accents.
Tips for Success
- Use a sponge for seamless blending.
- Apply thin layers to avoid clumps.
- Practice gradient on paper first.
- Use a quick-dry top coat to prevent smudging.
Creative Variations
- Add a matte top coat for contrast.
- Apply silver glitter in the gradient.
- Create a vertical ombré effect.
- Pair with a tiny star decal on one nail.
This design pairs with neon outfits or silver jewelry, radiating summer intensity. Maintain by refreshing the top coat every few days. Neon French Fade is a trendy vacation choice.
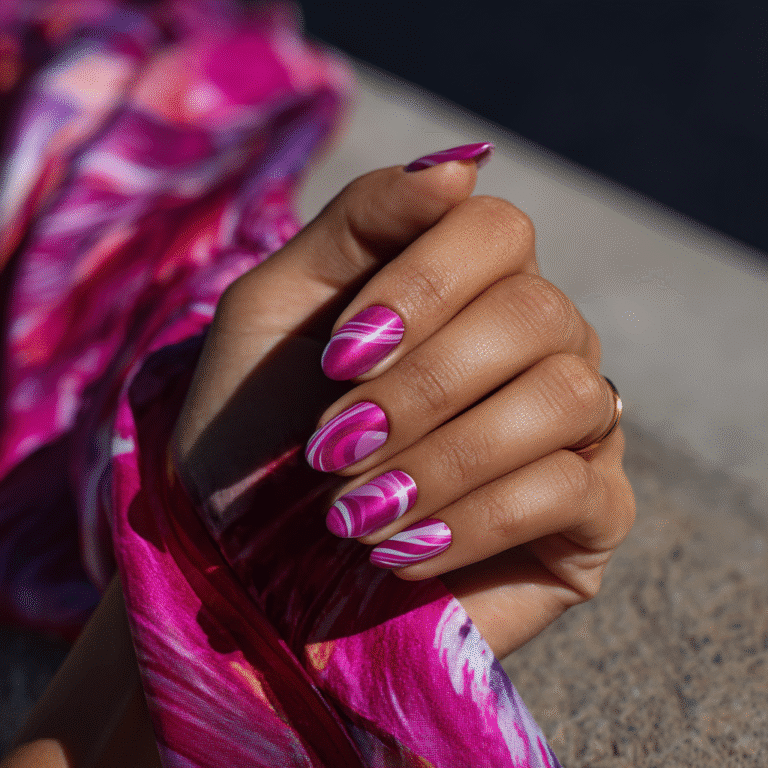
Sunset Swirl Nails
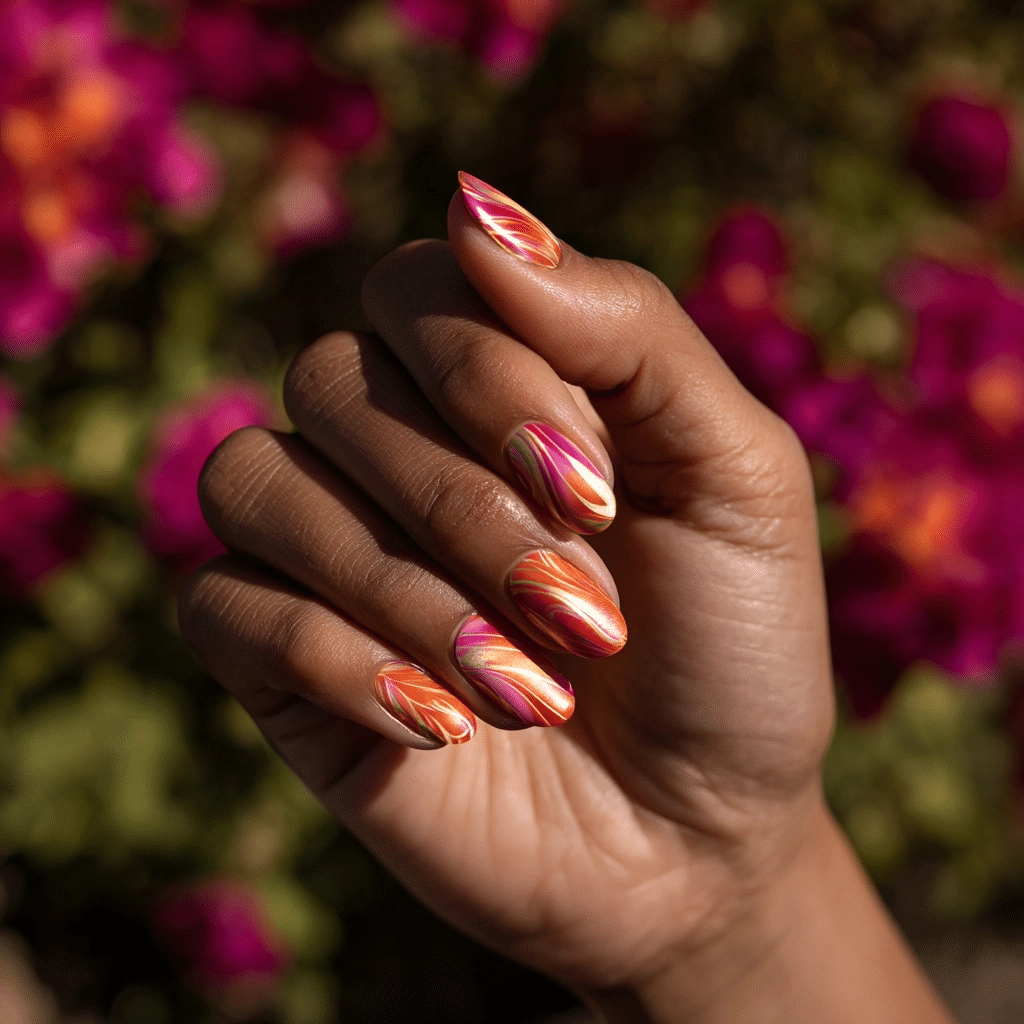
Sunset Swirl Nails feature abstract wave swirls in coral, fuchsia, and gold over an uncovered background, offering a vibrant, summery look. Ideal for beach sunsets or tropical evenings, this design radiates artistic warmth.
Tools Needed
- Uncovered base polish
- Coral, fuchsia, and gold nail polishes
- Thin striping brush
- Base coat and glossy top coat
- Nail file
- Acetone for cleanup
Step-by-Step Guide
- File nails to a medium-length, almond shape; apply a base coat and let dry.
- Paint nails with uncovered polish as a base; let dry.
- Using a striping brush, draw wavy coral swirls across each nail.
- Add fuchsia swirls, overlapping slightly for depth.
- Dot gold accents sparingly for shimmer.
- Clean excess polish with acetone.
- Seal with a glossy top coat for shine.
Complementary Color Suggestions
- Warm Pop: Coral swirls with white accents.
- Soft Glow: Pair with pastel peach for a base gradient.
- Bold Contrast: Use teal swirls for a vibrant twist.
Tips for Success
- Use a thin brush for precise swirls.
- Work quickly to blend colors smoothly.
- Practice swirls on paper first.
- Use a glossy top coat for vibrancy.
Creative Variations
- Add a matte top coat for a modern look.
- Apply gold foil flecks over swirls.
- Create tighter, spiral swirls.
- Pair with a tiny sunset decal.
This design pairs with flowy dresses or gold jewelry, radiating summer romance. Maintain by refreshing the top coat. Sunset Swirl Nails are a stunning vacation choice.
Glossy Tangerine Short Nails
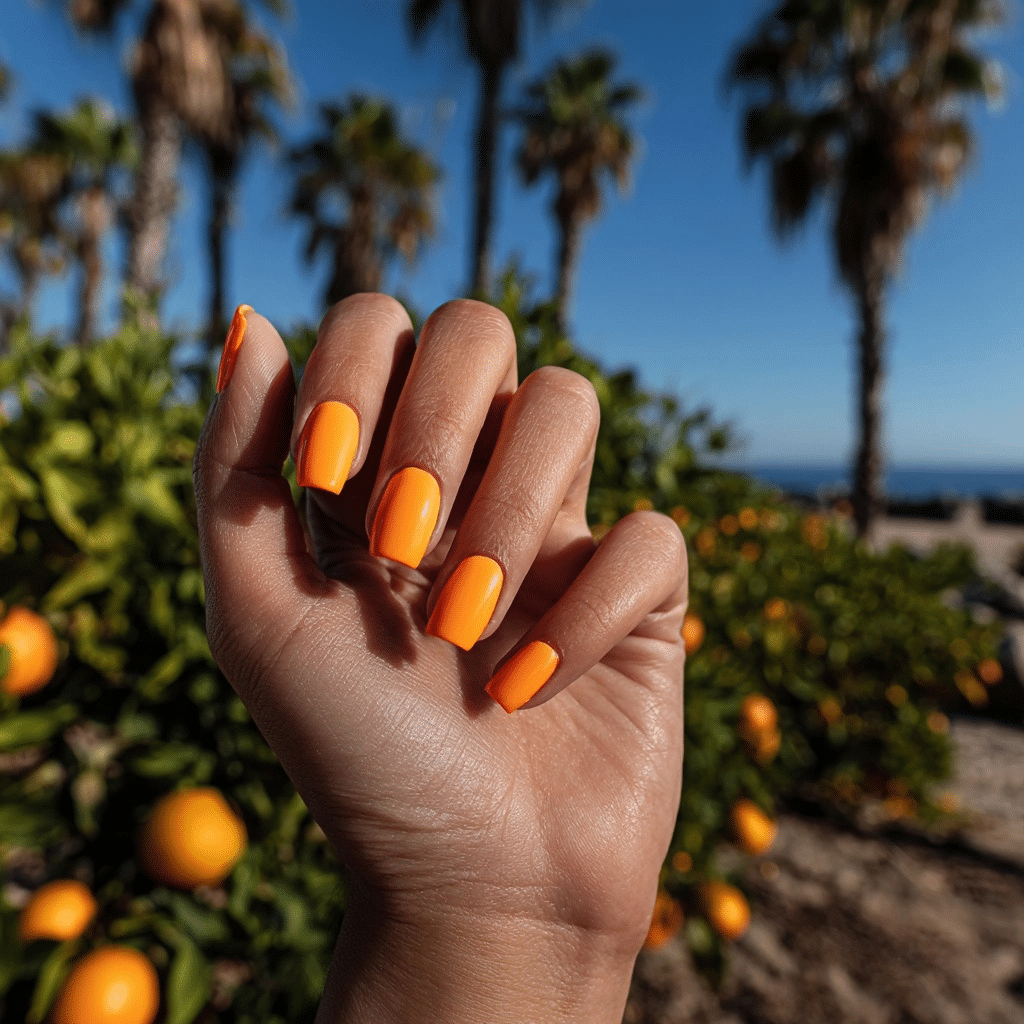
Glossy Tangerine Short Nails feature a clean, bright orange in a tidy short square shape, offering a bold, summery look. Ideal for beach brunches or tropical markets, this design radiates vibrant simplicity.
Tools Needed
- Tangerine orange nail polish
- Base coat and glossy top coat
- Nail file
- Acetone for cleanup
Step-by-Step Guide
- File nails to a short, square shape; apply a base coat and let dry.
- Paint nails with tangerine orange polish, using two coats for full opacity; let dry.
- Ensure smooth, even coverage for a vibrant finish.
- Clean excess polish around cuticles with acetone.
- Seal with a glossy top coat for radiant shine.
Complementary Color Suggestions
- Bright Pop: Tangerine with white dot accents.
- Soft Glow: Pair with pastel yellow for a gradient base.
- Bold Contrast: Combine with neon green for a split nail.
Tips for Success
- Use a high-opacity polish for bold color.
- Apply thin layers to prevent streaks.
- Clean cuticles for a polished finish.
- Use a quick-dry top coat for durability.
Creative Variations
- Add a matte top coat for contrast.
- Apply gold glitter to accent nails.
- Create a tangerine French tip.
- Pair with a tiny citrus decal.
This design pairs with white sundresses or silver jewelry, radiating summer warmth. Maintain by refreshing the top coat. Glossy Tangerine Short Nails are a chic vacation choice.
Rainbow Stripe Tips

Rainbow Stripe Tips feature micro-French tips in different neon hues across each nail, offering a playful, summery look. Ideal for summer festivals or beach parties, this design radiates colorful energy.
Tools Needed
- Neon pink, green, yellow, orange, and purple polishes
- Thin striping tape
- Base coat and glossy top coat
- Nail file
- Acetone for cleanup
Step-by-Step Guide
- File nails to a medium-length, square shape; apply a base coat and let dry.
- Apply striping tape near the nail tips to create a thin line.
- Paint each nail tip with a different neon polish (e.g., pink, green); remove tape immediately.
- Repeat for all nails, varying colors across fingers.
- Clean excess polish with acetone.
- Seal with a glossy top coat for shine.
Complementary Color Suggestions
- Vivid Pop: Neon tips with white dot accents.
- Soft Glow: Pair with pastel base colors for contrast.
- Bold Contrast: Use a black base for neon tips to pop.
Tips for Success
- Apply tape carefully for clean lines.
- Remove tape before polish dries.
- Use high-opacity neons for vibrancy.
- Use a glossy top coat for durability.
Creative Variations
- Add a matte top coat for contrast.
- Apply glitter over neon tips.
- Create double neon stripes.
- Pair with a tiny rainbow decal.
This design pairs with colorful outfits or silver jewelry, radiating summer fun. Maintain by refreshing the top coat. Rainbow Stripe Tips are a lively vacation choice.
Bubblegum Jelly Nails
Bubblegum Jelly Nails feature squishy, translucent pink polish with a playful finish, offering a whimsical, summery look. Ideal for beach picnics or summer outings, this design radiates youthful charm.
Tools Needed
- Jelly pink nail polish
- Base coat and glossy top coat
- Nail file
- Acetone for cleanup
Step-by-Step Guide
- File nails to a medium-length, oval shape; apply a base coat and let dry.
- Paint nails with jelly pink polish, using two to three coats for translucency; let dry.
- Check for even, sheer coverage with a squishy effect.
- Clean excess polish with acetone.
- Seal with a glossy top coat for shine.
Complementary Color Suggestions
- Playful Pop: Jelly pink with white heart decals.
- Soft Glow: Pair with pastel peach for a gradient.
- Bold Contrast: Combine with neon green for a split nail.
Tips for Success
- Apply thin layers for a translucent effect.
- Use a glossy top coat for vibrancy.
- Clean cuticles for a polished look.
- Use a quick-dry top coat to prevent smudging.
Creative Variations
- Add a matte top coat for contrast.
- Apply silver glitter flecks for sparkle.
- Create a jelly pink French tip.
- Pair with a tiny bubblegum decal.
This design pairs with pastel outfits or silver jewelry, radiating summer fun. Maintain by refreshing the top coat. Bubblegum Jelly Nails are a delightful vacation choice.
Electric Blue Chrome
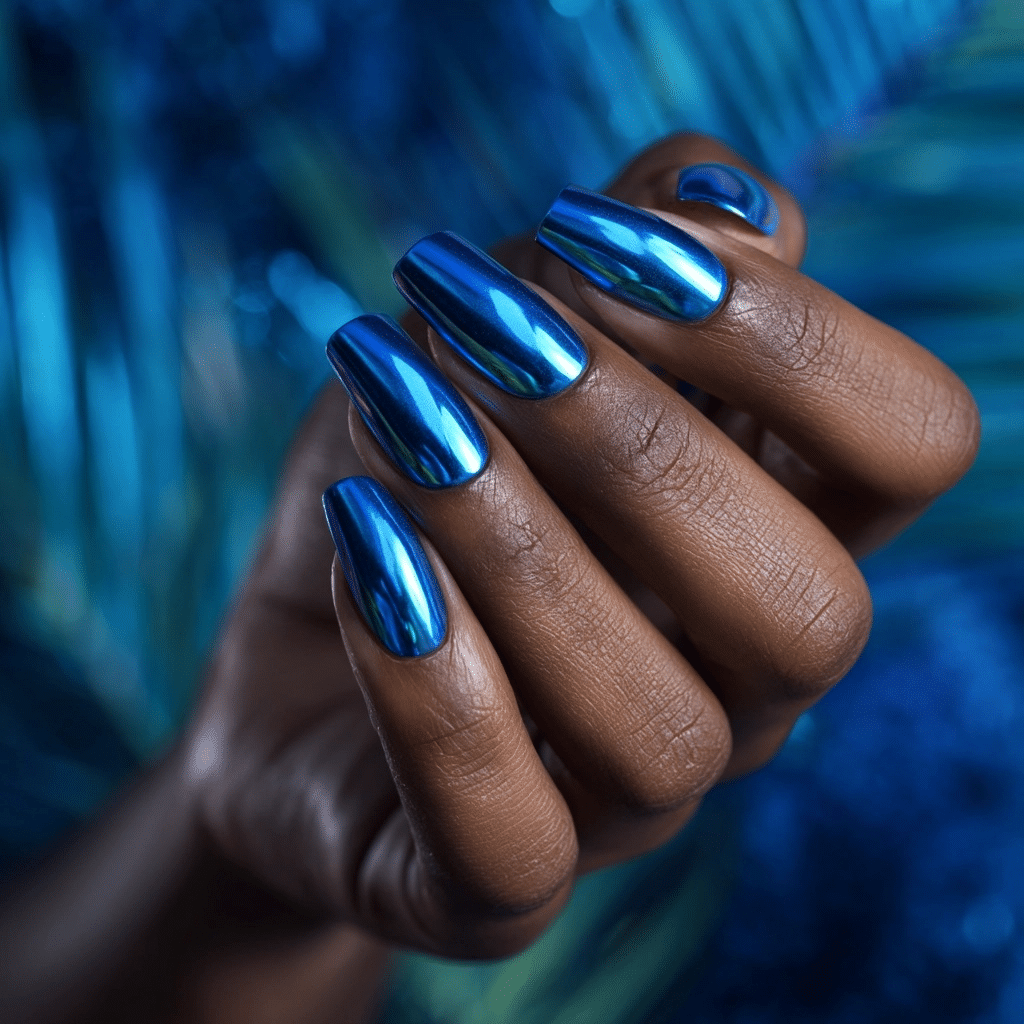
Electric Blue Chrome features reflective polish in bright cobalt, glowing in the sun, offering a bold, summery look. Ideal for beach parties or tropical nights, this design radiates futuristic vibrancy.
Tools Needed
- Chrome cobalt blue nail polish
- Base coat and glossy top coat
- Nail file
- Acetone for cleanup
Step-by-Step Guide
- File nails to a medium-length, coffin shape; apply a base coat and let dry.
- Paint nails with chrome cobalt blue polish, using two coats for full shimmer; let dry.
- Ensure even, reflective coverage for a mirror effect.
- Clean excess polish with acetone.
- Seal with a glossy top coat for shine.
Complementary Color Suggestions
- Shiny Pop: Blue chrome with white dot accents.
- Soft Glow: Pair with pastel mint for a gradient base.
- Bold Contrast: Combine with neon pink for a split nail.
Tips for Success
- Use a high-quality chrome polish for shimmer.
- Apply thin layers for smoothness.
- Clean cuticles for a polished look.
- Use a glossy top coat for vibrancy.
Creative Variations
- Add a matte top coat for contrast.
- Apply silver foil flecks for extra sparkle.
- Create a chrome French tip.
- Pair with a tiny wave decal.
This design pairs with bold outfits or silver jewelry, radiating summer glamour. Maintain by refreshing the top coat. Electric Blue Chrome is a stunning vacation choice.
Candy Color Block Nails
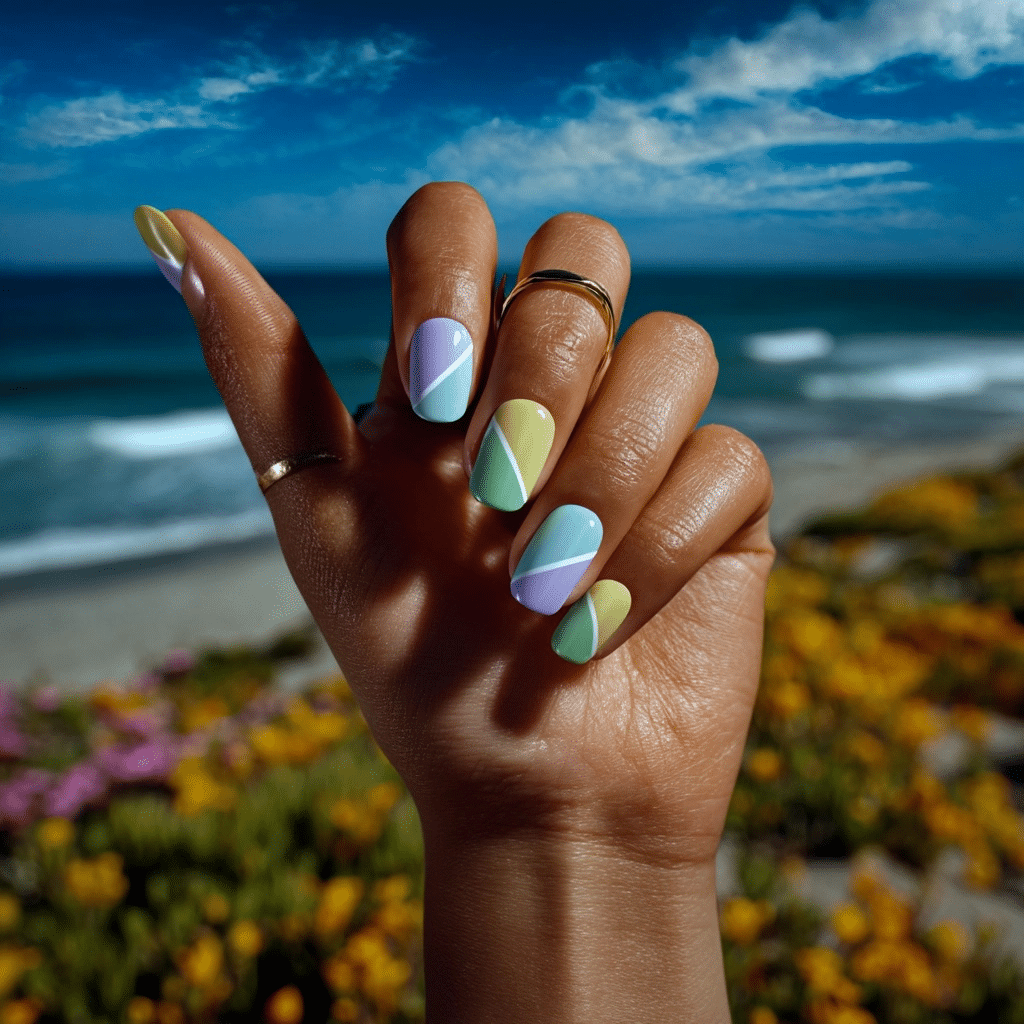
Candy Color Block Nails feature geometric sections of mint, lemon, and lilac outlined in white, offering a playful, summery look. Ideal for summer festivals or beach outings, this design radiates colorful charm.
Tools Needed
- Mint, lemon, and lilac nail polishes
- White nail polish
- Thin striping tape
- Base coat and glossy top coat
- Nail file
- Acetone for cleanup
Step-by-Step Guide
- File nails to a medium-length, square shape; apply a base coat and let dry.
- Apply striping tape to create geometric sections (e.g., triangles or rectangles).
- Paint each section with mint, lemon, or lilac polish; remove tape carefully.
- Outline sections with white polish using a thin brush.
- Clean excess polish with acetone.
- Seal with a glossy top coat for shine.
Complementary Color Suggestions
- Bright Pop: Color blocks with neon accents.
- Soft Glow: Pair with pastel base colors for contrast.
- Bold Contrast: Use black outlines for sharper definition.
Tips for Success
- Apply tape precisely for clean lines.
- Remove tape before polish dries.
- Use a thin brush for outlining.
- Use a glossy top coat for vibrancy.
Creative Variations
- Add a matte top coat for contrast.
- Apply glitter within sections.
- Create asymmetrical blocks.
- Pair with a tiny candy decal.
This design pairs with colorful outfits or silver jewelry, radiating summer joy. Maintain by refreshing the top coat. Candy Color Block Nails are a lively vacation choice.
Tropical Fruit Nail Art
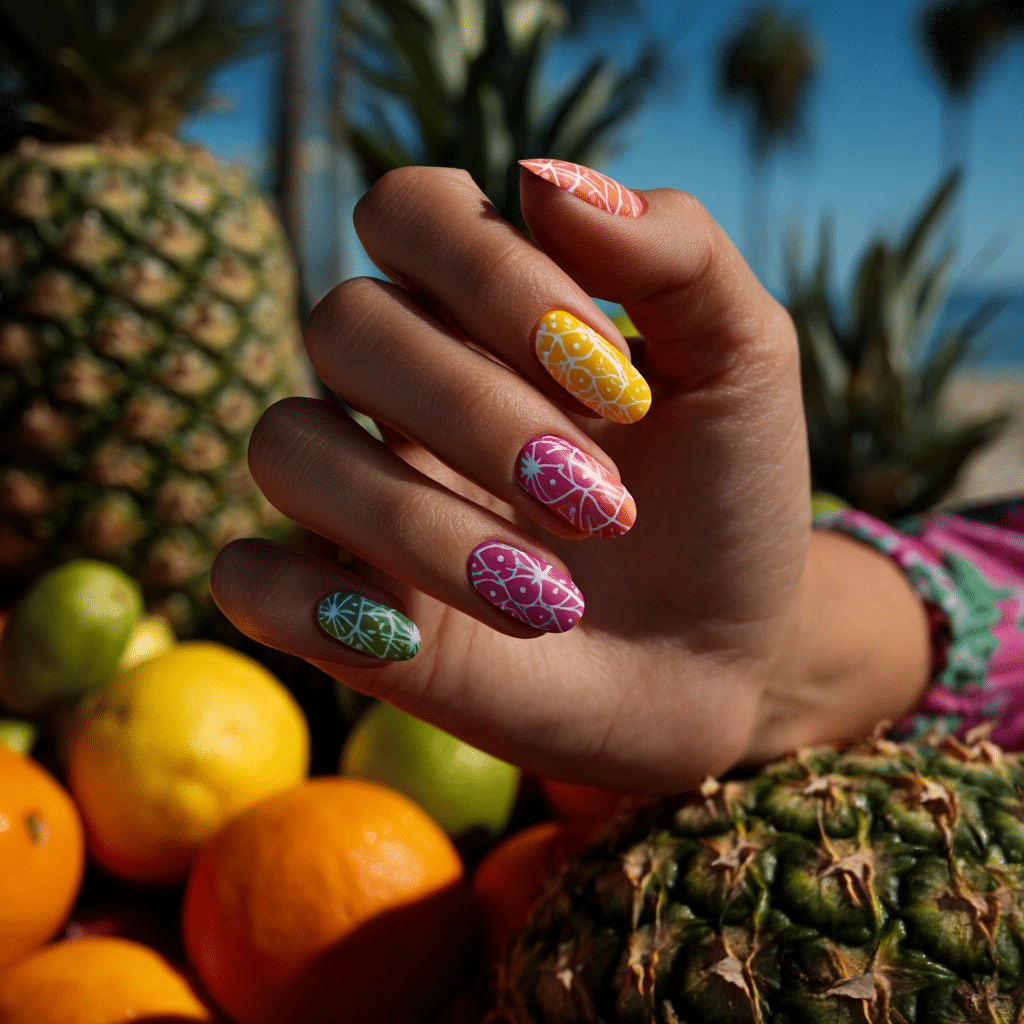
Tropical Fruit Nail Art features tiny pineapples, watermelon, or citrus slices painted on accent nails, offering a vibrant, summery look. Ideal for beach parties or tropical getaways, this design radiates playful energy.
Tools Needed
- Uncovered base polish
- Yellow, green, pink, and orange nail polishes
- Thin detail brush
- Dotting tool
- Base coat and glossy top coat
- Nail file
- Acetone for cleanup
Step-by-Step Guide
- File nails to a medium-length, oval shape; apply a base coat and let dry.
- Paint nails with uncovered polish as a base; let dry.
- On accent nails (e.g., ring finger), use a detail brush to paint pineapple shapes with yellow and green.
- Add watermelon slices with pink, green, and black dots for seeds on another nail.
- Clean excess polish with acetone.
- Seal with a glossy top coat for shine.
Complementary Color Suggestions
- Fruity Pop: Fruit art with neon base colors.
- Soft Glow: Pair with pastel peach for a gradient base.
- Bold Contrast: Use teal base for fruit to pop.
Tips for Success
- Use a fine brush for detailed fruit designs.
- Practice fruit shapes on paper first.
- Apply thin layers for clean lines.
- Use a glossy top coat for vibrancy.
Creative Variations
- Add a matte top coat for contrast.
- Apply glitter around fruit designs.
- Include mango or kiwi art.
- Pair with a tiny palm tree decal.
This design pairs with bright sundresses or gold jewelry, radiating summer fun. Maintain by refreshing the top coat. Tropical Fruit Nail Art is a delightful vacation choice.
Hot Pink Matte Almonds

Hot Pink Matte Almonds feature a bold matte finish in a sharp almond shape, offering a striking, summery look. Ideal for summer raves or beach festivals, this design radiates vibrant intensity.
Tools Needed
- Hot pink nail polish
- Base coat and matte top coat
- Nail file
- Acetone for cleanup
Step-by-Step Guide
- File nails to a medium-length, almond shape; apply a base coat and let dry.
- Paint nails with hot pink polish, using two coats for full opacity; let dry.
- Ensure bold, even coverage for a vibrant finish.
- Clean excess polish around cuticles with acetone.
- Seal with a matte top coat for a velvety finish.
Complementary Color Suggestions
- Vivid Pop: Hot pink with white star decals.
- Soft Glow: Pair with pastel peach for a gradient base.
- Bold Contrast: Combine with neon green for a split nail.
Tips for Success
- Use a high-opacity polish for bold color.
- Apply thin layers to prevent streaks.
- Clean cuticles for a polished look.
- Use a matte top coat for a modern finish.
Creative Variations
- Add glossy accents for contrast.
- Apply silver glitter to accent nails.
- Create a matte French tip.
- Pair with a tiny heart decal.
This design pairs with neon outfits or silver jewelry, radiating summer energy. Maintain by refreshing the top coat. Hot Pink Matte Almonds are a trendy vacation choice.
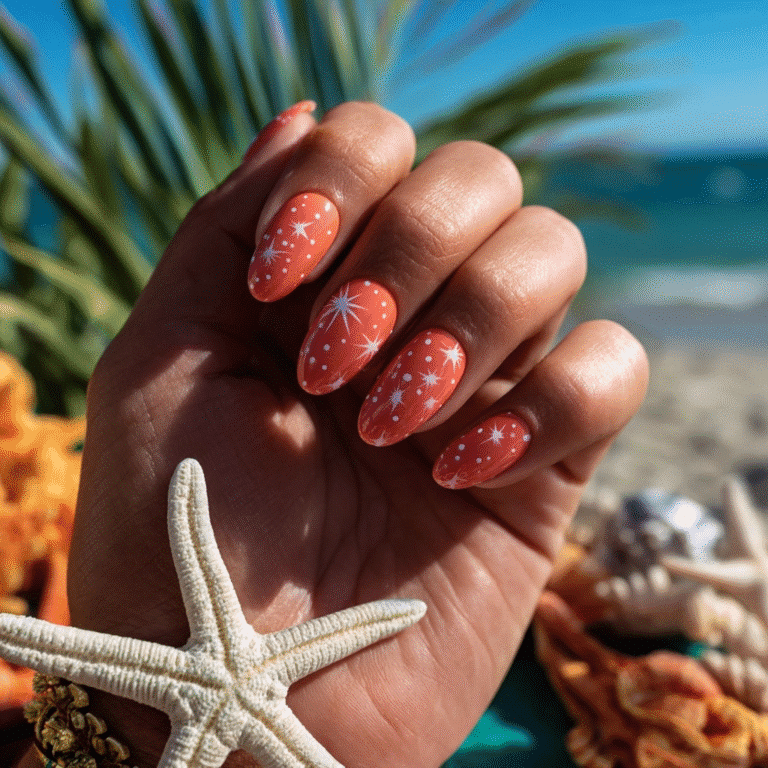
Bright Coral Flame Tips
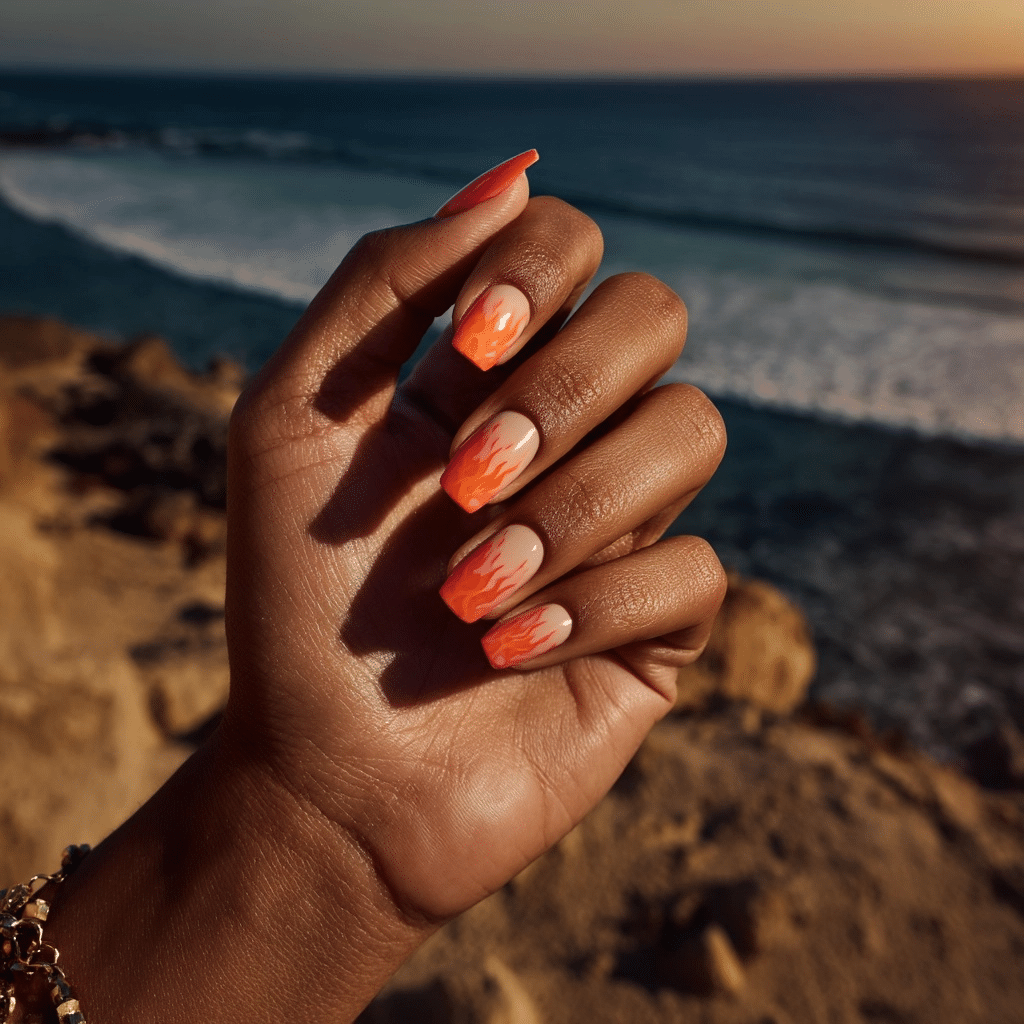
Bright Coral Flame Tips feature flame-shaped coral accents licking from the tips over an uncovered base, offering a bold, summery look. Ideal for beach parties or tropical nights, this design radiates fiery vibrancy.
Tools Needed
- Uncovered base polish
- Coral nail polish
- Thin detail brush
- Base coat and glossy top coat
- Nail file
- Acetone for cleanup
Step-by-Step Guide
- File nails to a medium-length, square shape; apply a base coat and let dry.
- Paint nails with uncovered polish as a base; let dry.
- Using a detail brush, paint coral flame shapes extending from the tips upward.
- Add thin, wavy lines for a flickering effect.
- Clean excess polish with acetone.
- Seal with a glossy top coat for shine.
Complementary Color Suggestions
- Fiery Pop: Coral flames with yellow accents.
- Soft Glow: Pair with pastel peach for a gradient base.
- Bold Contrast: Use teal flames for a vibrant twist.
Tips for Success
- Use a fine brush for precise flames.
- Practice flame shapes on paper first.
- Apply thin layers for clean lines.
- Use a glossy top coat for vibrancy.
Creative Variations
- Add a matte top coat for contrast.
- Apply gold glitter within flames.
- Create reverse flame tips from the cuticle.
- Pair with a tiny flame decal.
This design pairs with bright outfits or gold jewelry, radiating summer intensity. Maintain by refreshing the top coat. Bright Coral Flame Tips are a striking vacation choice.
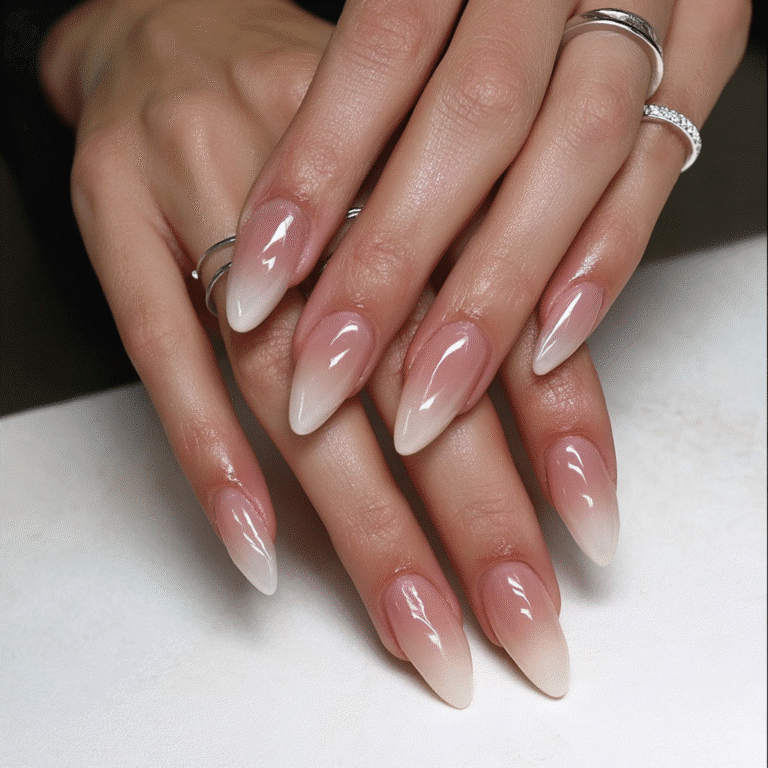
Lemonade Pastel Ombré
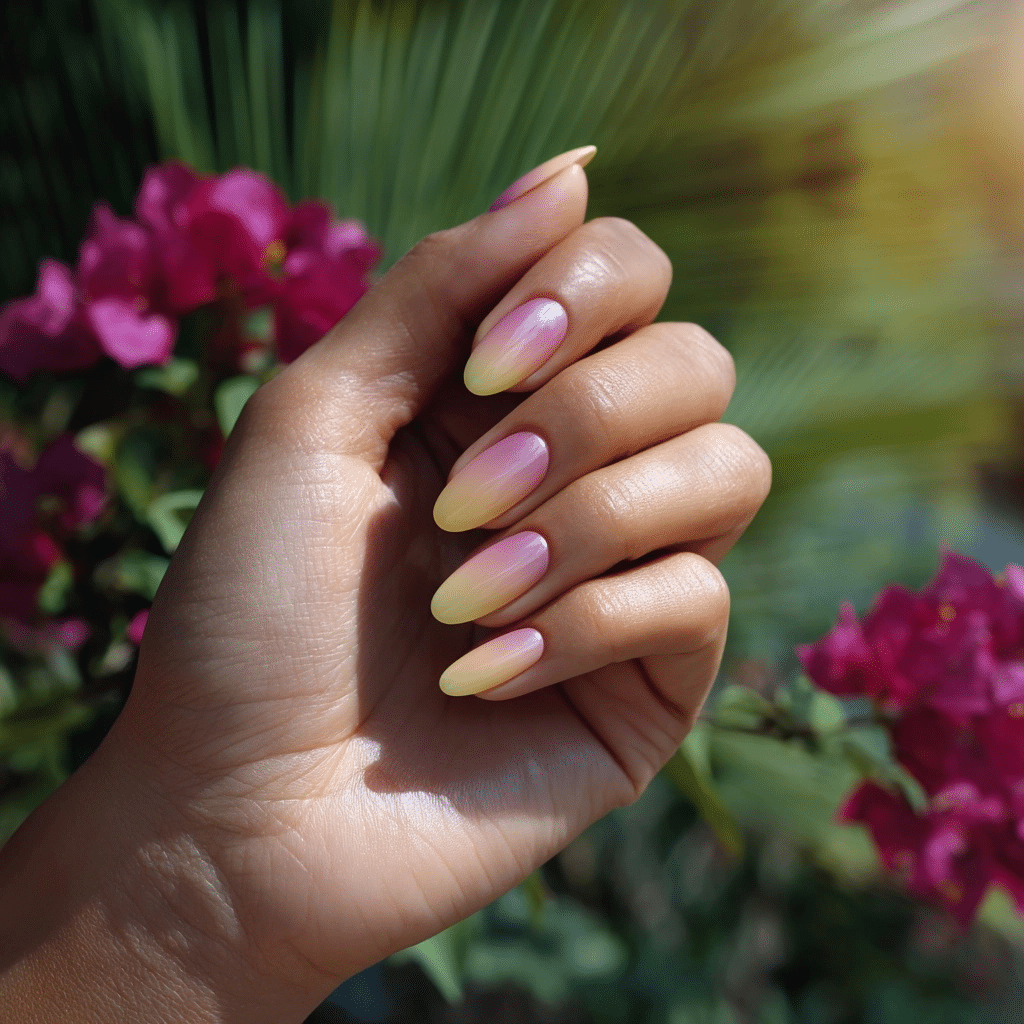
Lemonade Pastel Ombré features a faded yellow to pink gradient in a soft, diffused tone, offering a dreamy, summery look. Ideal for beach picnics or summer weddings, this design radiates delicate charm.
Tools Needed
- Pastel yellow and pink nail polishes
- Makeup sponge
- Base coat and glossy top coat
- Nail file
- Acetone for cleanup
Step-by-Step Guide
- File nails to a medium-length, oval shape; apply a base coat and let dry.
- Paint nails with a clear base; let dry.
- Dab pastel yellow and pink polishes onto a makeup sponge, blending slightly.
- Press sponge onto nails, creating a soft gradient from yellow to pink; let dry.
- Repeat for a seamless ombré effect.
- Clean excess polish with acetone.
- Seal with a glossy top coat for shine.
Complementary Color Suggestions
- Soft Pop: Pastel ombré with white dot accents.
- Dreamy Glow: Pair with pastel lavender for a tri-color ombré.
- Bold Contrast: Use neon green for accent nails.
Tips for Success
- Use a sponge for smooth blending.
- Apply thin layers to avoid clumps.
- Practice gradient on paper first.
- Use a glossy top coat for vibrancy.
Creative Variations
- Add a matte top coat for contrast.
- Apply silver glitter in the gradient.
- Create a vertical ombré effect.
- Pair with a tiny flower decal.
This design pairs with pastel dresses or silver jewelry, radiating summer sweetness. Maintain by refreshing the top coat. Lemonade Pastel Ombré is a romantic vacation choice.
Neon Confetti Accent Nails
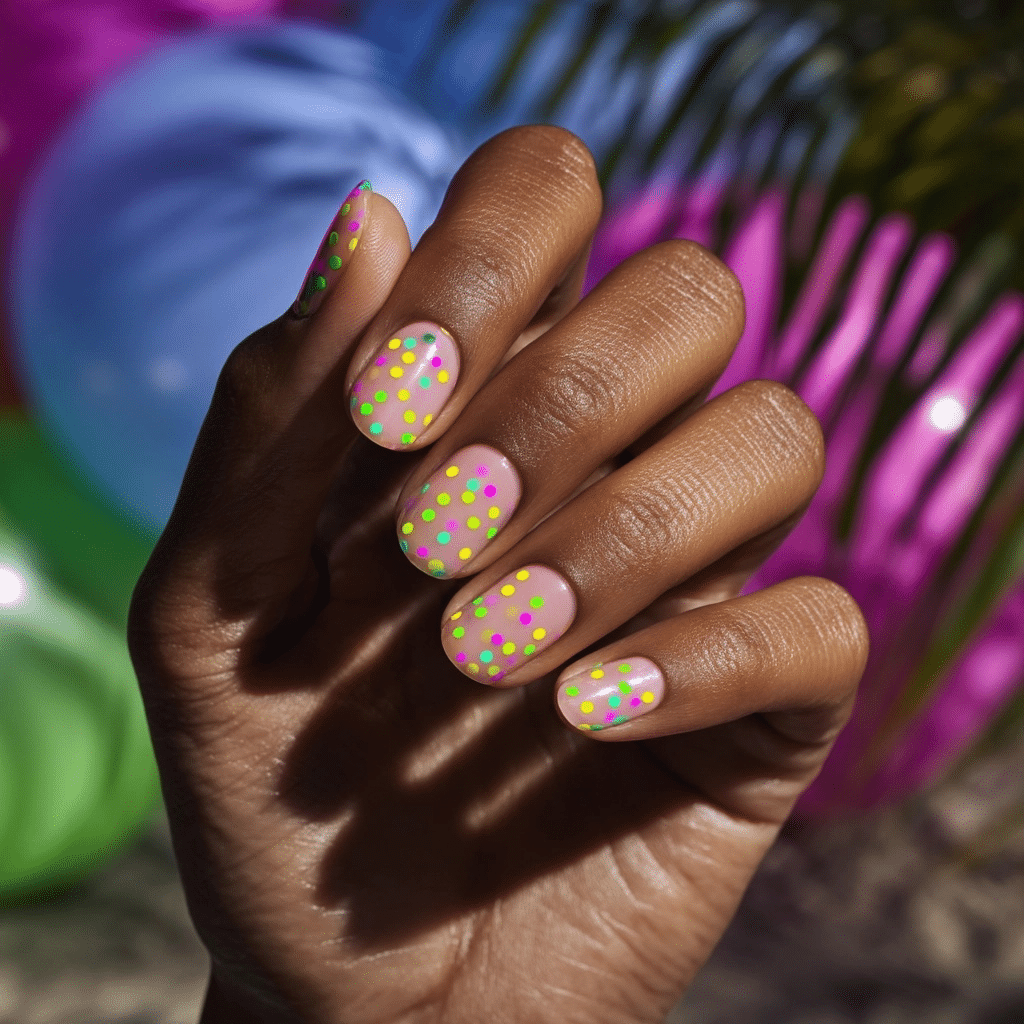
Neon Confetti Accent Nails feature uncovered polish with scattered neon dots in playful patterns, offering a vibrant, summery look. Ideal for summer festivals or beach outings, this design radiates colorful fun.
Tools Needed
- Uncovered base polish
- Neon pink, green, and yellow nail polishes
- Dotting tool
- Base coat and glossy top coat
- Nail file
- Acetone for cleanup
Step-by-Step Guide
- File nails to a medium-length, square shape; apply a base coat and let dry.
- Paint nails with uncovered polish as a base; let dry.
- On accent nails (e.g., ring and middle fingers), use a dotting tool to apply neon pink, green, and yellow dots in random patterns.
- Vary dot sizes for a confetti effect.
- Clean excess polish with acetone.
- Seal with a glossy top coat for shine.
Complementary Color Suggestions
- Playful Pop: Neon dots with white accents.
- Soft Glow: Pair with pastel base colors for contrast.
- Bold Contrast: Use a black base for neon dots to pop.
Tips for Success
- Use a dotting tool for precise dots.
- Apply dots sparingly for balance.
- Practice patterns on paper first.
- Use a glossy top coat for vibrancy.
Creative Variations
- Add a matte top coat for contrast.
- Apply glitter over neon dots.
- Create a gradient base for dots.
- Pair with a tiny star decal.
This design pairs with colorful outfits or silver jewelry, radiating summer joy. Maintain by refreshing the top coat. Neon Confetti Accent Nails are a lively vacation choice.
Watermelon French Tips
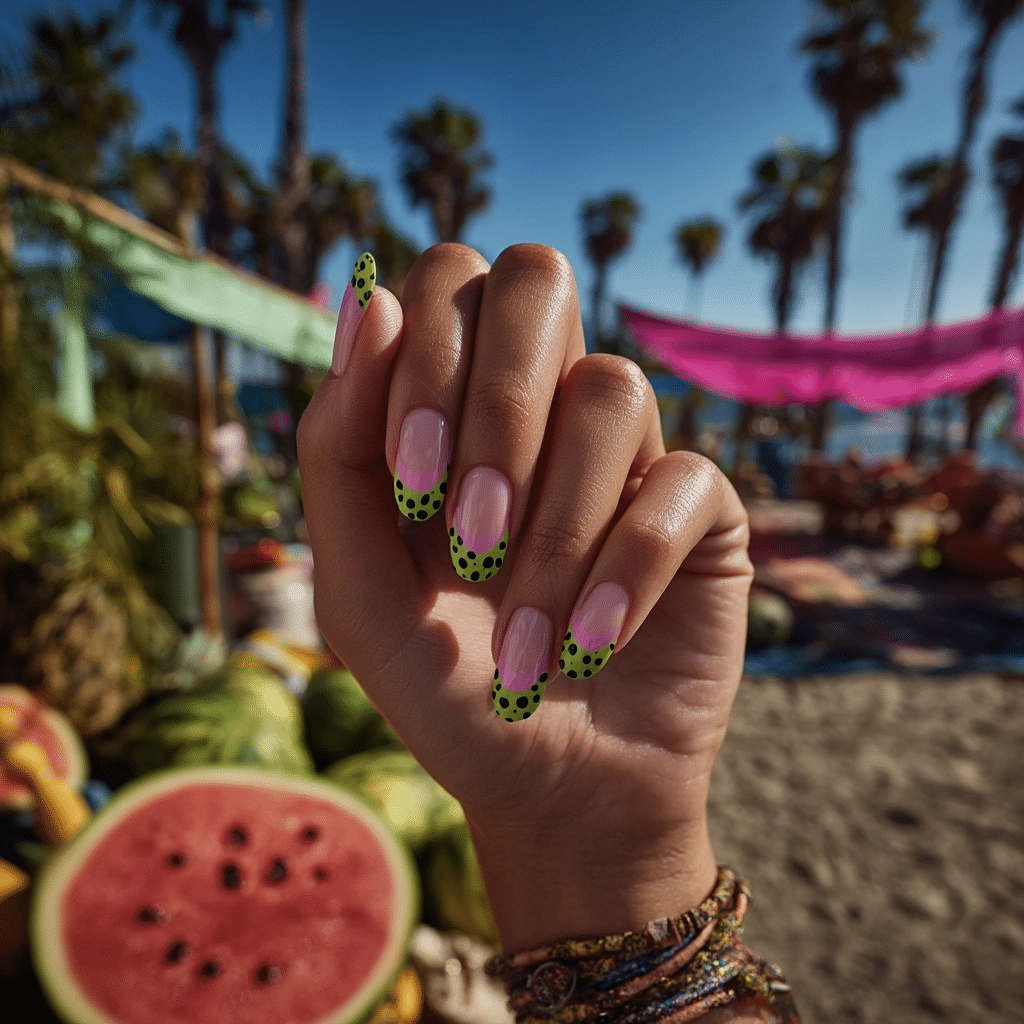
Watermelon French Tips feature pink tips with a green edge and tiny black dots for seeds, offering a playful, summery look. Ideal for beach picnics or summer parties, this design radiates fruity charm.
Tools Needed
- Pink, green, and black nail polishes
- Thin striping tape
- Dotting tool
- Base coat and glossy top coat
- Nail file
- Acetone for cleanup
Step-by-Step Guide
- File nails to a medium-length, oval shape; apply a base coat and let dry.
- Apply striping tape near the nail tips to create a French tip line.
- Paint tips with pink polish; remove tape carefully.
- Add a thin green stripe above the pink using a detail brush.
- Use a dotting tool to add black seed dots on the pink.
- Clean excess polish with acetone.
- Seal with a glossy top coat for shine.
Complementary Color Suggestions
- Fruity Pop: Watermelon tips with yellow accents.
- Soft Glow: Pair with pastel peach for a gradient base.
- Bold Contrast: Use a teal base for tips to pop.
Tips for Success
- Apply tape precisely for clean lines.
- Use a fine brush for green stripes.
- Apply seed dots sparingly.
- Use a glossy top coat for vibrancy.
Creative Variations
- Add a matte top coat for contrast.
- Apply glitter over pink tips.
- Create reverse watermelon tips.
- Pair with a tiny watermelon decal.
This design pairs with bright sundresses or silver jewelry, radiating summer fun. Maintain by refreshing the top coat. Watermelon French Tips are a delightful vacation choice.
Tangerine & Fuchsia Duo Nails
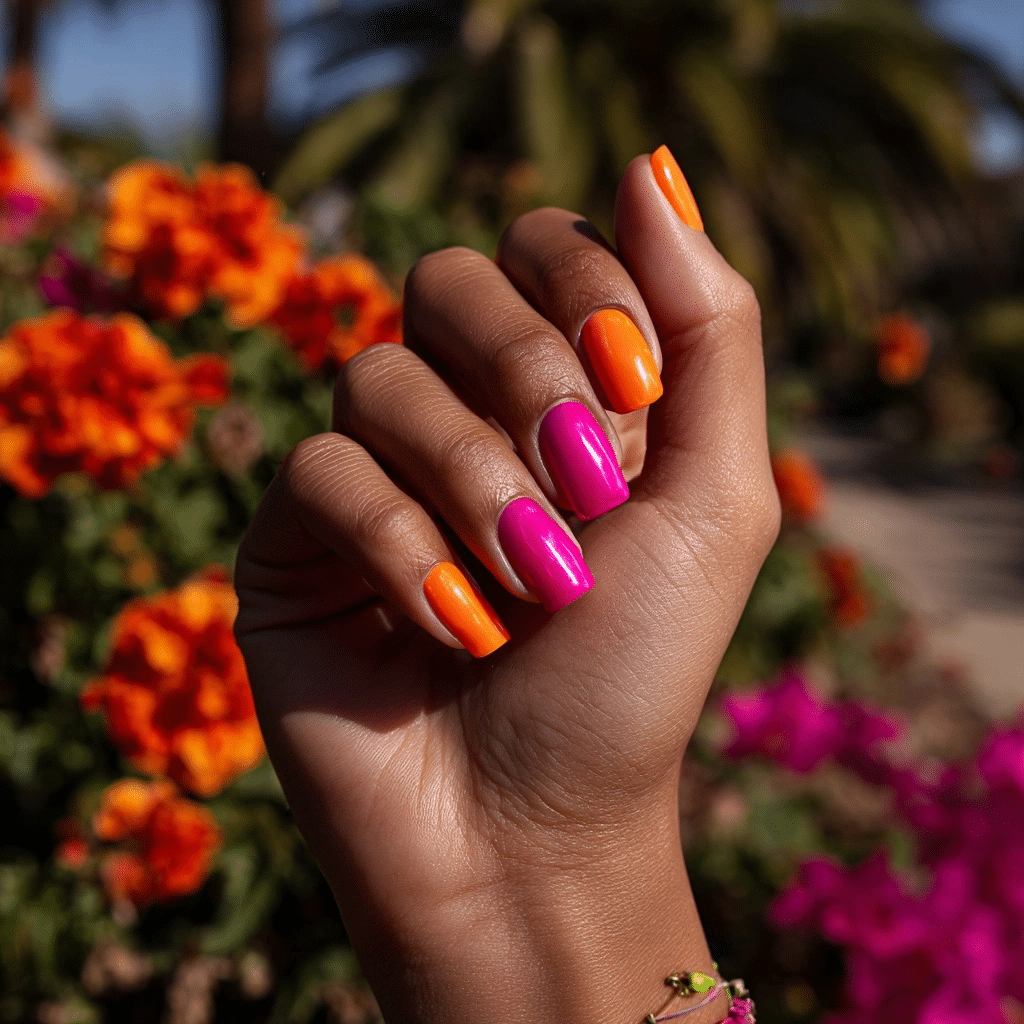
Tangerine & Fuchsia Duo Nails feature each hand painted in a different bright tone (tangerine and fuchsia), offering a bold, summery look. Ideal for summer raves or beach festivals, this design radiates vibrant contrast.
Tools Needed
- Tangerine and fuchsia nail polishes
- Base coat and glossy top coat
- Nail file
- Acetone for cleanup
Step-by-Step Guide
- File nails to a medium-length, square shape; apply a base coat and let dry.
- Paint all nails on one hand with tangerine polish, using two coats for opacity; let dry.
- Paint all nails on the other hand with fuchsia polish, using two coats; let dry.
- Ensure bold, even coverage on both hands.
- Clean excess polish with acetone.
- Seal with a glossy top coat for shine.
Complementary Color Suggestions
- Vivid Pop: Tangerine and fuchsia with white dot accents.
- Soft Glow: Pair with pastel bases for contrast.
- Bold Contrast: Add neon green accents on one nail per hand.
Tips for Success
- Use high-opacity polishes for bold colors.
- Apply thin layers to prevent streaks.
- Clean cuticles for a polished look.
- Use a glossy top coat for vibrancy.
Creative Variations
- Add a matte top coat for contrast.
- Apply silver glitter to accent nails.
- Create a split-color design on each nail.
- Pair with a tiny heart decal.
This design pairs with neon outfits or silver jewelry, radiating summer energy. Maintain by refreshing the top coat. Tangerine & Fuchsia Duo Nails are a trendy vacation choice.
Mint Swirl Design
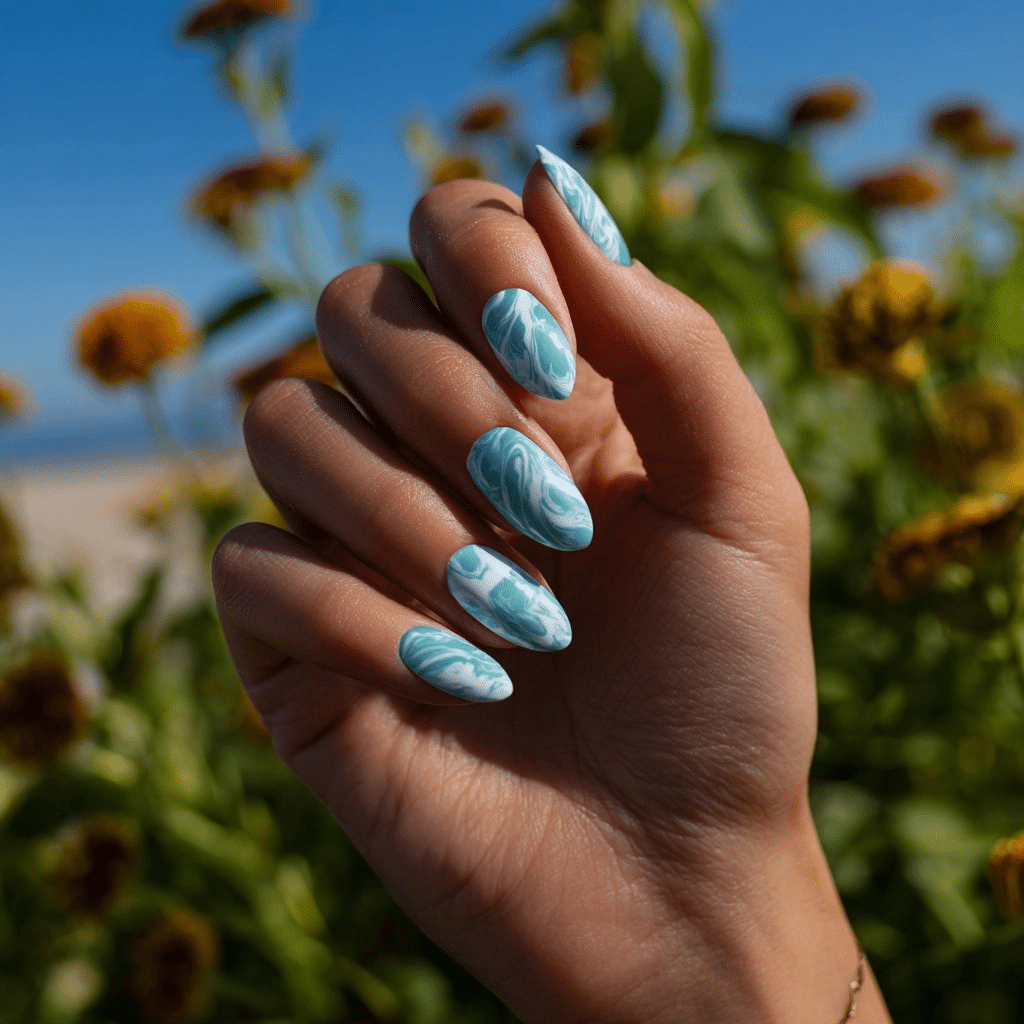
Mint Swirl Design features abstract swirls in soft mint and white over a clear or uncovered base, offering a refreshing, summery look. Ideal for beach brunches or summer soirées, this design radiates cool elegance.
Tools Needed
- Uncovered or clear base polish
- Mint and white nail polishes
- Thin striping brush
- Base coat and glossy top coat
- Nail file
- Acetone for cleanup
Step-by-Step Guide
- File nails to a medium-length, almond shape; apply a base coat and let dry.
- Paint nails with uncovered or clear polish as a base; let dry.
- Using a striping brush, draw wavy mint swirls across each nail.
- Add white swirls, overlapping slightly for depth.
- Clean excess polish with acetone.
- Seal with a glossy top coat for shine.
Complementary Color Suggestions
- Cool Pop: Mint swirls with silver accents.
- Soft Glow: Pair with pastel lavender for a gradient base.
- Bold Contrast: Use neon pink swirls for vibrancy.
Tips for Success
- Use a thin brush for precise swirls.
- Work quickly to blend colors smoothly.
- Practice swirls on paper first.
- Use a glossy top coat for vibrancy.
Creative Variations
- Add a matte top coat for contrast.
- Apply silver glitter over swirls.
- Create tighter, spiral swirls.
- Pair with a tiny leaf decal.
This design pairs with white dresses or silver jewelry, radiating summer freshness. Maintain by refreshing the top coat. Mint Swirl Design is a chic vacation choice.
Sunburst Graphic Nails
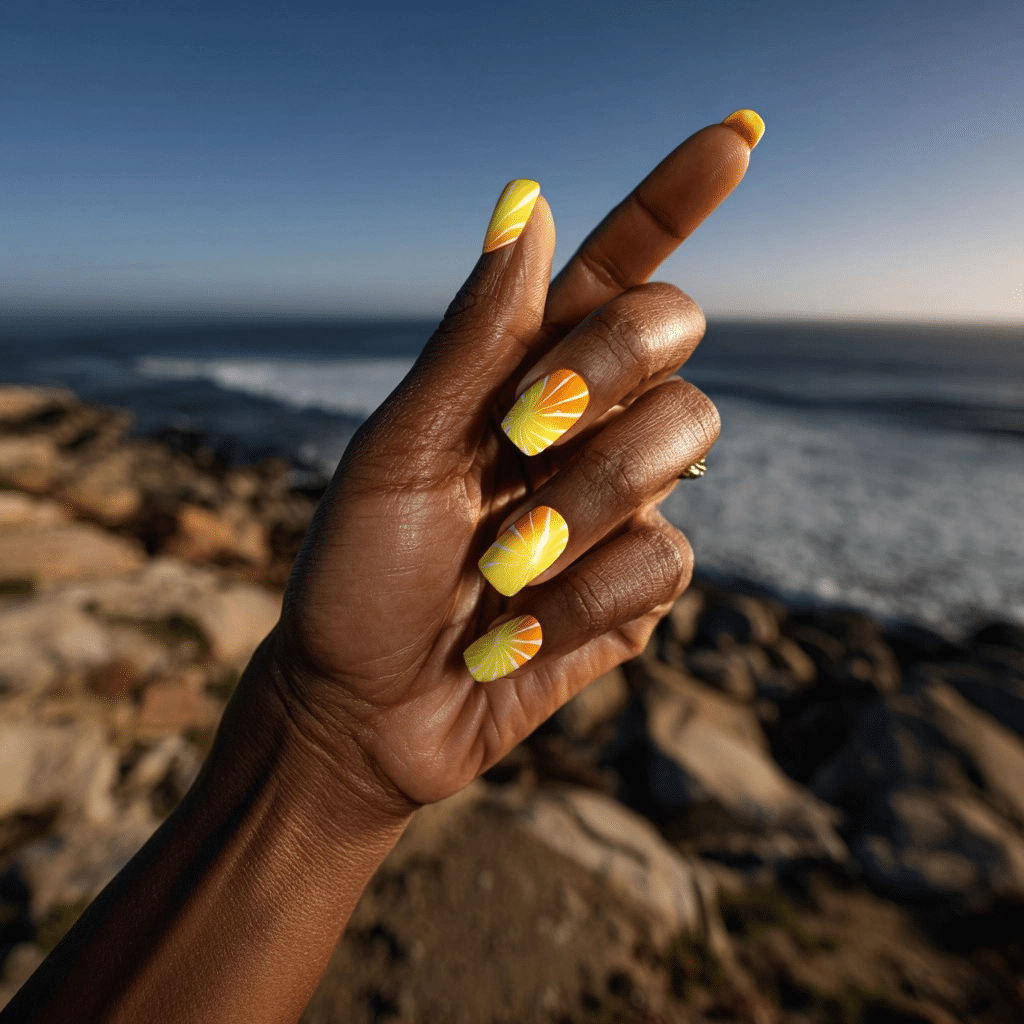
Sunburst Graphic Nails feature linear yellow and orange bursts from one side of the nail, offering a bold, summery look. Ideal for beach parties or tropical festivals, this design radiates radiant energy.
Tools Needed
- Uncovered base polish
- Yellow and orange nail polishes
- Thin striping tape
- Base coat and glossy top coat
- Nail file
- Acetone for cleanup
Step-by-Step Guide
- File nails to a medium-length, square shape; apply a base coat and let dry.
- Paint nails with uncovered polish as a base; let dry.
- Apply striping tape in radiating lines from one nail edge.
- Paint yellow and orange polish between tape lines for a burst effect; remove tape.
- Clean excess polish with acetone.
- Seal with a glossy top coat for shine.
Complementary Color Suggestions
- Bright Pop: Sunburst with white accents.
- Soft Glow: Pair with pastel peach for a gradient base.
- Bold Contrast: Use teal bursts for a vibrant twist.
Tips for Success
- Apply tape precisely for clean lines.
- Remove tape before polish dries.
- Use high-opacity polishes for vibrancy.
- Use a glossy top coat for durability.
Creative Variations
- Add a matte top coat for contrast.
- Apply gold glitter within bursts.
- Create bursts from the cuticle.
- Pair with a tiny sun decal.
This design pairs with bright outfits or gold jewelry, radiating summer intensity. Maintain by refreshing the top coat. Sunburst Graphic Nails are a striking vacation choice.
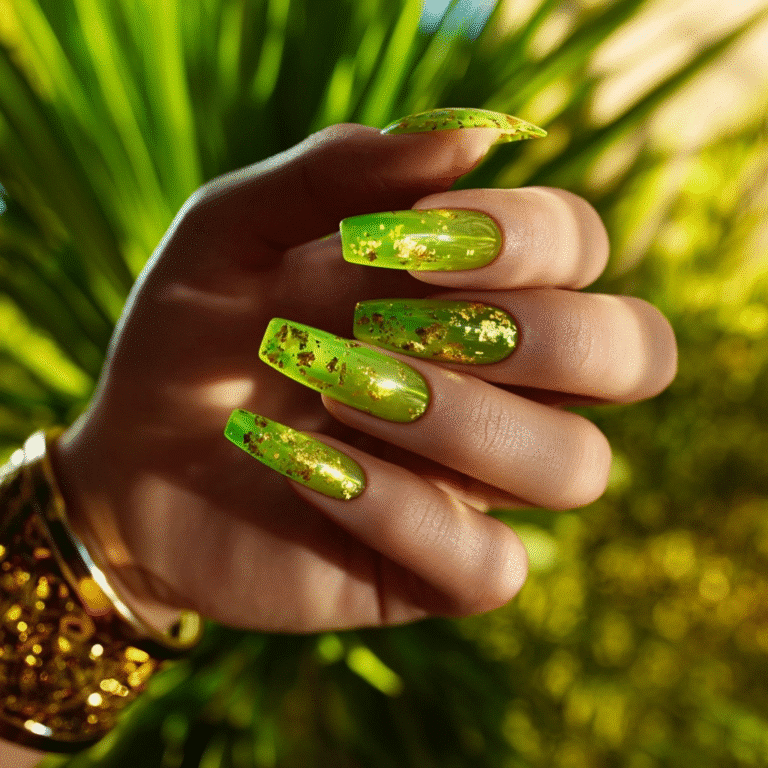
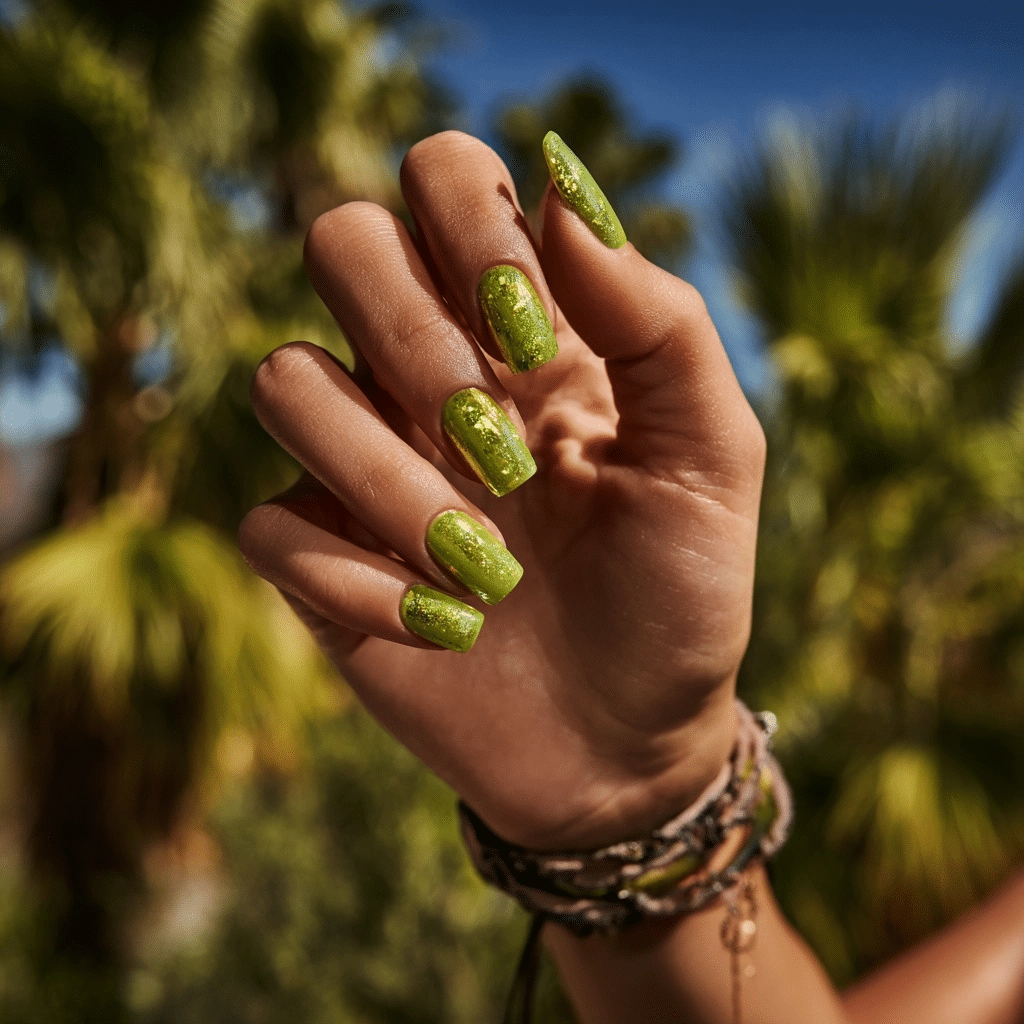
Lime Green Gloss with Gold Foil
Lime Green Gloss with Gold Foil features a glossy neon base accented with subtle flakes of gold, offering a bold, summery look. Ideal for summer raves or beach festivals, this design radiates vibrant glamour.
Tools Needed
- Neon green nail polish
- Gold foil flakes
- Base coat and glossy top coat
- Nail file
- Acetone for cleanup
- Tweezers
Step-by-Step Guide
- File nails to a medium-length, square shape; apply a base coat and let dry.
- Paint nails with neon green polish, using two coats for full opacity; let dry.
- Using tweezers, gently place gold foil flakes on accent nails (e.g., ring finger).
- Press foil lightly to adhere.
- Clean excess polish with acetone.
- Seal with a glossy top coat for shine.
Complementary Color Suggestions
- Shiny Pop: Lime green with white dot accents.
- Soft Glow: Pair with pastel yellow for a gradient base.
- Bold Contrast: Combine with fuchsia for a split nail.
Tips for Success
- Use a high-opacity polish for bold color.
- Apply foil sparingly for balance.
- Seal foil with a top coat to prevent peeling.
- Use a glossy top coat for vibrancy.
Creative Variations
- Add a matte top coat for contrast.
- Apply silver foil instead of gold.
- Create a foil gradient effect.
- Pair with a tiny star decal.
This design pairs with neon outfits or gold jewelry, radiating summer energy. Maintain by refreshing the top coat. Lime Green Gloss with Gold Foil is a trendy vacation choice.
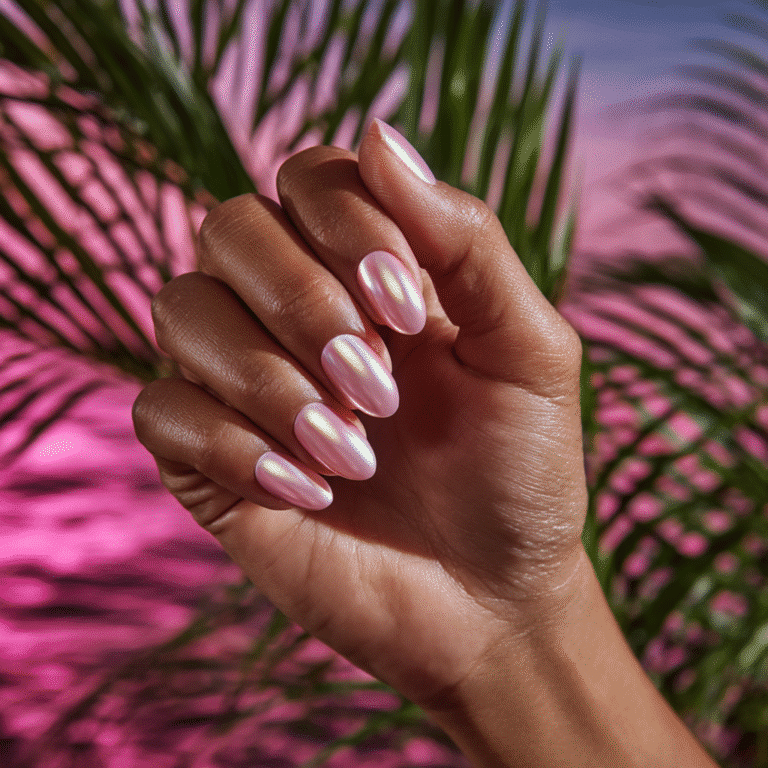
Bright Peach Chrome
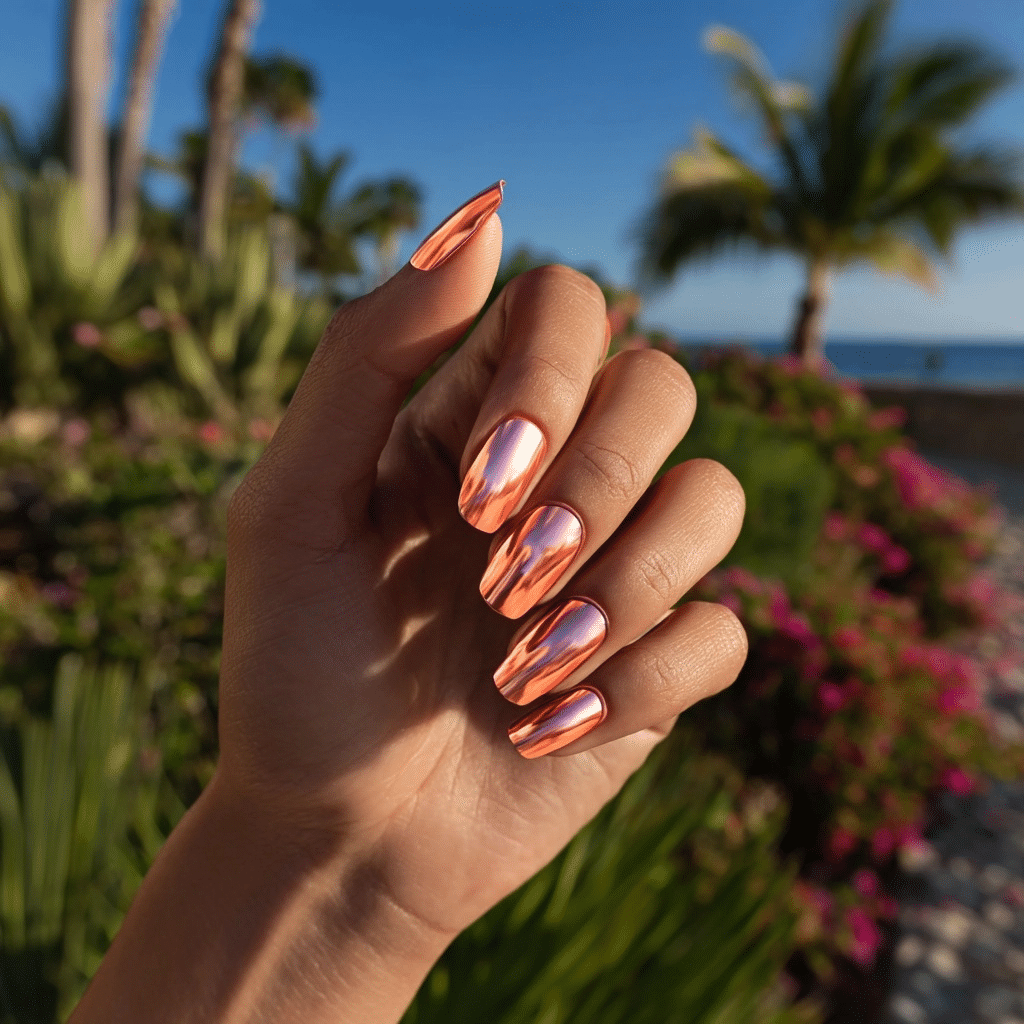
Bright Peach Chrome features a warm peach with a mirrored finish that glows in daylight, offering a bold, summery look. Ideal for beach parties or tropical evenings, this design radiates luxurious vibrancy.
Tools Needed
- Chrome peach nail polish
- Base coat and glossy top coat
- Nail file
- Acetone for cleanup
Step-by-Step Guide
- File nails to a medium-length, coffin shape; apply a base coat and let dry.
- Paint nails with chrome peach polish, using two coats for full shimmer; let dry.
- Ensure even, reflective coverage for a mirror effect.
- Clean excess polish with acetone.
- Seal with a glossy top coat for shine.
Complementary Color Suggestions
- Shiny Pop: Peach chrome with white dot accents.
- Soft Glow: Pair with pastel pink for a gradient base.
- Bold Contrast: Combine with neon green for a split nail.
Tips for Success
- Use a high-quality chrome polish for shimmer.
- Apply thin layers for smoothness.
- Clean cuticles for a polished look.
- Use a glossy top coat for vibrancy.
Creative Variations
- Add a matte top coat for contrast.
- Apply gold foil flecks for extra sparkle.
- Create a chrome French tip.
- Pair with a tiny peach decal.
This design pairs with bold outfits or gold jewelry, radiating summer glamour. Maintain by refreshing the top coat. Bright Peach Chrome is a stunning vacation choice.
Neon Wavy Tips
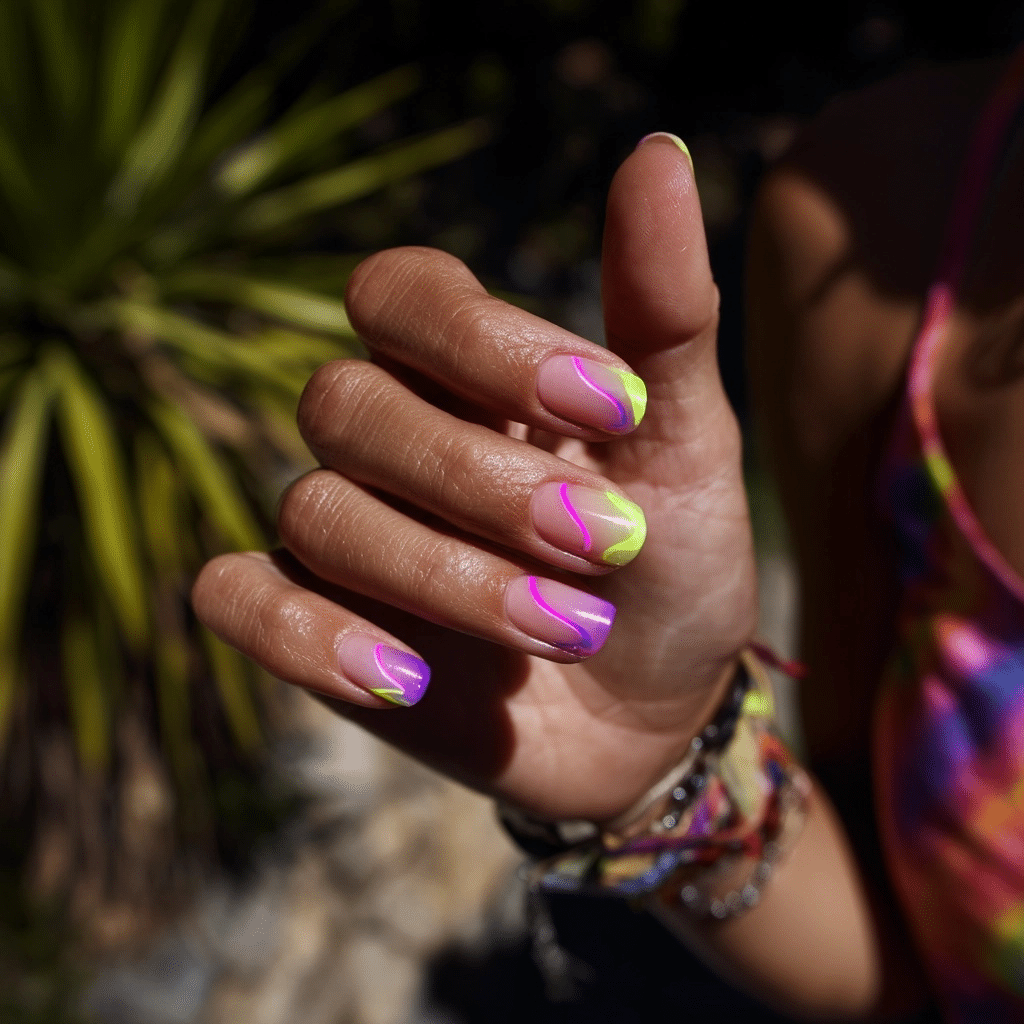
Neon Wavy Tips feature bright curved French lines in pink, purple, or lime, offering a playful, summery look. Ideal for summer festivals or beach outings, this design radiates dynamic energy.
Tools Needed
- Uncovered base polish
- Neon pink, purple, and lime nail polishes
- Thin detail brush
- Base coat and glossy top coat
- Nail file
- Acetone for cleanup
Step-by-Step Guide
- File nails to a medium-length, square shape; apply a base coat and let dry.
- Paint nails with uncovered polish as a base; let dry.
- Using a detail brush, paint wavy neon pink lines across the tips of some nails.
- Repeat with purple and lime on other nails for variety.
- Clean excess polish with acetone.
- Seal with a glossy top coat for shine.
Complementary Color Suggestions
- Vivid Pop: Neon wavy tips with white accents.
- Soft Glow: Pair with pastel base colors for contrast.
- Bold Contrast: Use a black base for neon lines to pop.
Tips for Success
- Use a fine brush for precise wavy lines.
- Practice wave patterns on paper first.
- Apply thin layers for clean lines.
- Use a glossy top coat for vibrancy.
Creative Variations
- Add a matte top coat for contrast.
- Apply glitter over neon lines.
- Create double wavy lines.
- Pair with a tiny star decal.
This design pairs with colorful outfits or silver jewelry, radiating summer fun. Maintain by refreshing the top coat. Neon Wavy Tips are a lively vacation choice.
Sky Blue with White Clouds
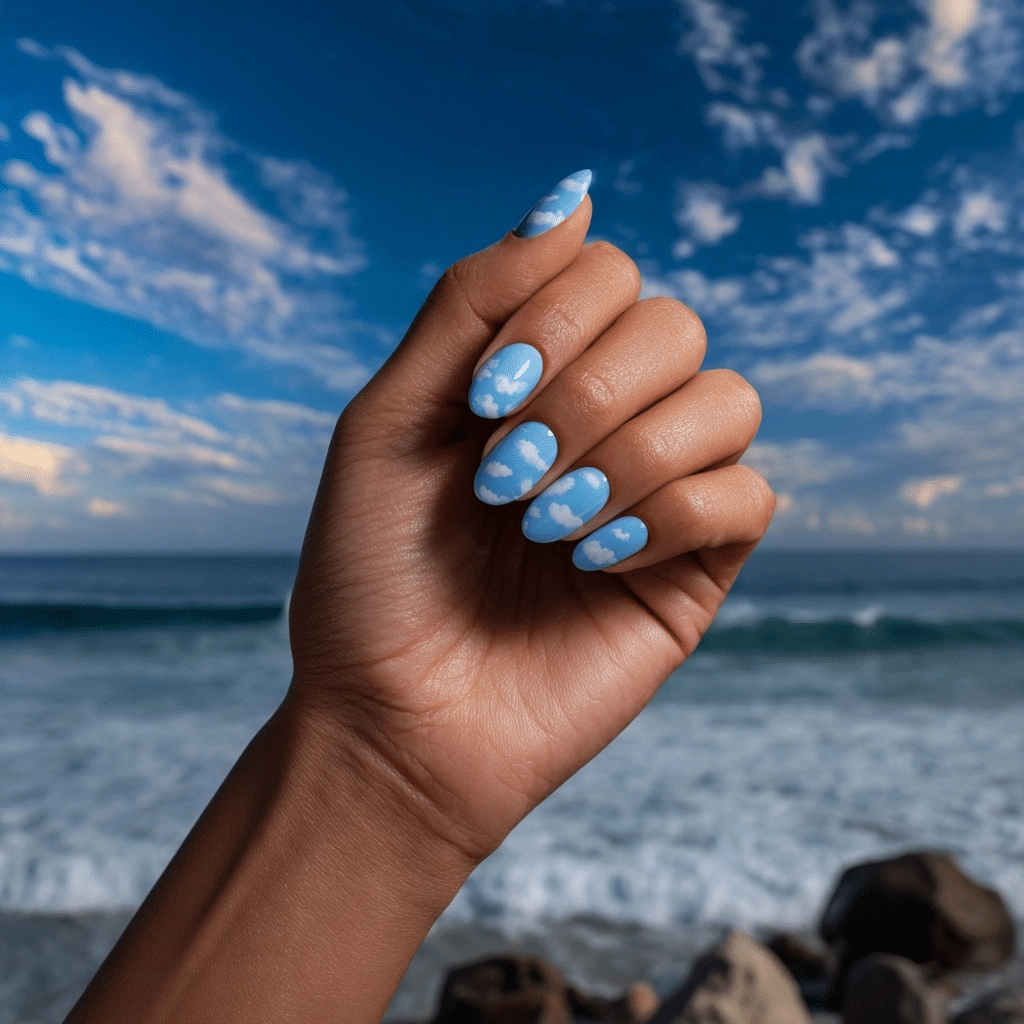
Sky Blue with White Clouds features a glossy blue base dotted with soft cloud art, offering a serene, summery look. Ideal for beach strolls or tropical getaways, this design radiates dreamy charm.
Tools Needed
- Sky blue nail polish
- White nail polish
- Dotting tool
- Base coat and glossy top coat
- Nail file
- Acetone for cleanup
Step-by-Step Guide
- File nails to a medium-length, oval shape; apply a base coat and let dry.
- Paint nails with sky blue polish, using two coats for full opacity; let dry.
- On accent nails (e.g., ring finger), use a dotting tool to create white cloud shapes with small, overlapping dots.
- Add clouds sparingly for a balanced look.
- Clean excess polish with acetone.
- Seal with a glossy top coat for shine.
Complementary Color Suggestions
- Dreamy Pop: Blue with yellow sun accents.
- Soft Glow: Pair with pastel mint for a gradient base.
- Bold Contrast: Use neon pink clouds for vibrancy.
Tips for Success
- Use a dotting tool for soft cloud shapes.
- Apply clouds sparingly for balance.
- Practice cloud designs on paper first.
- Use a glossy top coat for vibrancy.
Creative Variations
- Add a matte top coat for contrast.
- Apply silver glitter around clouds.
- Create a sunset sky base.
- Pair with a tiny star decal.
This design pairs with white dresses or silver jewelry, radiating summer calm. Maintain by refreshing the top coat. Sky Blue with White Clouds is a refreshing vacation choice.
Popsicle Stripe Nails
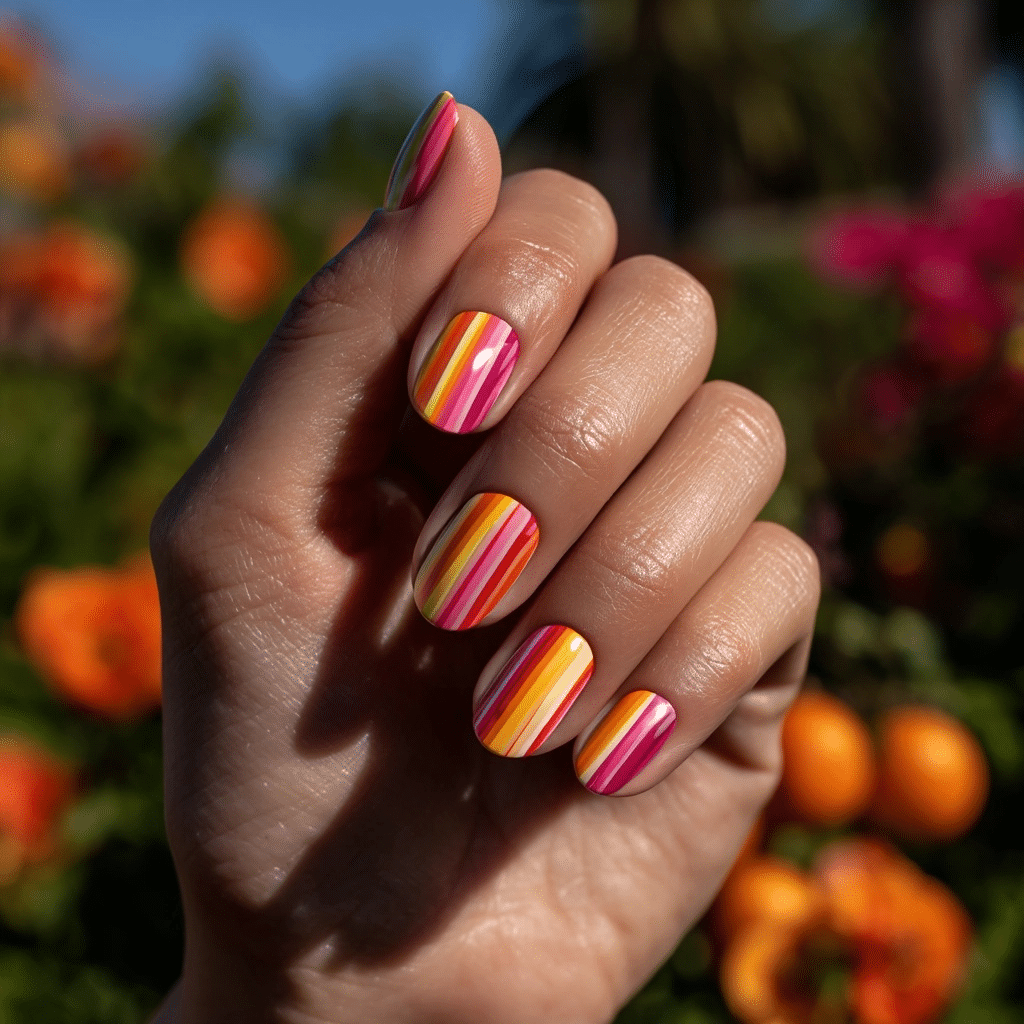
Popsicle Stripe Nails feature bright vertical stripes in watermelon red, mango orange, and banana yellow, offering a vibrant, summery look. Ideal for beach picnics or summer festivals, this design radiates colorful fun.
Tools Needed
- Red, orange, and yellow nail polishes
- Thin striping tape
- Base coat and glossy top coat
- Nail file
- Acetone for cleanup
Step-by-Step Guide
- File nails to a medium-length, square shape; apply a base coat and let dry.
- Apply striping tape vertically to create even sections.
- Paint sections with red, orange, and yellow polishes, alternating colors; remove tape carefully.
- Repeat for all nails, varying stripe patterns.
- Clean excess polish with acetone.
- Seal with a glossy top coat for shine.
Complementary Color Suggestions
- Fruity Pop: Stripes with white accents.
- Soft Glow: Pair with pastel base colors for contrast.
- Bold Contrast: Use a black base for stripes to pop.
Tips for Success
- Apply tape precisely for clean lines.
- Remove tape before polish dries.
- Use high-opacity polishes for vibrancy.
- Use a glossy top coat for durability.
Creative Variations
- Add a matte top coat for contrast.
- Apply glitter over stripes.
- Create diagonal stripes.
- Pair with a tiny popsicle decal.
This design pairs with colorful outfits or silver jewelry, radiating summer joy. Maintain by refreshing the top coat. Popsicle Stripe Nails are a lively vacation choice.
Cherry Red Short Nails
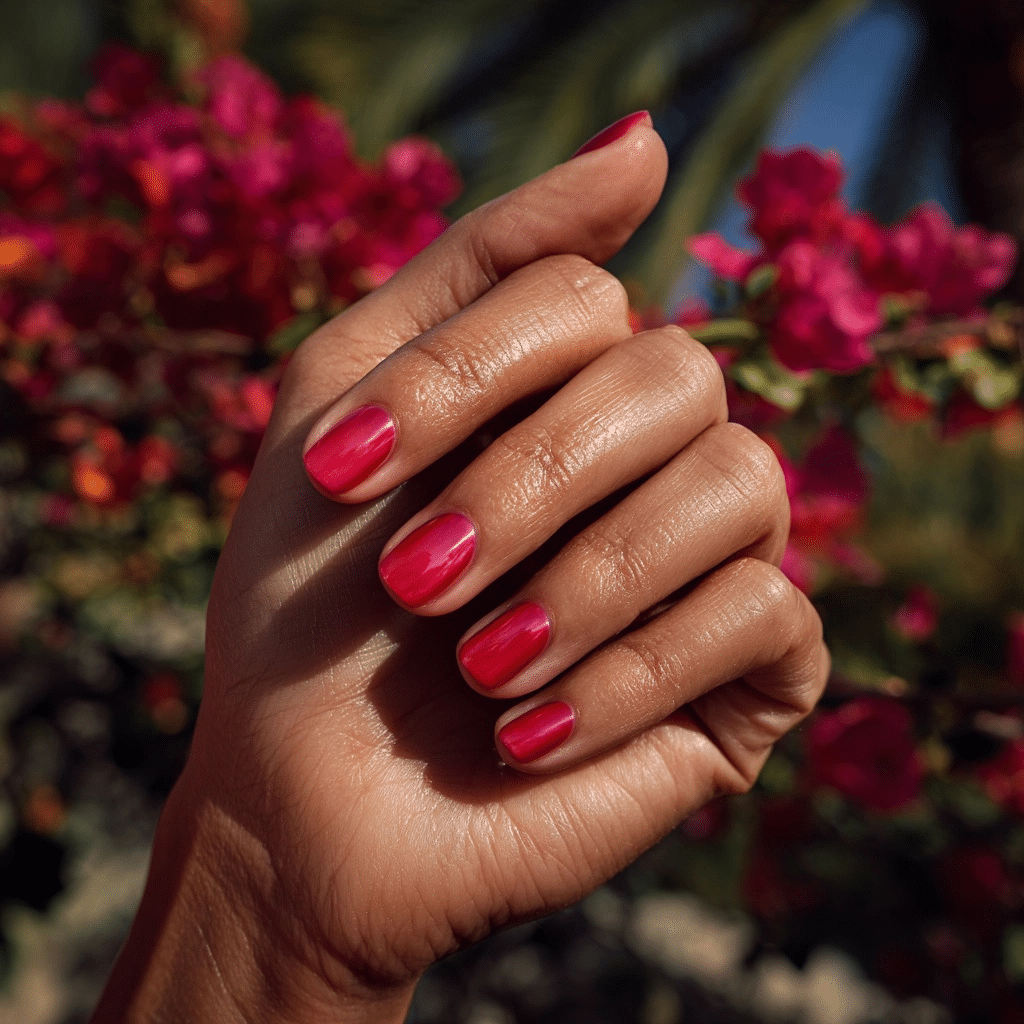
Cherry Red Short Nails feature a clean and bold red with a jelly-gloss finish, offering a classic, summery look. Ideal for summer parties or tropical brunches, this design radiates vibrant sophistication.
Tools Needed
- Cherry red nail polish
- Base coat and glossy top coat
- Nail file
- Acetone for cleanup
Step-by-Step Guide
- File nails to a short, square shape; apply a base coat and let dry.
- Paint nails with cherry red polish, using two coats for a jelly-gloss effect; let dry.
- Ensure bold, even coverage with a translucent sheen.
- Clean excess polish with acetone.
- Seal with a glossy top coat for shine.
Complementary Color Suggestions
- Classic Pop: Cherry red with white dot accents.
- Soft Glow: Pair with pastel pink for a gradient base.
- Bold Contrast: Combine with black for a split nail.
Tips for Success
- Use a high-opacity polish for bold color.
- Apply thin layers for a jelly effect.
- Clean cuticles for a polished look.
- Use a glossy top coat for vibrancy.
Creative Variations
- Add a matte top coat for contrast.
- Apply silver glitter to accent nails.
- Create a red French tip.
- Pair with a tiny cherry decal.
This design pairs with bold outfits or gold jewelry, radiating summer glamour. Maintain by refreshing the top coat. Cherry Red Short Nails are a timeless vacation choice.
Pastel Neon Tie-Dye
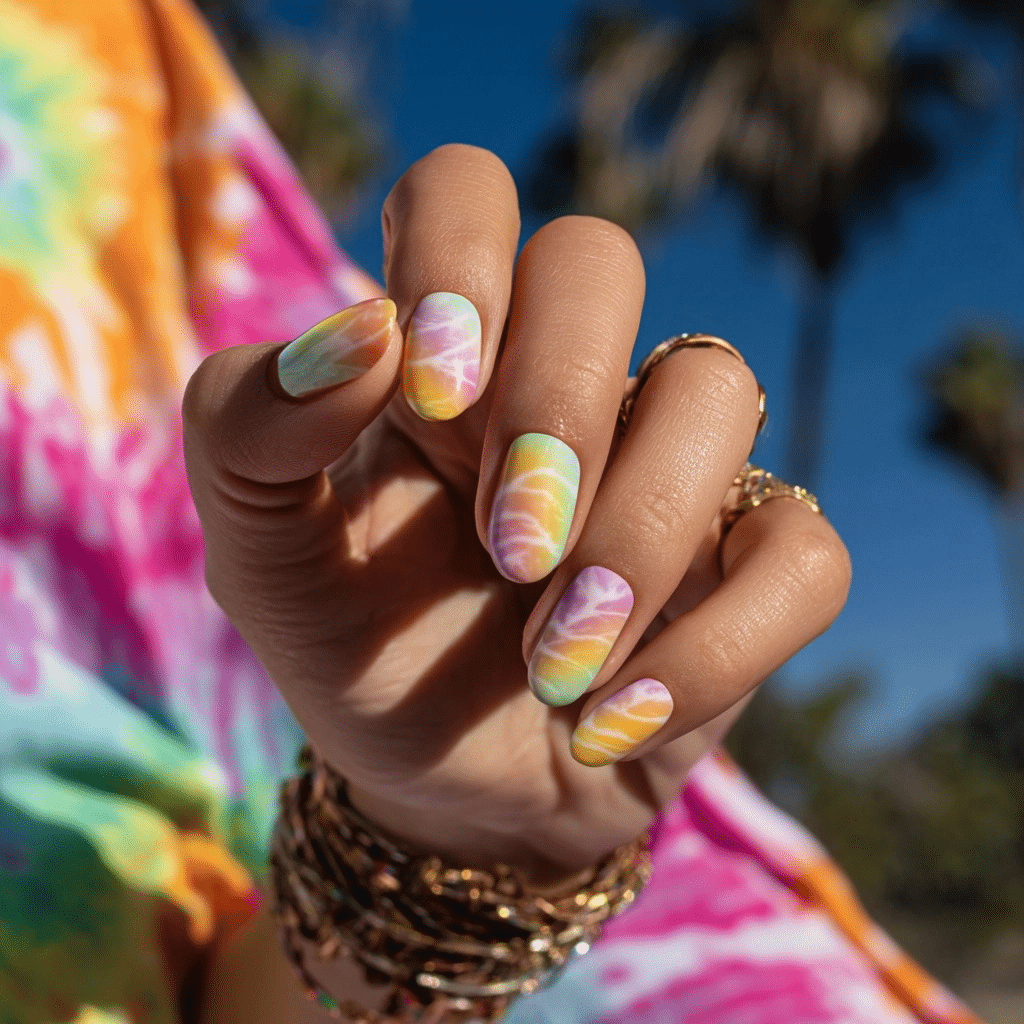
Pastel Neon Tie-Dye features swirled pastel and neon shades in an airy, watercolor effect, offering a dreamy, summery look. Ideal for summer festivals or beach outings, this design radiates whimsical vibrancy.
Tools Needed
- Pastel pink, yellow, and neon green nail polishes
- Clear polish
- Thin striping brush
- Base coat and glossy top coat
- Nail file
- Acetone for cleanup
Step-by-Step Guide
- File nails to a medium-length, oval shape; apply a base coat and let dry.
- Paint nails with clear polish as a base; let dry slightly (still tacky).
- Using a striping brush, dab pastel pink, yellow, and neon green polishes in random patches.
- Swirl colors gently with the brush for a tie-dye effect.
- Clean excess polish with acetone.
- Seal with a glossy top coat for shine.
Complementary Color Suggestions
- Dreamy Pop: Tie-dye with white accents.
- Soft Glow: Pair with pastel lavender for a base gradient.
- Bold Contrast: Use neon purple for added vibrancy.
Tips for Success
- Work quickly while polish is wet for blending.
- Use a light hand for a watercolor effect.
- Practice swirls on paper first.
- Use a glossy top coat for vibrancy.
Creative Variations
- Add a matte top coat for contrast.
- Apply glitter over tie-dye patches.
- Create a single-color tie-dye effect.
- Pair with a tiny star decal.
This design pairs with pastel outfits or silver jewelry, radiating summer joy. Maintain by refreshing the top coat. Pastel Neon Tie-Dye is a delightful vacation choice.
Bright summer nail designs offer more than just color—they deliver character. They’re mood-boosters, outfit enhancers, and confidence sparks. Whether you go all-in on neon flames or keep it minimal with colorful tips, your nails become part of your summer identity.
So let this season inspire your boldest, happiest self. Choose colors that reflect how you want to feel, patterns that make you smile, and styles that show off your glow. Because when the days are this bright, your nails should be, too.