Coastal Calm: Nail Designs That Bring the Beach to Your Fingertips
There’s something about the beach that stays with us long after we’ve left. The soft crash of waves, the shimmer of light on water, the feeling of sun-warmed sand—it’s sensory magic. And in 2025, beach-inspired nail art captures that same energy. These designs aren’t just seasonal—they’re transportive, offering a mini-escape in the form of polish.
This year’s beachy nail trends are breezy, wearable, and filled with texture. From sea-glass finishes to delicate shell patterns and sunset hues, each style channels the relaxed elegance of a perfect day by the shore.
Why I Love It
I love beachy nails because they bring that feeling of calm and clarity into everyday life. Even if I’m nowhere near the ocean, a seafoam gradient or shell-white polish makes me feel just a bit more relaxed and refreshed. These designs are soft, natural, and easy to wear—no matter your destination.
They also allow for creativity without excess. You don’t need bold color to make a statement; sometimes a wavy line in beige and blue says more. These looks are understated, stylish, and always effortless—exactly what summer should be.
15 Summer Beachy Nail Designs Guide
These 15 summer beachy nail designs for 2025 capture the serene, shimmering essence of coastal escapes, from sandy shores to turquoise waves. Each design is inspired by the ocean’s beauty, featuring soft gradients, chrome finishes, and intricate nail art. Detailed steps, tools, and variations ensure accessibility for all skill levels, embodying summer’s coastal charm. The term “uncovered” is used for base polishes to align with sensitivity guidelines.
Seafoam Gradient Nails
Seafoam Gradient Nails feature a soft fade from sandy uncovered to pale turquoise, offering a serene, beachy look. Ideal for coastal strolls or summer getaways, this design radiates tranquil vibrancy.
Tools Needed
- Sandy uncovered and pale turquoise nail polishes
- Makeup sponge
- Base coat and glossy top coat
- Nail file
- Acetone for cleanup
Step-by-Step Guide
- File nails to a medium-length, almond shape; apply a base coat and let dry.
- Paint nails with a clear base; let dry.
- Dab sandy uncovered and pale turquoise polishes onto a makeup sponge, blending slightly.
- Press sponge onto nails, creating a gradient from uncovered to turquoise; repeat for opacity.
- Clean excess polish with acetone.
- Seal with a glossy top coat for shine.
Complementary Color Suggestions
- Soft Pop: Gradient with white wave accents.
- Dreamy Glow: Pair with pastel blue for a tri-color fade.
- Bold Contrast: Add neon coral accent nails.
Tips for Success
- Use a sponge for seamless blending.
- Apply thin layers to avoid clumps.
- Practice gradient on paper first.
- Use a glossy top coat for vibrancy.
Creative Variations
- Add a matte top coat for contrast.
- Apply silver glitter in the gradient.
- Create a vertical gradient effect.
- Pair with a tiny seashell decal.
This design pairs with white dresses or silver jewelry, radiating coastal calm. Maintain by refreshing the top coat. Seafoam Gradient Nails is a refreshing vacation choice.
Mini Seashell Accent Nails
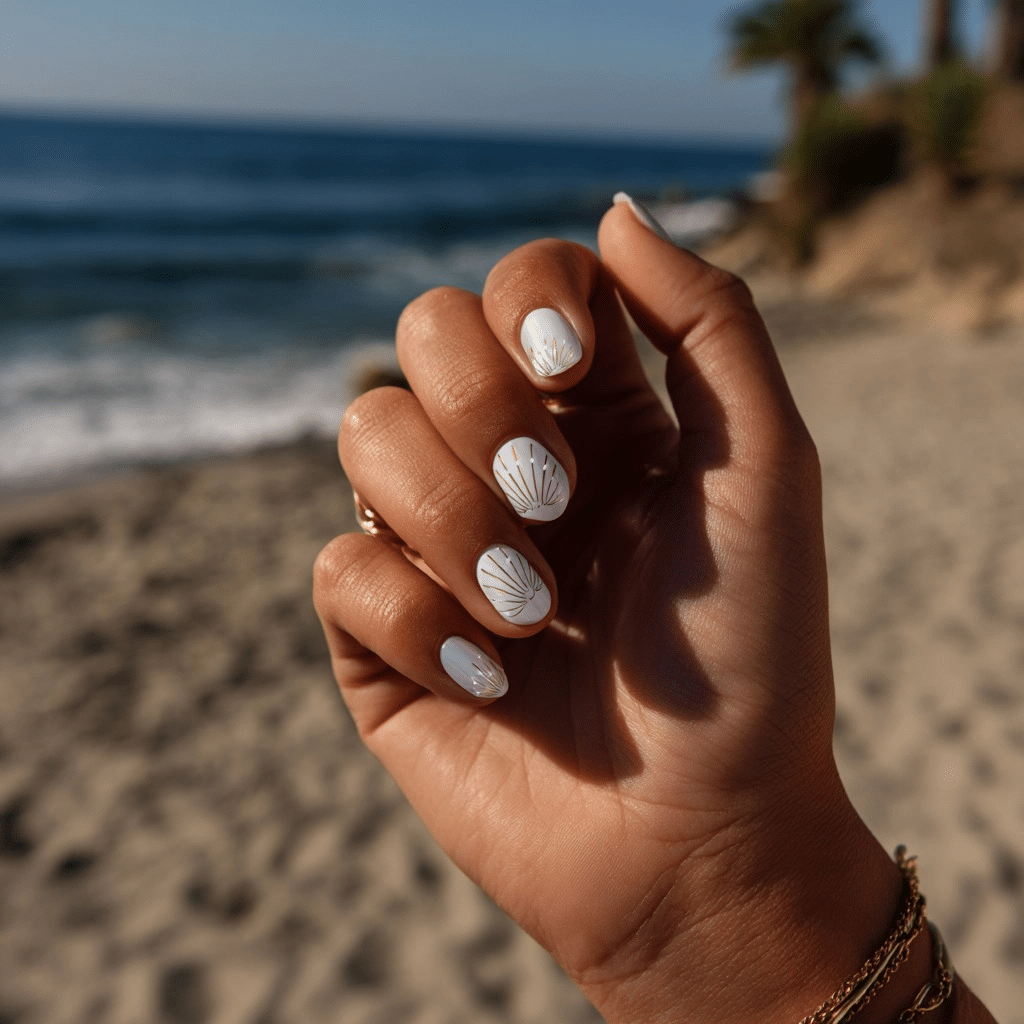
Mini Seashell Accent Nails feature a white or pearly base with tiny shell decals or hand-drawn art, offering a delicate, beachy look. Ideal for beach picnics or summer weddings, this design radiates oceanic charm.
Tools Needed
- White or pearly base polish
- White and beige nail polishes (for hand-drawn shells)
- Thin detail brush or seashell decals
- Tweezers (for decals)
- Base coat and glossy top coat
- Nail file
- Acetone for cleanup
Step-by-Step Guide
- File nails to a medium-length, oval shape; apply a base coat and let dry.
- Paint nails with white or pearly polish as a base; let dry.
- On accent nails (e.g., ring finger), apply seashell decals with tweezers or use a detail brush to paint tiny white shells with beige ridges.
- Add small details for depth if hand-painting.
- Clean excess polish with acetone.
- Seal with a glossy top coat for shine.
Complementary Color Suggestions
- Delicate Pop: Shells with silver glitter accents.
- Soft Glow: Pair with pastel blue for a gradient base.
- Bold Contrast: Use coral base for shells to pop.
Tips for Success
- Use tweezers for precise decal placement.
- Practice shell designs on paper if hand-painting.
- Seal decals with a top coat to prevent peeling.
- Use a glossy top coat for vibrancy.
Creative Variations
- Add a matte top coat for contrast.
- Apply pearl dust over shells.
- Include starfish decals.
- Pair with a tiny wave decal.
This design pairs with pastel dresses or pearl jewelry, radiating summer sweetness. Maintain by refreshing the top coat. Mini Seashell Accent Nails is a romantic vacation choice.
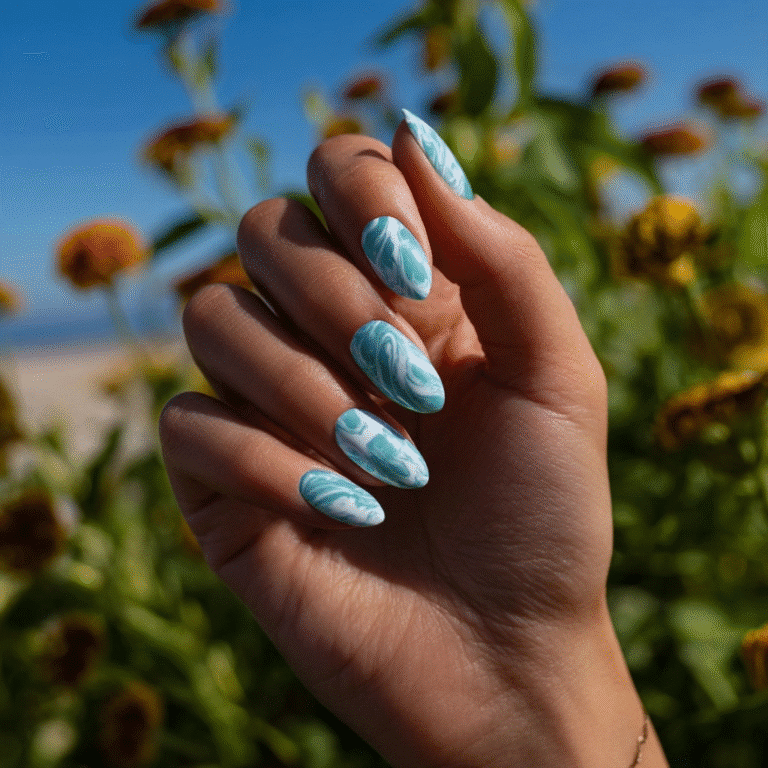
Ocean Wave Marble Nails
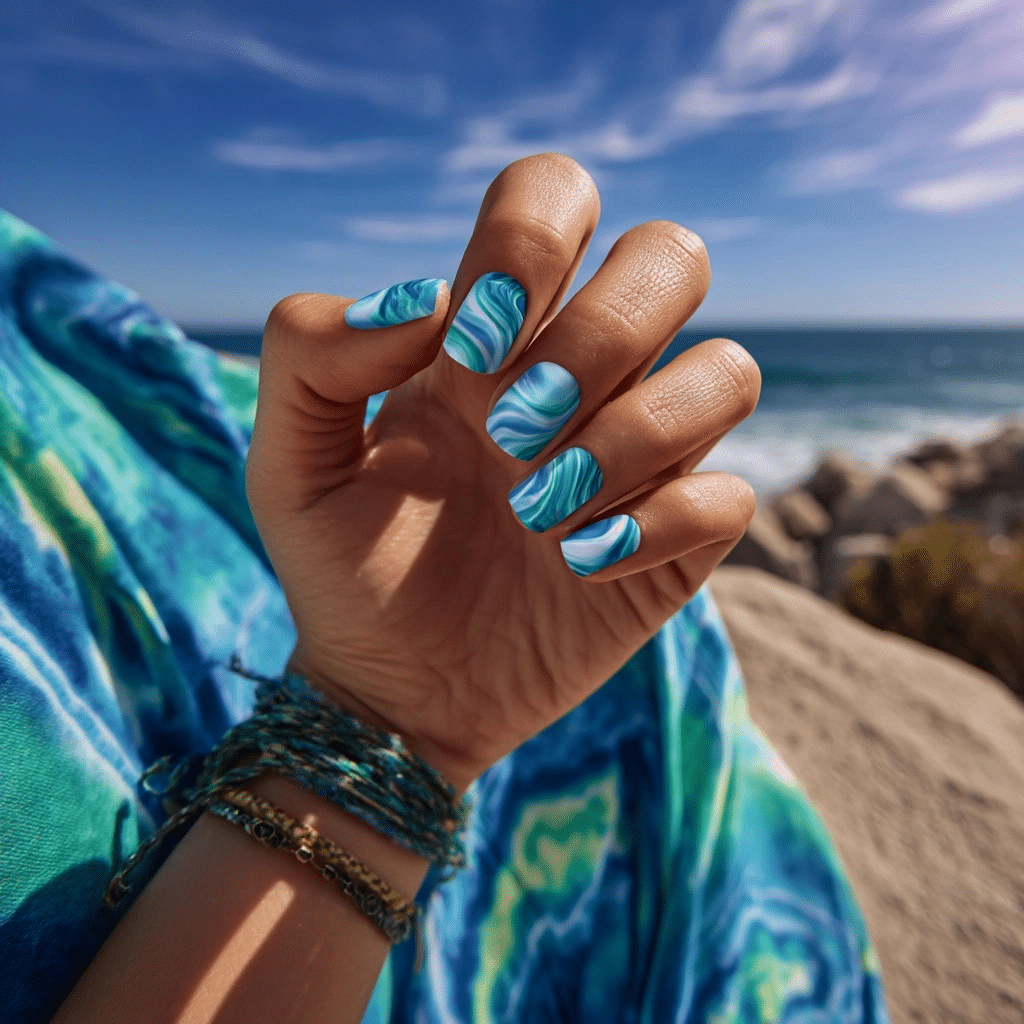
Ocean Wave Marble Nails feature swirls of blue, white, and teal for a dynamic sea-inspired look, offering a vibrant, beachy design. Ideal for beach parties or tropical getaways, this design radiates oceanic energy.
Tools Needed
- Blue, white, and teal nail polishes
- Thin detail brush
- Plastic wrap or water marbling tool
- Base coat and glossy top coat
- Nail file
- Acetone for cleanup
Step-by-Step Guide
- File nails to a medium-length, square shape; apply a base coat and let dry.
- Paint nails with white polish as a base; let dry slightly (still tacky).
- Dab blue and teal polishes randomly on nails; crumple plastic wrap and press onto nails to create a marbled effect.
- Use a detail brush to add white wave-like swirls for depth.
- Clean excess polish with acetone.
- Seal with a glossy top coat for shine.
Complementary Color Suggestions
- Vivid Pop: Marble with silver glitter accents.
- Soft Glow: Pair with pastel green for a gradient base.
- Bold Contrast: Use neon blue for bolder swirls.
Tips for Success
- Work quickly while polish is wet for marbling.
- Use plastic wrap for a natural wave effect.
- Practice marbling on paper first.
- Use a glossy top coat for vibrancy.
Creative Variations
- Add a matte top coat for contrast.
- Apply holographic glitter in the marble.
- Create a single-color marble effect.
- Pair with a tiny starfish decal.
This design pairs with blue outfits or silver jewelry, radiating summer intensity. Maintain by refreshing the top coat. Ocean Wave Marble Nails is a striking vacation choice.
Sandy Beige with Gold Foil
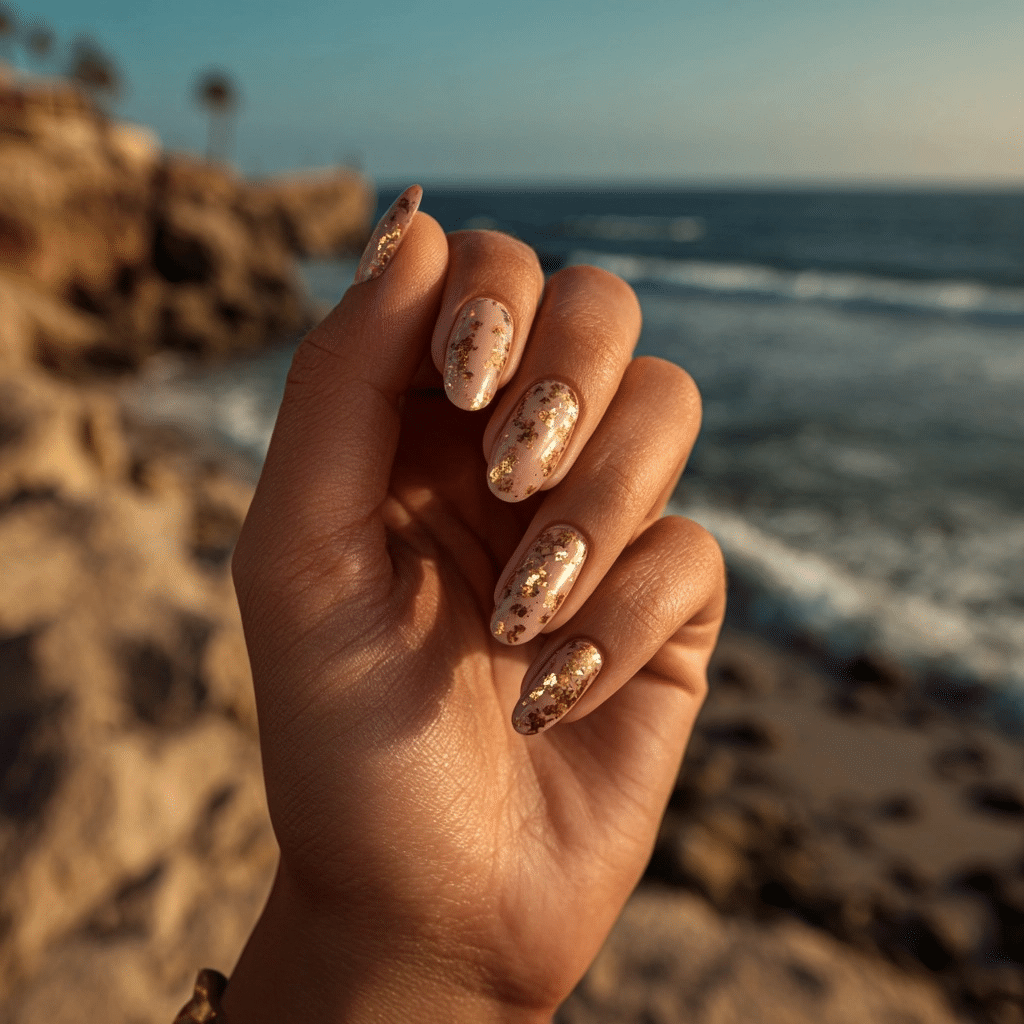
Sandy Beige with Gold Foil features a warm neutral polish with scattered metallic foil for beach shimmer, offering a chic, beachy look. Ideal for coastal dinners or summer soirées, this design radiates elegant sparkle.
Tools Needed
- Sandy beige nail polish
- Gold foil sheets
- Foil adhesive
- Base coat and glossy top coat
- Nail file
- Acetone for cleanup
Step-by-Step Guide
- File nails to a medium-length, almond shape; apply a base coat and let dry.
- Paint nails with sandy beige polish, using two coats for full opacity; let dry.
- Apply foil adhesive to random areas on nails; let dry until tacky.
- Press gold foil sheets onto adhesive areas, then peel off to leave scattered shimmer.
- Clean excess polish with acetone.
- Seal with a glossy top coat for shine.
Complementary Color Suggestions
- Shiny Pop: Foil with white wave accents.
- Soft Glow: Pair with pastel peach for a gradient base.
- Bold Contrast: Use rose gold foil for warmth.
Tips for Success
- Apply foil adhesive sparingly for a scattered effect.
- Use tweezers for precise foil placement.
- Seal foil with a top coat to prevent peeling.
- Use a glossy top coat for durability.
Creative Variations
- Add a matte top coat for contrast.
- Apply silver foil for a cooler tone.
- Create a foil French tip.
- Pair with a tiny shell decal.
This design pairs with neutral outfits or gold jewelry, radiating summer elegance. Maintain by refreshing the top coat. Sandy Beige with Gold Foil is a luxurious vacation choice.
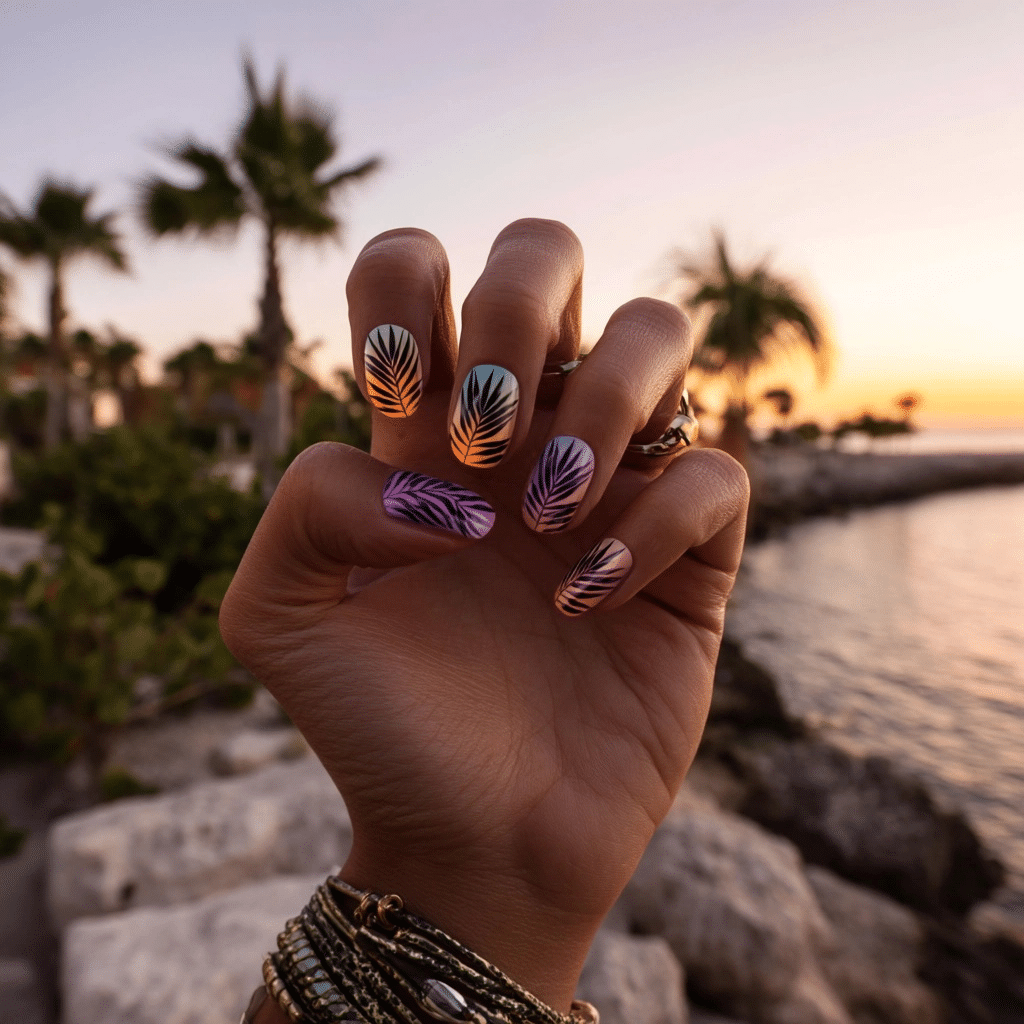
Palm Tree Silhouettes
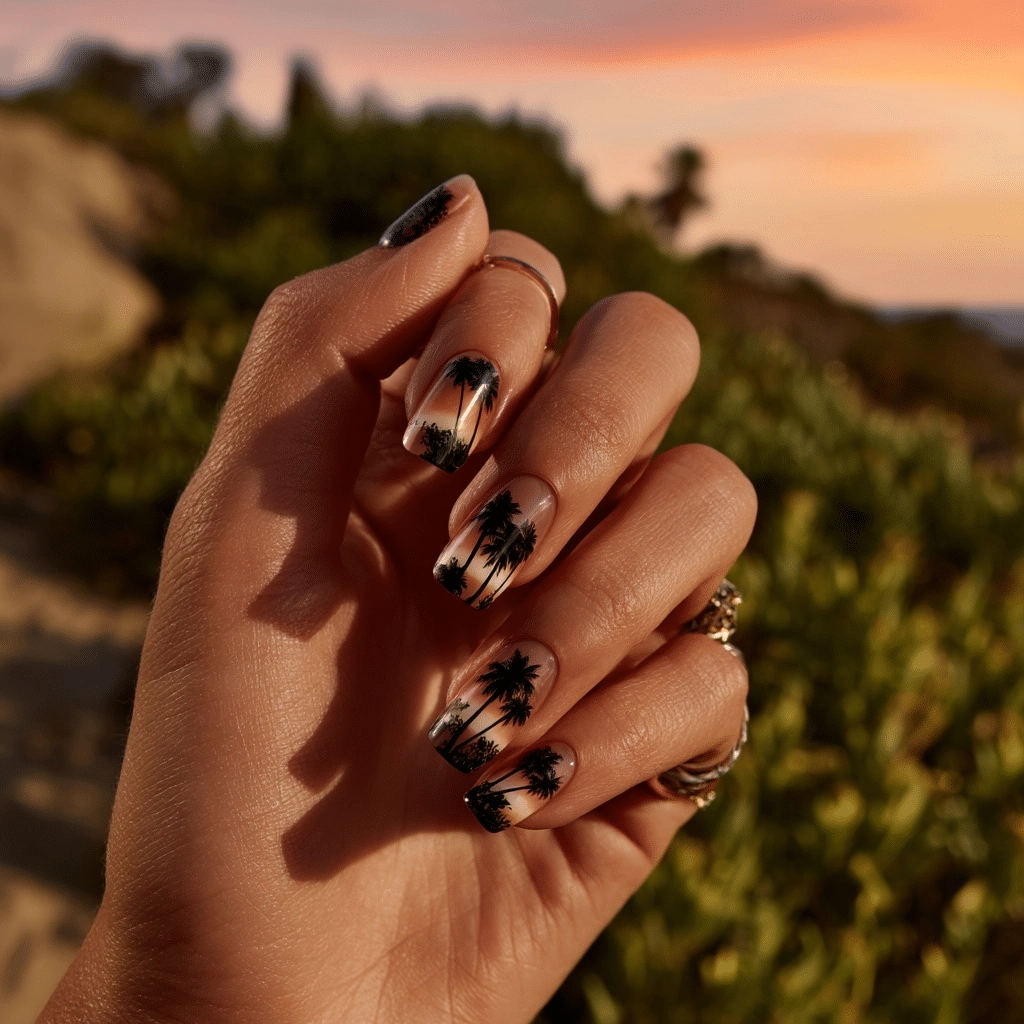
Palm Tree Silhouettes feature black palm outlines over sunset ombré or clear polish, offering a tropical, beachy look. Ideal for beach sunsets or island escapes, this design radiates coastal charm.
Tools Needed
- Orange, pink, and clear nail polishes (for ombré)
- Black nail polish
- Thin detail brush or palm tree stencils
- Makeup sponge (for ombré)
- Base coat and glossy top coat
- Nail file
- Acetone for cleanup
Step-by-Step Guide
- File nails to a medium-length, square shape; apply a base coat and let dry.
- For ombré base, dab orange and pink polishes onto a makeup sponge; press onto nails for a sunset gradient (or use clear polish); let dry.
- Apply palm tree stencils or use a detail brush to paint black palm silhouettes on each nail.
- Add small frond details for depth.
- Clean excess polish with acetone.
- Seal with a glossy top coat for shine.
Complementary Color Suggestions
- Tropical Pop: Palms with gold glitter accents.
- Soft Glow: Pair with pastel yellow for a gradient base.
- Bold Contrast: Use neon green palms for vibrancy.
Tips for Success
- Use stencils for precise palm shapes.
- Practice palm designs on paper if hand-painting.
- Apply thin layers for clean lines.
- Use a glossy top coat for vibrancy.
Creative Variations
- Add a matte top coat for contrast.
- Apply glitter around palms.
- Use a blue sunset gradient.
- Pair with a tiny sun decal.
This design pairs with tropical dresses or gold jewelry, radiating summer warmth. Maintain by refreshing the top coat. Palm Tree Silhouettes is a chic vacation choice.
Water Ripple Gloss Nails
Water Ripple Gloss Nails feature glossy aqua with layered gel to mimic wave patterns, offering a vibrant, beachy look. Ideal for beach outings or tropical parties, this design radiates oceanic shimmer.
Tools Needed
- Aqua gel polish
- Clear gel polish
- Thin detail brush
- UV/LED lamp
- Base coat and glossy top coat
- Nail file
- Acetone for cleanup
Step-by-Step Guide
- File nails to a medium-length, oval shape; apply a base coat and cure under UV/LED lamp.
- Apply two coats of aqua gel polish, curing each layer.
- Use a detail brush to apply clear gel in wavy, ripple-like patterns; cure lightly to set.
- Add a second layer of clear gel ripples for dimension; cure fully.
- Clean excess polish with acetone.
- Seal with a glossy top coat and cure.
Complementary Color Suggestions
- Shiny Pop: Ripples with silver glitter accents.
- Soft Glow: Pair with pastel blue for a gradient base.
- Bold Contrast: Use neon teal ripples for vibrancy.
Tips for Success
- Use a fine brush for precise ripple patterns.
- Cure gel layers briefly to maintain dimension.
- Practice ripple designs on paper first.
- Use a glossy top coat for shine.
Creative Variations
- Add a matte top coat for contrast.
- Apply holographic glitter over ripples.
- Create a blue-to-white ripple gradient.
- Pair with a tiny wave decal.
This design pairs with blue outfits or silver jewelry, radiating summer intensity. Maintain by refreshing the top coat. Water Ripple Gloss Nails is a stunning vacation choice.
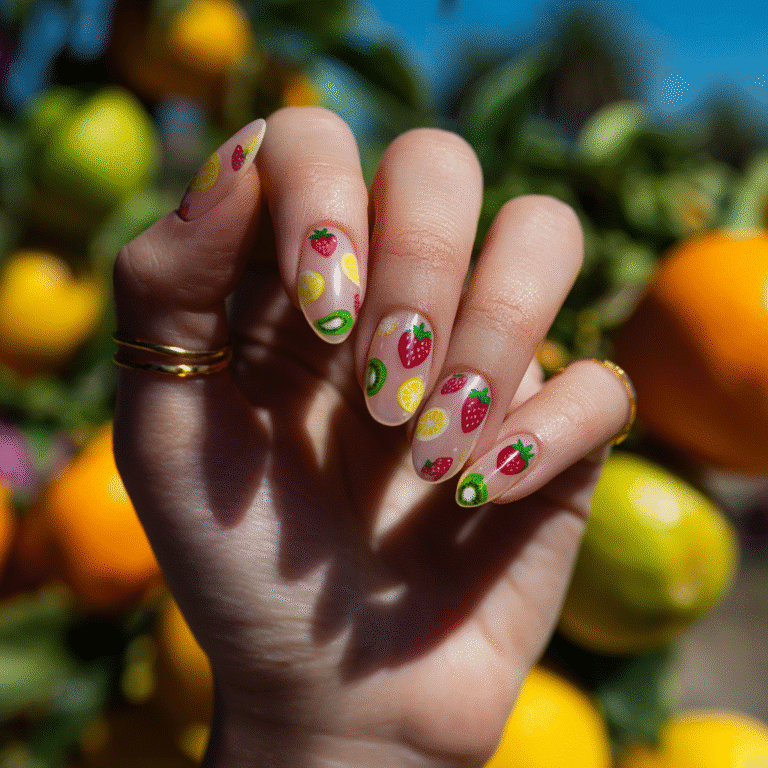
Starfish and Sea Dot Design
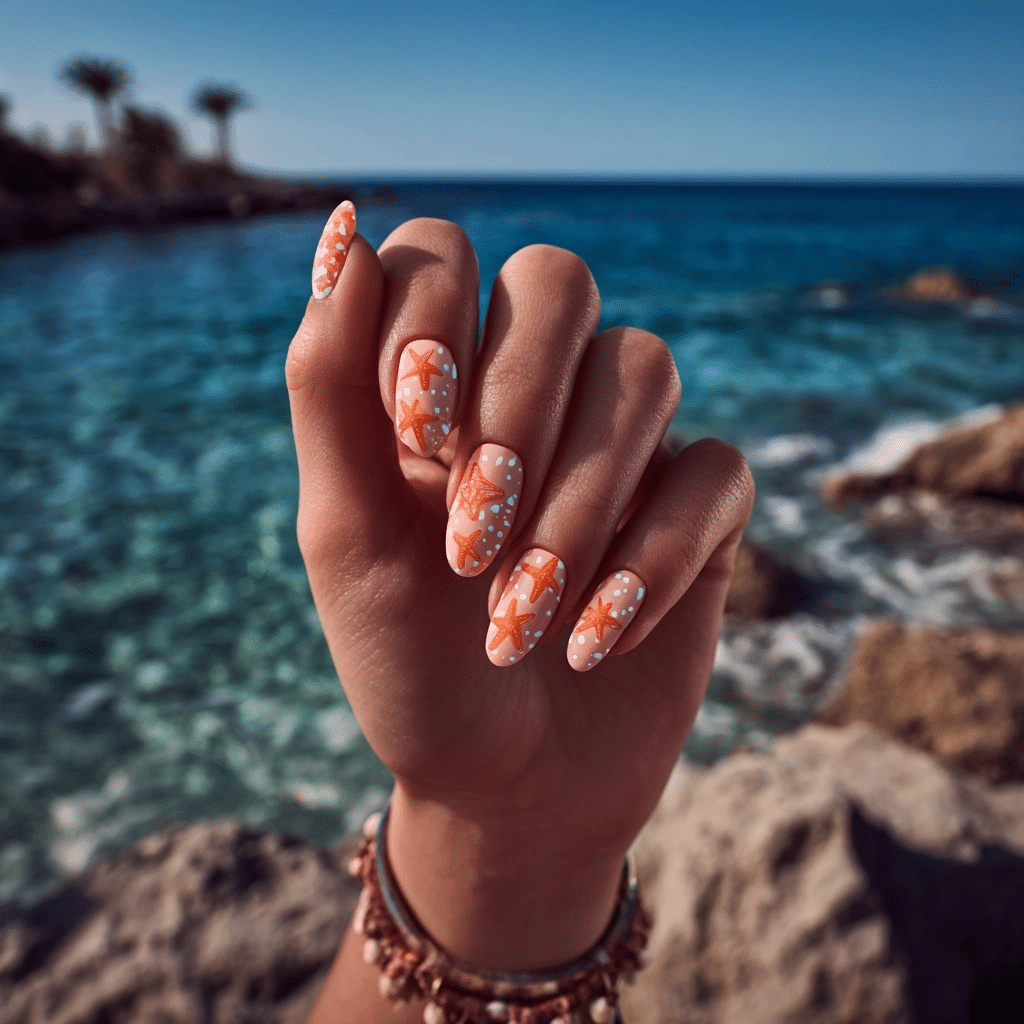
Starfish and Sea Dot Design feature tiny coral stars and white dots over a soft uncovered background, offering a playful, beachy look. Ideal for beach picnics or summer festivals, this design radiates coastal charm.
Tools Needed
- Soft uncovered base polish
- Coral and white nail polishes
- Thin detail brush or starfish decals
- Dotting tool
- Base coat and glossy top coat
- Nail file
- Acetone for cleanup
Step-by-Step Guide
- File nails to a medium-length, oval shape; apply a base coat and let dry.
- Paint nails with soft uncovered polish as a base; let dry.
- On accent nails, apply starfish decals or use a detail brush to paint coral starfish shapes.
- Use a dotting tool to add white dots around starfish for a sea effect.
- Clean excess polish with acetone.
- Seal with a glossy top coat for shine.
Complementary Color Suggestions
- Playful Pop: Starfish with silver dot accents.
- Soft Glow: Pair with pastel peach for a gradient base.
- Bold Contrast: Use neon blue starfish for vibrancy.
Tips for Success
- Use a fine brush for precise starfish shapes.
- Practice starfish designs on paper if hand-painting.
- Apply dots sparingly for balance.
- Use a glossy top coat for vibrancy.
Creative Variations
- Add a matte top coat for contrast.
- Apply glitter around starfish.
- Include seashell decals.
- Pair with a tiny coral decal.
This design pairs with pastel outfits or silver jewelry, radiating summer fun. Maintain by refreshing the top coat. Starfish and Sea Dot Design is a delightful vacation choice.
Clear Nails with Blue French Tips

Clear Nails with Blue French Tips feature ocean blue tips on a transparent or natural base, offering a minimalist, beachy look. Ideal for coastal brunches or summer outings, this design radiates serene elegance.
Tools Needed
- Clear base polish
- Ocean blue nail polish
- Thin striping tape
- Base coat and glossy top coat
- Nail file
- Acetone for cleanup
Step-by-Step Guide
- File nails to a medium-length, square shape; apply a base coat and let dry.
- Paint nails with clear polish as a base; let dry.
- Apply striping tape near the nail tips to create a French tip line.
- Paint tips with ocean blue polish; remove tape carefully.
- Clean excess polish with acetone.
- Seal with a glossy top coat for shine.
Complementary Color Suggestions
- Minimal Pop: Blue tips with white wave accents.
- Soft Glow: Pair with pastel aqua for a gradient base.
- Bold Contrast: Use neon blue tips for vibrancy.
Tips for Success
- Apply tape precisely for clean lines.
- Remove tape before polish dries.
- Use high-opacity polish for bold tips.
- Use a glossy top coat for durability.
Creative Variations
- Add a matte top coat for contrast.
- Apply silver glitter over tips.
- Create wavy blue tips.
- Pair with a tiny seashell decal.
This design pairs with white outfits or silver jewelry, radiating summer simplicity. Maintain by refreshing the top coat. Clear Nails with Blue French Tips is a chic vacation choice.
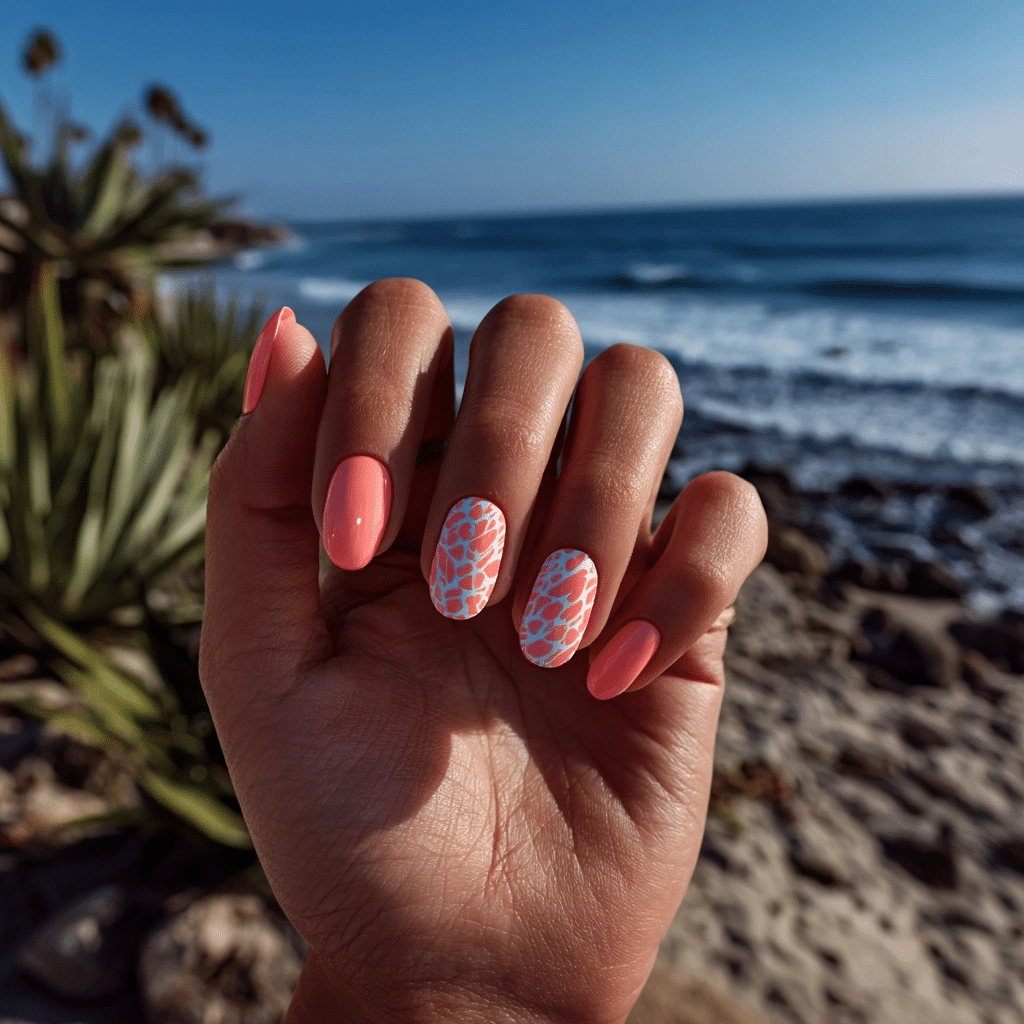
Coral Pink & Shell White Combo
Coral Pink & Shell White Combo feature alternating nails in coral and soft shell-toned white, offering a vibrant, beachy look. Ideal for beach parties or tropical getaways, this design radiates coastal warmth.
Tools Needed
- Coral pink and shell white nail polishes
- Base coat and glossy top coat
- Nail file
- Acetone for cleanup
Step-by-Step Guide
- File nails to a medium-length, oval shape; apply a base coat and let dry.
- Paint alternating nails with coral pink and shell white polish, using two coats for opacity; let dry.
- Ensure bold, even coverage for a vibrant finish.
- Clean excess polish with acetone.
- Seal with a glossy top coat for shine.
Complementary Color Suggestions
- Vivid Pop: Combo with gold glitter accents.
- Soft Glow: Pair with pastel peach for a gradient base.
- Bold Contrast: Add neon teal accents on one nail.
Tips for Success
- Use high-opacity polishes for bold colors.
- Apply thin layers to prevent streaks.
- Clean cuticles for a polished look.
- Use a glossy top coat for vibrancy.
Creative Variations
- Add a matte top coat for contrast.
- Apply silver glitter to accent nails.
- Create a gradient with coral and white.
- Pair with a tiny shell decal.
This design pairs with coral outfits or gold jewelry, radiating summer energy. Maintain by refreshing the top coat. Coral Pink & Shell White Combo is a trendy vacation choice.
Beachy Abstract Swirls
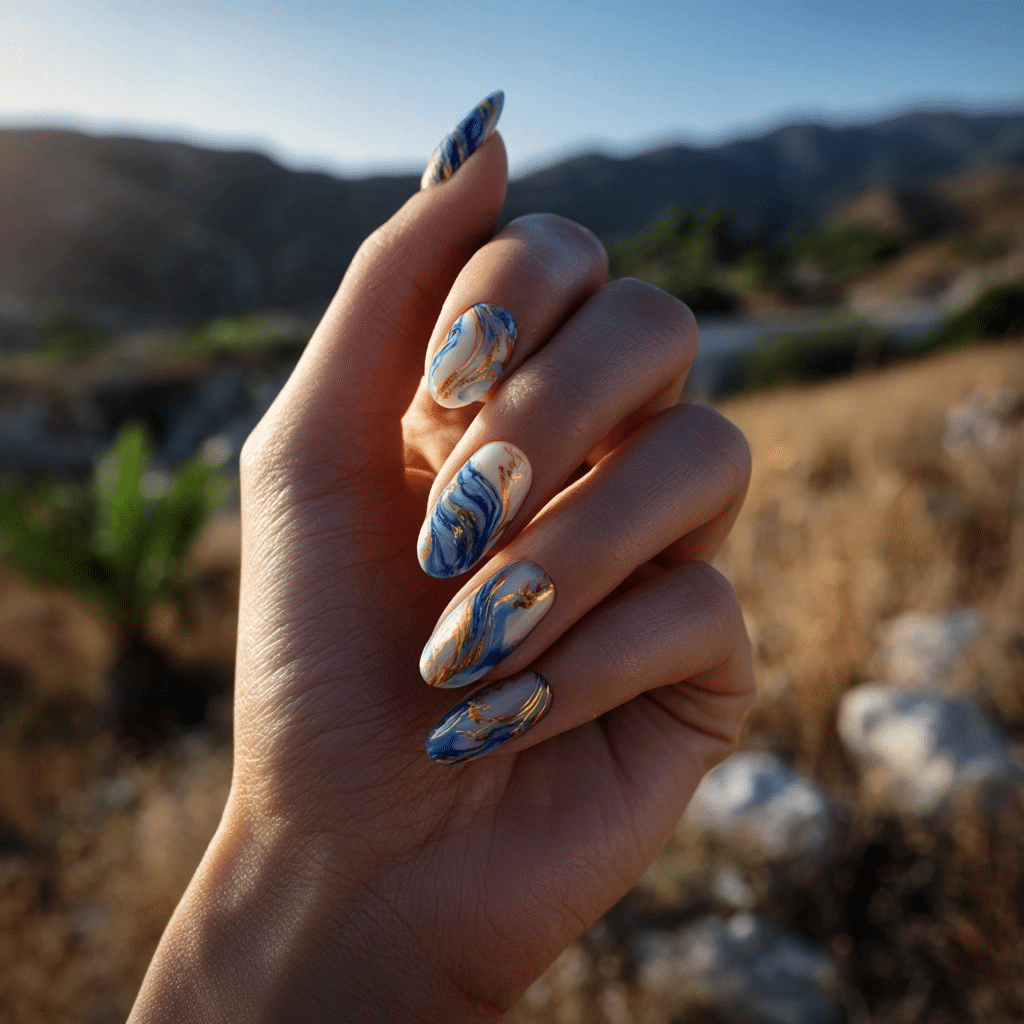
Beachy Abstract Swirls feature curved swipes in beige, blue, and gold on a milky base, offering an artistic, beachy look. Ideal for summer festivals or coastal outings, this design radiates serene creativity.
Tools Needed
- Milky base polish
- Beige, blue, and gold nail polishes
- Thin detail brush
- Base coat and glossy top coat
- Nail file
- Acetone for cleanup
Step-by-Step Guide
- File nails to a medium-length, almond shape; apply a base coat and let dry.
- Paint nails with milky polish as a base; let dry.
- Using a detail brush, paint curved beige swirls across each nail.
- Add blue and gold swirls, overlapping slightly for depth.
- Clean excess polish with acetone.
- Seal with a glossy top coat for shine.
Complementary Color Suggestions
- Artistic Pop: Swirls with white accents.
- Soft Glow: Pair with pastel green for a gradient base.
- Bold Contrast: Use neon blue swirls for vibrancy.
Tips for Success
- Use a thin brush for precise swirls.
- Work quickly to blend colors smoothly.
- Practice swirls on paper first.
- Use a glossy top coat for vibrancy.
Creative Variations
- Add a matte top coat for contrast.
- Apply glitter over swirls.
- Create tighter, spiral swirls.
- Pair with a tiny wave decal.
This design pairs with neutral outfits or gold jewelry, radiating summer artistry. Maintain by refreshing the top coat. Beachy Abstract Swirls is a lively vacation choice.
Tropical Sunset Nail Art
Tropical Sunset Nail Art features gradients in orange, pink, and lavender, paired with black detail, offering a vibrant, beachy look. Ideal for beach sunsets or tropical evenings, this design radiates romantic warmth.
Tools Needed
- Orange, pink, and lavender nail polishes
- Black nail polish
- Makeup sponge
- Thin detail brush
- Base coat and glossy top coat
- Nail file
- Acetone for cleanup
Step-by-Step Guide
- File nails to a medium-length, square shape; apply a base coat and let dry.
- Dab orange, pink, and lavender polishes onto a makeup sponge; press onto nails for a sunset gradient.
- Use a detail brush to paint black details (e.g., palm trees or birds) on accent nails.
- Add small details for depth.
- Clean excess polish with acetone.
- Seal with a glossy top coat for shine.
Complementary Color Suggestions
- Warm Pop: Gradient with gold glitter accents.
- Soft Glow: Pair with pastel yellow for a tri-color fade.
- Bold Contrast: Use neon green details for vibrancy.
Tips for Success
- Use a sponge for seamless blending.
- Practice black details on paper first.
- Apply thin layers for clean lines.
- Use a glossy top coat for vibrancy.
Creative Variations
- Add a matte top coat for contrast.
- Apply silver glitter in the gradient.
- Create a vertical sunset gradient.
- Pair with a tiny sun decal.
This design pairs with flowy dresses or gold jewelry, radiating summer romance. Maintain by refreshing the top coat. Tropical Sunset Nail Art is a stunning vacation choice.
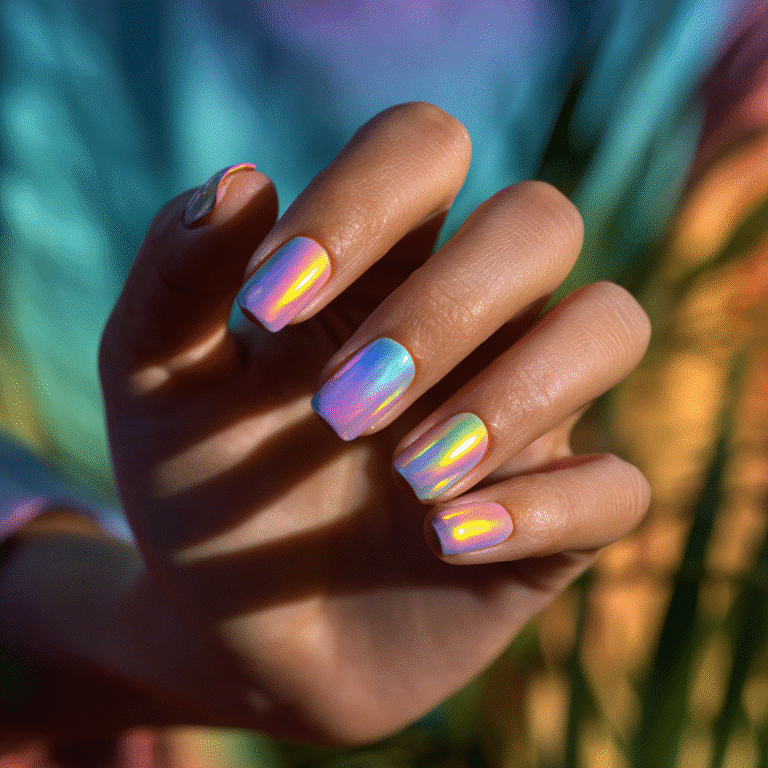
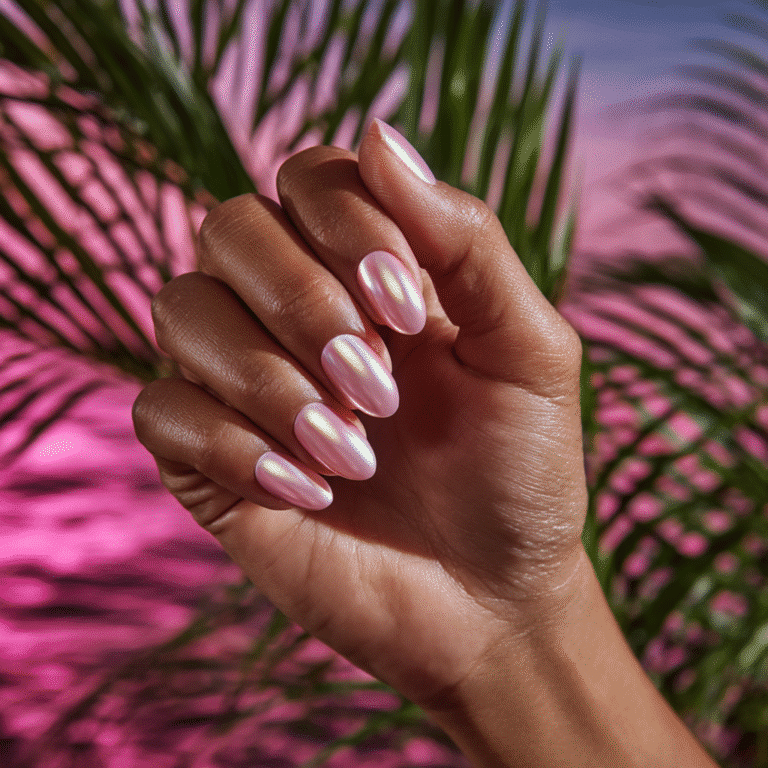
Pearly Oyster Chrome Nails
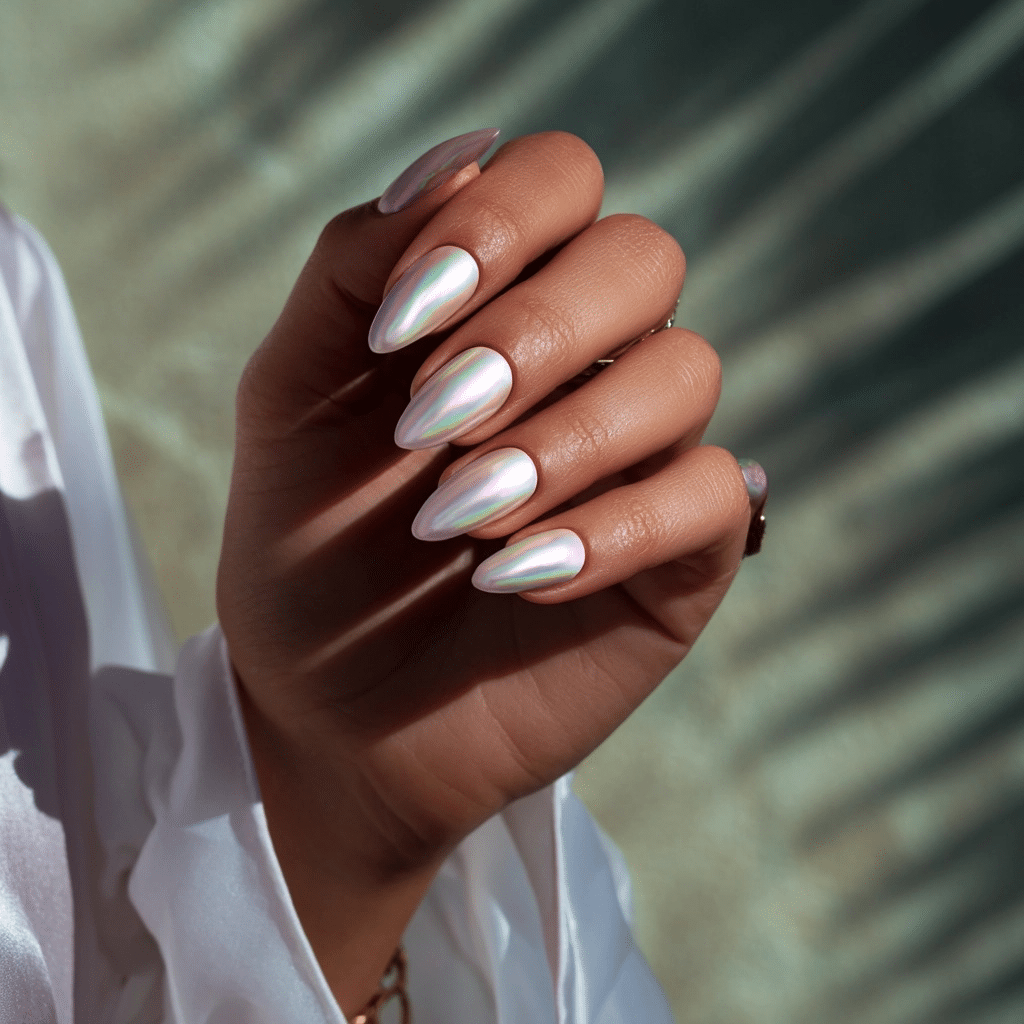
Pearly Oyster Chrome Nails feature iridescent white polish with a hint of pink or green shimmer, offering a luxurious, beachy look. Ideal for coastal soirées or summer weddings, this design radiates elegant shine.
Tools Needed
- Pearly white chrome nail polish
- Base coat and glossy top coat
- Nail file
- Acetone for cleanup
Step-by-Step Guide
- File nails to a medium-length, stiletto shape; apply a base coat and let dry.
- Paint nails with pearly white chrome polish, using two coats for full opacity; let dry.
- Ensure even, iridescent coverage for a shimmering effect.
- Clean excess polish with acetone.
- Seal with a glossy top coat for shine.
Complementary Color Suggestions
- Shiny Pop: Chrome with silver wave accents.
- Soft Glow: Pair with pastel pink for a gradient base.
- Bold Contrast: Use neon coral for a split nail.
Tips for Success
- Use a high-quality chrome polish for shine.
- Apply thin layers for smoothness.
- Clean cuticles for a polished look.
- Use a glossy top coat for durability.
Creative Variations
- Add a matte top coat for contrast.
- Apply pearl dust for extra shimmer.
- Create a chrome French tip.
- Pair with a tiny pearl decal.
This design pairs with white outfits or pearl jewelry, radiating summer glamour. Maintain by refreshing the top coat. Pearly Oyster Chrome Nails is a luxurious vacation choice.
Mermaid Scale Accent Nails
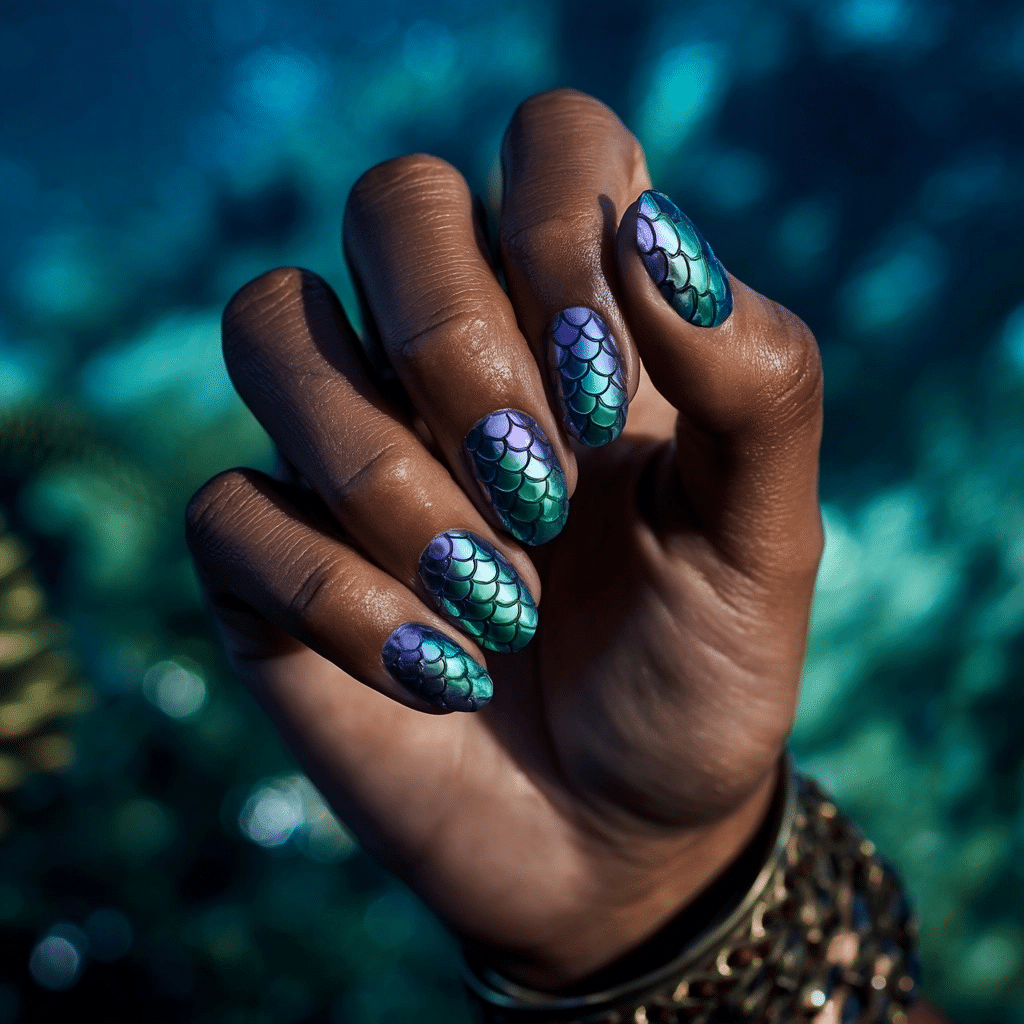
Mermaid Scale Accent Nails feature one or two nails with shimmering scale patterns in teal and purple, offering a mystical, beachy look. Ideal for beach festivals or tropical parties, this design radiates oceanic allure.
Tools Needed
- Uncovered base polish
- Teal and purple nail polishes
- Scale stencils or thin detail brush
- Base coat and glossy top coat
- Nail file
- Acetone for cleanup
Step-by-Step Guide
- File nails to a medium-length, oval shape; apply a base coat and let dry.
- Paint nails with uncovered polish as a base; let dry.
- On accent nails, apply scale stencils or use a detail brush to paint teal and purple scale patterns.
- Add shimmer polish for depth.
- Clean excess polish with acetone.
- Seal with a glossy top coat for shine.
Complementary Color Suggestions
- Mystical Pop: Scales with silver glitter accents.
- Soft Glow: Pair with pastel blue for a gradient base.
- Bold Contrast: Use neon pink scales for vibrancy.
Tips for Success
- Use stencils for precise scale shapes.
- Practice scale designs on paper if hand-painting.
- Apply thin layers for clean lines.
- Use a glossy top coat for vibrancy.
Creative Variations
- Add a matte top coat for contrast.
- Apply holographic glitter over scales.
- Create full-nail scale patterns.
- Pair with a tiny mermaid decal.
This design pairs with teal outfits or silver jewelry, radiating summer magic. Maintain by refreshing the top coat. Mermaid Scale Accent Nails is a captivating vacation choice.
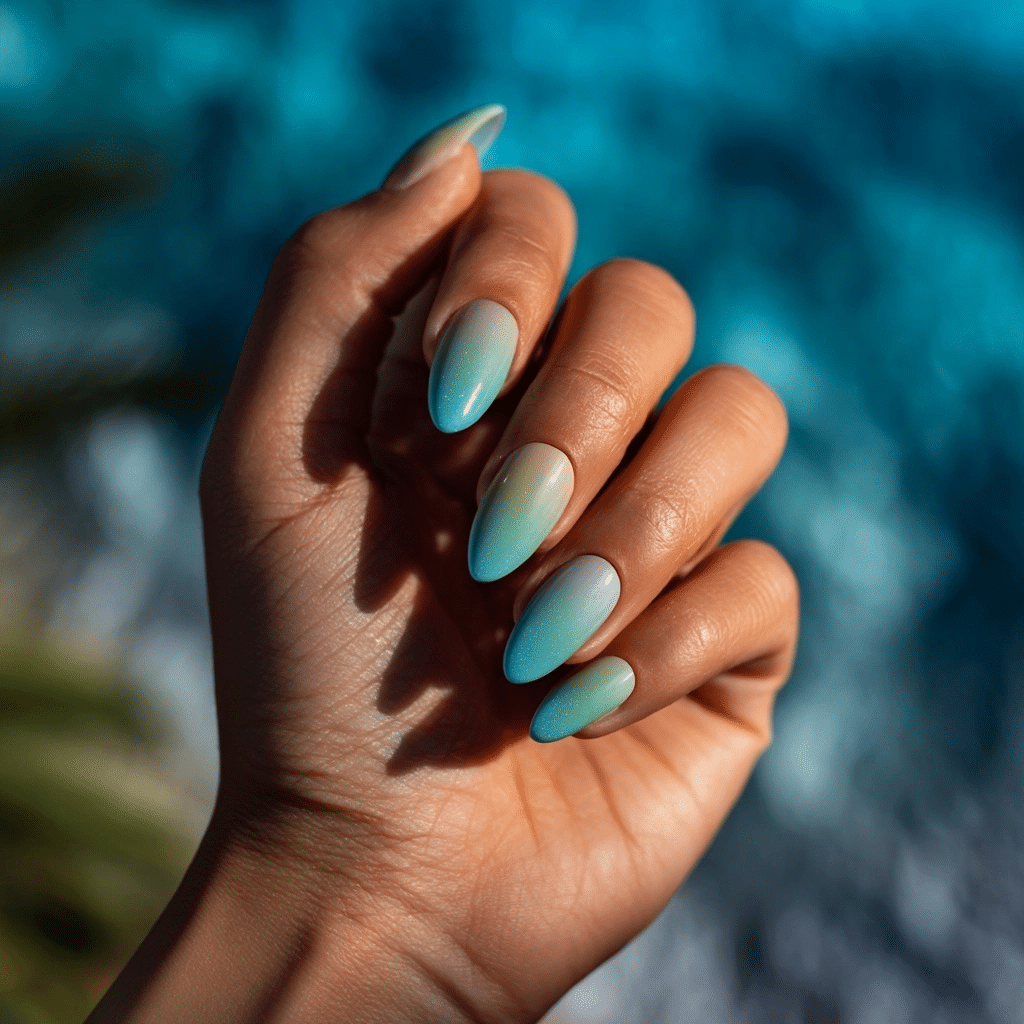
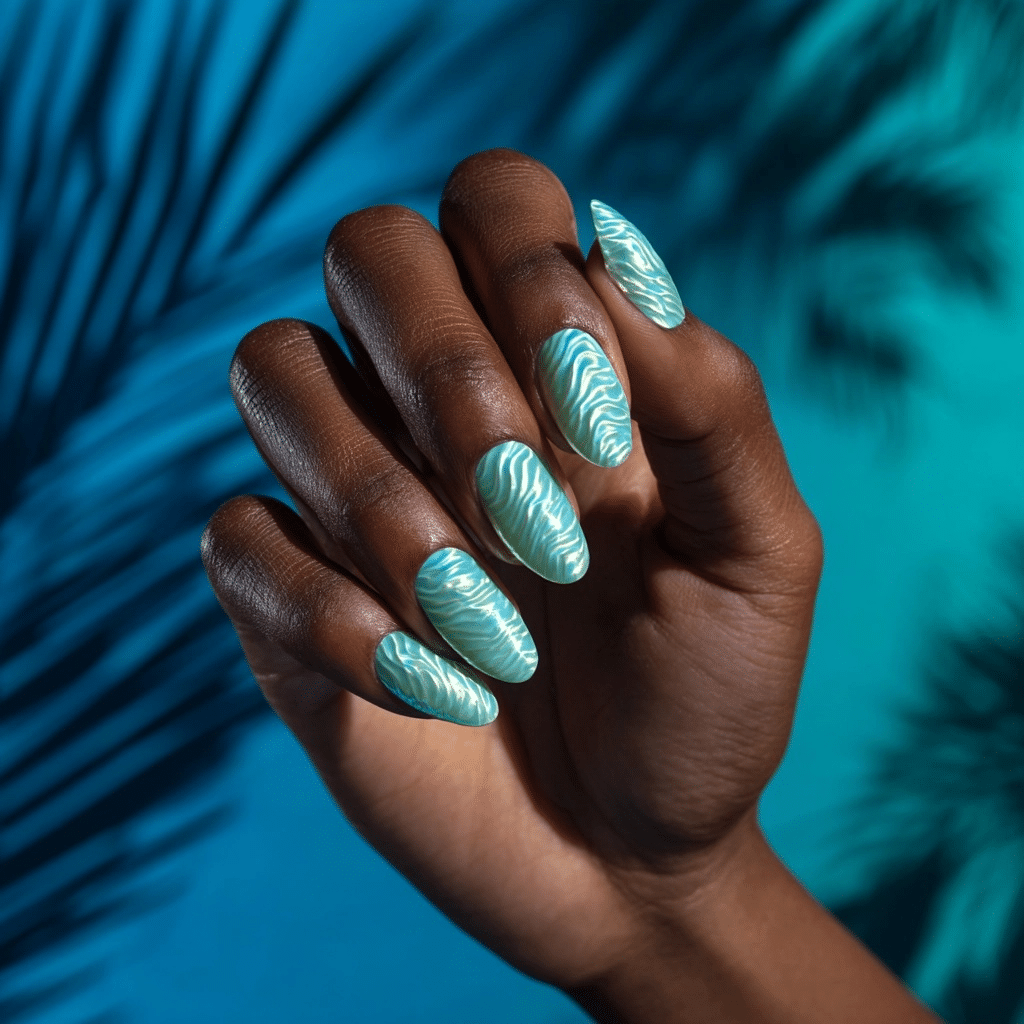
Sea Glass Matte Nails

Sea Glass Matte Nails feature frosted pastel blue and green with a soft, sandy texture, offering a serene, beachy look. Ideal for coastal walks or summer outings, this design radiates tranquil beauty.
Tools Needed
- Pastel blue and green nail polishes
- Base coat and matte top coat
- Nail file
- Acetone for cleanup
Step-by-Step Guide
- File nails to a medium-length, square shape; apply a base coat and let dry.
- Paint alternating nails with pastel blue and green polish, using two coats for opacity; let dry.
- Ensure even, frosted coverage for a sea glass effect.
- Clean excess polish with acetone.
- Seal with a matte top coat for a velvety finish.
Complementary Color Suggestions
- Soft Pop: Sea glass with white dot accents.
- Dreamy Glow: Pair with pastel peach for a gradient base.
- Bold Contrast: Add neon coral accents on one nail.
Tips for Success
- Use high-opacity polishes for bold colors.
- Apply thin layers to prevent streaks.
- Clean cuticles for a polished look.
- Use a matte top coat for texture.
Creative Variations
- Add a glossy top coat for contrast.
- Apply silver glitter to accent nails.
- Create a gradient with blue and green.
- Pair with a tiny shell decal.
This design pairs with pastel outfits or silver jewelry, radiating summer calm. Maintain by refreshing the top coat. Sea Glass Matte Nails is a serene vacation choice.
Minimalist Sand Dune Lines
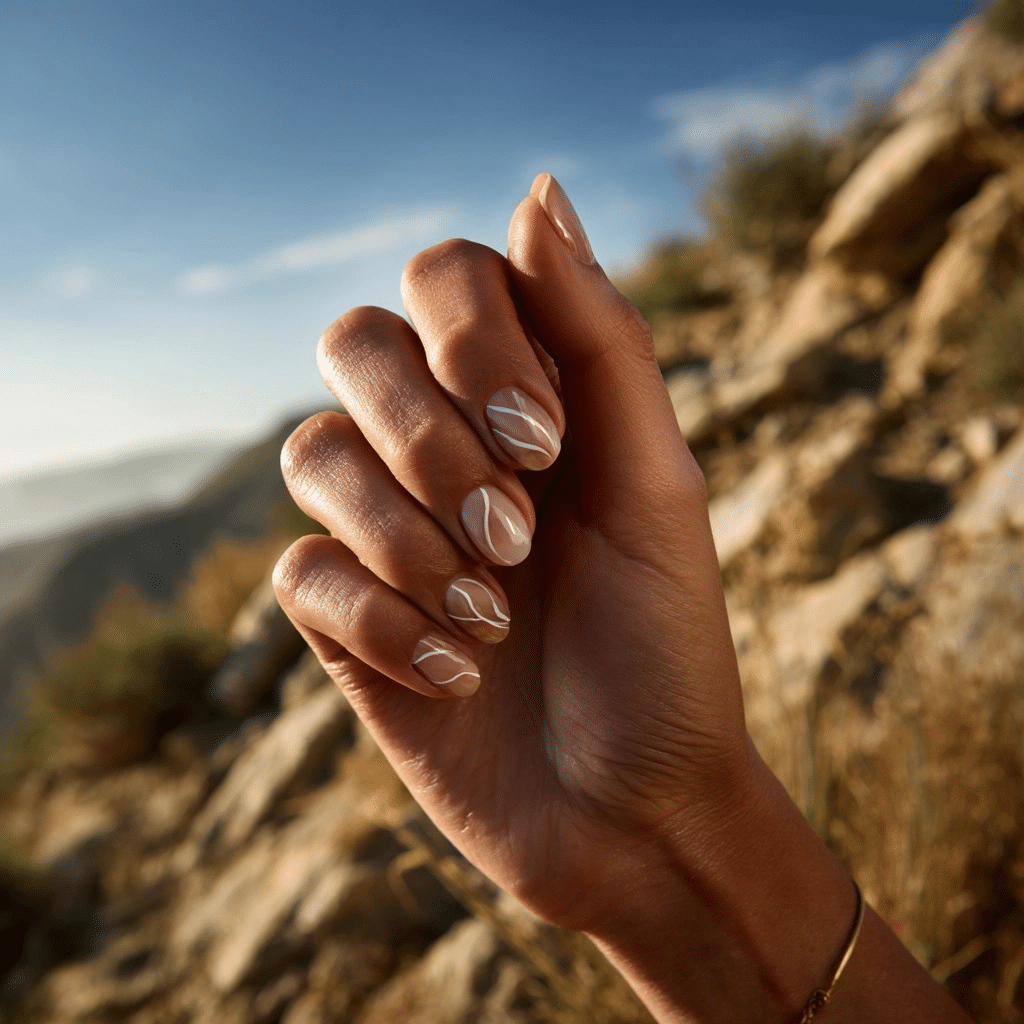
Minimalist Sand Dune Lines feature wavy line art in uncovered and tan over a clear base, offering a subtle, beachy look. Ideal for coastal brunches or summer minimalists, this design radiates understated elegance.
Tools Needed
- Clear base polish
- Uncovered and tan nail polishes
- Thin detail brush
- Base coat and glossy top coat
- Nail file
- Acetone for cleanup
Step-by-Step Guide
- File nails to a medium-length, almond shape; apply a base coat and let dry.
- Paint nails with clear polish as a base; let dry.
- Using a detail brush, paint wavy uncovered and tan lines across each nail, mimicking sand dunes.
- Keep lines minimal and spaced for balance.
- Clean excess polish with acetone.
- Seal with a glossy top coat for shine.
Complementary Color Suggestions
- Minimal Pop: Lines with gold accents.
- Soft Glow: Pair with pastel beige for a gradient base.
- Bold Contrast: Use neon yellow lines for vibrancy.
Tips for Success
- Use a fine brush for precise lines.
- Practice line patterns on paper first.
- Apply lines sparingly for a minimalist look.
- Use a glossy top coat for vibrancy.
Creative Variations
- Add a matte top coat for contrast.
- Apply glitter along lines.
- Create vertical dune lines.
- Pair with a tiny star decal.
This design pairs with neutral outfits or gold jewelry, radiating summer simplicity. Maintain by refreshing the top coat. Minimalist Sand Dune Lines is a chic vacation choice.
Beachy nail designs in 2025 remind us that beauty can be both subtle and impactful. They bring texture, warmth, and peaceful energy to your fingertips, making every gesture feel a bit more grounded and graceful.
So whether you’re actually headed to the coast or simply want to carry a little summer calm with you, these designs offer a perfect way to do just that. Let your nails echo the horizon, the breeze, and the tide. Summer’s rhythm is already in your hands.