Expressing the Spirit of Escape: Vacation Nails That Embody Summer 2025
Summer 2025 promises a return to vibrant color, confident style, and travel-inspired details. For many of us, vacations aren’t just about the destination—they’re about embracing a mindset, a feeling, a glow. And one of the most expressive ways to do that is through your nails. Vacation nails have become essential travel companions: they complement your swimwear, match your beach drink, and often star in your travel selfies.
This year’s nail trends are fresh, refined, and wonderfully playful. With jelly finishes, subtle textures, and a return to pastel whimsy, 2025 summer manicures are about blending style with ease. Whether you’re jetting to a tropical paradise or road-tripping to hidden getaways, your nail design can tell the story of your adventure.
Why I Love It
What I love most about summer vacation nails is how personal they feel. They’re often inspired by the places we dream of, the colors we associate with escape, and the emotions tied to rest and renewal. There’s something magical about looking down at your hands and seeing a reflection of where you are—or where you’re going.
This year, the trend toward transparency, soft chrome, and micro-art details makes room for self-expression without loudness. It’s about being intentional. A floating floral, a citrus accent, or a glassy coral polish brings subtle delight, and in the heat of summer, that touch of charm can make all the difference.
23 New Trendy Vacation Nails Summer Ideas For 2025
These 23 new trendy vacation nail ideas for summer 2025 capture the vibrant, adventurous spirit of tropical getaways with bold colors, artistic designs, and chic minimalism. Perfect for beach vacations, island retreats, or summer festivals, each design blends modern trends with vacation-ready flair. Detailed steps, tools, and variations ensure accessibility for all skill levels, embodying summer’s radiant energy. The term “uncovered” is used for base polishes to align with sensitivity guidelines.
Glossy Kiwi Green Tips
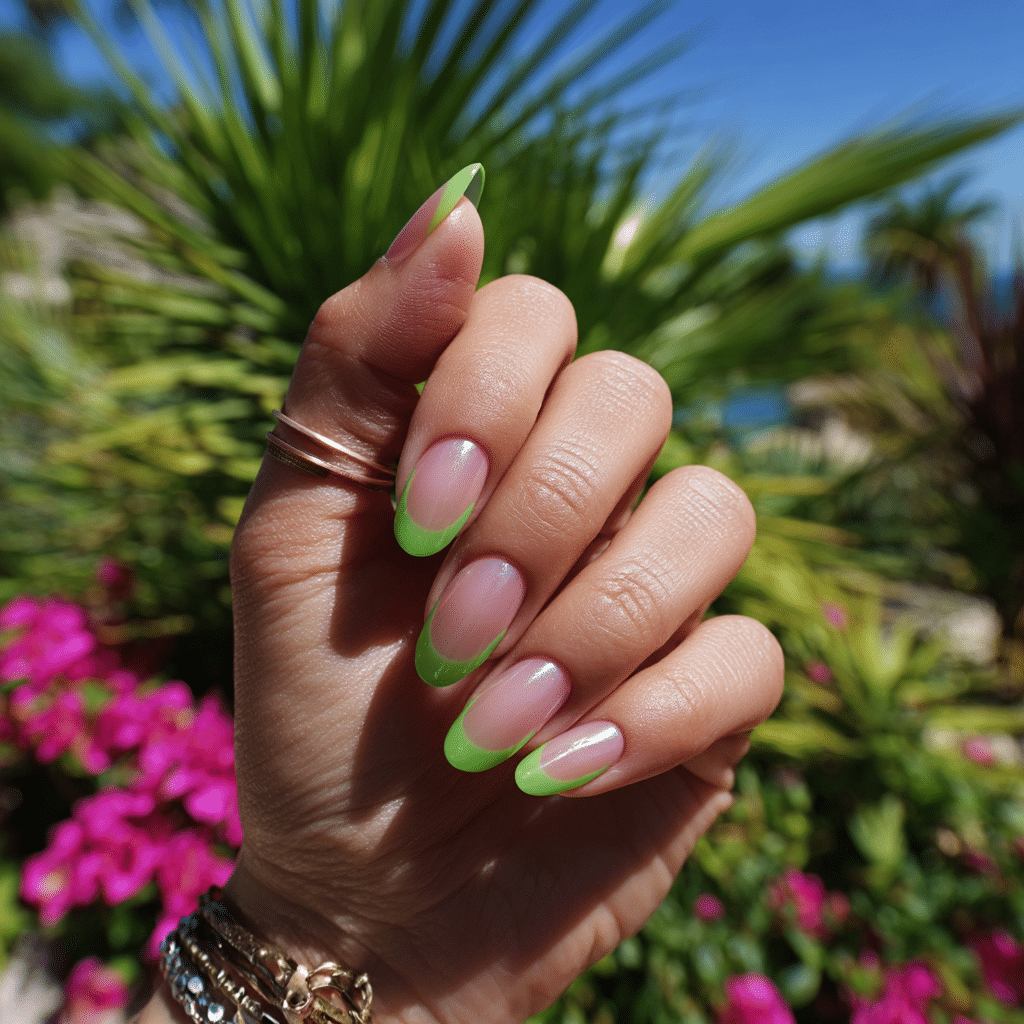
Glossy Kiwi Green Tips feature fresh green French tips over a sheer pink base, offering a zesty, eye-catching look. Perfect for beach picnics or tropical parties, this playful manicure radiates summery vibrancy.
Tools Needed
- Sheer pink and kiwi green nail polishes
- Striping tape or fine nail art brush
- Base coat and glossy top coat
- Acetone for cleanup
Step-by-Step Guide
- Apply a base coat and let dry.
- Paint nails with sheer pink polish, using two coats; let dry.
- Use striping tape or a fine brush to create clean kiwi green tips.
- Apply two layers of green polish for vibrant tips.
- Clean excess polish with acetone.
- Seal with a glossy top coat.
Color Suggestions
- Zesty Pop: Sheer pink with kiwi green tips.
- Soft Glow: Sheer peach with mint green tips.
- Bold Contrast: Sheer pink with neon green tips.
Tips for Success
- Use tape for precise tip lines.
- Apply thin polish layers for evenness.
- Practice tip placement on paper.
- Use a glossy top coat for shine.
Creative Variations
- Add glitter to green tips.
- Use a matte green tip for contrast.
- Create double green tips on one nail.
- Pair with a tiny kiwi decal.
This manicure pairs with bright outfits or silver accessories, radiating tropical energy. Maintain by touching up tips and refreshing the top coat. Glossy Kiwi Green Tips are a lively vacation choice.
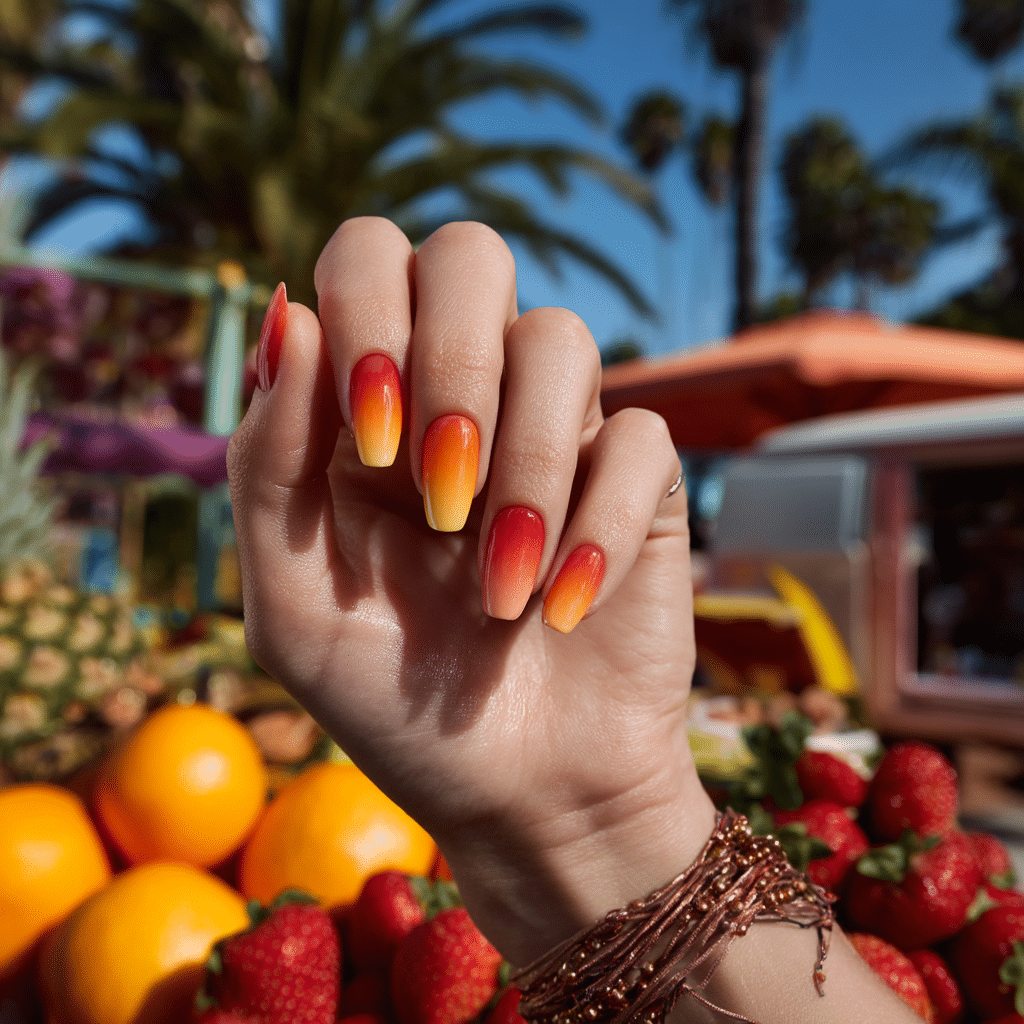
Sunset Aura Nails
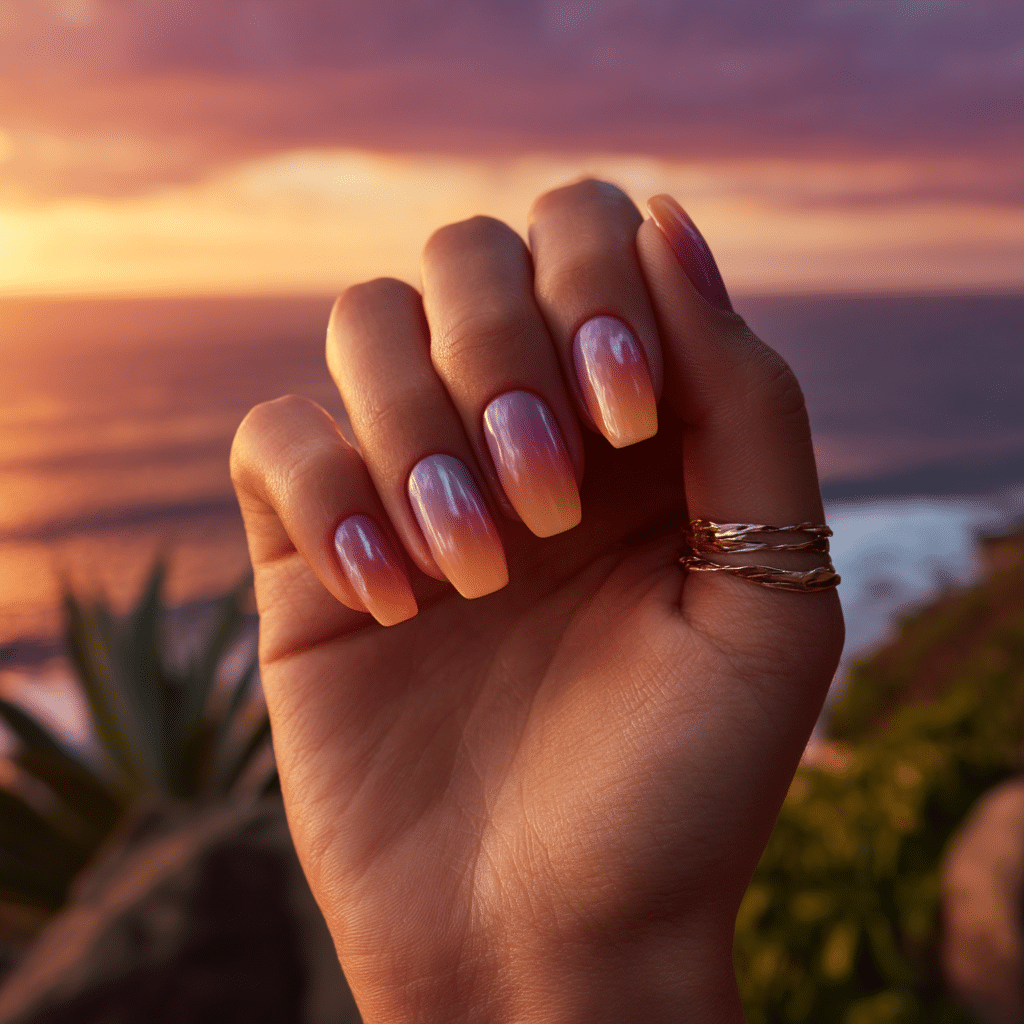
Sunset Aura Nails feature a blurred blend of orange, pink, and lavender, mimicking summer skies. Ideal for beach sunsets or island evenings, this dreamy manicure exudes serene beauty.
Tools Needed
- Orange, pink, lavender nail polishes
- Makeup sponge
- Base coat and glossy top coat
- Acetone for cleanup
Step-by-Step Guide
- Apply a base coat and let dry.
- Paint nails with a clear base; let dry.
- Dab orange, pink, and lavender polish onto a sponge, blending slightly.
- Press sponge onto nails, creating a soft, blurred gradient.
- Repeat for a seamless aura effect; let dry.
- Clean excess polish with acetone.
- Seal with a glossy top coat.
Color Suggestions
- Sunset Glow: Orange, pink, lavender blend.
- Soft Pop: Peach, blush, lilac blend.
- Bold Blend: Coral, hot pink, purple blend.
Tips for Success
- Use a sponge for smooth blending.
- Apply thin layers to avoid clumps.
- Practice gradient on paper first.
- Use a quick-dry top coat for shine.
Creative Variations
- Add glitter in the gradient.
- Use a matte top coat for contrast.
- Create a vertical aura blend.
- Pair with a tiny sun decal.
This manicure pairs with airy dresses or gold jewelry, enhancing summer’s calm. Maintain by reapplying the top coat. Sunset Aura Nails are a tranquil vacation choice.
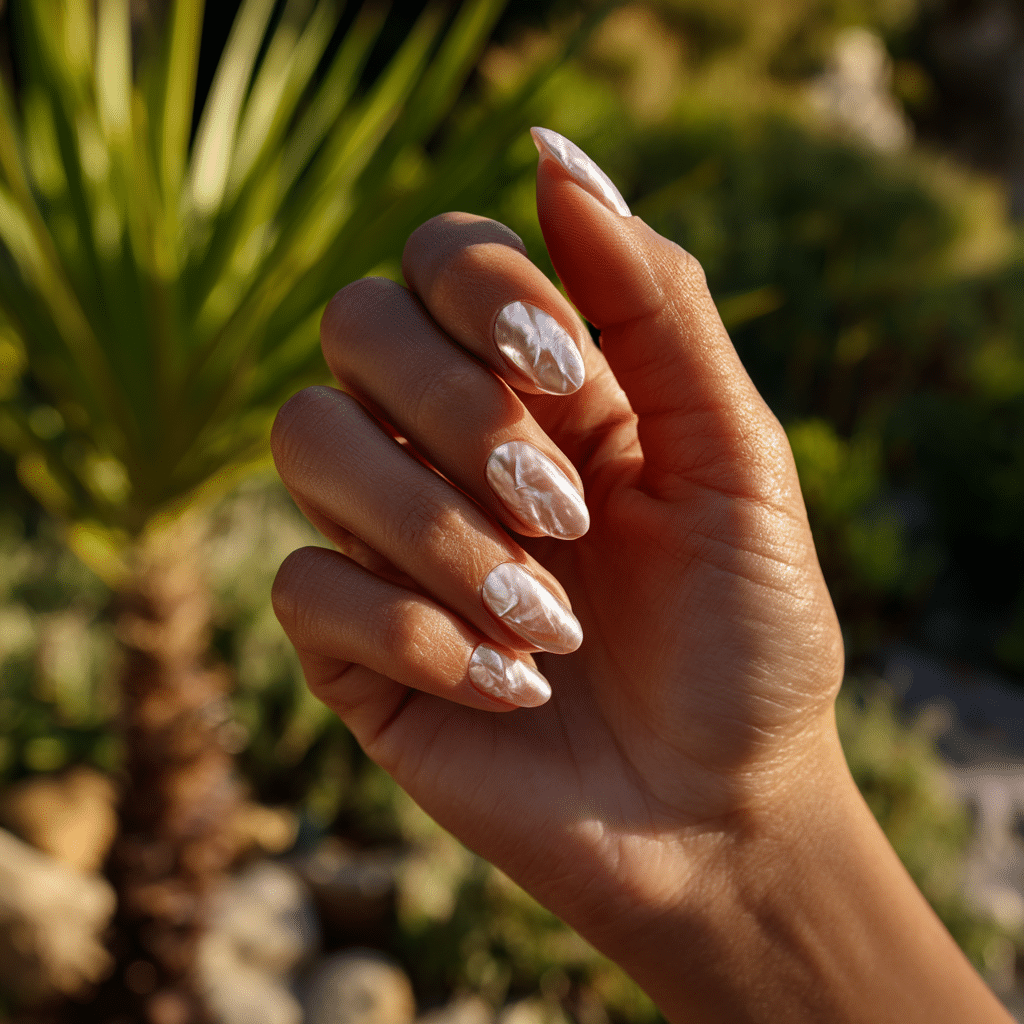
Shell-Inspired Micro Chrome
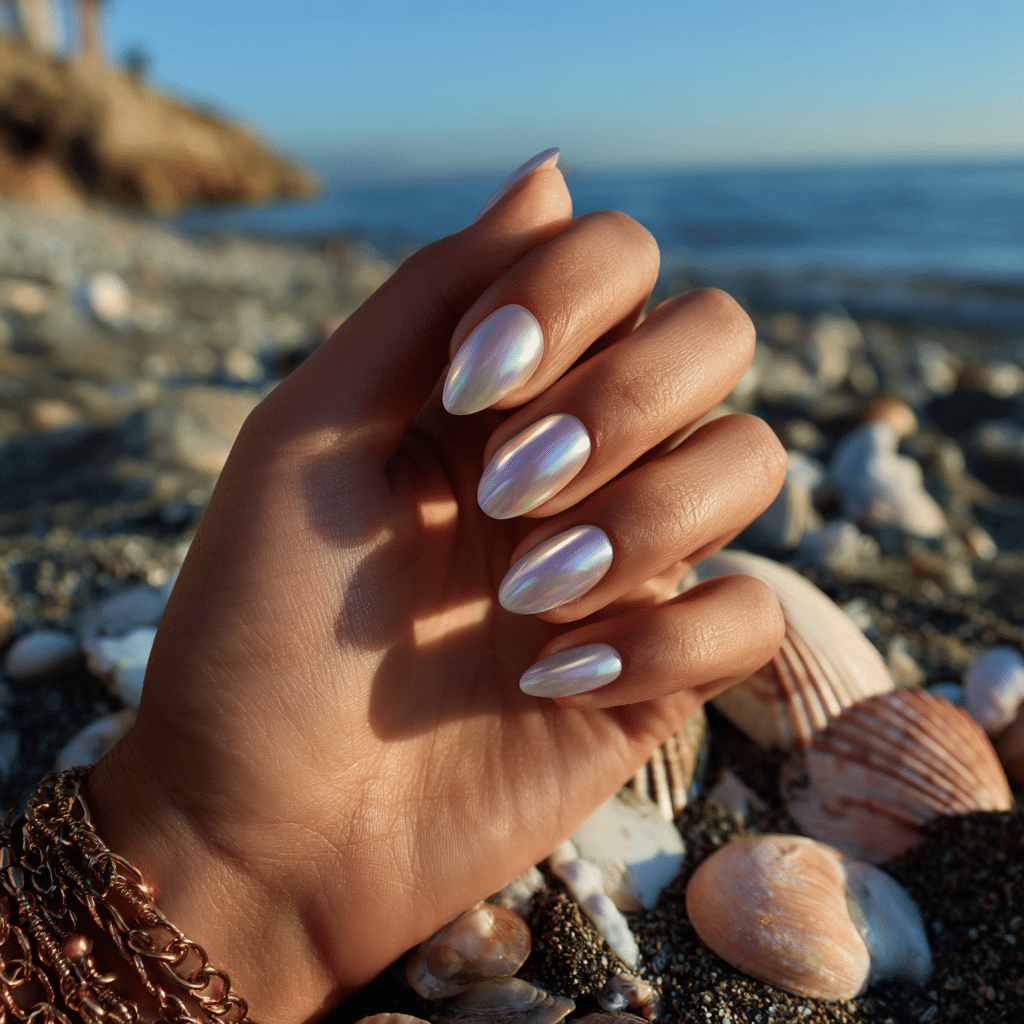
Shell-Inspired Micro Chrome features iridescent pearl tones with a fine chrome finish, smooth and luminous like shells. Perfect for beach weddings or tropical galas, this glamorous manicure radiates ethereal charm.
Tools Needed
- Iridescent pearl chrome nail polish
- Base coat and glossy top coat
- Nail file
- Acetone for cleanup
Step-by-Step Guide
- File nails to desired shape; apply a base coat and let dry.
- Paint nails with iridescent pearl chrome polish, using two coats; let dry.
- Apply a second layer for full chrome effect.
- Check for even, luminous finish.
- Clean excess polish with acetone.
- Seal with a glossy top coat.
Color Suggestions
- Shell Shine: Iridescent pearl chrome.
- Soft Pop: Iridescent pink chrome.
- Bold Glow: Iridescent silver chrome.
Tips for Success
- Apply thin polish layers for smoothness.
- Use a glossy top coat for vibrancy.
- Clean cuticles for a polished look.
- Use a quick-dry top coat.
Creative Variations
- Add a matte top coat for contrast.
- Apply glitter to accent nails.
- Create a chrome French tip.
- Pair with a single pearl decal.
This manicure pairs with evening dresses or silver jewelry, radiating coastal allure. Maintain by refreshing the top coat. Shell-Inspired Micro Chrome is a dreamy vacation choice.
Neon French Arches
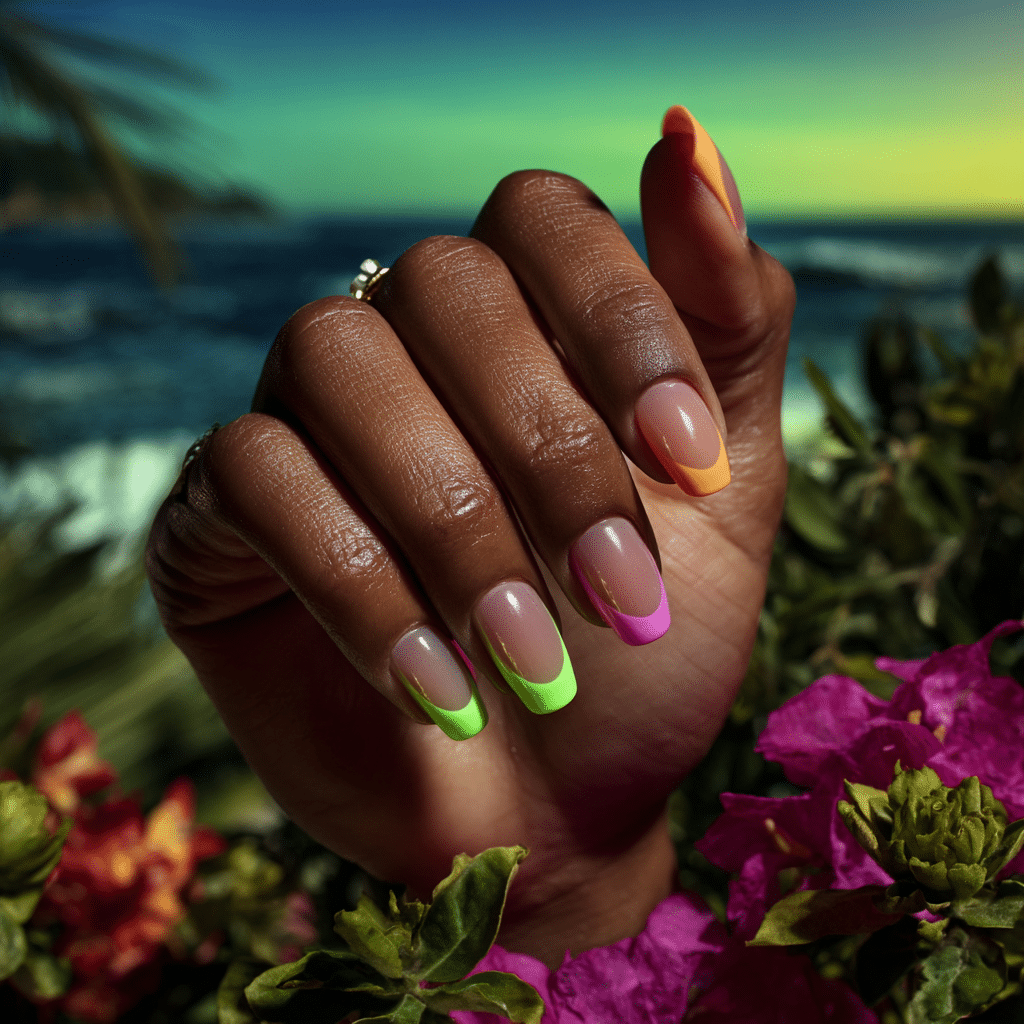
Neon French Arches feature a reversed French manicure with arched neon tips, offering a bold graphic effect. Perfect for beach raves or tropical nightlife, this vibrant manicure pops with modern energy.
Tools Needed
- Neon nail polish (green, pink, or orange)
- Clear nail polish
- Fine nail art brush
- Base coat and glossy top coat
- Acetone for cleanup
Step-by-Step Guide
- Apply a base coat and let dry.
- Paint nails with neon polish, leaving arched tips clear; let dry.
- Use a fine brush to define arched neon tips precisely.
- Apply two layers of neon polish for vibrancy.
- Clean excess polish with acetone.
- Seal with a glossy top coat.
Color Suggestions
- Graphic Pop: Neon green with clear arched tips.
- Bold Glow: Neon pink with clear arched tips.
- Vibrant Shine: Neon orange with clear arched tips.
Tips for Success
- Use a fine brush for clean arches.
- Apply thin polish layers for evenness.
- Practice arch shapes on paper.
- Use a glossy top coat for shine.
Creative Variations
- Add glitter to neon arches.
- Use a matte neon base.
- Create double arches on one nail.
- Pair with a single star decal.
This manicure pairs with neon outfits or silver accessories, radiating party vibes. Maintain by touching up arches and refreshing the top coat. Neon French Arches are a trendy vacation choice.
Minimal Flamingo Detail
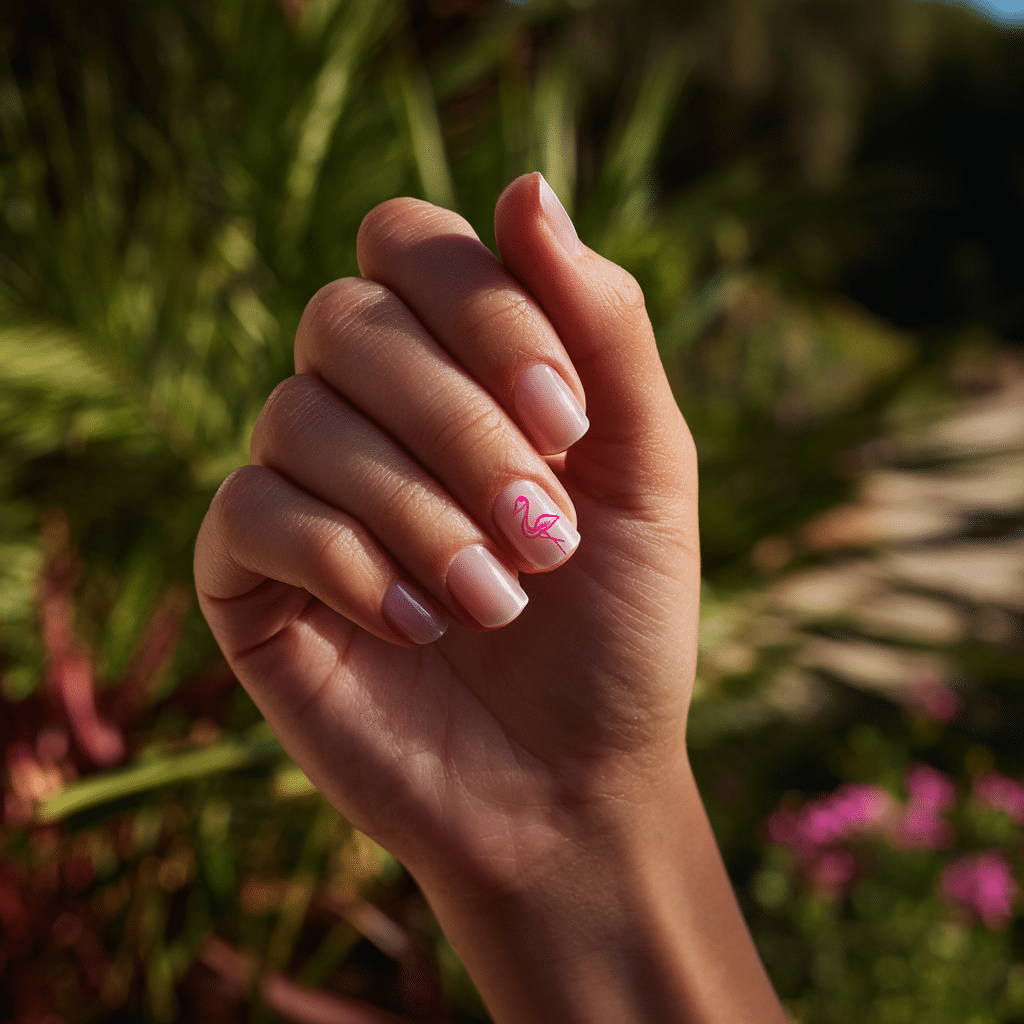
Minimal Flamingo Detail features clean uncovered nails with a single flamingo icon on one accent nail, offering a subtle, playful look. Perfect for beach strolls or tropical brunches, this manicure exudes understated charm.
Tools Needed
- Uncovered nail polish
- Pink and black nail polishes
- Fine nail art brush
- Base coat and glossy top coat
- Acetone for cleanup
Step-by-Step Guide
- Apply a base coat and let dry.
- Paint nails with uncovered polish, using two coats; let dry.
- Use a fine brush to paint a small pink flamingo with black details on one accent nail.
- Keep the flamingo minimal and centered.
- Clean excess polish with acetone.
- Seal with a glossy top coat.
Color Suggestions
- Playful Charm: Uncovered with pink flamingo.
- Soft Pop: Sheer pink with coral flamingo.
- Bold Contrast: Uncovered with neon pink flamingo.
Tips for Success
- Practice flamingo shapes on paper.
- Use a fine brush for precision.
- Keep the design small for minimalism.
- Use a glossy top coat for shine.
Creative Variations
- Add flamingos to two accent nails.
- Use glitter polish for the flamingo.
- Create a gradient uncovered base.
- Pair with a tiny palm decal.
This manicure pairs with neutral outfits or gold jewelry, adding summery sophistication. Maintain by touching up the flamingo and refreshing the top coat. Minimal Flamingo Detail is a serene vacation choice.
Ocean Wave Gel Layers
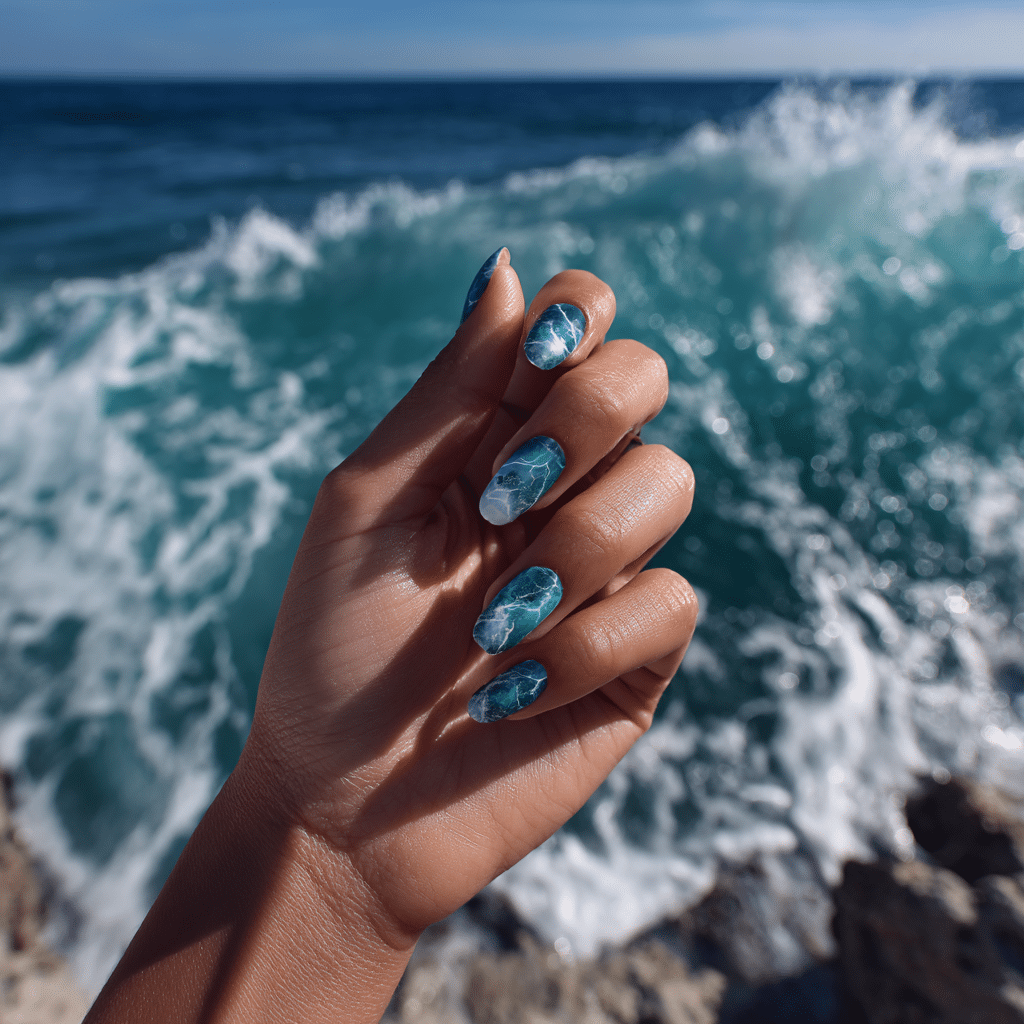
Ocean Wave Gel Layers feature blue, white, and teal gel art layered like crashing waves, offering a textured, dimensional look. Perfect for beach swims or coastal adventures, this artistic manicure radiates aquatic beauty.
Tools Needed
- Blue, white, teal gel nail polishes
- Fine nail art brush
- UV lamp for gel curing
- Base coat and glossy top coat
- Acetone for cleanup
Step-by-Step Guide
- Apply a base coat and let dry.
- Apply a thin layer of clear gel polish; cure under UV lamp.
- Use a fine brush to paint blue, white, and teal wave layers, curing each layer.
- Create overlapping, wavy patterns for a crashing wave effect.
- Clean excess polish with acetone.
- Seal with a glossy top coat.
Color Suggestions
- Ocean Crash: Blue, white, teal waves.
- Soft Pop: Aqua, ivory, mint waves.
- Bold Contrast: Navy, white, turquoise waves.
Tips for Success
- Practice wave patterns on paper.
- Use a fine brush for precision.
- Cure each layer fully for texture.
- Use a glossy top coat for shine.
Creative Variations
- Add waves to accent nails only.
- Use glitter gel for waves.
- Create a gradient gel base.
- Pair with tiny bubble decals.
This manicure pairs with swimwear or silver accessories, radiating coastal allure. Maintain by checking gel adhesion and refreshing the top coat. Ocean Wave Gel Layers are a captivating vacation choice.
Coconut Taupe Gloss

Coconut Taupe Gloss features creamy taupe polish with an ultra-glossy topcoat, offering a neutral, sleek, beachy look. Perfect for beach dinners or island retreats, this chic manicure exudes understated elegance.
Tools Needed
- Taupe nail polish
- Base coat and glossy top coat
- Nail file
- Acetone for cleanup
Step-by-Step Guide
- File nails to desired shape; apply a base coat and let dry.
- Paint nails with taupe polish, using two coats; let dry.
- Apply a second layer if needed for opacity.
- Check for even, glossy coverage.
- Clean excess polish with acetone.
- Seal with a glossy top coat.
Color Suggestions
- Beachy Chic: Creamy taupe gloss.
- Soft Pop: Beige taupe gloss.
- Bold Shine: Gray taupe gloss.
Tips for Success
- Apply thin polish layers for smoothness.
- Use a glossy top coat for vibrancy.
- Clean cuticles for a polished look.
- File nails evenly for uniformity.
Creative Variations
- Add a matte top coat for contrast.
- Apply gold glitter to accent nails.
- Create a taupe French tip.
- Pair with a single shell decal.
This manicure pairs with neutral outfits or gold jewelry, radiating summery sophistication. Maintain by refreshing the top coat. Coconut Taupe Gloss is a timeless vacation choice.
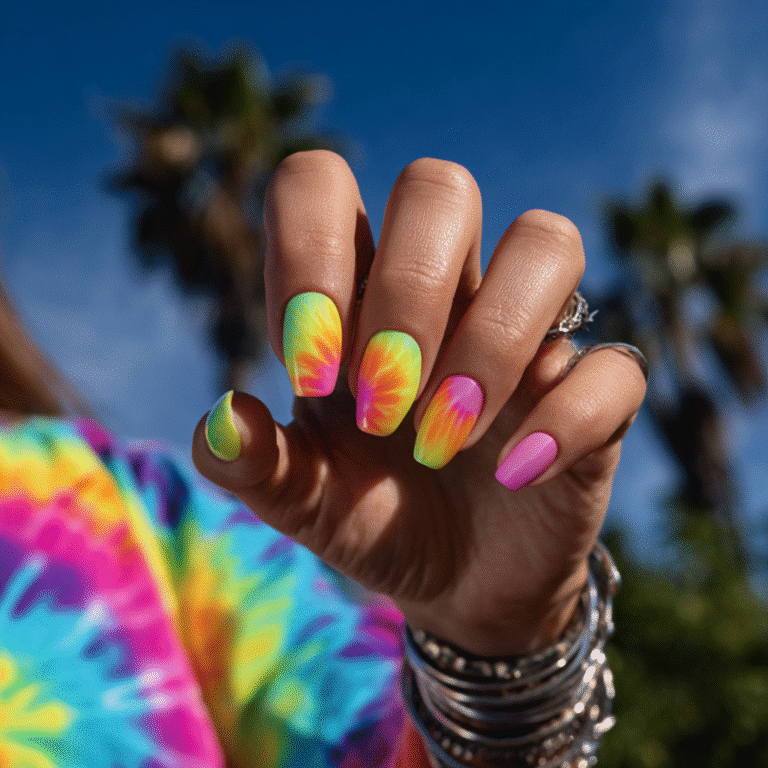
Color Drip Tips
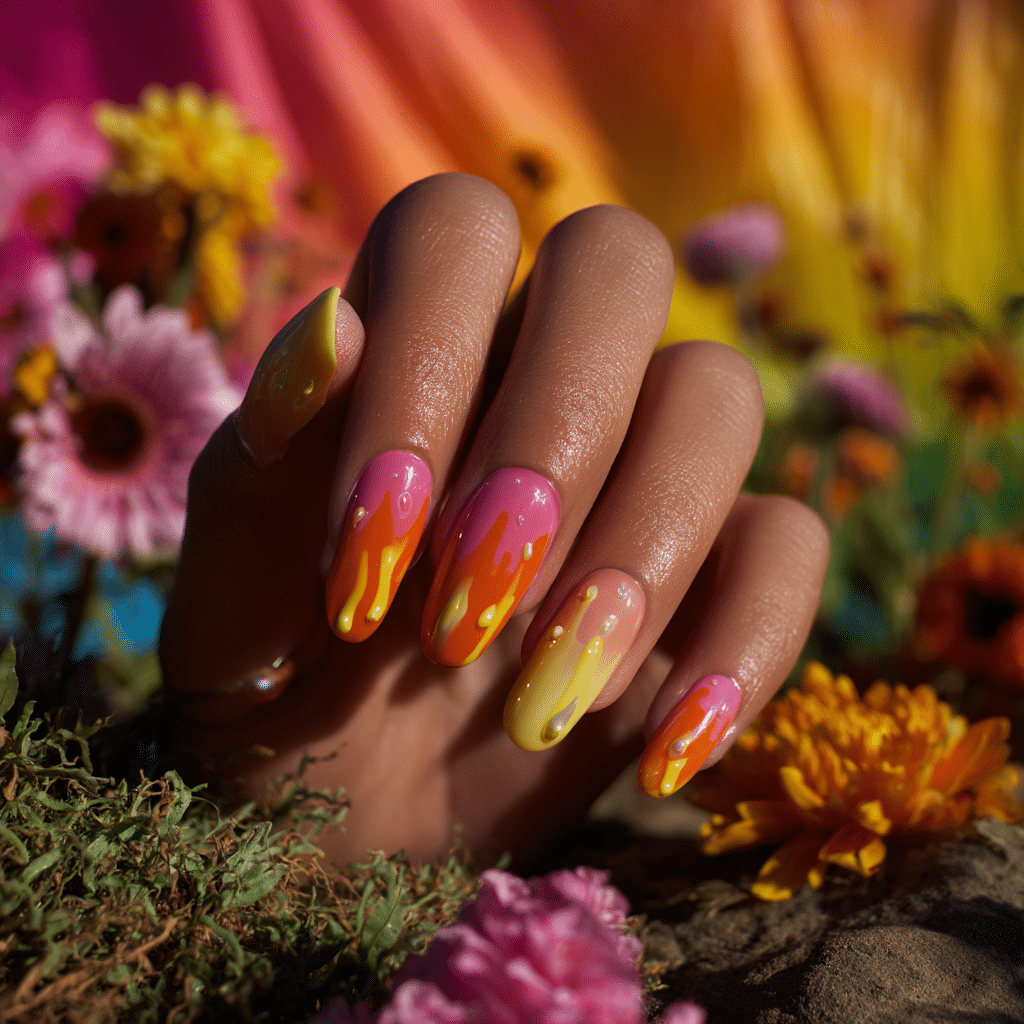
Color Drip Tips feature jelly-bright polish dripping from the tips in pink, yellow, or orange, offering a playful, artistic look. Perfect for beach festivals or tropical parties, this bold manicure radiates summery energy.
Tools Needed
- Jelly pink, yellow, or orange nail polishes
- Fine nail art brush
- Base coat and glossy top coat
- Acetone for cleanup
Step-by-Step Guide
- Apply a base coat and let dry.
- Paint nails with a clear base, using two coats; let dry.
- Use a fine brush to paint jelly pink, yellow, or orange drips from the tips.
- Create uneven, dripping patterns for an artistic effect.
- Clean excess polish with acetone.
- Seal with a glossy top coat.
Color Suggestions
- Playful Drip: Jelly pink drips.
- Bold Pop: Jelly yellow drips.
- Vibrant Glow: Jelly orange drips.
Tips for Success
- Practice drip patterns on paper.
- Use a fine brush for precision.
- Keep drips varied for artistry.
- Use a glossy top coat for shine.
Creative Variations
- Add drips to accent nails only.
- Use glitter jelly polish for drips.
- Create a gradient base.
- Pair with a tiny star decal.
This manicure pairs with colorful outfits or silver accessories, radiating summer fun. Maintain by touching up drips and refreshing the top coat. Color Drip Tips are a lively vacation choice.
Ice Blue Aura Glow
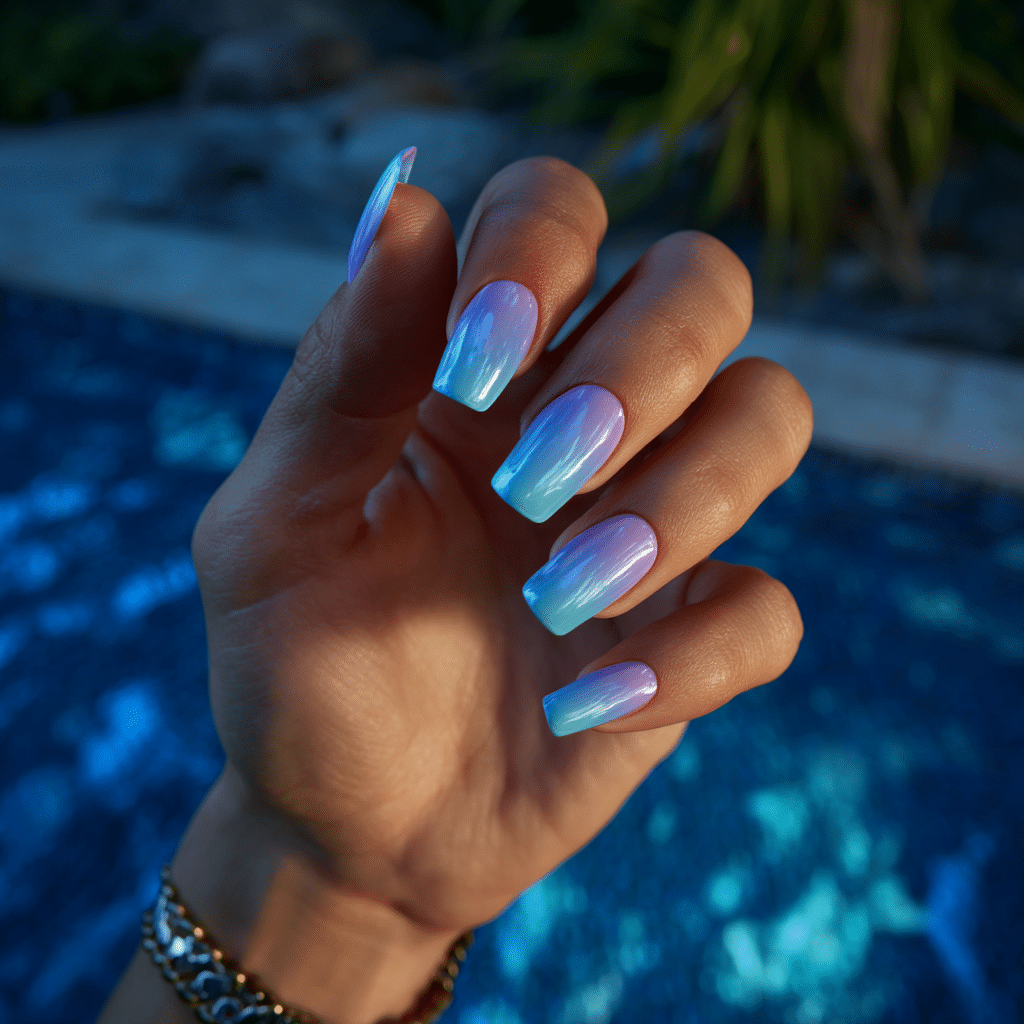
Ice Blue Aura Glow features soft translucent baby blue polish with radiant glow edges, evoking a cool summer breeze. Perfect for beach mornings or coastal strolls, this ethereal manicure radiates serene beauty.
Tools Needed
- Translucent baby blue nail polish
- Iridescent top coat
- Base coat and glossy top coat
- Nail file
- Acetone for cleanup
Step-by-Step Guide
- File nails to desired shape; apply a base coat and let dry.
- Paint nails with translucent baby blue polish, using two coats; let dry.
- Apply an iridescent top coat for glowing edges.
- Check for even, radiant effect.
- Clean excess polish with acetone.
- Seal with a glossy top coat.
Color Suggestions
- Cool Glow: Translucent baby blue with iridescent glow.
- Soft Pop: Translucent aqua with pearl glow.
- Bold Shine: Translucent teal with silver glow.
Tips for Success
- Apply thin polish layers for transparency.
- Use an iridescent top coat sparingly.
- Clean cuticles for a polished look.
- Use a quick-dry top coat.
Creative Variations
- Add glitter flecks for sparkle.
- Use a matte top coat for contrast.
- Create a gradient blue effect.
- Pair with a single cloud decal.
This manicure pairs with airy outfits or silver jewelry, radiating coastal charm. Maintain by refreshing the top coat. Ice Blue Aura Glow is a dreamy vacation choice.
Botanical Vines on Clear Base
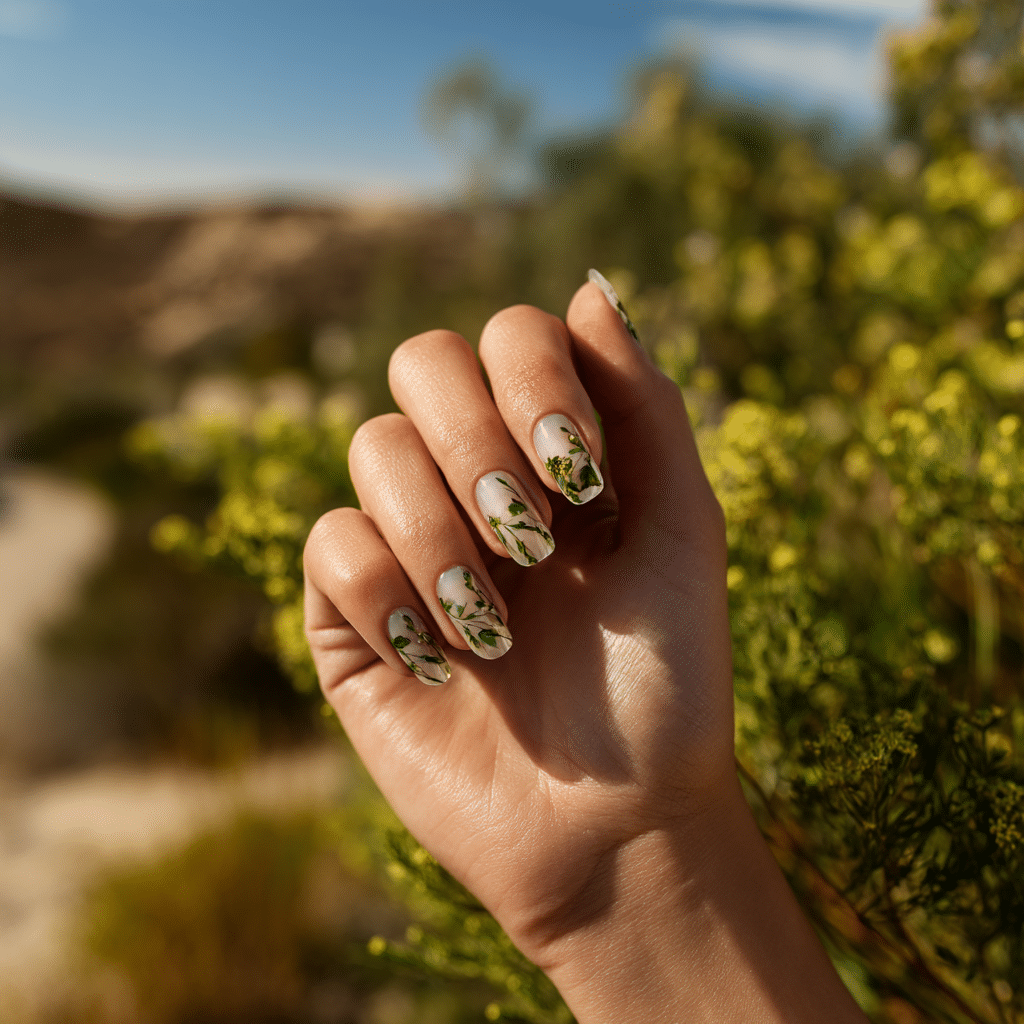
Botanical Vines on Clear Base feature fine green vines or leaves drawn across a sheer base, offering an earthy vacation feel. Perfect for tropical hikes or beach picnics, this delicate manicure exudes natural elegance.
Tools Needed
- Clear nail polish
- Green nail polish
- Fine nail art brush
- Base coat and glossy top coat
- Acetone for cleanup
Step-by-Step Guide
- Apply a base coat and let dry.
- Paint nails with clear polish, using two coats; let dry.
- Use a fine brush to paint fine green vines or leaves across nails.
- Create delicate, flowing patterns for a botanical effect.
- Clean excess polish with acetone.
- Seal with a glossy top coat.
Color Suggestions
- Earthy Charm: Clear with green vines.
- Soft Pop: Sheer pink with mint vines.
- Bold Contrast: Clear with neon green vines.
Tips for Success
- Practice vine patterns on paper.
- Use a fine brush for precision.
- Keep vines delicate for elegance.
- Use a glossy top coat for shine.
Creative Variations
- Add vines to accent nails only.
- Use glitter polish for vines.
- Create a gradient clear base.
- Pair with tiny flower decals.
This manicure pairs with neutral outfits or gold jewelry, adding summery sophistication. Maintain by touching up vines and refreshing the top coat. Botanical Vines on Clear Base are a refined vacation choice.
Pastel Rainbow Glazed Nails
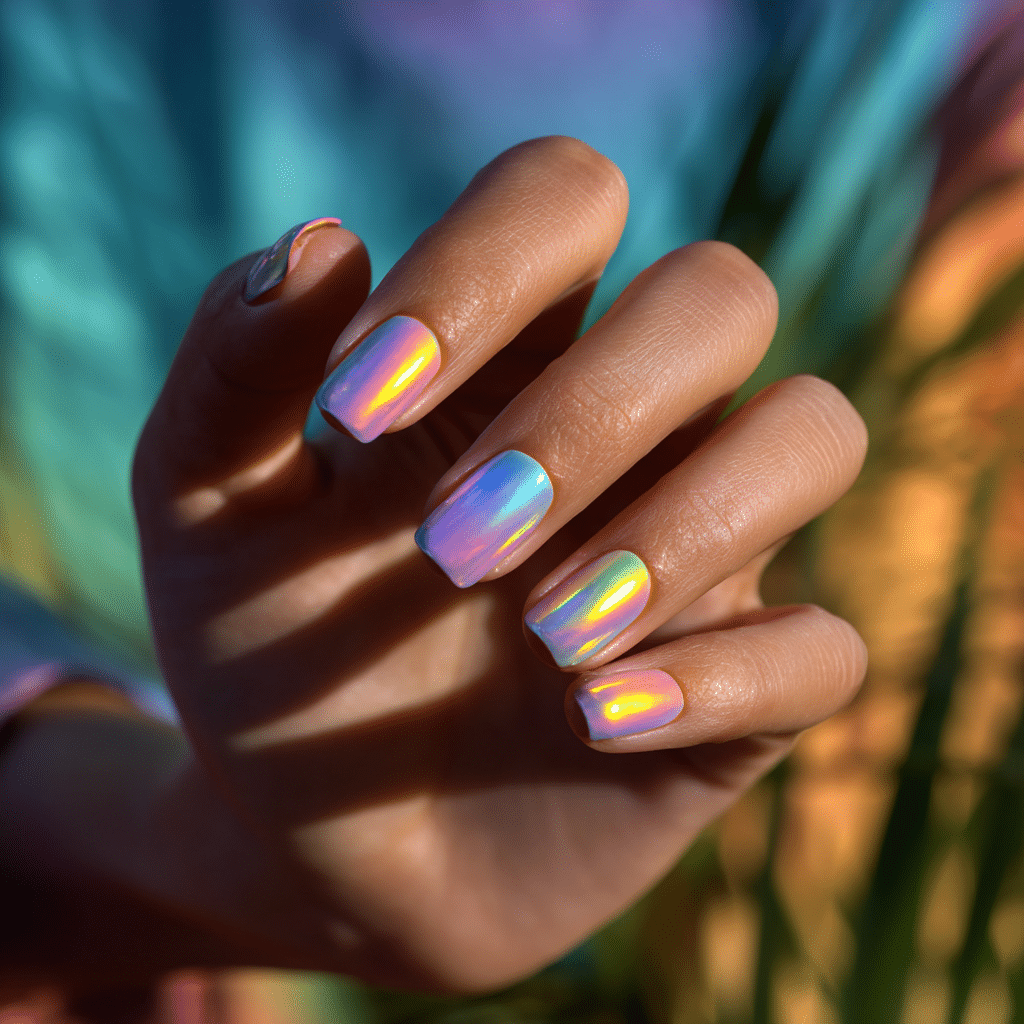
Pastel Rainbow Glazed Nails feature iridescent chrome over a soft rainbow base, offering a candy-like, futuristic look. Perfect for beach festivals or tropical parties, this vibrant manicure radiates playful energy.
Tools Needed
- Pastel nail polishes (pink, blue, yellow)
- Iridescent chrome top coat
- Base coat and glossy top coat
- Nail file
- Acetone for cleanup
Step-by-Step Guide
- File nails to desired shape; apply a base coat and let dry.
- Paint nails with pastel pink, blue, or yellow polish, using two coats; let dry.
- Apply an iridescent chrome top coat for a glazed effect.
- Check for even, shimmering finish.
- Clean excess polish with acetone.
- Seal with a glossy top coat.
Color Suggestions
- Candy Pop: Pastel rainbow with chrome glaze.
- Soft Glow: Pastel coral, aqua, lemon with pearl glaze.
- Bold Shine: Neon pastel pink, blue, yellow with silver glaze.
Tips for Success
- Apply thin polish layers for smoothness.
- Use a chrome top coat sparingly.
- Clean cuticles for a polished look.
- Use a quick-dry top coat.
Creative Variations
- Add glitter to the base.
- Use a matte top coat for contrast.
- Create a gradient rainbow base.
- Pair with a single star decal.
This manicure pairs with colorful outfits or silver accessories, radiating summer fun. Maintain by refreshing the top coat. Pastel Rainbow Glazed Nails are a trendy vacation choice.
Mini Starfish & Seaglass Combo
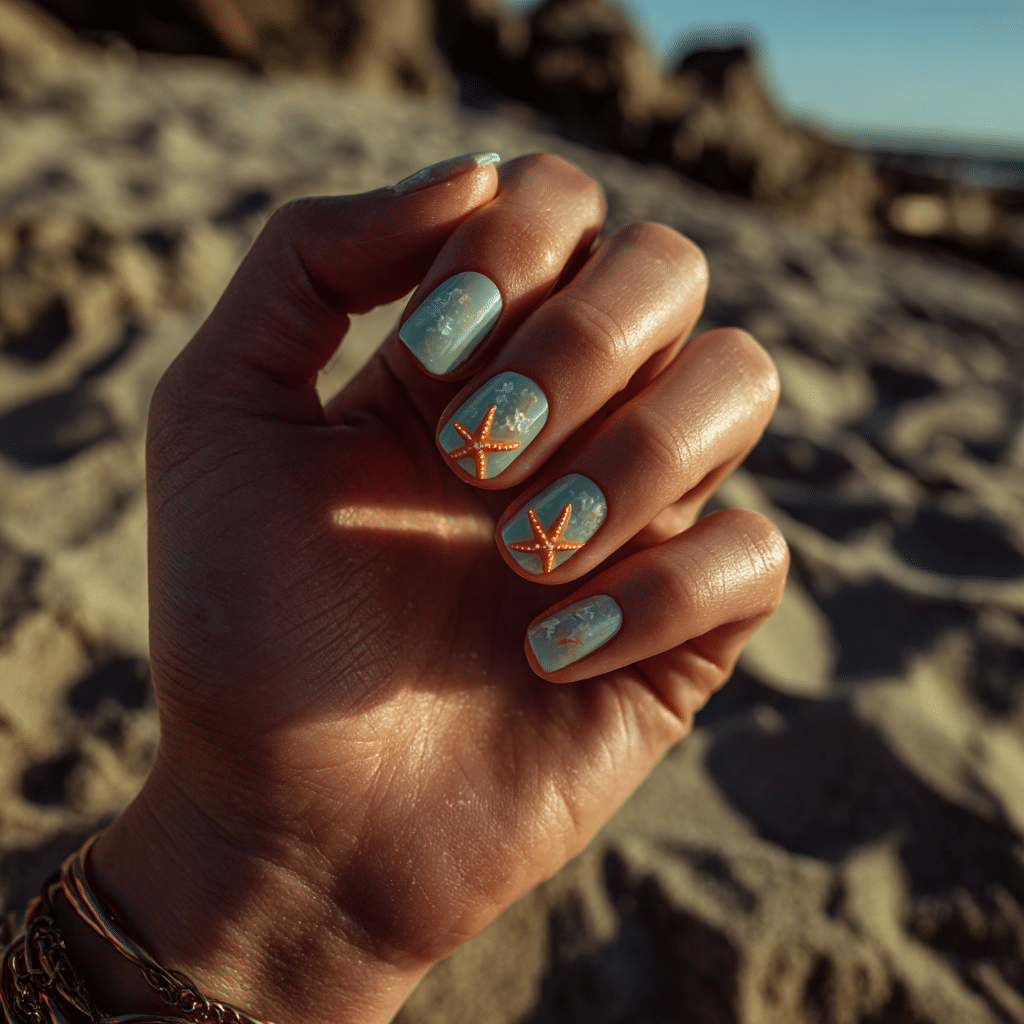
Mini Starfish & Seaglass Combo features a translucent sea-green base with micro starfish accents, offering a coastal, whimsical look. Perfect for beach strolls or tropical dinners, this manicure radiates serene charm.
Tools Needed
- Translucent sea-green nail polish
- Orange or white nail polish
- Fine nail art brush or decals
- Base coat and glossy top coat
- Acetone for cleanup
Step-by-Step Guide
- Apply a base coat and let dry.
- Paint nails with translucent sea-green polish, using two coats; let dry.
- Use a fine brush or decals to place micro starfish in orange or white.
- Place starfish sparsely for a delicate effect.
- Clean excess polish with acetone.
- Seal with a glossy top coat.
Color Suggestions
- Coastal Charm: Sea-green with orange starfish.
- Soft Pop: Aqua with white starfish.
- Bold Contrast: Teal with gold starfish.
Tips for Success
- Practice starfish shapes or use decals.
- Use a fine brush for precision.
- Keep starfish small for subtlety.
- Use a glossy top coat for shine.
Creative Variations
- Add starfish to accent nails only.
- Use glitter polish for starfish.
- Create a gradient sea-green base.
- Pair with tiny seaglass decals.
This manicure pairs with beachwear or silver jewelry, radiating coastal allure. Maintain by touching up starfish and refreshing the top coat. Mini Starfish & Seaglass Combo is a serene vacation choice.
Citrus Half-Moon Detail
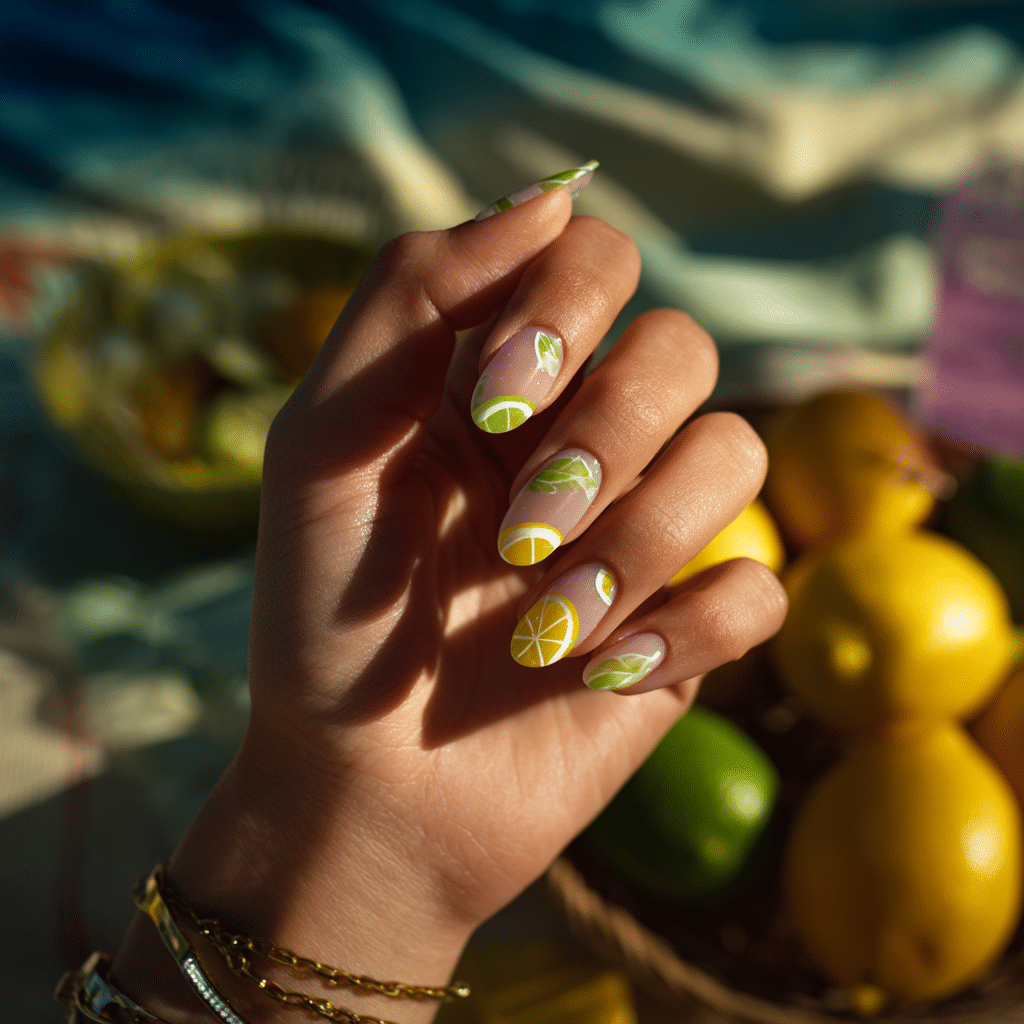
Citrus Half-Moon Detail features half-moon lemon or lime shapes at the cuticle, offering a quirky, cute look. Perfect for beach picnics or tropical markets, this playful manicure bursts with summery charm.
Tools Needed
- Clear or sheer nail polish
- Yellow or green nail polish
- Fine nail art brush
- Base coat and glossy top coat
- Acetone for cleanup
Step-by-Step Guide
- Apply a base coat and let dry.
- Paint nails with clear or sheer polish, using two coats; let dry.
- Use a fine brush to paint half-moon lemon or lime shapes at the cuticle.
- Add details like seeds or texture for realism.
- Clean excess polish with acetone.
- Seal with a glossy top coat.
Color Suggestions
- Fruity Pop: Clear with lemon half-moons.
- Soft Glow: Sheer pink with lime half-moons.
- Bold Contrast: Clear with neon yellow half-moons.
Tips for Success
- Practice half-moon shapes on paper.
- Use a fine brush for precision.
- Keep designs small for cuteness.
- Use a glossy top coat for shine.
Creative Variations
- Add half-moons to accent nails only.
- Use glitter polish for half-moons.
- Create a gradient base.
- Pair with tiny fruit decals.
This manicure pairs with bright outfits or silver accessories, radiating summer zest. Maintain by touching up half-moons and refreshing the top coat. Citrus Half-Moon Detail is a delightful vacation choice.
Bold Coral Chrome
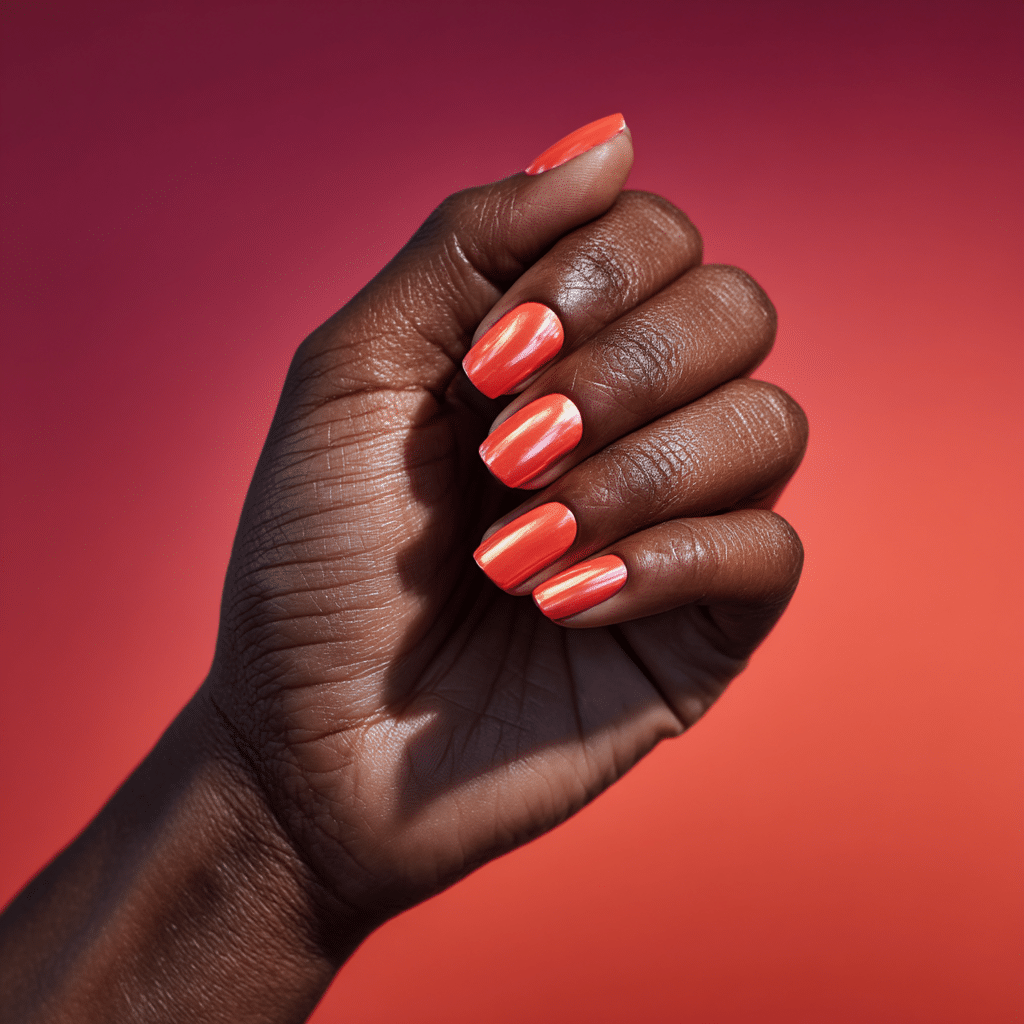
Bold Coral Chrome features statement coral red polish with a high-shine chrome overlay, offering a vibrant, glamorous look. Perfect for beach parties or tropical galas, this bold manicure radiates summery energy.
Tools Needed
- Coral red nail polish
- Chrome top coat
- Base coat and glossy top coat
- Nail file
- Acetone for cleanup
Step-by-Step Guide
- File nails to desired shape; apply a base coat and let dry.
- Paint nails with coral red polish, using two coats; let dry.
- Apply a chrome top coat for a high-shine effect.
- Check for even, reflective finish.
- Clean excess polish with acetone.
- Seal with a glossy top coat.
Color Suggestions
- Vibrant Pop: Coral red with chrome.
- Soft Pop: Peach with chrome.
- Bold Shine: Neon coral with chrome.
Tips for Success
- Apply thin polish layers for smoothness.
- Use a chrome top coat sparingly.
- Clean cuticles for a polished look.
- Use a quick-dry top coat.
Creative Variations
- Add a matte top coat for contrast.
- Apply glitter to accent nails.
- Create a coral French tip.
- Pair with a single rhinestone.
This manicure pairs with bold outfits or gold jewelry, radiating summer glamour. Maintain by refreshing the top coat. Bold Coral Chrome is a striking vacation choice.
Sky Reflection Nails
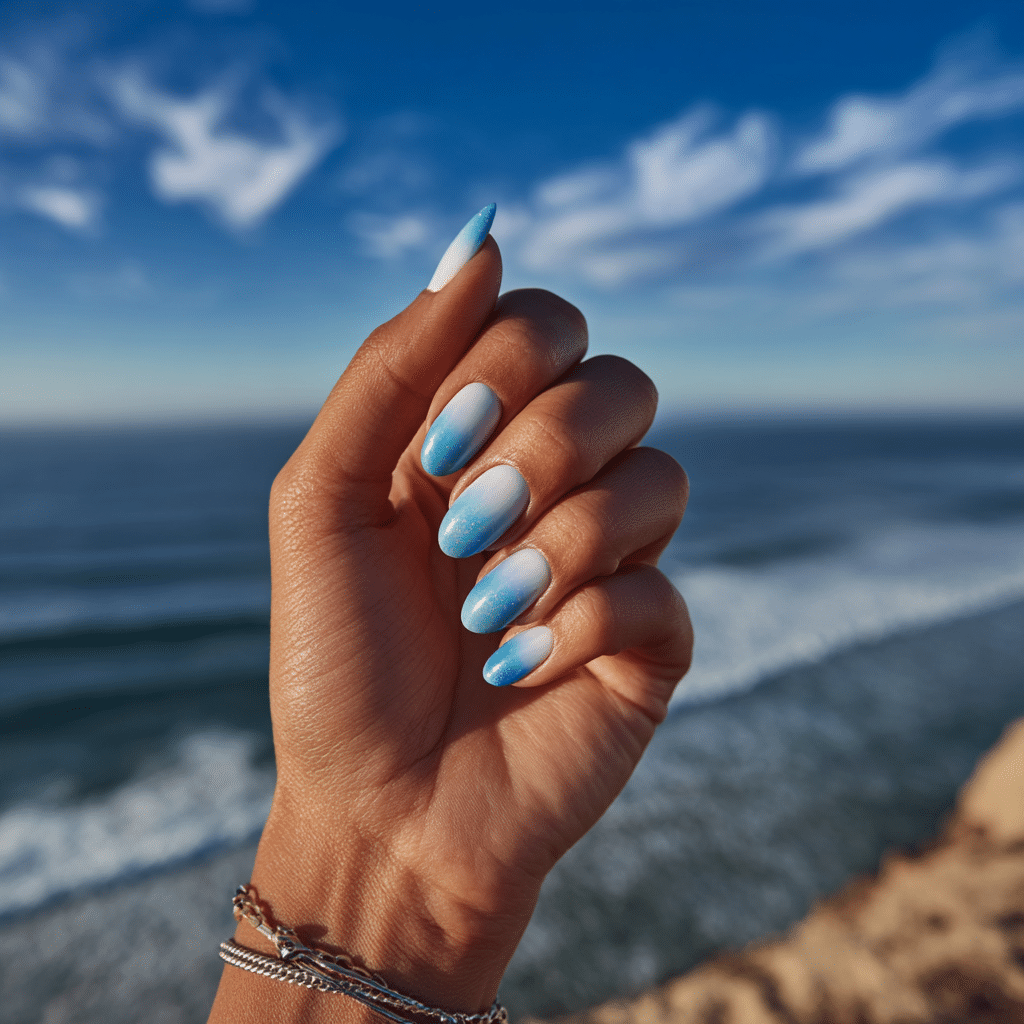
Sky Reflection Nails feature a white-blue ombré with a gloss finish, mirroring a hot day sky. Perfect for beach days or tropical cruises, this serene manicure radiates coastal beauty.
Tools Needed
- White and blue nail polishes
- Makeup sponge
- Base coat and glossy top coat
- Acetone for cleanup
Step-by-Step Guide
- Apply a base coat and let dry.
- Paint nails with a clear base; let dry.
- Dab white and blue polish onto a sponge, blending slightly.
- Press sponge onto nails, creating a smooth ombré.
- Repeat for a seamless sky effect; let dry.
- Clean excess polish with acetone.
- Seal with a glossy top coat.
Color Suggestions
- Sky Glow: White to blue ombré.
- Soft Pop: Ivory to aqua ombré.
- Bold Blend: White to navy ombré.
Tips for Success
- Use a sponge for smooth blending.
- Apply thin layers to avoid clumps.
- Practice gradient on paper.
- Use a glossy top coat for shine.
Creative Variations
- Add glitter in the ombré.
- Use a matte top coat for contrast.
- Create a vertical ombré.
- Pair with a tiny cloud decal.
This manicure pairs with beachwear or silver jewelry, radiating coastal charm. Maintain by reapplying the top coat. Sky Reflection Nails are a tranquil vacation choice.
Mango Swirl Gel Nails
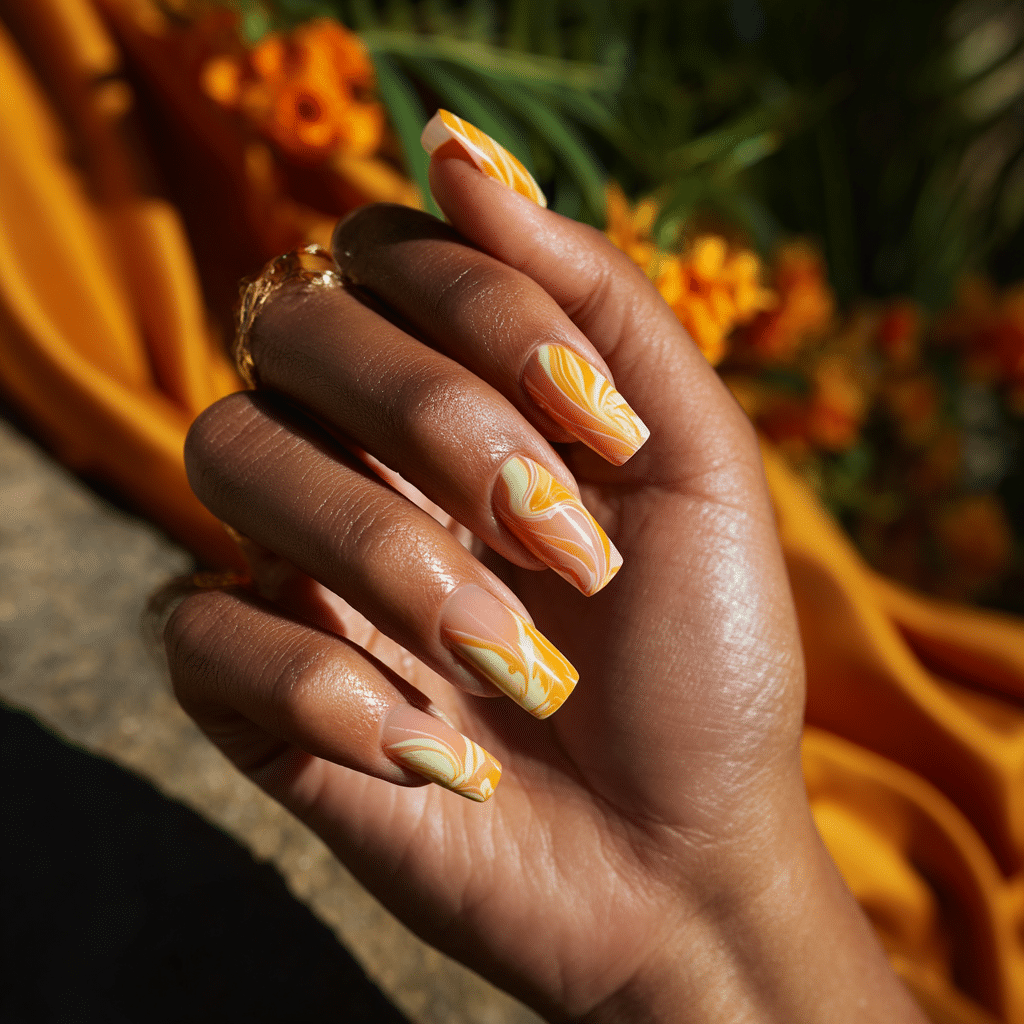
Mango Swirl Gel Nails feature abstract mango-yellow swirls on a sheer peach base, offering a fruity, elegant look. Perfect for beach picnics or tropical evenings, this artistic manicure radiates summery sophistication.
Tools Needed
- Sheer peach and mango-yellow gel polishes
- Fine nail art brush
- UV lamp for gel curing
- Base coat and glossy top coat
- Acetone for cleanup
Step-by-Step Guide
- Apply a base coat and let dry.
- Apply a thin layer of sheer peach gel polish; cure under UV lamp.
- Use a fine brush to paint abstract mango-yellow swirls, curing after each swirl.
- Create overlapping, curvy patterns for a fruity effect.
- Clean excess polish with acetone.
- Seal with a glossy top coat.
Color Suggestions
- Fruity Elegance: Sheer peach with mango-yellow swirls.
- Soft Pop: Sheer pink with lemon-yellow swirls.
- Bold Contrast: Sheer peach with neon yellow swirls.
Tips for Success
- Practice swirl patterns on paper.
- Use a fine brush for precision.
- Cure each layer fully for durability.
- Use a glossy top coat for shine.
Creative Variations
- Add swirls to accent nails only.
- Use glitter gel for swirls.
- Create a gradient peach base.
- Pair with tiny fruit decals.
This manicure pairs with tropical outfits or gold jewelry, radiating summer flair. Maintain by checking gel adhesion and refreshing the top coat. Mango Swirl Gel Nails are a chic vacation choice.
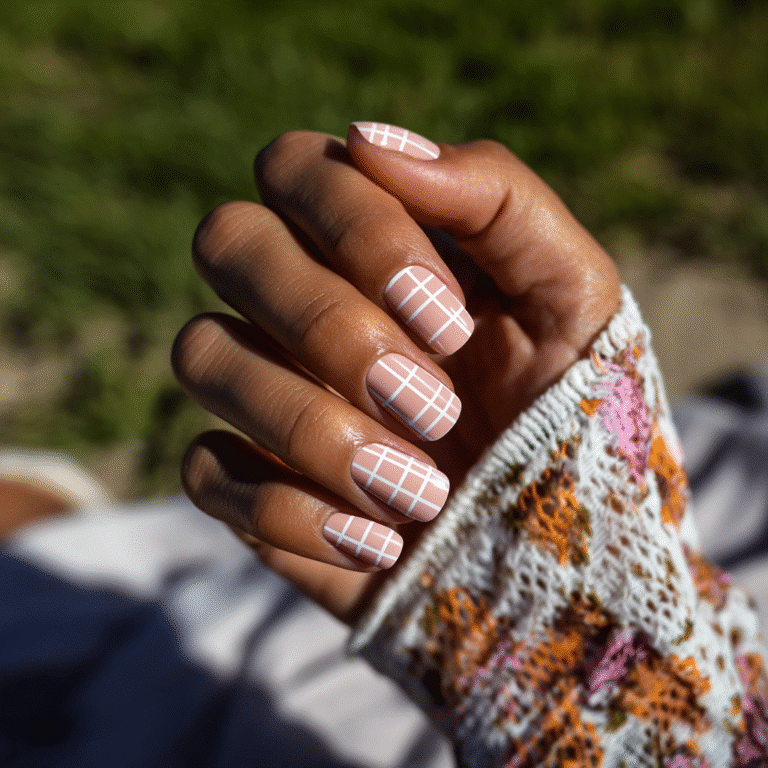
Matte White & Gold Stripe
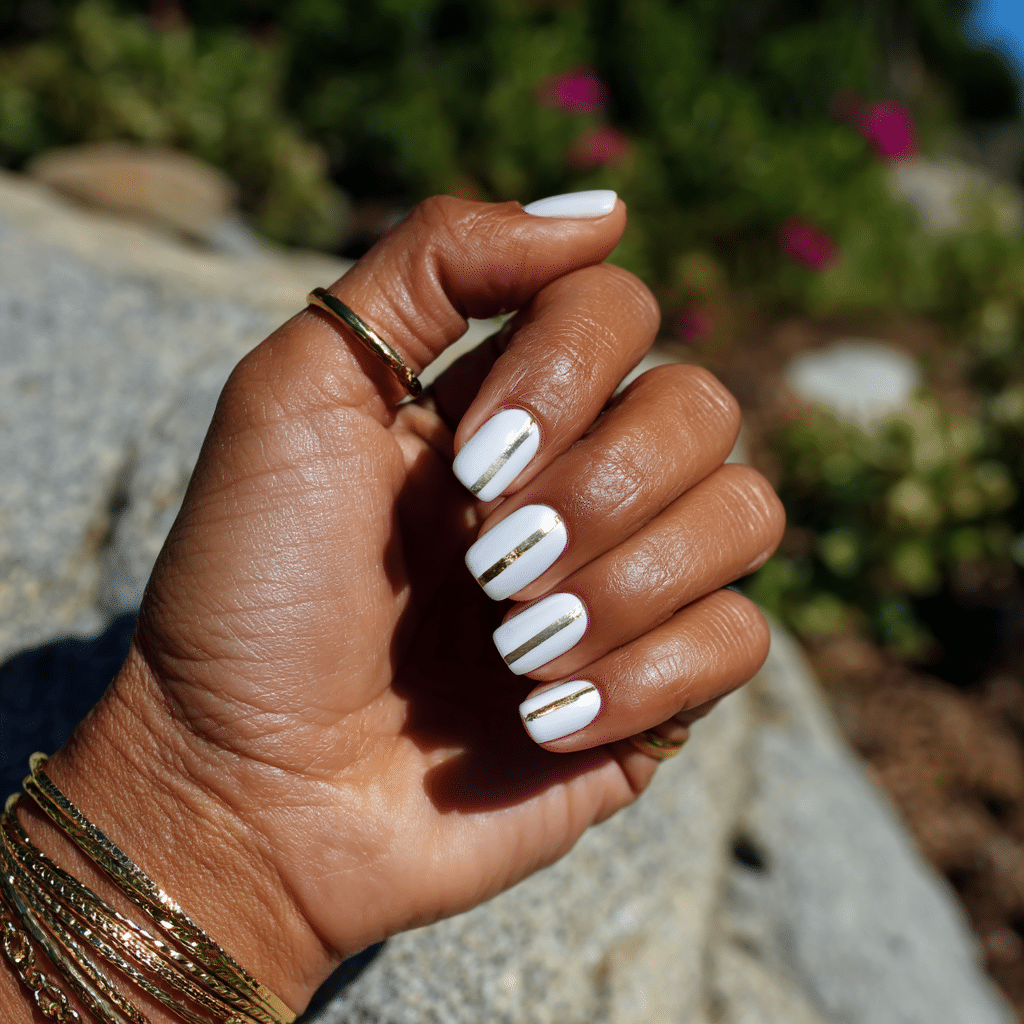
Matte White & Gold Stripe features pure matte white nails with one vertical metallic gold line, offering a modern, clean look. Perfect for beach dinners or island retreats, this chic manicure exudes minimalist elegance.
Tools Needed
- White nail polish
- Gold nail polish
- Fine nail art brush
- Matte top coat
- Base coat
- Acetone for cleanup
Step-by-Step Guide
- Apply a base coat and let dry.
- Paint nails with white polish, using two coats; let dry.
- Apply a matte top coat evenly across all nails.
- Use a fine brush to paint a vertical gold stripe on each nail.
- Clean excess polish with acetone.
- Let dry without a glossy top coat to preserve matte finish.
Color Suggestions
- Modern Chic: Matte white with gold stripe.
- Soft Pop: Matte ivory with rose gold stripe.
- Bold Contrast: Matte white with silver stripe.
Tips for Success
- Practice stripe lines on paper.
- Use a fine brush for precision.
- Apply matte top coat evenly.
- Clean cuticles for a polished look.
Creative Variations
- Add stripes to accent nails only.
- Use glitter polish for stripes.
- Create a diagonal gold stripe.
- Pair with a tiny star decal.
This manicure pairs with neutral outfits or gold jewelry, radiating summery sophistication. Maintain by refreshing the matte top coat. Matte White & Gold Stripe is a refined vacation choice.
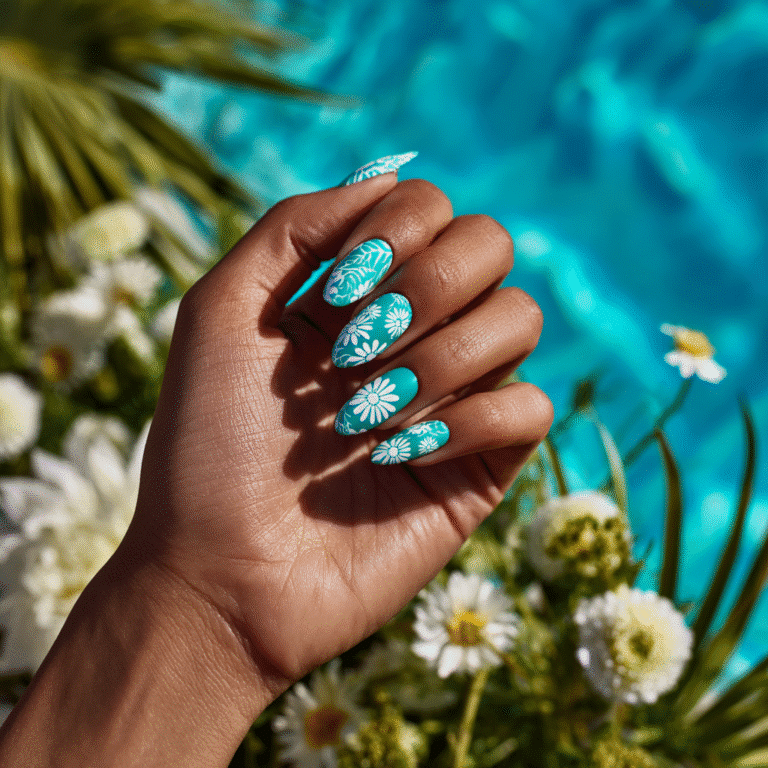
Floating Floral Art
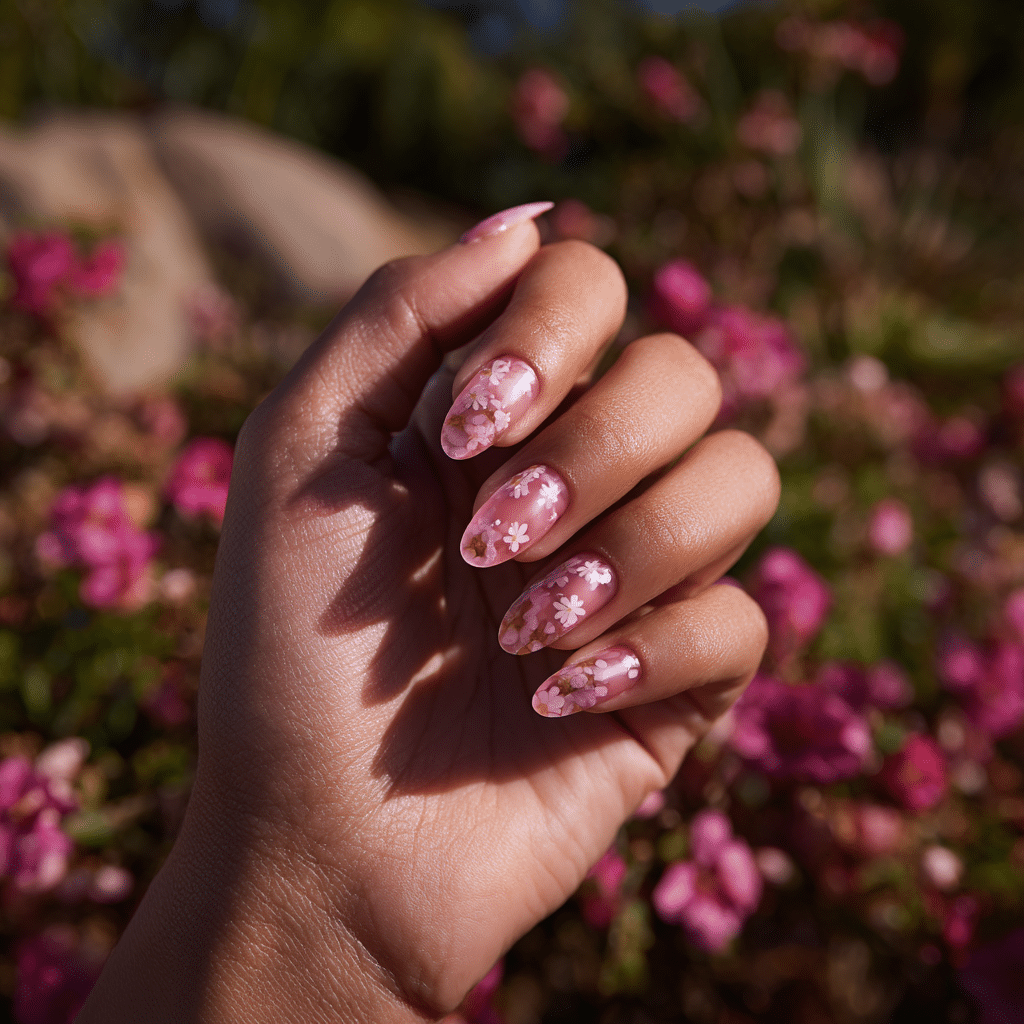
Floating Floral Art features mini flowers encapsulated in clear gel polish, floating like petals in water. Perfect for beach weddings or tropical brunches, this delicate manicure exudes romantic charm.
Tools Needed
- Clear gel nail polish
- Pink, white, or yellow nail polishes
- Fine nail art brush
- UV lamp for gel curing
- Base coat and glossy top coat
- Acetone for cleanup
Step-by-Step Guide
- Apply a base coat and let dry.
- Apply a thin layer of clear gel polish; cure under UV lamp.
- Use a fine brush to paint mini pink, white, or yellow flowers; cure.
- Apply another layer of clear gel polish to encapsulate flowers; cure.
- Clean excess polish with acetone.
- Seal with a glossy top coat.
Color Suggestions
- Romantic Charm: Clear with pink flowers.
- Soft Pop: Clear with white flowers.
- Bold Contrast: Clear with yellow flowers.
Tips for Success
- Practice flower shapes on paper.
- Use a fine brush for precision.
- Cure each layer fully for depth.
- Use a glossy top coat for shine.
Creative Variations
- Add flowers to accent nails only.
- Use glitter polish for flowers.
- Create a gradient clear base.
- Pair with tiny leaf decals.
This manicure pairs with floral dresses or silver jewelry, radiating summery romance. Maintain by checking gel adhesion and refreshing the top coat. Floating Floral Art is a dreamy vacation choice.
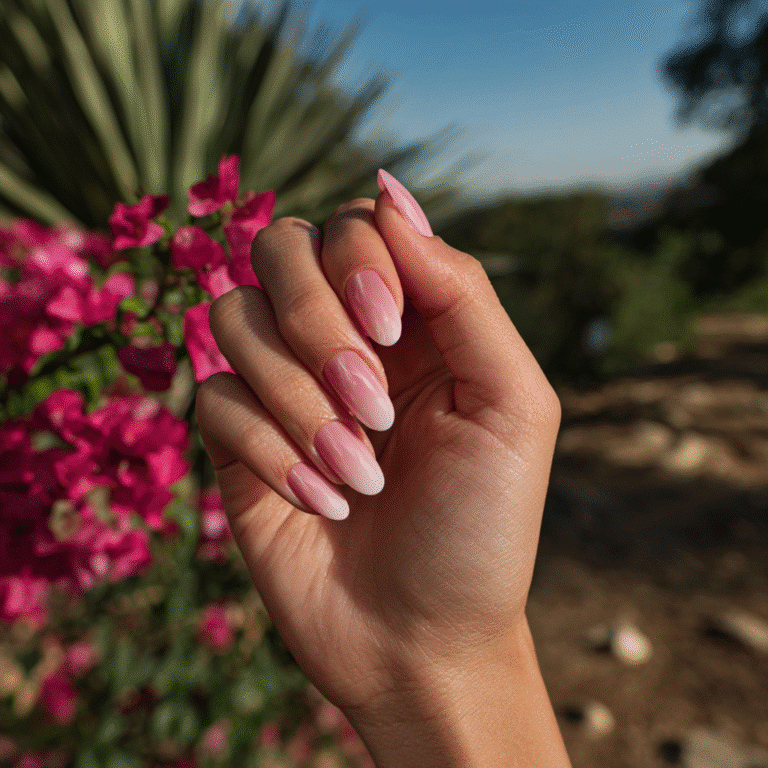
Lilac-Tipped Almonds
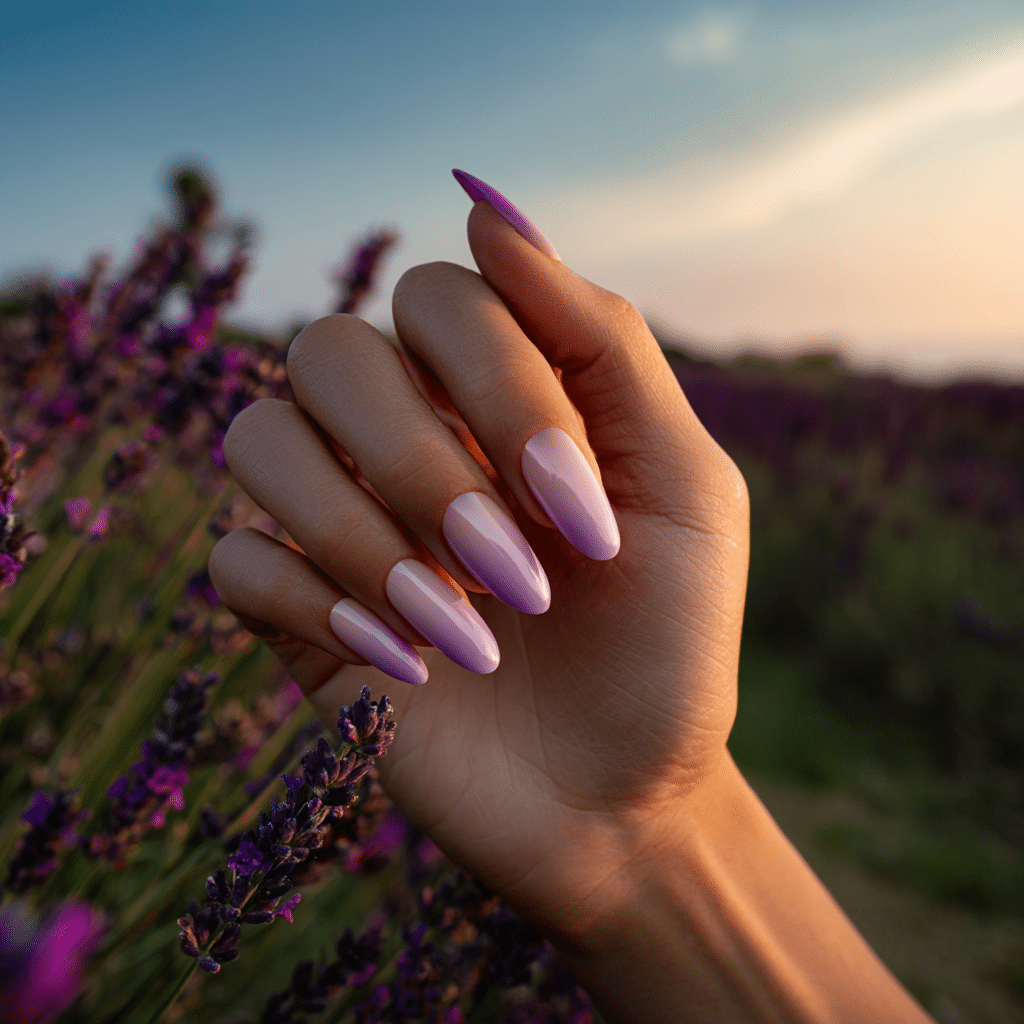
Lilac-Tipped Almonds feature a sheer base with smooth lavender tips, offering a romantic, refined look. Perfect for beach sunsets or tropical dates, this chic manicure exudes elegance.
Tools Needed
- Sheer and lavender nail polishes
- Striping tape or fine nail art brush
- Base coat and glossy top coat
- Nail file
- Acetone for cleanup
Step-by-Step Guide
- File nails to almond shape; apply a base coat and let dry.
- Paint nails with sheer polish, using two coats; let dry.
- Use striping tape or a fine brush to create clean lavender tips.
- Apply two layers of lavender polish for smooth tips.
- Clean excess polish with acetone.
- Seal with a glossy top coat.
Color Suggestions
- Romantic Glow: Sheer with lavender tips.
- Soft Pop: Sheer pink with lilac tips.
- Bold Contrast: Sheer with purple tips.
Tips for Success
- Use tape for precise tip lines.
- Apply thin polish layers for evenness.
- Shape nails carefully for almond form.
- Use a glossy top coat for shine.
Creative Variations
- Add glitter to lavender tips.
- Use a matte lavender tip for contrast.
- Create double lavender tips on one nail.
- Pair with a tiny heart decal.
This manicure pairs with pastel outfits or silver jewelry, radiating summery elegance. Maintain by touching up tips and refreshing the top coat. Lilac-Tipped Almonds are a refined vacation choice.
Turquoise Pebble Texture
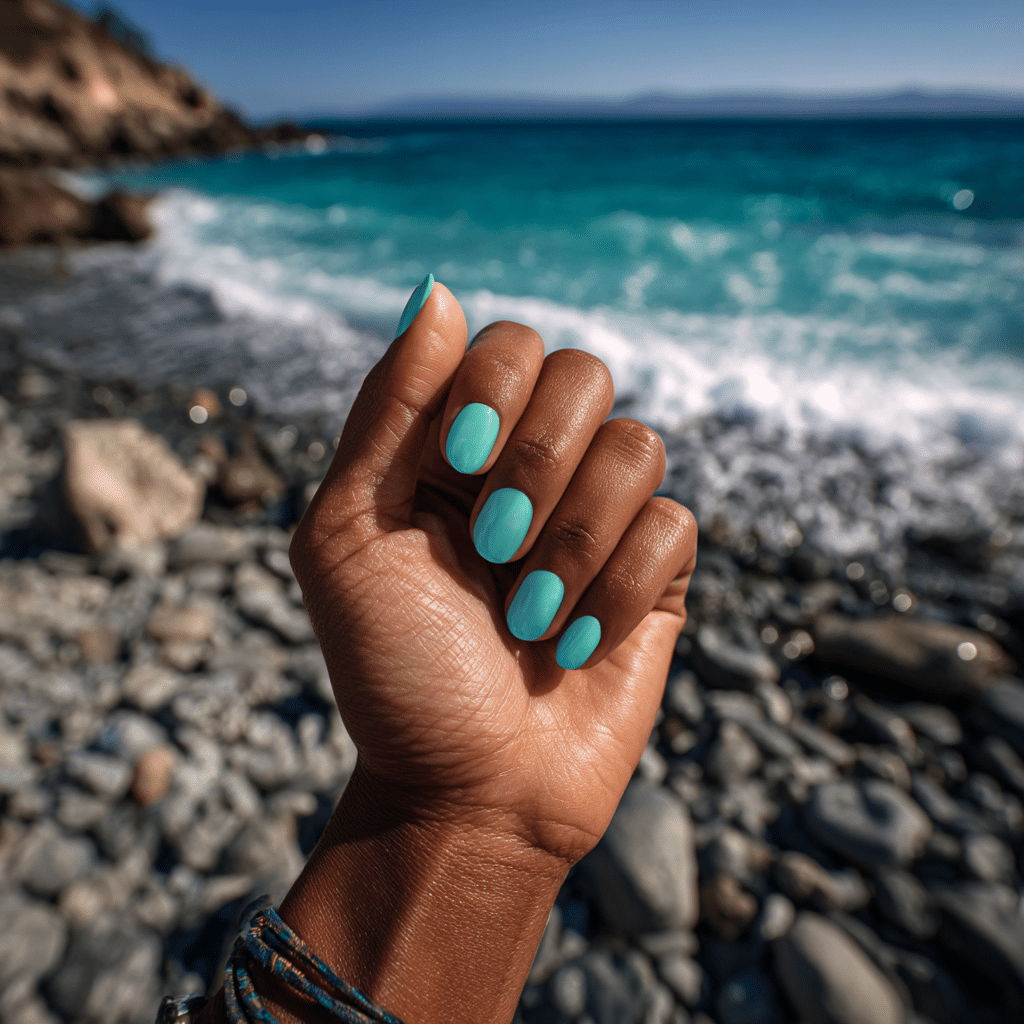
Turquoise Pebble Texture features slightly textured turquoise nails with a matte topcoat, offering a natural, refreshing look. Perfect for beach hikes or coastal adventures, this unique manicure radiates earthy charm.
Tools Needed
- Turquoise nail polish
- Textured top coat
- Matte top coat
- Base coat
- Nail file
- Acetone for cleanup
Step-by-Step Guide
- File nails to desired shape; apply a base coat and let dry.
- Paint nails with turquoise polish, using two coats; let dry.
- Apply a textured top coat for a pebble effect.
- Apply a matte top coat evenly across all nails.
- Clean excess polish with acetone.
- Let dry to preserve matte finish.
Color Suggestions
- Earthy Pop: Turquoise with pebble texture.
- Soft Pop: Aqua with pebble texture.
- Bold Contrast: Teal with pebble texture.
Tips for Success
- Apply textured top coat sparingly.
- Use a matte top coat evenly.
- Clean cuticles for a polished look.
- File nails evenly for uniformity.
Creative Variations
- Add a glossy top coat to one nail.
- Use a gradient turquoise base.
- Apply a single shell decal.
- Create a subtle wave pattern.
This manicure pairs with beachwear or silver jewelry, radiating coastal allure. Maintain by refreshing the matte top coat. Turquoise Pebble Texture is a unique vacation choice.
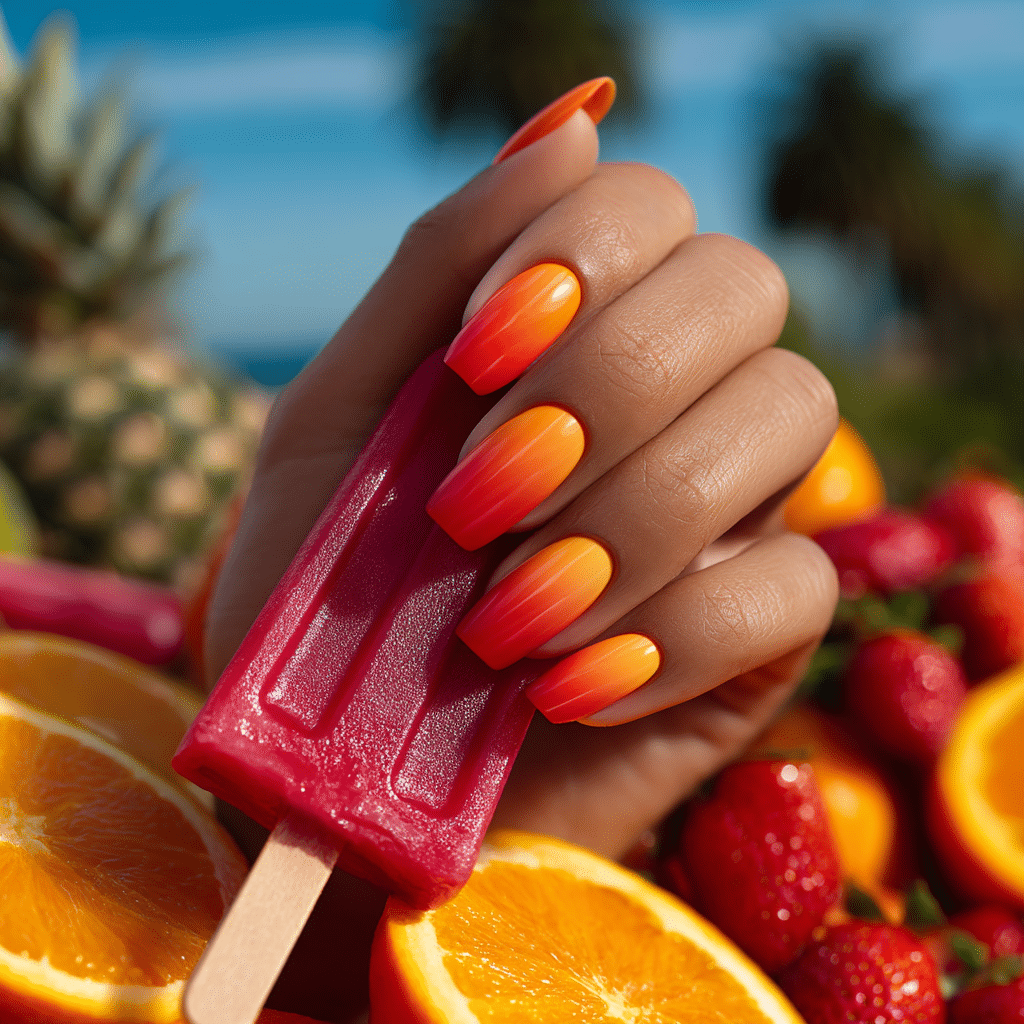
Popsicle Gradient Nails
Popsicle Gradient Nails feature a bright vertical fade mimicking orange and strawberry popsicles, offering a playful, summery look. Perfect for beach picnics or tropical festivals, this vibrant manicure radiates fun.
Tools Needed
- Orange and red nail polishes
- Makeup sponge
- Base coat and glossy top coat
- Acetone for cleanup
Step-by-Step Guide
- Apply a base coat and let dry.
- Paint nails with a clear base; let dry.
- Dab orange and red polish vertically onto a sponge, blending slightly.
- Press sponge onto nails, creating a vertical gradient.
- Repeat for a seamless popsicle effect; let dry.
- Clean excess polish with acetone.
- Seal with a glossy top coat.
Color Suggestions
- Fruity Fade: Orange to red gradient.
- Soft Pop: Peach to pink gradient.
- Bold Blend: Tangerine to berry gradient.
Tips for Success
- Use a sponge for smooth blending.
- Apply thin layers to avoid clumps.
- Practice gradient on paper.
- Use a glossy top coat for shine.
Creative Variations
- Add glitter in the gradient.
- Use a matte top coat for contrast.
- Create a horizontal gradient.
- Pair with a tiny popsicle decal.
This manicure pairs with bright outfits or silver accessories, radiating summer zest. Maintain by reapplying the top coat. Popsicle Gradient Nails are a lively vacation choice.
Neutral Uncovered with Shell Foil
Neutral Uncovered with Shell Foil features a soft uncovered base with pearlescent shell foils, offering understated vacation glam. Perfect for beach dinners or tropical retreats, this chic manicure exudes elegance.
Tools Needed
- Uncovered nail polish
- Pearlescent shell foil and foil glue
- Tweezers
- Base coat and glossy top coat
- Acetone for cleanup
Step-by-Step Guide
- Apply a base coat and let dry.
- Paint nails with uncovered polish, using two coats; let dry.
- Apply foil glue sparingly to nails.
- Use tweezers to place pearlescent shell foil flakes randomly.
- Press gently to secure foil.
- Clean excess polish with acetone.
- Seal with a glossy top coat.
Color Suggestions
- Subtle Glam: Uncovered with pearlescent foil.
- Soft Pop: Sheer pink with iridescent foil.
- Bold Contrast: Uncovered with silver foil.
Tips for Success
- Apply foil glue sparingly for subtlety.
- Use tweezers for precise placement.
- Keep foil sparse for elegance.
- Use a glossy top coat for shine.
Creative Variations
- Add foil to accent nails only.
- Use glitter polish as a base.
- Create a gradient uncovered base.
- Pair with a single pearl decal.
This manicure pairs with neutral outfits or gold jewelry, radiating summery sophistication. Maintain by checking foil adhesion and refreshing the top coat. Neutral Uncovered with Shell Foil is a glamorous vacation choice.
Jetsetter Icon Nails
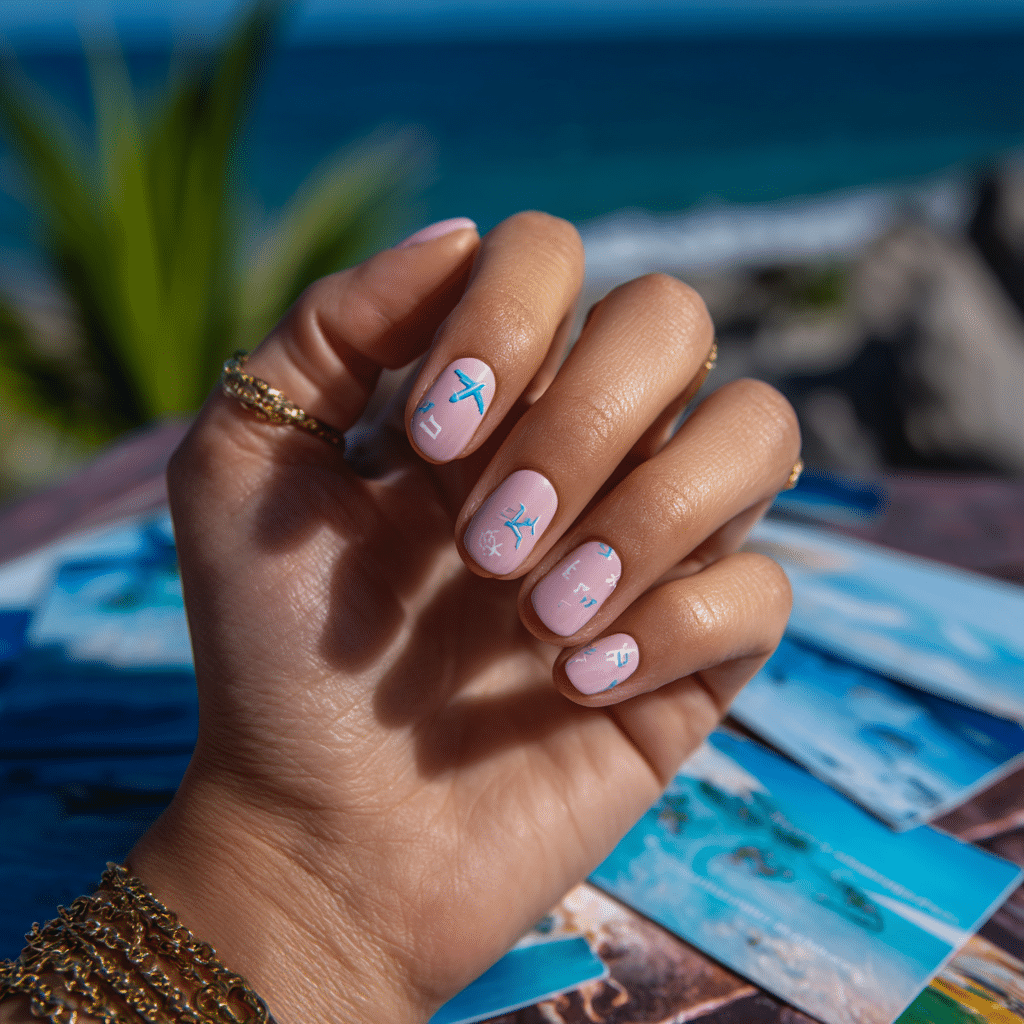
Jetsetter Icon Nails feature tiny travel-themed icons like planes, suns, or waves on a blush base, offering a playful, adventurous look. Perfect for beach trips or tropical adventures, this cute manicure radiates vacation vibes.
Tools Needed
- Blush nail polish
- White, yellow, or blue nail polishes
- Fine nail art brush or decals
- Base coat and glossy top coat
- Acetone for cleanup
Step-by-Step Guide
- Apply a base coat and let dry.
- Paint nails with blush polish, using two coats; let dry.
- Use a fine brush or decals to place tiny plane, sun, or wave icons on accent nails.
- Keep icons small and sparse for a playful effect.
- Clean excess polish with acetone.
- Seal with a glossy top coat.
Color Suggestions
- Travel Charm: Blush with white icons.
- Soft Pop: Sheer pink with yellow icons.
- Bold Contrast: Blush with blue icons.
Tips for Success
- Practice icon shapes or use decals.
- Use a fine brush for precision.
- Keep icons minimal for cuteness.
- Use a glossy top coat for shine.
Creative Variations
- Add icons to all nails.
- Use glitter polish for icons.
- Create a gradient blush base.
- Pair with tiny star decals.
This manicure pairs with travel outfits or silver accessories, radiating summer fun. Maintain by touching up icons and refreshing the top coat. Jetsetter Icon Nails are a delightful vacation choice.
Summer vacation nails in 2025 are more than a trend—they’re wearable memories in the making. From bold chrome finishes to soft botanical designs, these manicures aren’t just stylish—they’re soulful. They embody freedom, playfulness, and the beauty of being present. Whether you go bright or stay soft, your nails should reflect the feeling you want to carry with you on your journey.
As you plan your next escape, let your manicure be part of the anticipation. Let it whisper sunshine, sea, and spontaneity with every gesture. After all, what better way to travel in style than with a little art at your fingertips?