Nail the Mood: How Summer Vacations Inspire Creative, Joyful Nail Designs
Summer is a time of escape—a break from routine that invites us to slow down, explore new places, and reconnect with ourselves. It’s a season that thrives on energy, color, and creativity. And while fashion and beauty routines change to suit the climate, one of the most expressive, joyful changes we make is to our nails. Summer vacation nails are not just a seasonal detail—they’re part of the journey.
Nail design, in this context, becomes an extension of the getaway experience. Whether you’re lounging on sun-warmed sand or hopping between cobblestone streets in a new city, the right manicure sets the tone. It becomes a travel companion, a conversation starter, and a tiny reflection of where you are—or where you’re dreaming of being.
Why I Love Summer Vacation Nails ?
Summer nail designs offer a unique freedom, inviting you to break the mold with bright neons, playful motifs like fruit or flamingos, or sheer bases with delicate details. They strike a perfect balance between fun and sophistication.
They also evoke nostalgia, linking polish colors to cherished moments—chrome blue reflecting the sea or pastel waves evoking gelato by the coast. These thoughtful touches help transform fleeting summer joys into wearable art, reminding us to stay present, embrace playfulness, and find beauty in small moments.
Gorgeous Summer Vacation Nail Art Designs
These 30 gorgeous summer vacation nail designs capture the vibrant spirit of tropical getaways, beachside lounging, and adventurous travels. Each manicure blends bold colors, playful patterns, and elegant details, perfect for island escapes or sunny adventures. Detailed steps, tools, and variations ensure accessibility, embodying summer’s radiant charm.
Tropical Sunset Gradient
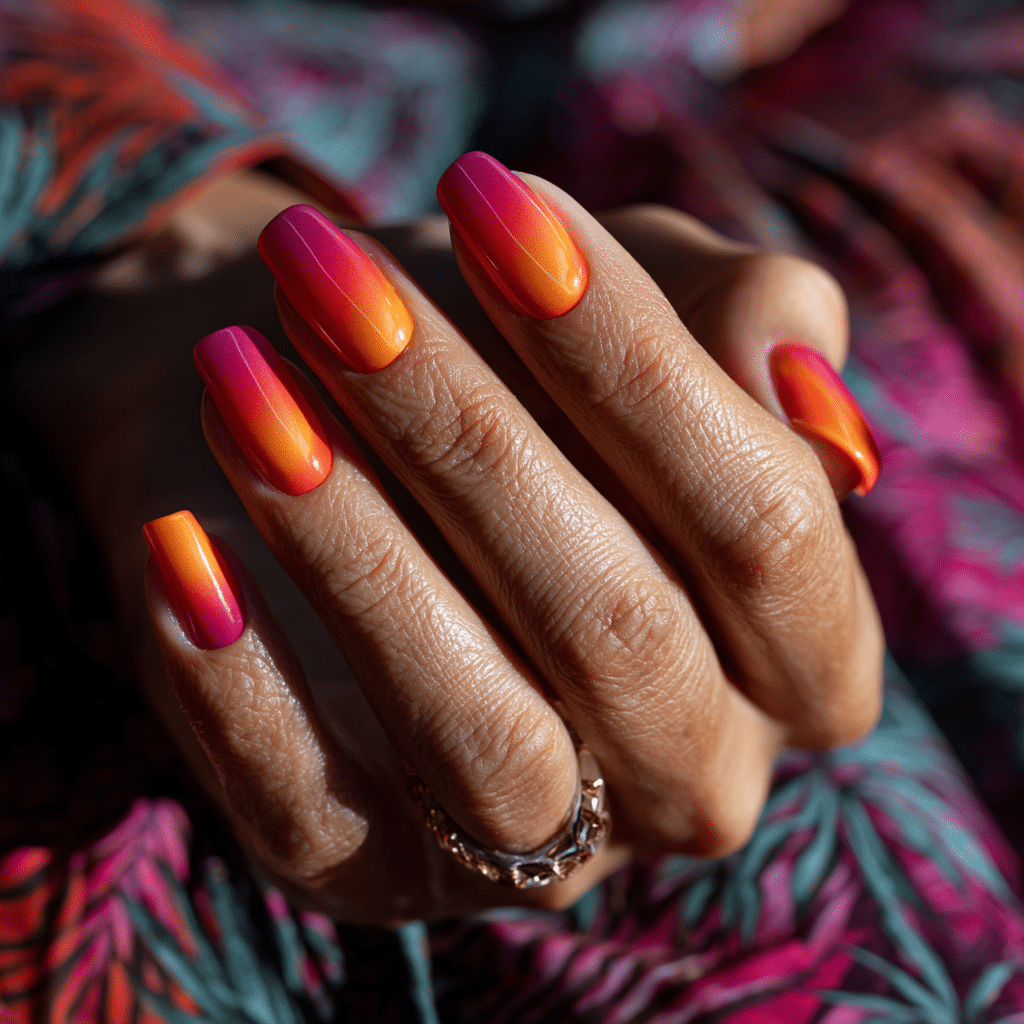
Tropical Sunset Gradient features a stunning blend of coral, orange, and magenta across each nail, fading like a sunset over the sea. Ideal for tropical getaways, this vibrant manicure radiates warmth, perfect for beach evenings or island lounging.
Tools Needed
- Coral, orange, and magenta nail polishes
- Makeup sponge
- Base coat and glossy top coat
- Acetone for cleanup
Step-by-Step Guide
- Apply a base coat and let dry.
- Paint nails with a nude base for opacity; let dry.
- Dab coral, orange, and magenta polish onto a sponge, overlapping slightly.
- Press sponge onto nails, blending colors for a sunset effect.
- Repeat for a smooth gradient; let dry.
- Clean excess polish with acetone.
- Seal with a glossy top coat.
Color Suggestions
- Sunset Glow: Coral, orange, magenta.
- Warm Fade: Pink, peach, red.
- Cool Sunset: Purple, pink, orange.
Tips for Success
- Use a sponge for seamless blending.
- Apply thin layers to avoid clumps.
- Practice gradient on paper.
- Use a quick-dry top coat.
Creative Variations
- Add glitter in the gradient’s middle.
- Use a matte top coat for contrast.
- Create a vertical gradient.
- Add a palm silhouette on one nail.
This manicure pairs with tropical dresses or gold jewelry, enhancing summer’s vibrancy. Maintain by reapplying the top coat regularly. Tropical Sunset Gradient is a radiant choice for vacation vibes.
Turquoise Ocean Marble
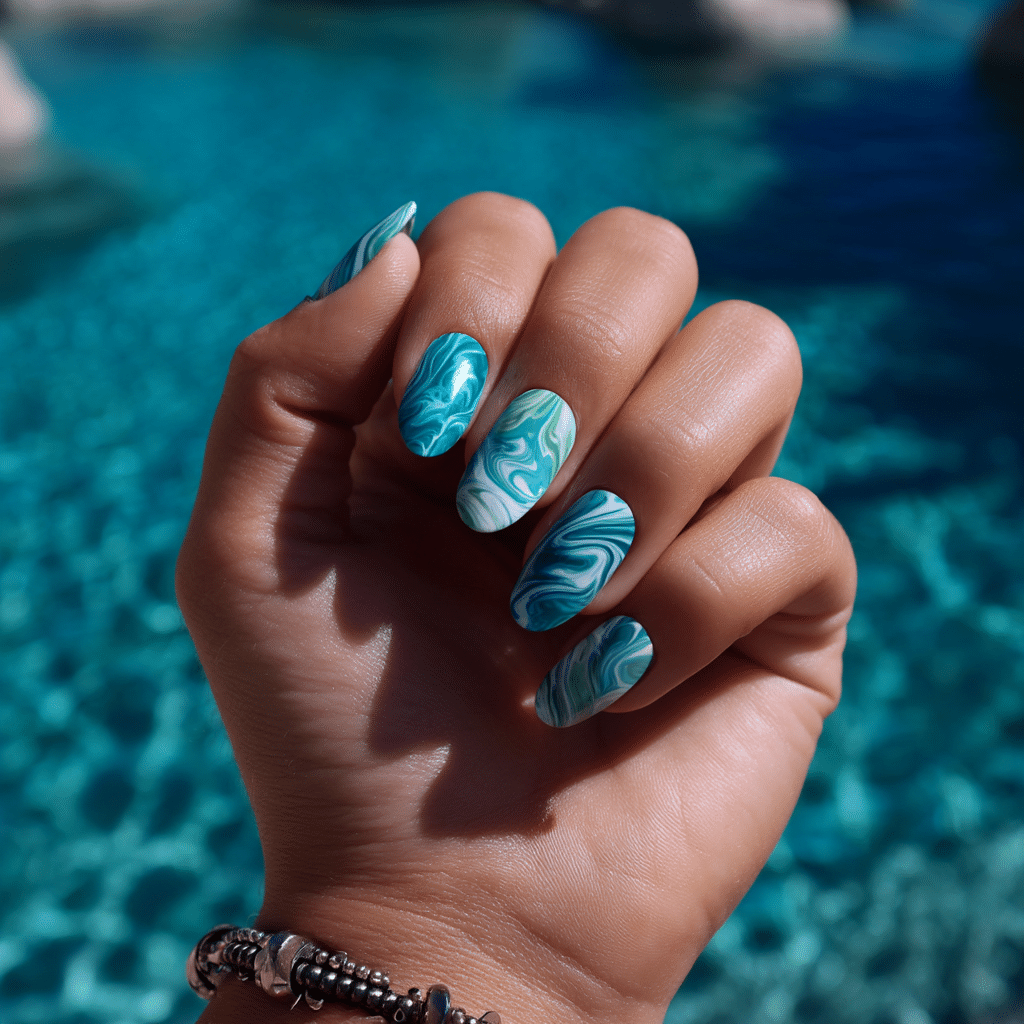
Turquoise Ocean Marble features swirls of turquoise, teal, and white, mimicking sea foam and waves with a glossy sheen. Perfect for beach vacations, this design captures the ocean’s fluid beauty, ideal for coastal adventures.
Tools Needed
- Turquoise, teal, and white nail polishes
- Small cup of water
- Toothpick
- Base coat and glossy top coat
- Acetone for cleanup
Step-by-Step Guide
- Apply a base coat and let dry.
- Paint nails with white polish as a base; let dry.
- Drop turquoise, teal, and white polish into a cup of water.
- Swirl with a toothpick to create a marble pattern.
- Dip each nail into the pattern; remove excess with acetone.
- Seal with a glossy top coat.
Color Suggestions
- Ocean Swirl: Turquoise, teal, white.
- Deep Sea: Navy, teal, white.
- Soft Wave: Mint, turquoise, ivory.
Tips for Success
- Use room-temperature water for marbling.
- Work quickly to avoid polish drying.
- Practice marbling on paper.
- Clean cuticles for a polished look.
Creative Variations
- Marble accent nails only.
- Add glitter to the marble effect.
- Use a matte top coat for contrast.
- Pair with pearl accents.
This manicure pairs with beachwear or silver accessories, evoking coastal elegance. Maintain by refreshing the top coat. Turquoise Ocean Marble is a captivating summer choice.
Minimalist Palm Leaf Tips
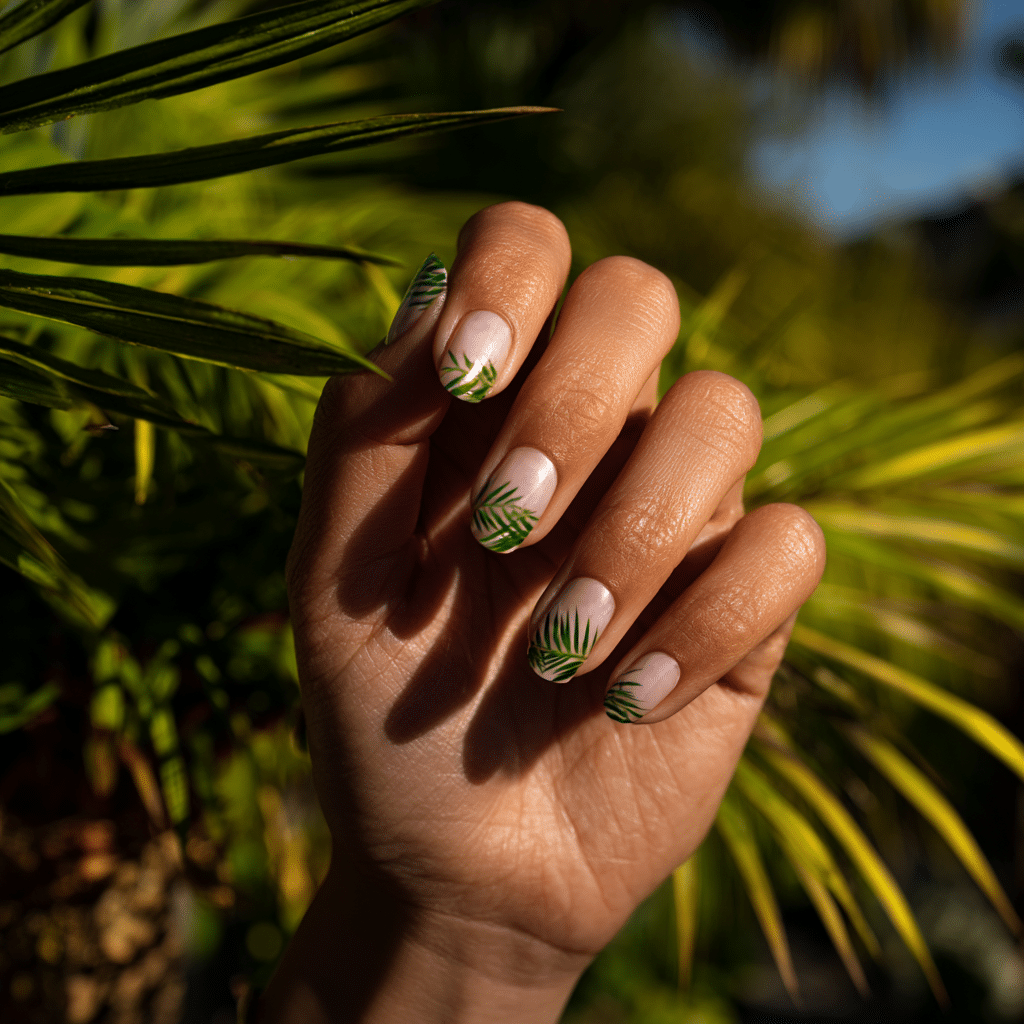
Minimalist Palm Leaf Tips feature nude nails with finely detailed green palm fronds painted at the tips, offering a subtle tropical touch. Perfect for understated vacation style, this design suits beachside or urban getaways.
Tools Needed
- Nude nail polish
- Green nail polish
- Fine nail art brush
- Base coat and glossy top coat
- Acetone for cleanup
Step-by-Step Guide
- Apply a base coat and let dry.
- Paint nails with nude polish, using two coats; let dry.
- Use a fine brush to paint green palm fronds at the tips.
- Keep fronds minimal and delicate.
- Clean excess polish with acetone.
- Seal with a glossy top coat.
Color Suggestions
- Tropical Chic: Nude with green palm tips.
- Bold Pop: Beige with emerald palm tips.
- Soft Glow: Peach with mint palm tips.
Tips for Success
- Practice palm shapes on paper.
- Use a fine brush for precision.
- Apply thin layers for clarity.
- Use a glossy top coat for shine.
Creative Variations
- Add palm tips to accent nails only.
- Use gold polish for palm fronds.
- Create a gradient nude base.
- Pair with tiny flower details.
This manicure pairs with neutral outfits or tropical prints, adding summery sophistication. Maintain by touching up fronds and refreshing the top coat. Minimalist Palm Leaf Tips are a chic vacation choice.
Lemon Yellow Glossy Finish

Lemon Yellow Glossy Finish features a full coat of shiny lemon yellow polish, radiating sunny, citrusy vacation vibes. Perfect for beach days or city adventures, this bold design brightens any summer look.
Tools Needed
- Lemon yellow nail polish
- Base coat and glossy top coat
- Nail file
- Acetone for cleanup
Step-by-Step Guide
- File nails to desired shape; apply a base coat and let dry.
- Paint nails with lemon yellow polish, using two coats; let dry.
- Apply a second layer if needed for opacity.
- Check for even coverage.
- Clean excess polish with acetone.
- Seal with a glossy top coat.
Color Suggestions
- Sunny Pop: Lemon yellow with glossy finish.
- Soft Glow: Pale yellow with glossy finish.
- Bold Contrast: Neon yellow with glossy finish.
Tips for Success
- Apply thin polish layers for smoothness.
- Use a glossy top coat for vibrancy.
- Clean cuticles for a polished look.
- Use a quick-dry top coat.
Creative Variations
- Add a matte top coat for contrast.
- Apply glitter to accent nails.
- Create a yellow French tip.
- Pair with a single rhinestone.
This manicure pairs with white outfits or bold accessories, radiating summer energy. Maintain by refreshing the top coat. Lemon Yellow Glossy Finish is a vibrant vacation choice.
Coconut Milk White Matte
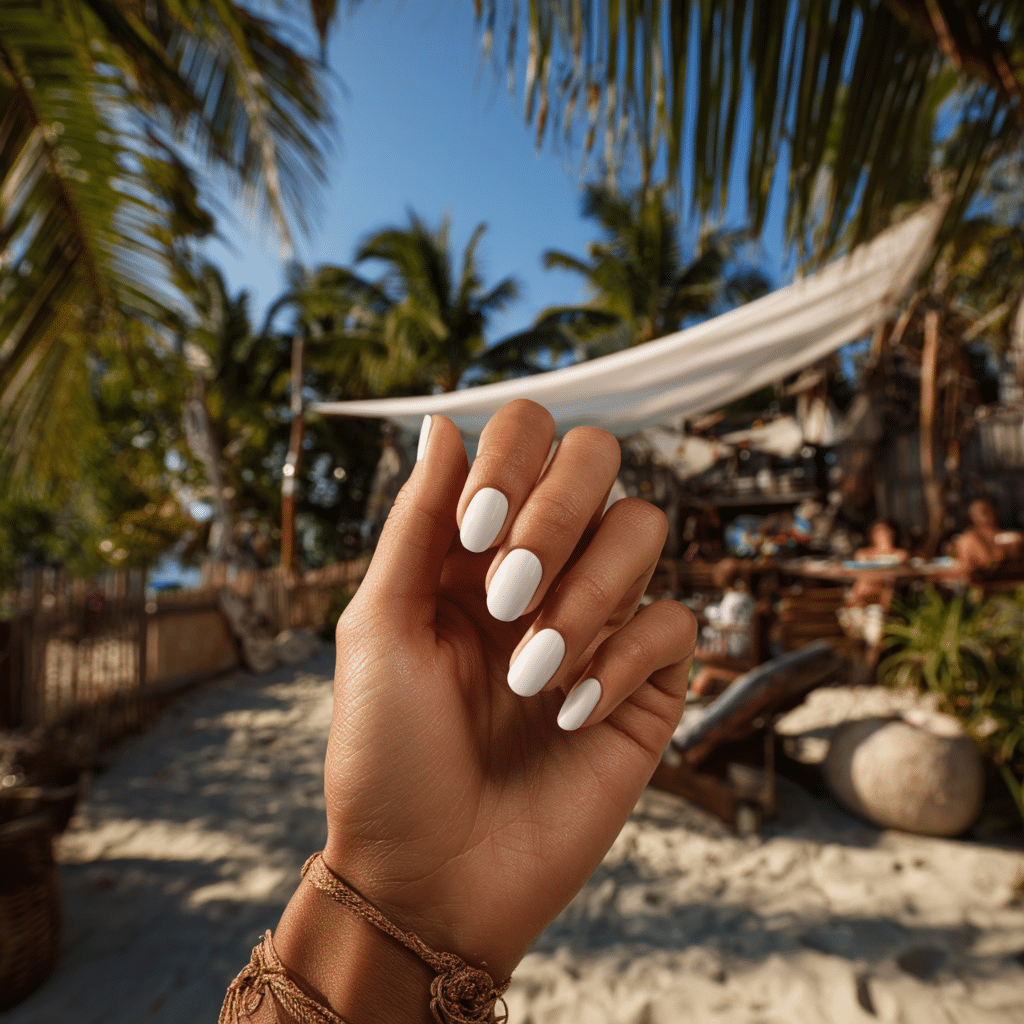
Coconut Milk White Matte features a soft white matte polish, resembling beachy coconut milk or chalky sand. This elegant, wearable manicure is perfect for tropical escapes or minimalist vacation style.
Tools Needed
- White nail polish
- Matte top coat
- Base coat
- Nail file
- Acetone for cleanup
Step-by-Step Guide
- File nails to desired shape; apply a base coat and let dry.
- Paint nails with white polish, using two coats; let dry.
- Apply a matte top coat evenly across all nails.
- Let dry completely for a velvety finish.
- Clean excess polish with acetone.
- Check for even matte coverage.
Color Suggestions
- Beachy Elegance: Coconut white with matte finish.
- Soft Pop: Ivory white with matte finish.
- Cool Tone: Pearl white with matte finish.
Tips for Success
- Apply thin polish layers for smoothness.
- Use a matte top coat sparingly.
- Clean cuticles for a polished look.
- File nails evenly for uniformity.
Creative Variations
- Add a glossy top coat to one nail.
- Use a gradient white shade.
- Apply a single pearl accent.
- Create a subtle pattern on one nail.
This manicure pairs with airy dresses or silver jewelry, evoking coastal charm. Maintain by refreshing the matte top coat. Coconut Milk White Matte is a refined vacation choice.
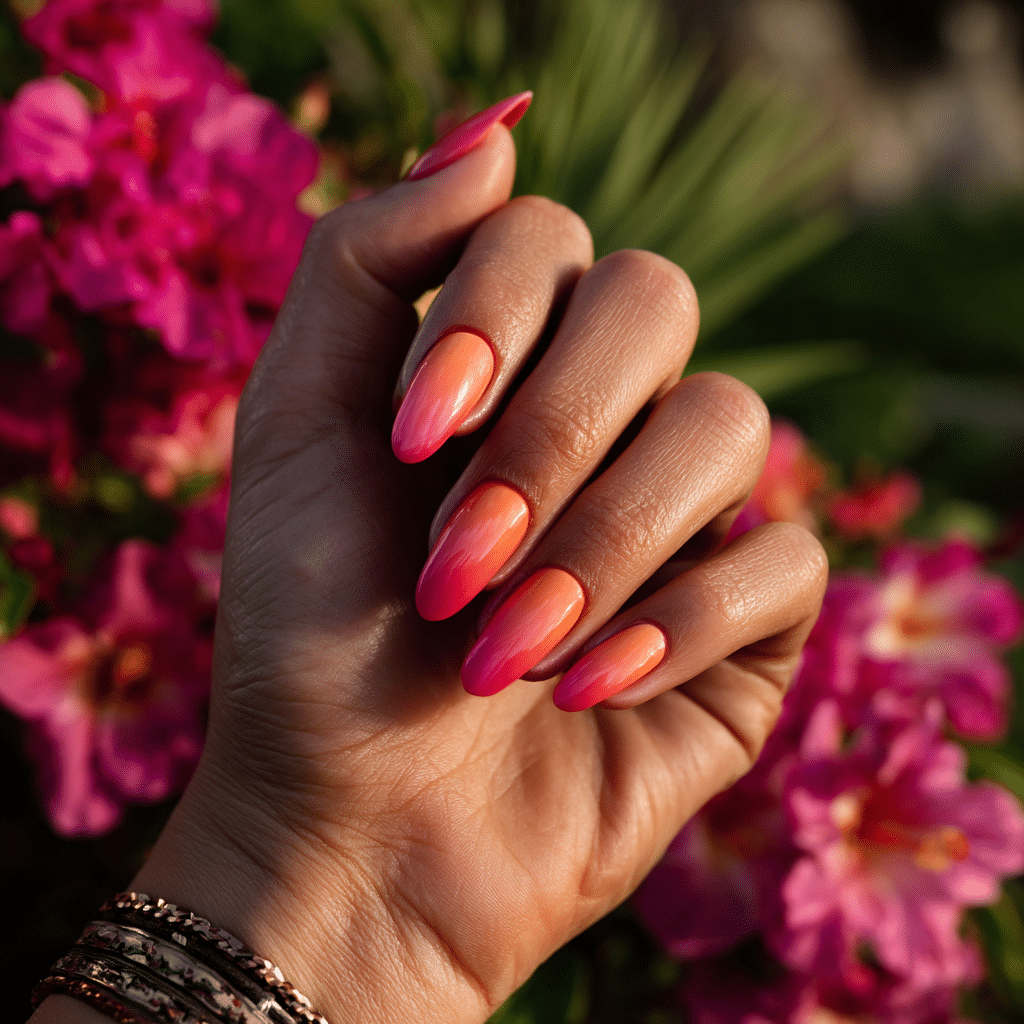
Bright Coral and Pink Ombré
Bright Coral and Pink Ombré features a gradual fade from deep coral to soft pink, resembling tropical flowers in bloom. Perfect for island vacations, this vibrant manicure adds a floral pop to summer looks.
Tools Needed
- Coral and pink nail polishes
- Makeup sponge
- Base coat and glossy top coat
- Acetone for cleanup
Step-by-Step Guide
- Apply a base coat and let dry.
- Paint nails with a nude base; let dry.
- Dab coral and pink polish onto a sponge, overlapping slightly.
- Press sponge onto nails, blending coral at the base to pink at the tip.
- Repeat for a smooth gradient; let dry.
- Clean excess polish with acetone.
- Seal with a glossy top coat.
Color Suggestions
- Floral Fade: Coral to soft pink.
- Bold Pop: Orange to fuchsia.
- Soft Glow: Peach to baby pink.
Tips for Success
- Use a sponge for seamless blending.
- Apply thin layers to avoid clumps.
- Practice gradient on paper.
- Use a glossy top coat for shine.
Creative Variations
- Add glitter in the gradient.
- Use a matte top coat for contrast.
- Create a diagonal ombré.
- Pair with a rhinestone accent.
This manicure pairs with tropical prints or gold accessories, radiating summer warmth. Maintain by reapplying the top coat. Bright Coral and Pink Ombré is a stunning vacation choice.
Watermelon Nail Art
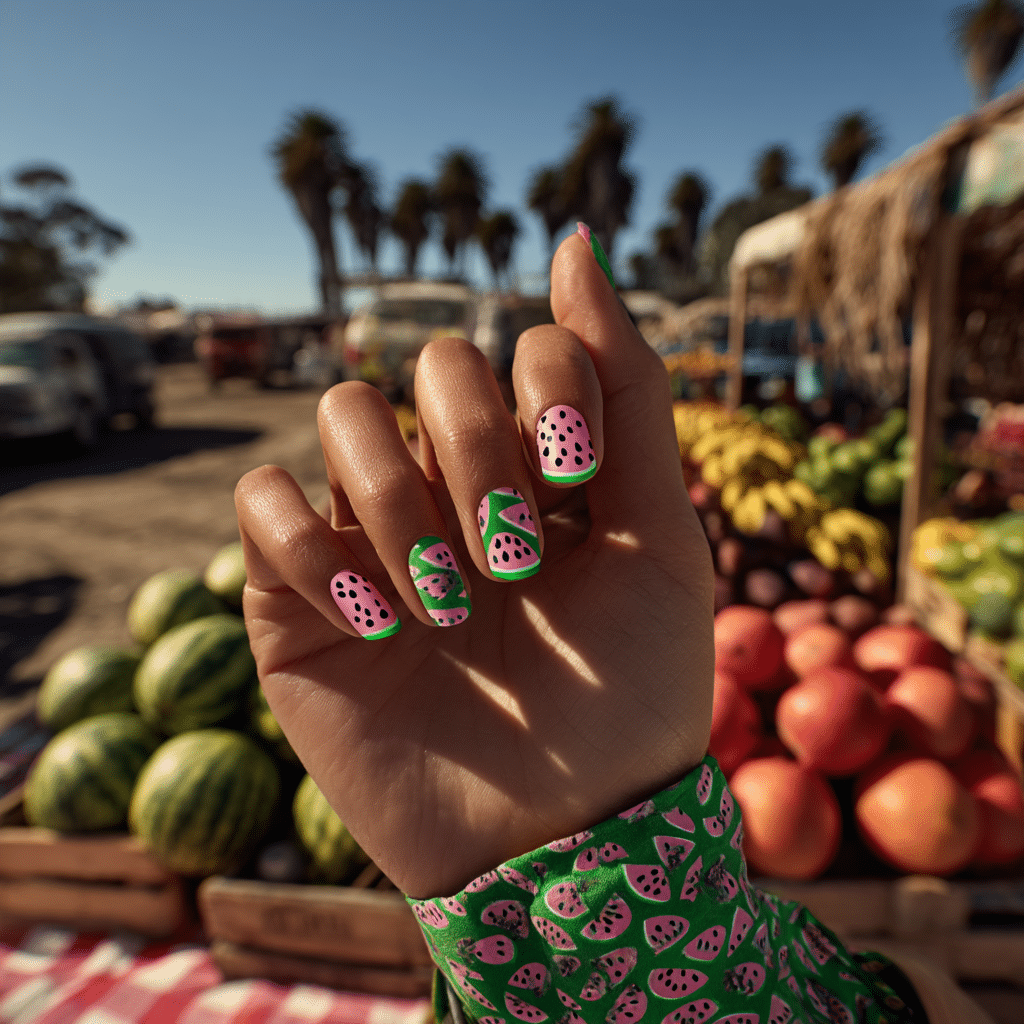
Watermelon Nail Art features green half-moons with bright pink centers and black seed dots, creating a fun, fruity summer manicure. Perfect for beach picnics or tropical getaways, this design bursts with vacation joy.
Tools Needed
- Green, pink, and black nail polishes
- Nude nail polish
- Fine nail art brush and dotting tool
- Base coat and glossy top coat
- Acetone for cleanup
Step-by-Step Guide
- Apply a base coat and let dry.
- Paint nails with nude polish, using two coats; let dry.
- Use a fine brush to paint green half-moons at the base.
- Paint pink centers above the green, leaving a thin white stripe.
- Add black seed dots with a dotting tool.
- Clean excess polish with acetone.
- Seal with a glossy top coat.
Color Suggestions
- Fruity Pop: Green, pink, black watermelon.
- Soft Glow: Mint green, blush pink watermelon.
- Bold Contrast: Neon green, hot pink watermelon.
Tips for Success
- Practice watermelon art on paper.
- Use a fine brush for precision.
- Keep designs small for detail.
- Use a glossy top coat for shine.
Creative Variations
- Add watermelon to accent nails only.
- Use glitter in the pink section.
- Create full-nail watermelons.
- Pair with green leaf details.
This manicure pairs with bright outfits or fruit-themed accessories, adding summer zest. Maintain by touching up details and refreshing the top coat. Watermelon Nail Art is a playful vacation choice.
Ocean-Inspired Glitter Fade
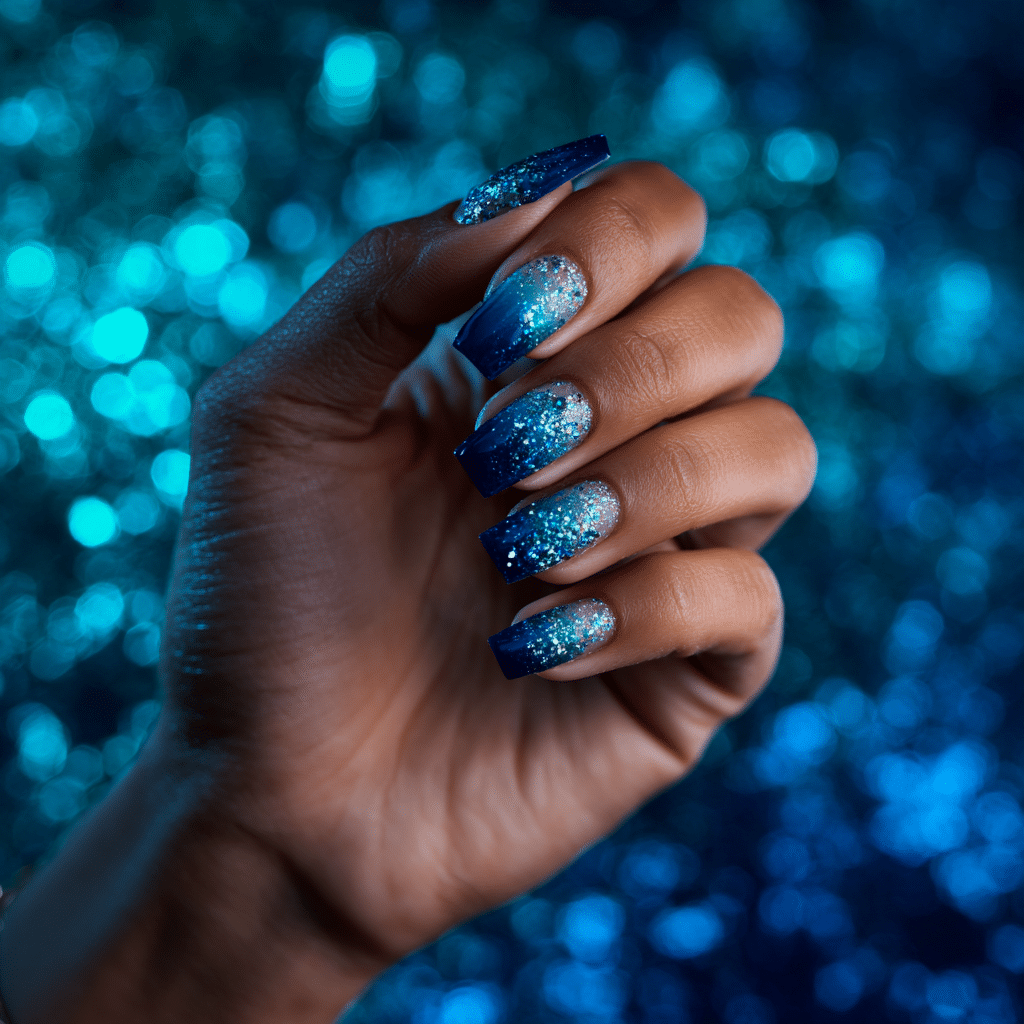
Ocean-Inspired Glitter Fade features deep blue polish fading into a sheer base with sparkly glitter, evoking deep sea to shallow shores. Perfect for coastal vacations, this manicure shimmers with oceanic allure.
Tools Needed
- Deep blue nail polish
- Glitter polish
- Makeup sponge
- Base coat and glossy top coat
- Acetone for cleanup
Step-by-Step Guide
- Apply a base coat and let dry.
- Paint nails with a sheer base; let dry.
- Dab deep blue polish onto a sponge, focusing on the base.
- Press sponge onto nails, fading blue upward.
- Apply glitter polish over the fade for sparkle.
- Clean excess polish with acetone.
- Seal with a glossy top coat.
Color Suggestions
- Deep Sea: Navy blue with silver glitter.
- Tropical Wave: Turquoise with gold glitter.
- Soft Glow: Teal with holographic glitter.
Tips for Success
- Use a sponge for smooth fading.
- Apply glitter sparingly for subtlety.
- Practice fade on paper.
- Use a glossy top coat for shine.
Creative Variations
- Fade glitter from tips instead.
- Use a matte blue base.
- Add a pearl at the base.
- Create a diagonal glitter fade.
This manicure pairs with beachwear or silver jewelry, evoking coastal glamour. Maintain by reapplying the top coat. Ocean-Inspired Glitter Fade is a dazzling vacation choice.
Airplane Window Nails
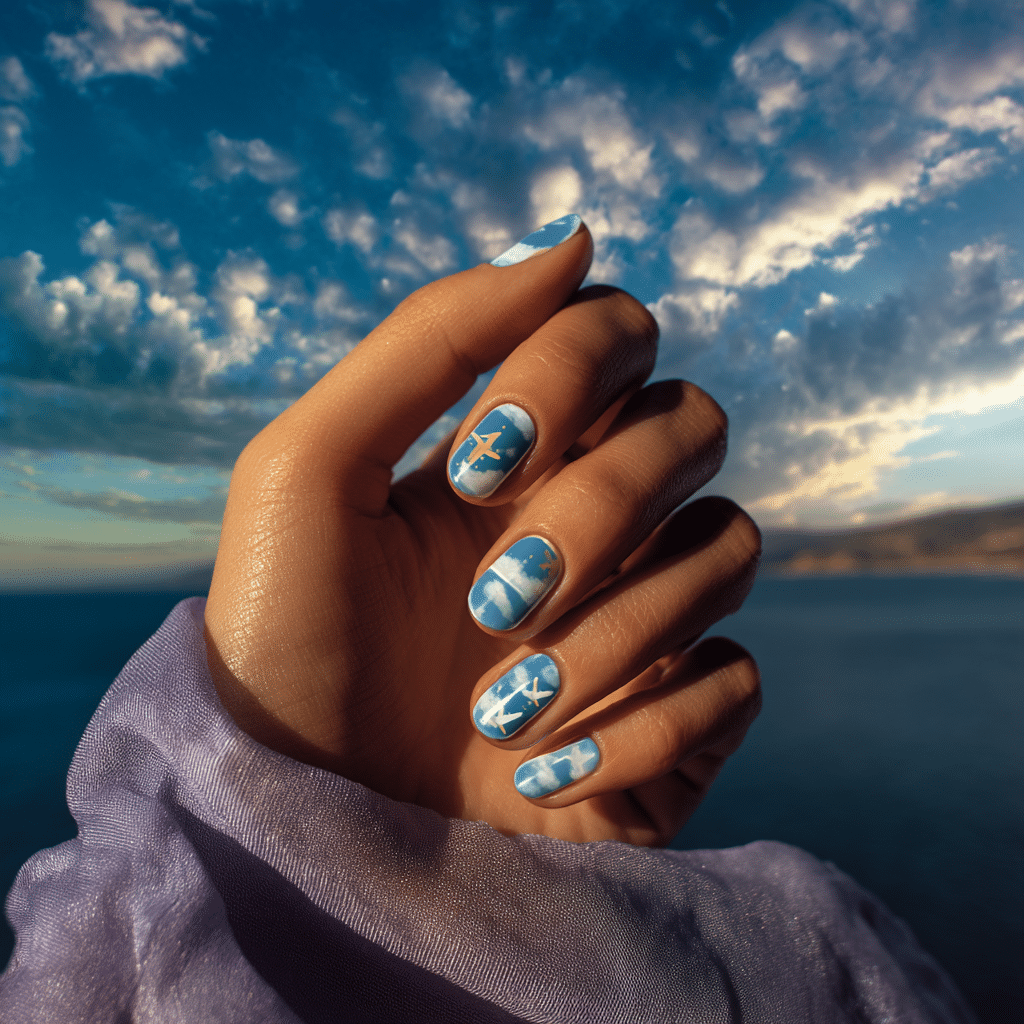
Airplane Window Nails feature small ovals painted like airplane windows with sky and clouds, ideal for travel lovers. This unique summer manicure captures the excitement of jet-setting, perfect for vacation adventures.
Tools Needed
- Nude nail polish
- Blue and white nail polishes
- Fine nail art brush
- Base coat and glossy top coat
- Acetone for cleanup
Step-by-Step Guide
- Apply a base coat and let dry.
- Paint nails with nude polish, using two coats; let dry.
- Use a fine brush to paint small blue ovals as windows.
- Add white clouds inside the ovals.
- Clean excess polish with acetone.
- Seal with a glossy top coat.
Color Suggestions
- Sky View: Nude with blue windows.
- Sunset Flight: Beige with orange windows.
- Twilight Trip: Gray nude with purple windows.
Tips for Success
- Practice window shapes on paper.
- Use a fine brush for precision.
- Keep designs small for detail.
- Use a glossy top coat for shine.
Creative Variations
- Add windows to accent nails only.
- Use glitter for cloud sparkle.
- Create a gradient sky base.
- Pair with tiny airplane decals.
This manicure pairs with travel outfits or silver accessories, radiating adventure. Maintain by touching up details and refreshing the top coat. Airplane Window Nails are a unique vacation choice.
Sunflower Accent Design
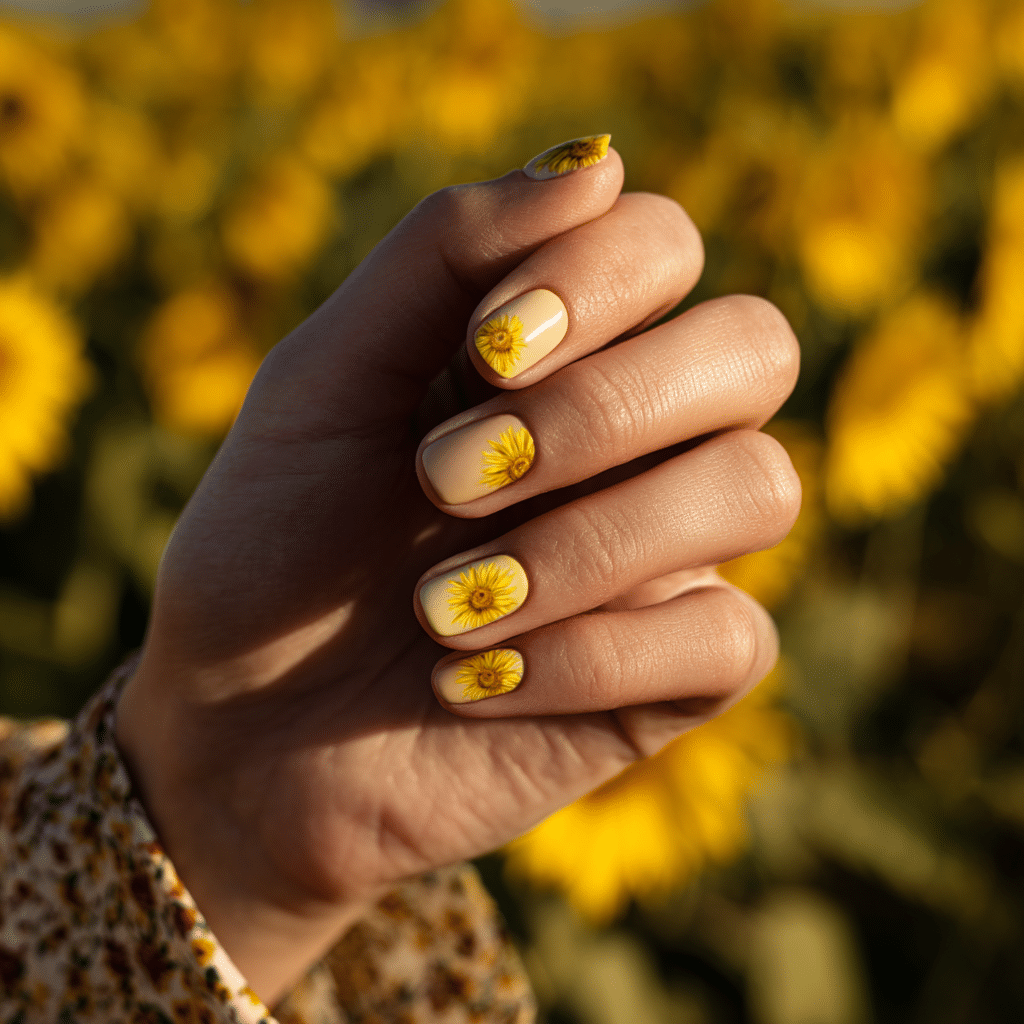
Sunflower Accent Design features a nude or pale yellow base with bold sunflowers on the ring fingers, offering a rustic summer touch. Perfect for countryside vacations or beachside retreats, this design blooms with warmth.
Tools Needed
- Nude or pale yellow nail polish
- Yellow and brown nail polishes
- Fine nail art brush and dotting tool
- Base coat and glossy top coat
- Acetone for cleanup
Step-by-Step Guide
- Apply a base coat and let dry.
- Paint nails with nude or pale yellow polish, using two coats; let dry.
- Use a fine brush to paint yellow sunflower petals on ring fingers.
- Add brown centers with a dotting tool.
- Clean excess polish with acetone.
- Seal with a glossy top coat.
Color Suggestions
- Rustic Bloom: Nude with yellow sunflowers.
- Soft Pop: Pale yellow with ivory sunflowers.
- Bold Contrast: Beige with orange sunflowers.
Tips for Success
- Practice sunflower shapes on paper.
- Keep flowers bold yet balanced.
- Use a fine brush for precision.
- Use a glossy top coat for shine.
Creative Variations
- Add sunflowers to all nails.
- Use glitter in sunflower centers.
- Create a gradient base.
- Pair with green leaf details.
This manicure pairs with earthy tones or floral dresses, adding summer charm. Maintain by touching up sunflowers and refreshing the top coat. Sunflower Accent Design is a warm vacation choice.
Seaglass Effect Polish
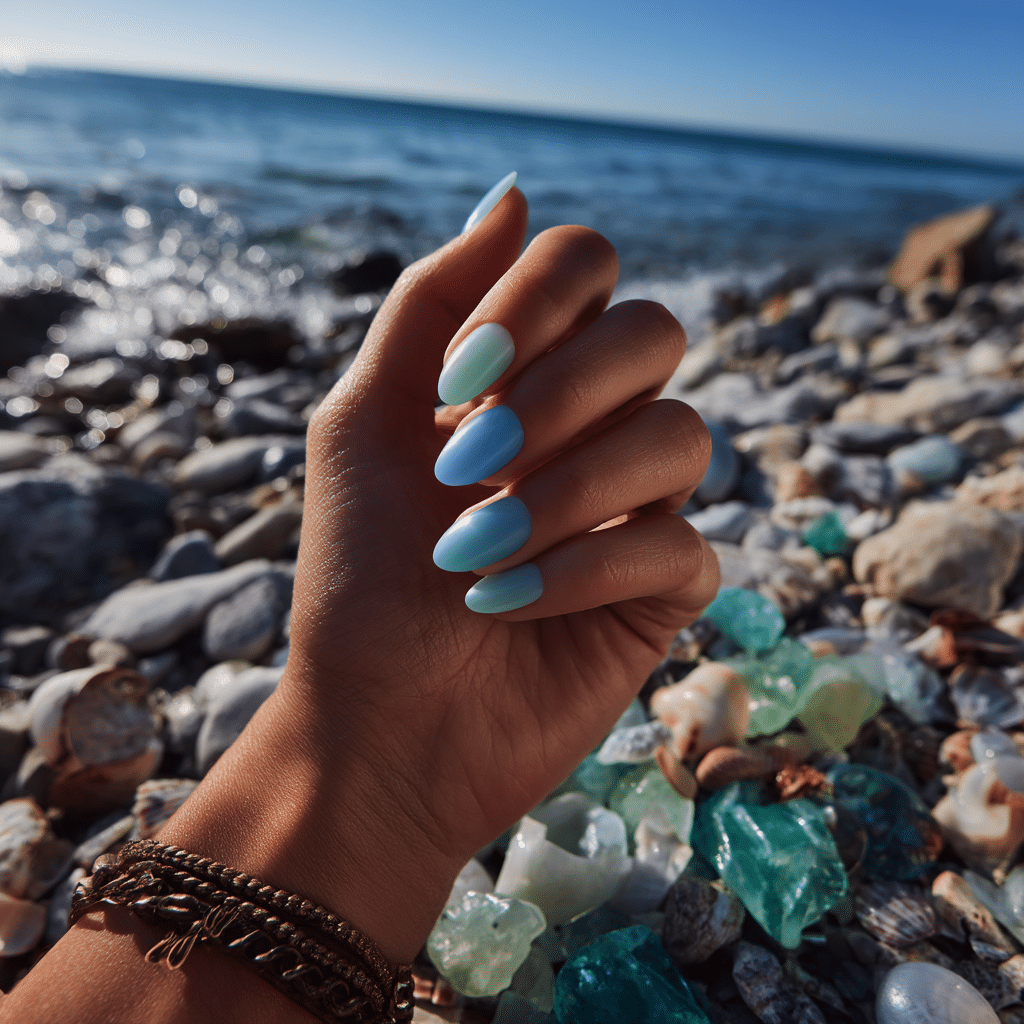
Seaglass Effect Polish features semi-opaque blues and greens with a frosted matte finish, mimicking smooth seaglass. Perfect for coastal vacations, this elegant manicure evokes beachside treasures with a soft, summery glow.
Tools Needed
- Blue and green nail polishes
- Matte top coat
- Base coat
- Nail file
- Acetone for cleanup
Step-by-Step Guide
- File nails to desired shape; apply a base coat and let dry.
- Paint nails with blue or green polish, using two coats; let dry.
- Alternate colors for a seaglass effect.
- Apply a matte top coat for a frosted finish.
- Clean excess polish with acetone.
- Check for even matte coverage.
Color Suggestions
- Beach Treasure: Turquoise and sea green.
- Soft Glow: Mint and pale blue.
- Bold Pop: Teal and emerald.
Tips for Success
- Apply thin polish layers for translucency.
- Use a matte top coat sparingly.
- Clean cuticles for a polished look.
- File nails evenly for uniformity.
Creative Variations
- Add a glossy top coat to one nail.
- Use a gradient seaglass shade.
- Apply a single pearl accent.
- Create a subtle wave pattern.
This manicure pairs with beachwear or silver jewelry, evoking coastal serenity. Maintain by refreshing the matte top coat. Seaglass Effect Polish is a tranquil vacation choice.
Map Lines and Coordinates
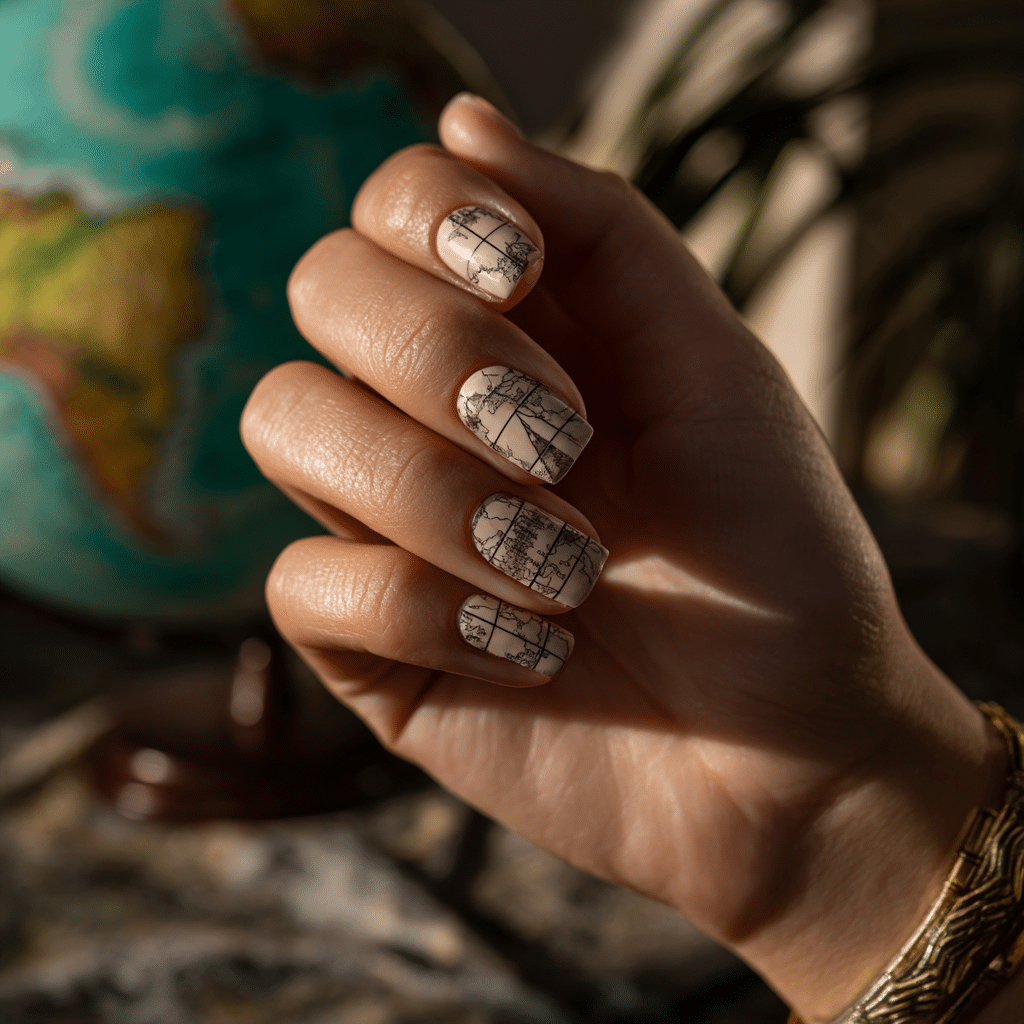
Map Lines and Coordinates feature soft beige nails with black fine-line map graphics or coordinates, offering a sophisticated travel theme. Perfect for globetrotters, this manicure captures the spirit of summer adventures.
Tools Needed
- Beige nail polish
- Black nail polish
- Fine nail art brush
- Base coat and glossy top coat
- Acetone for cleanup
Step-by-Step Guide
- Apply a base coat and let dry.
- Paint nails with beige polish, using two coats; let dry.
- Use a fine brush to paint map lines or coordinates.
- Keep lines minimal and precise.
- Clean excess polish with acetone.
- Seal with a glossy top coat.
Color Suggestions
- Travel Chic: Beige with black maps.
- Soft Pop: Nude with gold maps.
- Bold Contrast: Taupe with white maps.
Tips for Success
- Practice map designs on paper.
- Use a fine brush for precision.
- Apply thin layers for clarity.
- Use a glossy top coat for shine.
Creative Variations
- Add maps to accent nails only.
- Use glitter polish for lines.
- Create a gradient beige base.
- Pair with tiny compass decals.
This manicure pairs with neutral outfits or travel accessories, radiating adventure. Maintain by touching up lines and refreshing the top coat. Map Lines and Coordinates are a refined vacation choice.
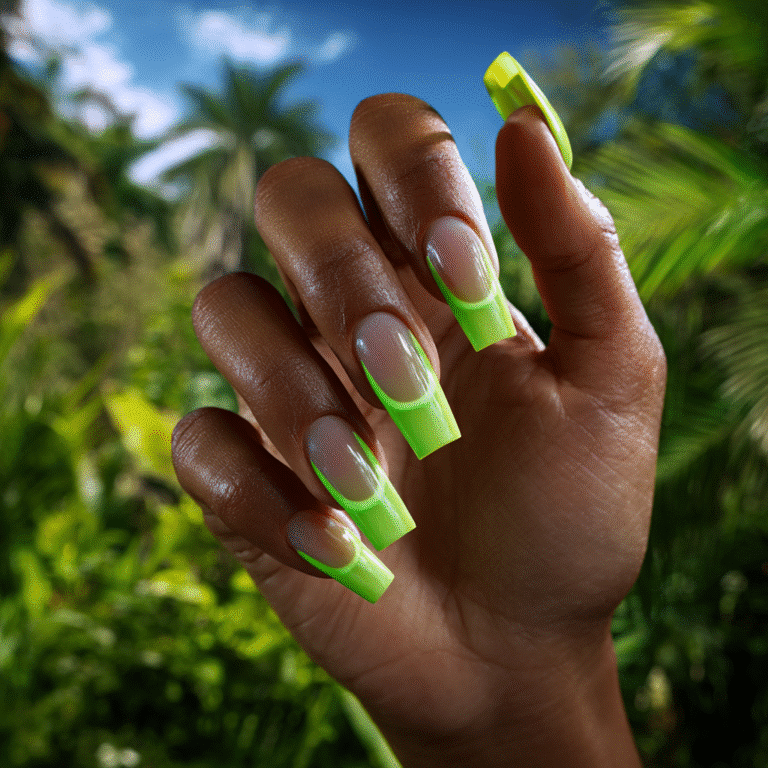
Neon Citrus French Tips
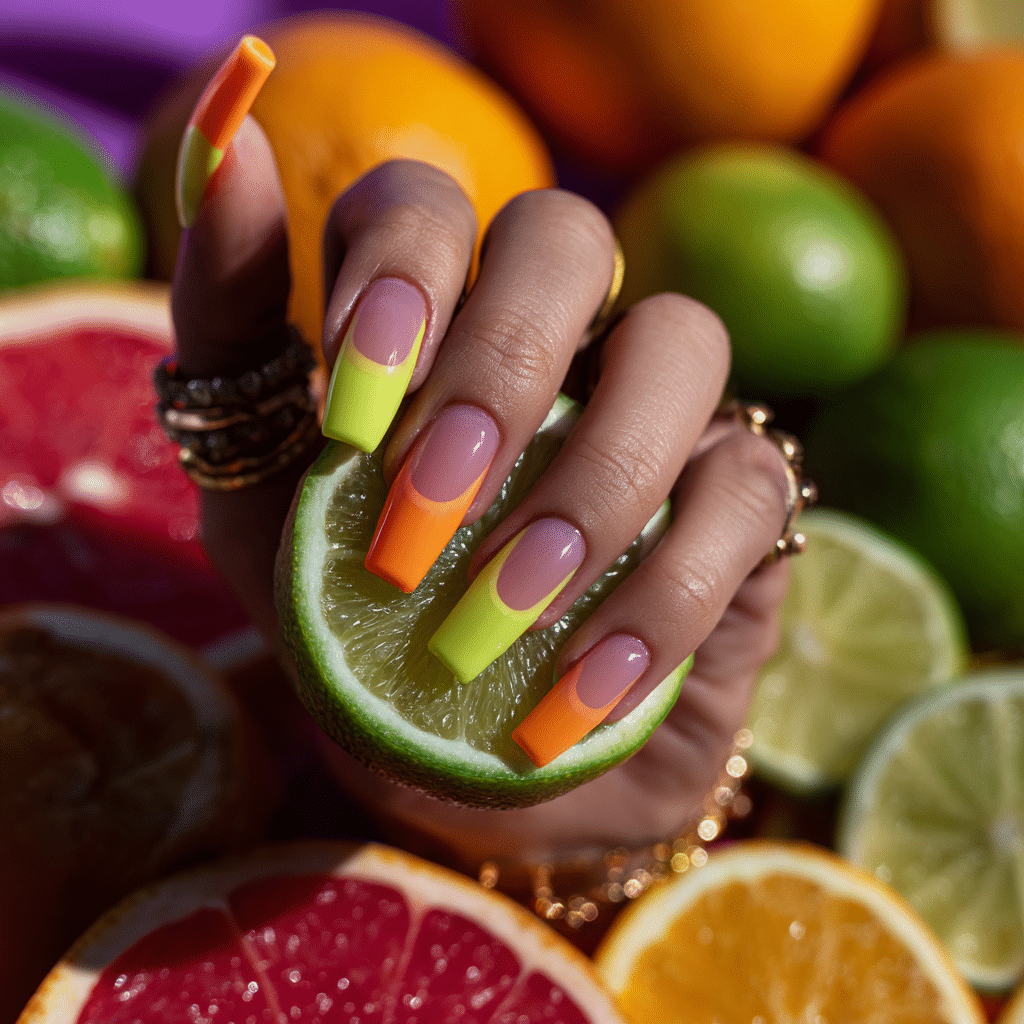
Neon Citrus French Tips feature a French manicure with tips in alternating neon lime, orange, and lemon tones, creating a refreshing fruity vibe. Perfect for tropical vacations, this design pops with summery energy.
Tools Needed
- Nude nail polish
- Neon lime, orange, and lemon nail polishes
- Striping tape or fine brush
- Base coat and glossy top coat
- Acetone for cleanup
Step-by-Step Guide
- Apply a base coat and let dry.
- Paint nails with nude polish, using two coats; let dry.
- Use tape or a fine brush to paint neon citrus tips, alternating colors.
- Apply two layers for vibrancy.
- Remove tape; clean excess with acetone.
- Seal with a glossy top coat.
Color Suggestions
- Citrus Pop: Neon lime, orange, lemon tips.
- Soft Glow: Pastel lime, peach, yellow tips.
- Bold Mix: Neon green, pink, yellow tips.
Tips for Success
- Use tape for clean tip lines.
- Apply thin polish layers for evenness.
- Practice tip placement on paper.
- Use a glossy top coat for shine.
Creative Variations
- Add glitter to citrus tips.
- Use a matte nude base.
- Create double tips on one nail.
- Apply tips to accent nails only.
This manicure pairs with bright outfits or neon accessories, radiating summer zest. Maintain by touching up tips and refreshing the top coat. Neon Citrus French Tips are a vibrant vacation choice.
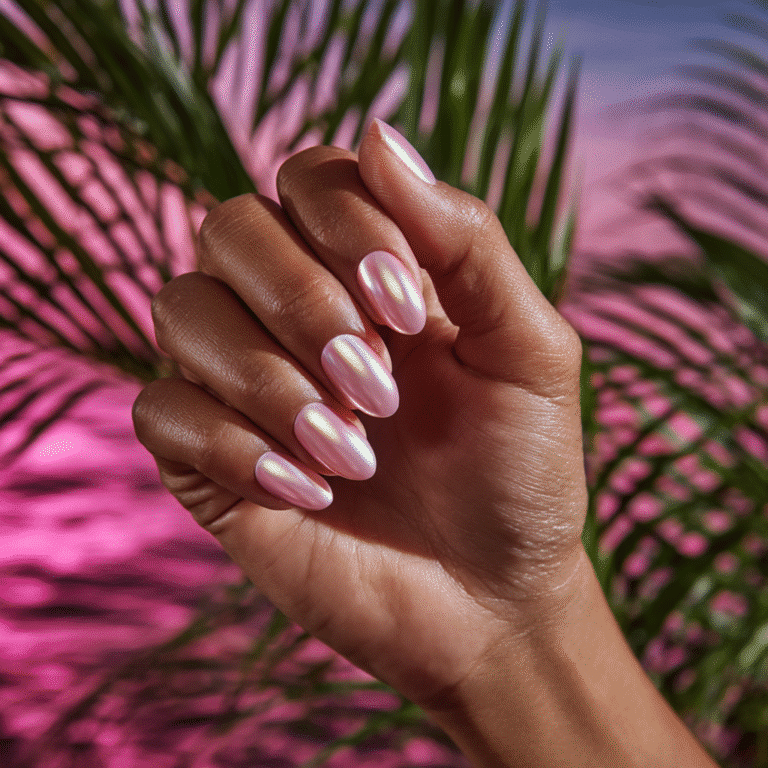
Chrome Ocean Blue Nails
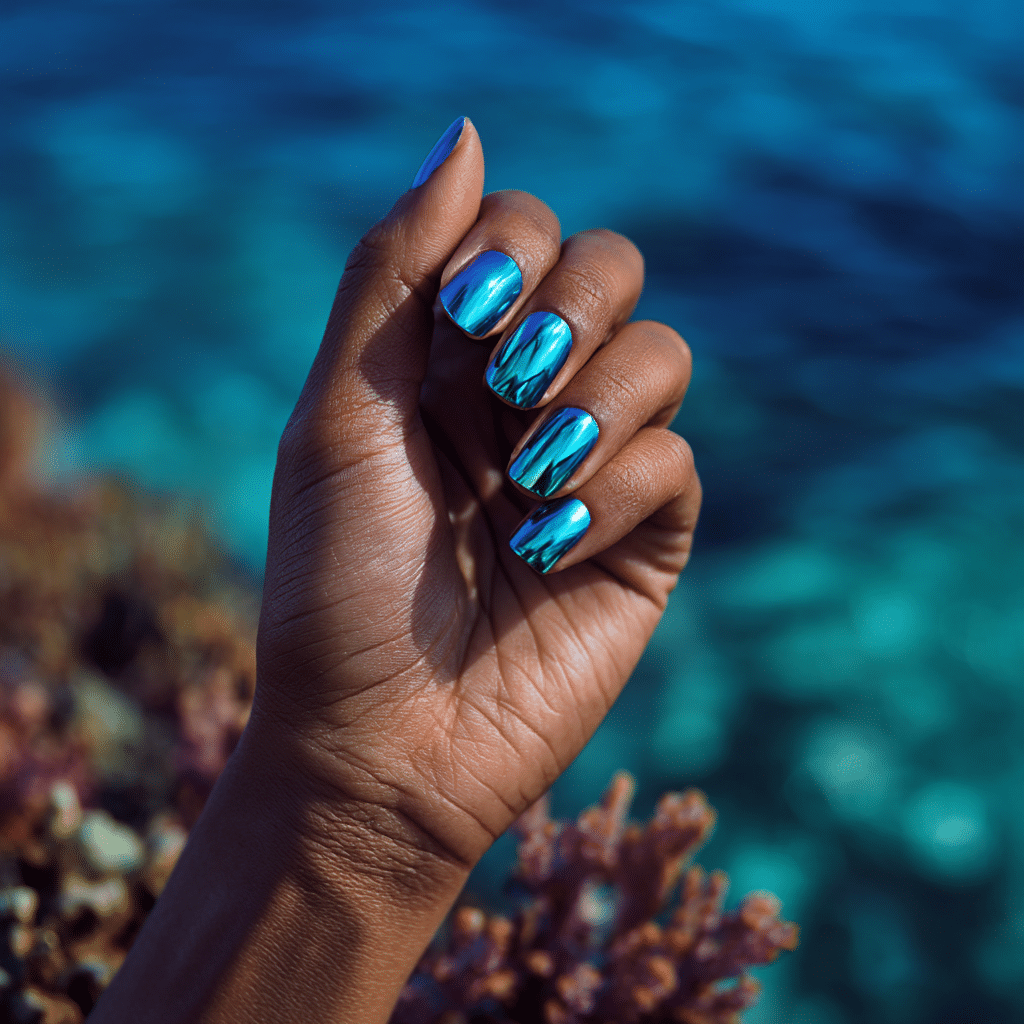
Chrome Ocean Blue Nails feature mirror-like blue polish reflecting the sea’s tones, catching light beautifully. Perfect for coastal vacations, this bold manicure shimmers with summery glamour, ideal for sunny days.
Tools Needed
- Chrome blue nail polish
- Base coat and glossy top coat
- Nail file
- Acetone for cleanup
Step-by-Step Guide
- File nails to desired shape; apply a base coat and let dry.
- Paint nails with chrome blue polish, using two coats; let dry.
- Apply a second layer if needed for opacity.
- Check for even chrome effect.
- Clean excess polish with acetone.
- Seal with a glossy top coat.
Color Suggestions
- Ocean Shine: Chrome blue.
- Soft Pop: Chrome turquoise.
- Bold Glow: Chrome navy.
Tips for Success
- Apply thin polish layers for smoothness.
- Use a glossy top coat for vibrancy.
- Clean cuticles for a polished look.
- Use a quick-dry top coat.
Creative Variations
- Add a matte top coat for contrast.
- Apply glitter to accent nails.
- Create a chrome French tip.
- Pair with a single pearl.
This manicure pairs with beachwear or silver jewelry, radiating coastal allure. Maintain by refreshing the top coat. Chrome Ocean Blue Nails are a dazzling vacation choice.
Hibiscus Flower Design
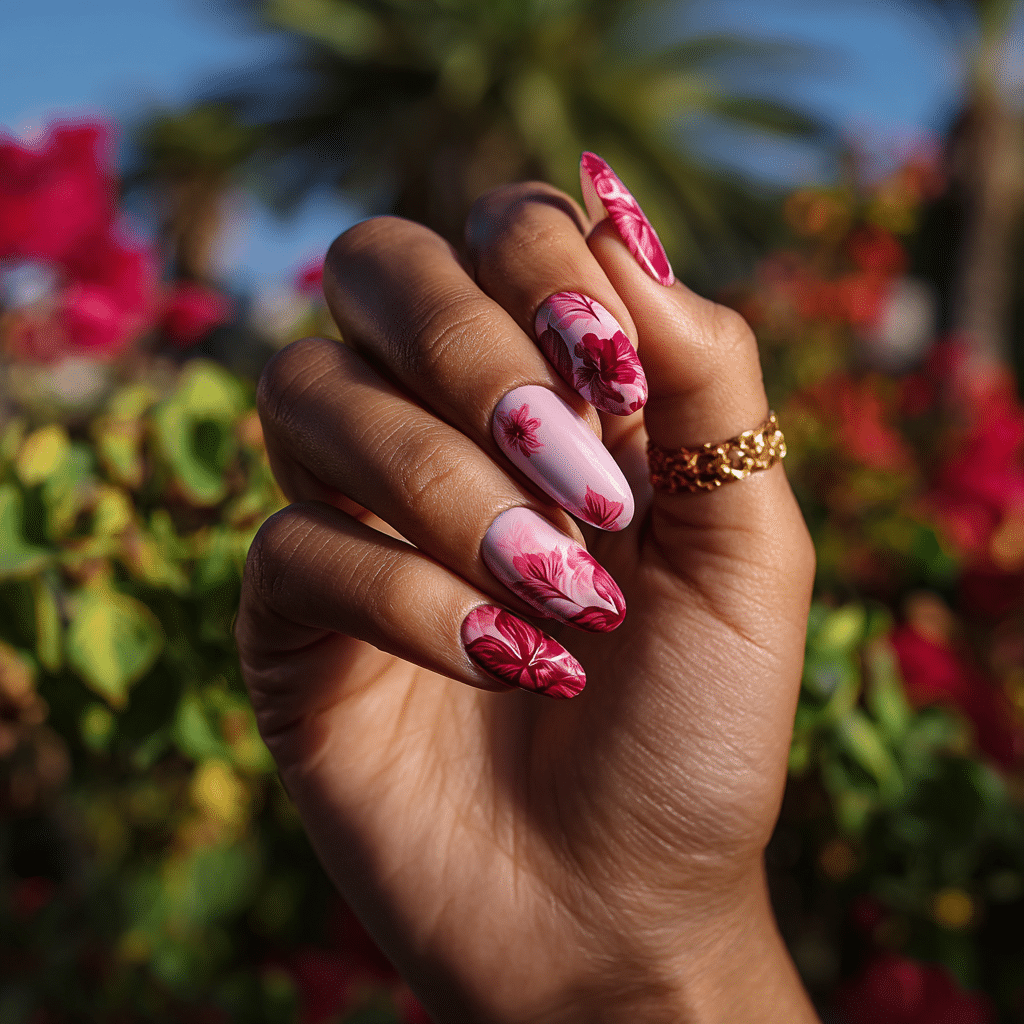
Hibiscus Flower Design features large pink and red hibiscus blooms hand-painted on a pastel background, evoking Hawaiian vibes. Perfect for tropical vacations, this vibrant manicure blooms with summery romance.
Tools Needed
- Pastel nail polish
- Pink and red nail polishes
- Fine nail art brush
- Base coat and glossy top coat
- Acetone for cleanup
Step-by-Step Guide
- Apply a base coat and let dry.
- Paint nails with pastel polish, using two coats; let dry.
- Use a fine brush to paint pink or red hibiscus blooms on accent nails.
- Add yellow centers and green leaves.
- Clean excess polish with acetone.
- Seal with a glossy top coat.
Color Suggestions
- Hawaiian Bloom: Pastel pink with red hibiscus.
- Soft Pop: Pastel yellow with pink hibiscus.
- Bold Contrast: Pastel blue with orange hibiscus.
Tips for Success
- Practice hibiscus shapes on paper.
- Use a fine brush for precision.
- Keep blooms bold yet balanced.
- Use a glossy top coat for shine.
Creative Variations
- Add hibiscus to all nails.
- Use glitter in flower centers.
- Create a gradient pastel base.
- Pair with tiny leaf details.
This manicure pairs with floral dresses or gold jewelry, adding tropical charm. Maintain by touching up blooms and refreshing the top coat. Hibiscus Flower Design is a romantic vacation choice.
Sunset Ombre with Gold Foil
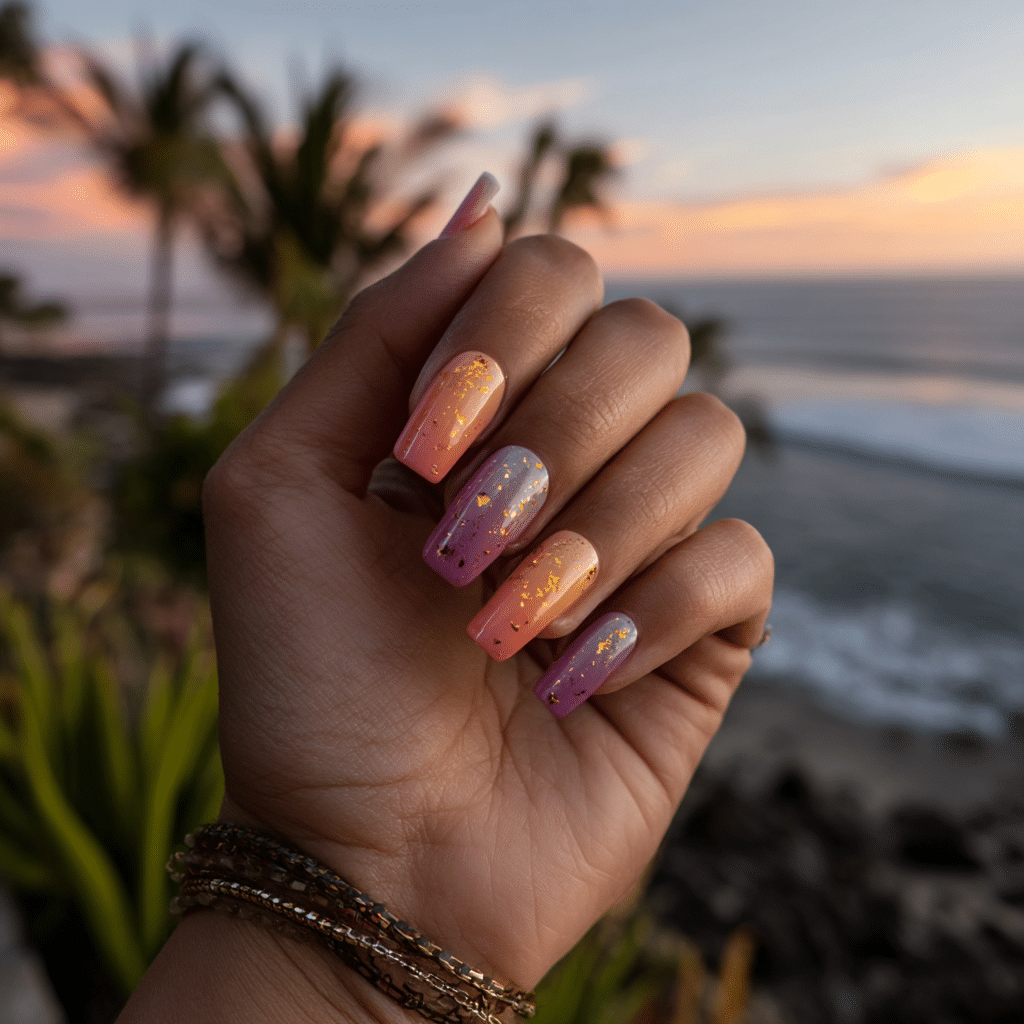
Sunset Ombre with Gold Foil features a gradient of peach, pink, and purple with tiny gold foil specks, resembling sunlight at dusk. Perfect for beach vacations, this manicure shimmers with summery elegance.
Tools Needed
- Peach, pink, and purple nail polishes
- Gold foil and foil glue
- Makeup sponge and tweezers
- Base coat and glossy top coat
- Acetone for cleanup
Step-by-Step Guide
- Apply a base coat and let dry.
- Paint nails with a nude base; let dry.
- Dab peach, pink, and purple polish onto a sponge, blending.
- Press sponge onto nails for an ombre effect.
- Apply foil glue in random spots; press gold foil with tweezers.
- Clean excess polish with acetone.
- Seal with a glossy top coat.
Color Suggestions
- Dusk Glow: Peach, pink, purple with gold foil.
- Warm Fade: Orange, coral, pink with gold foil.
- Cool Sunset: Pink, purple, blue with silver foil.
Tips for Success
- Use a sponge for smooth blending.
- Apply foil glue sparingly for subtlety.
- Practice gradient on paper.
- Use a glossy top coat for shine.
Creative Variations
- Add foil to accent nails only.
- Use a matte top coat for contrast.
- Create a vertical ombre.
- Pair with a rhinestone accent.
This manicure pairs with tropical outfits or gold accessories, radiating warmth. Maintain by reapplying the top coat. Sunset Ombre with Gold Foil is a glamorous vacation choice.
Mini Flamingo Art
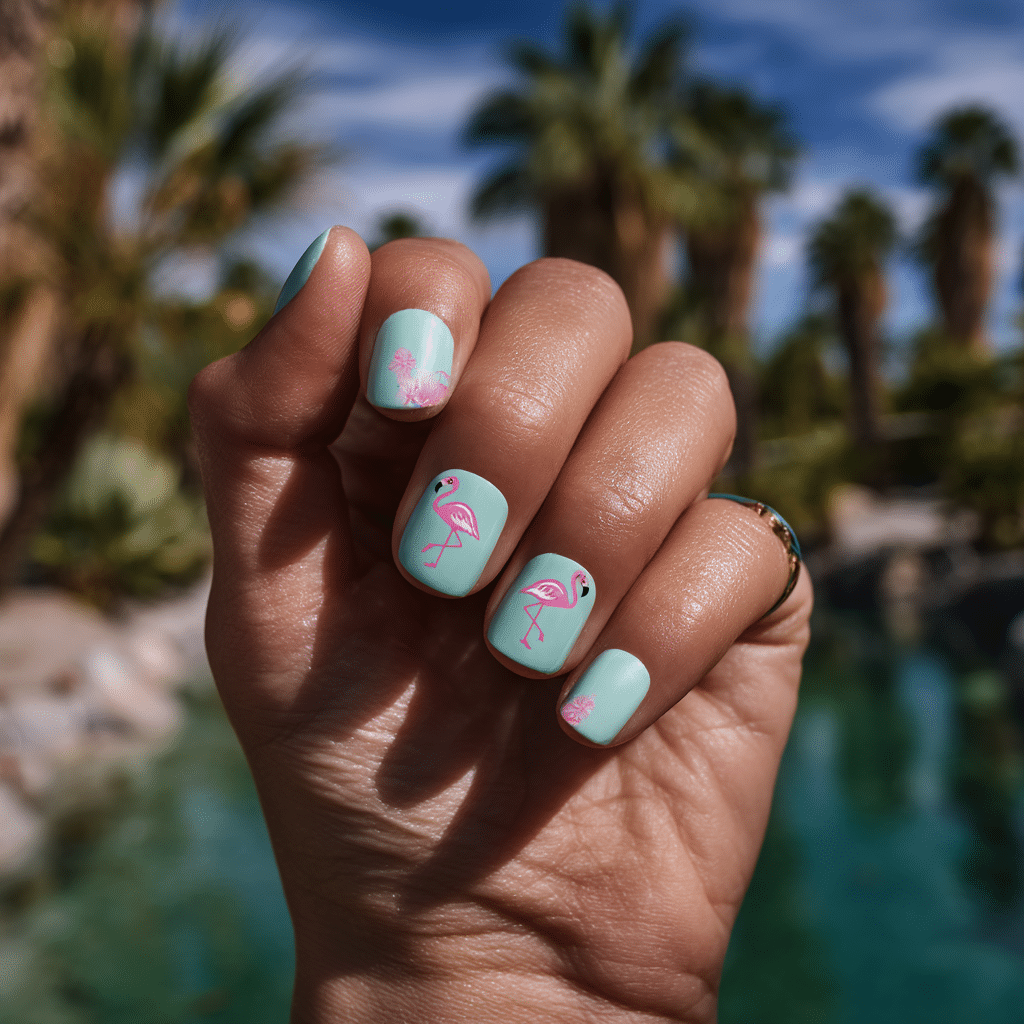
Mini Flamingo Art features delicate flamingo icons on a mint or light aqua background, creating a playful summer manicure. Perfect for tropical vacations, this design adds a whimsical, beachy vibe to your nails.
Tools Needed
- Mint or aqua nail polish
- Pink and black nail polishes
- Fine nail art brush
- Base coat and glossy top coat
- Acetone for cleanup
Step-by-Step Guide
- Apply a base coat and let dry.
- Paint nails with mint or aqua polish, using two coats; let dry.
- Use a fine brush to paint pink flamingos with black beaks on accent nails.
- Keep flamingos small and delicate.
- Clean excess polish with acetone.
- Seal with a glossy top coat.
Color Suggestions
- Beachy Pop: Mint with pink flamingos.
- Soft Glow: Aqua with coral flamingos.
- Bold Contrast: Light blue with red flamingos.
Tips for Success
- Practice flamingo shapes on paper.
- Use a fine brush for precision.
- Keep designs minimal for elegance.
-*, use a glossy top coat for shine.
Creative Variations
- Add flamingos to all nails.
- Use glitter polish for flamingos.
- Create a gradient mint base.
- Pair with tiny palm details.
This manicure pairs with pastel outfits or beach accessories, adding summery fun. Maintain by touching up flamingos and refreshing the top coat. Mini Flamingo Art is a charming vacation choice.
Beach Sand Texture Nails
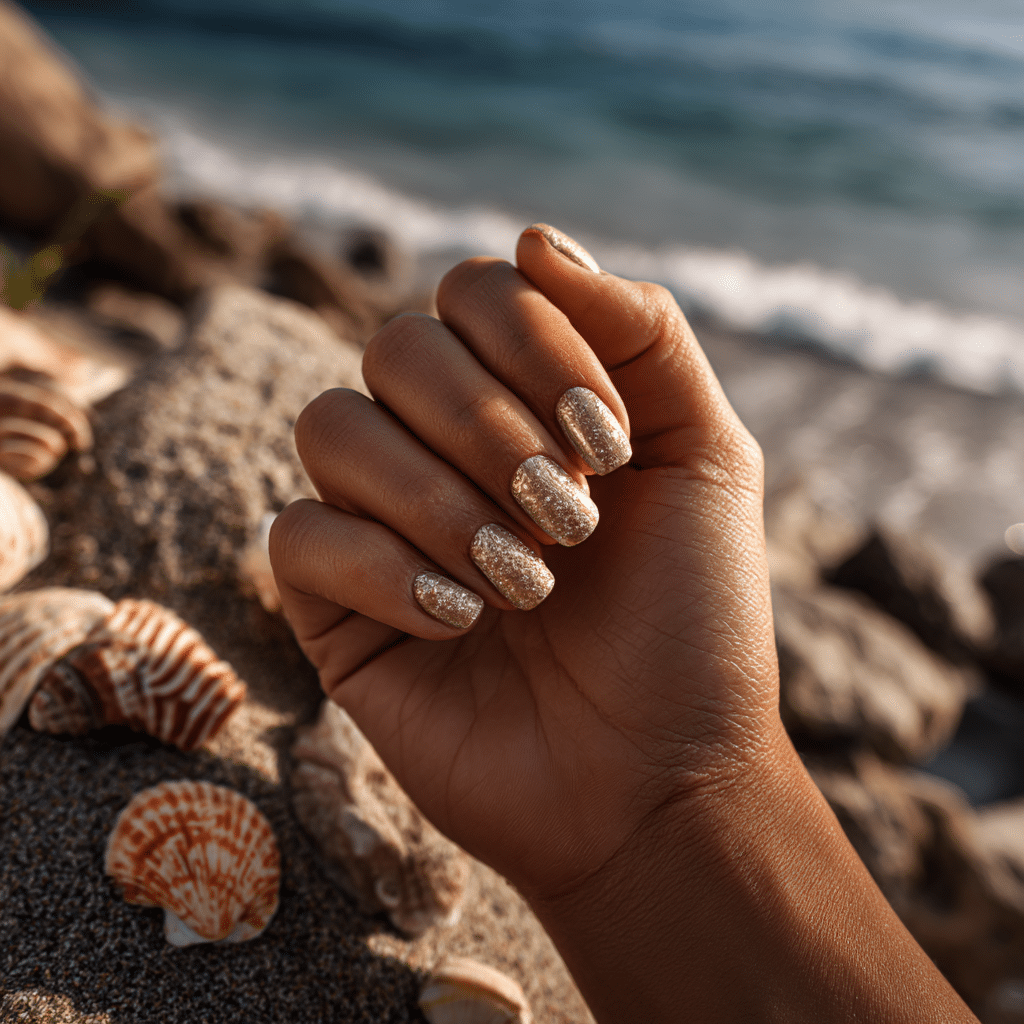
Beach Sand Texture Nails feature textured polish in warm beige or golden hues, resembling real sand. Perfect for coastal vacations, this tactile, unique manicure evokes the feel of a sunny beach day.
Tools Needed
- Beige or golden textured nail polish
- Base coat and glossy top coat
- Nail file
- Acetone for cleanup
Step-by-Step Guide
- File nails to desired shape; apply a base coat and let dry.
- Paint nails with textured beige or golden polish, using two coats; let dry.
- Apply a second layer for full texture.
- Check for even sandy effect.
- Clean excess polish with acetone.
- Seal with a glossy top coat (optional for texture).
Color Suggestions
- Sandy Shore: Beige textured polish.
- Golden Beach: Golden textured polish.
- Soft Glow: Ivory textured polish.
Tips for Success
- Apply thin polish layers for even texture.
- Skip glossy top coat for maximum sand effect.
- Clean cuticles for a polished look.
- Use a quick-dry polish for efficiency.
Creative Variations
- Add a glossy top coat to one nail.
- Use a gradient sand shade.
- Apply a single shell decal.
- Create a wave pattern on one nail.
This manicure pairs with beachwear or earthy accessories, evoking coastal vibes. Maintain by refreshing the texture polish. Beach Sand Texture Nails are a unique vacation choice.
Sea Turtle Accent Nail
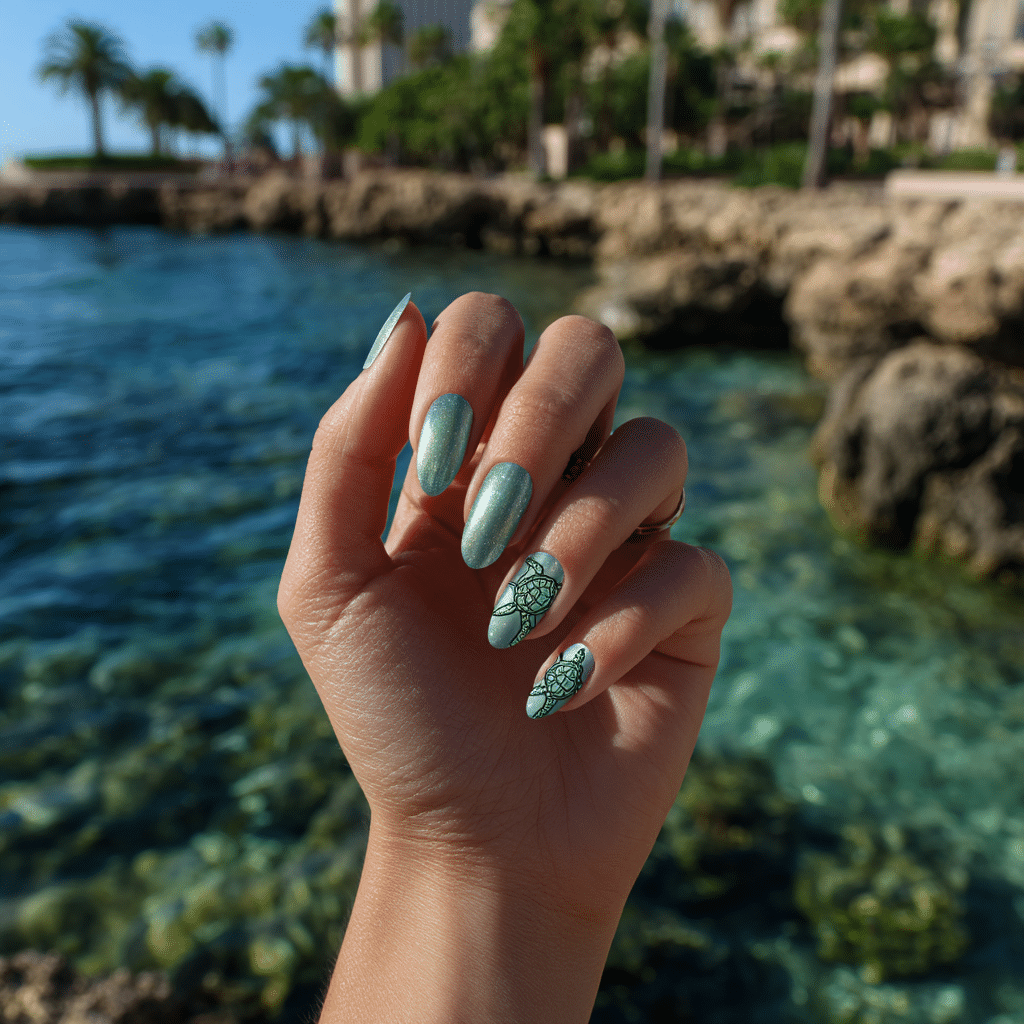
Sea Turtle Accent Nail features a detailed turtle illustration on one or two nails with a shimmery sea green base, capturing ocean charm. Perfect for beach vacations, this design blends cuteness with summery elegance.
Tools Needed
- Sea green nail polish
- Green, brown, and black nail polishes
- Fine nail art brush
- Base coat and glossy top coat
- Acetone for cleanup
Step-by-Step Guide
- Apply a base coat and let dry.
- Paint nails with shimmery sea green polish, using two coats; let dry.
- Use a fine brush to paint a turtle on one or two nails.
- Add green shell, brown limbs, and black details.
- Clean excess polish with acetone.
- Seal with a glossy top coat.
Color Suggestions
- Ocean Charm: Sea green with green turtles.
- Soft Pop: Mint green with light brown turtles.
- Bold Contrast: Teal with dark green turtles.
Tips for Success
- Practice turtle shapes on paper.
- Use a fine brush for precision.
- Keep turtles small for detail.
- Use a glossy top coat for shine.
Creative Variations
- Add turtles to all nails.
- Use glitter polish for the shell.
- Create a gradient green base.
- Pair with wave details.
This manicure pairs with beachwear or silver jewelry, radiating coastal beauty. Maintain by touching up turtles and refreshing the top coat. Sea Turtle Accent Nail is a delightful vacation choice.
Wavy Lines in Sunset Tones
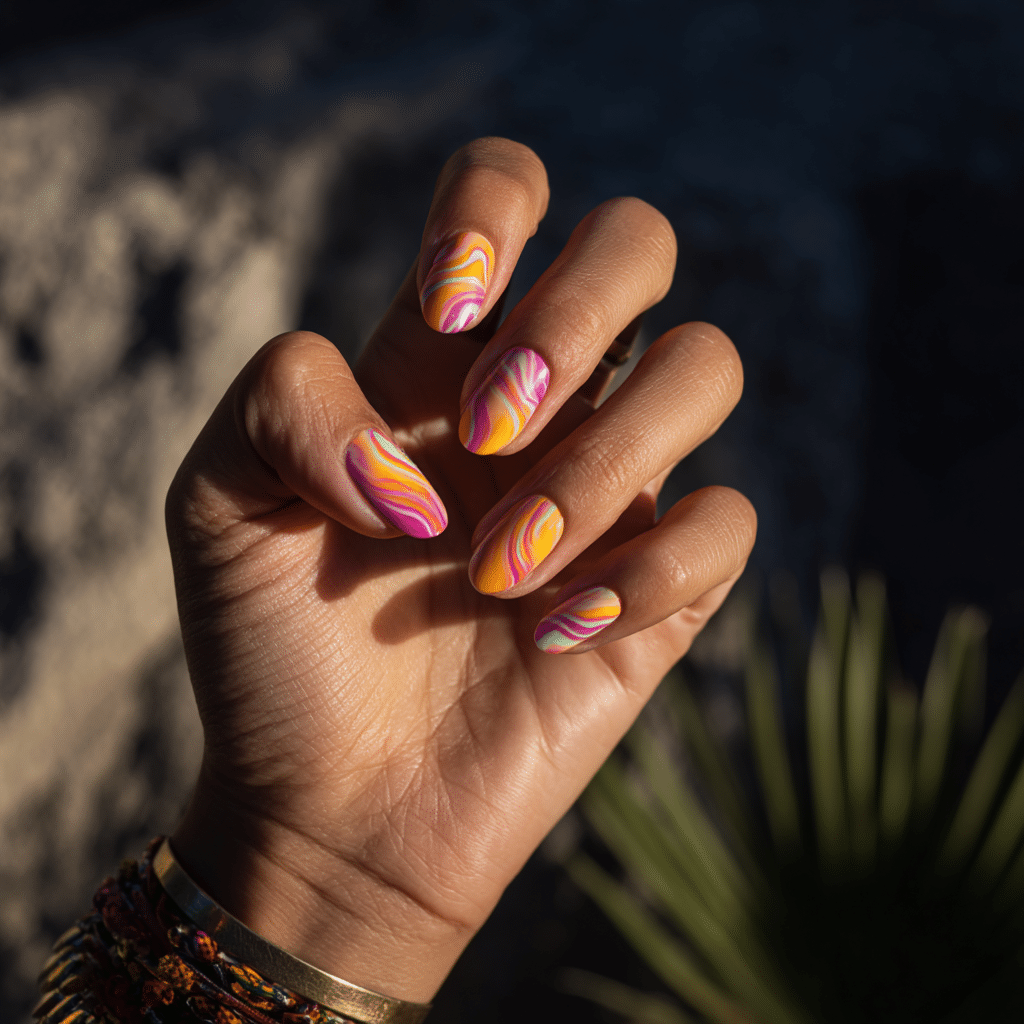
Wavy Lines in Sunset Tones feature abstract waves in pink, yellow, and orange lines across a neutral background, evoking a vibrant sunset. Perfect for tropical vacations, this design adds an artistic summer flair.
Tools Needed
- Neutral nail polish
- Pink, yellow, and orange nail polishes
- Fine nail art brush
- Base coat and glossy top coat
- Acetone for cleanup
Step-by-Step Guide
- Apply a base coat and let dry.
- Paint nails with neutral polish, using two coats; let dry.
- Use a fine brush to paint wavy pink, yellow, and orange lines.
- Layer waves for an abstract effect.
- Clean excess polish with acetone.
- Seal with a glossy top coat.
Color Suggestions
- Sunset Waves: Pink, yellow, orange waves.
- Soft Glow: Peach, pale yellow, coral waves.
- Bold Pop: Red, orange, pink waves.
Tips for Success
- Practice wave patterns on paper.
- Use a fine brush for precision.
- Keep lines varied for artistry.
- Use a glossy top coat for shine.
Creative Variations
- Add waves to accent nails only.
- Use glitter polish for waves.
- Create a gradient neutral base.
- Pair with tiny star decals.
This manicure pairs with tropical outfits or gold accessories, adding summery vibrancy. Maintain by touching up waves and refreshing the top coat. Wavy Lines in Sunset Tones are a bold vacation choice.
White Nails with Blue Anchors
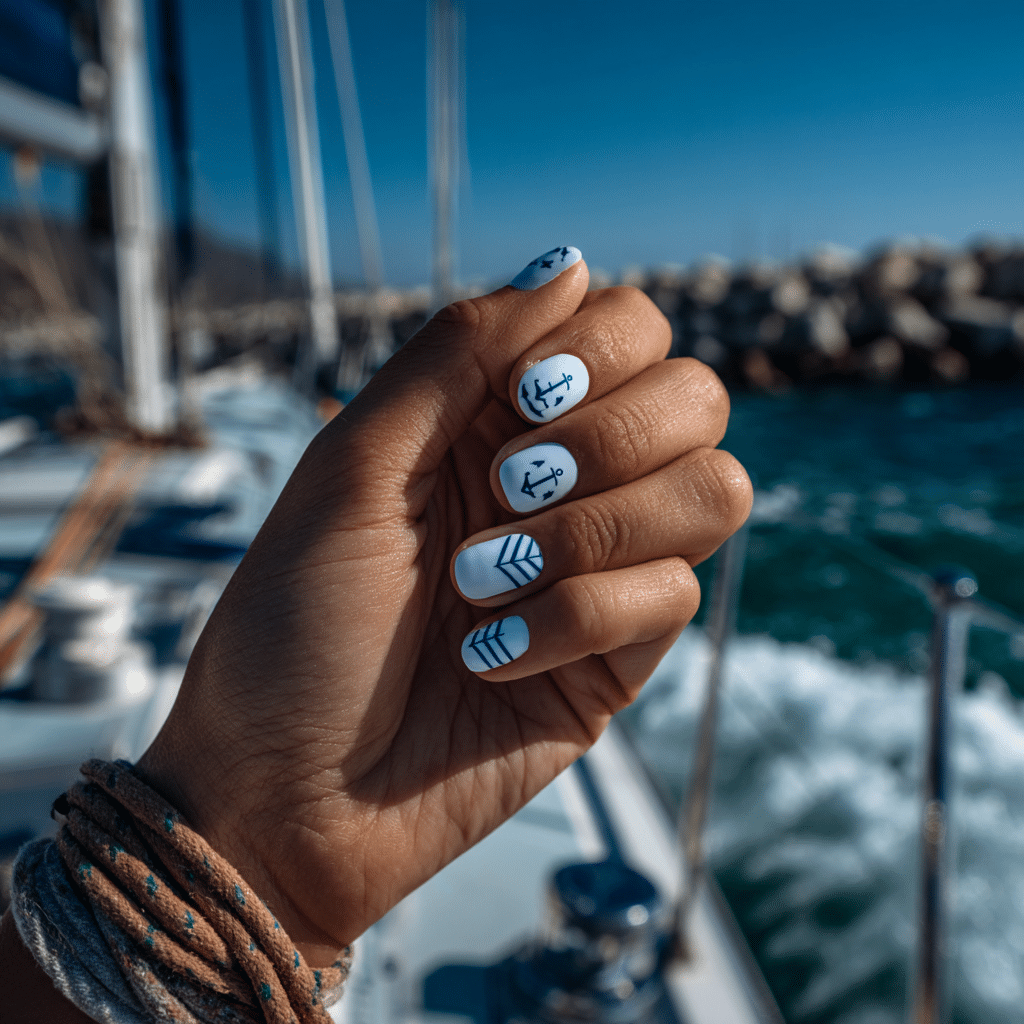
White Nails with Blue Anchors feature a nautical design with clean white nails and deep blue anchor icons or stripes. Perfect for coastal vacations, this manicure captures the charm of seaside adventures.
Tools Needed
- White nail polish
- Blue nail polish
- Fine nail art brush
- Base coat and glossy top coat
- Acetone for cleanup
Step-by-Step Guide
- Apply a base coat and let dry.
- Paint nails with white polish, using two coats; let dry.
- Use a fine brush to paint blue anchors or stripes on accent nails.
- Keep designs small and precise.
- Clean excess polish with acetone.
- Seal with a glossy top coat.
Color Suggestions
- Nautical Chic: White with navy blue anchors.
- Soft Pop: White with sky blue anchors.
- Bold Contrast: White with red anchors.
Tips for Success
- Practice anchor shapes on paper.
- Use a fine brush for precision.
- Keep designs minimal for elegance.
- Use a glossy top coat for shine.
Creative Variations
- Add anchors to all nails.
- Use glitter polish for anchors.
- Create a gradient white base.
- Pair with tiny rope details.
This manicure pairs with nautical outfits or silver jewelry, evoking coastal charm. Maintain by touching up anchors and refreshing the top coat. White Nails with Blue Anchors are a classic vacation choice.
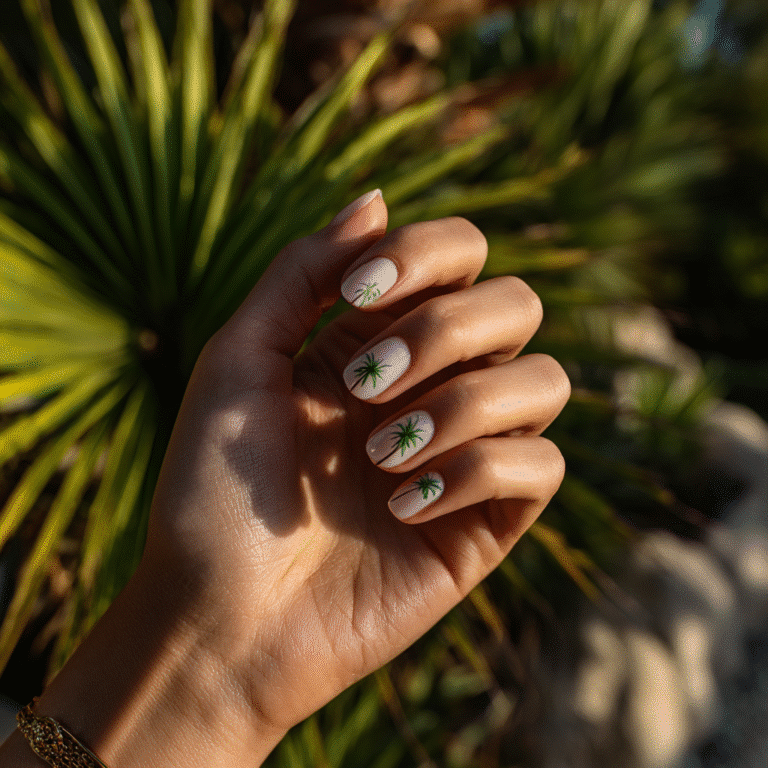
Palm Silhouette Over Gradient Skies
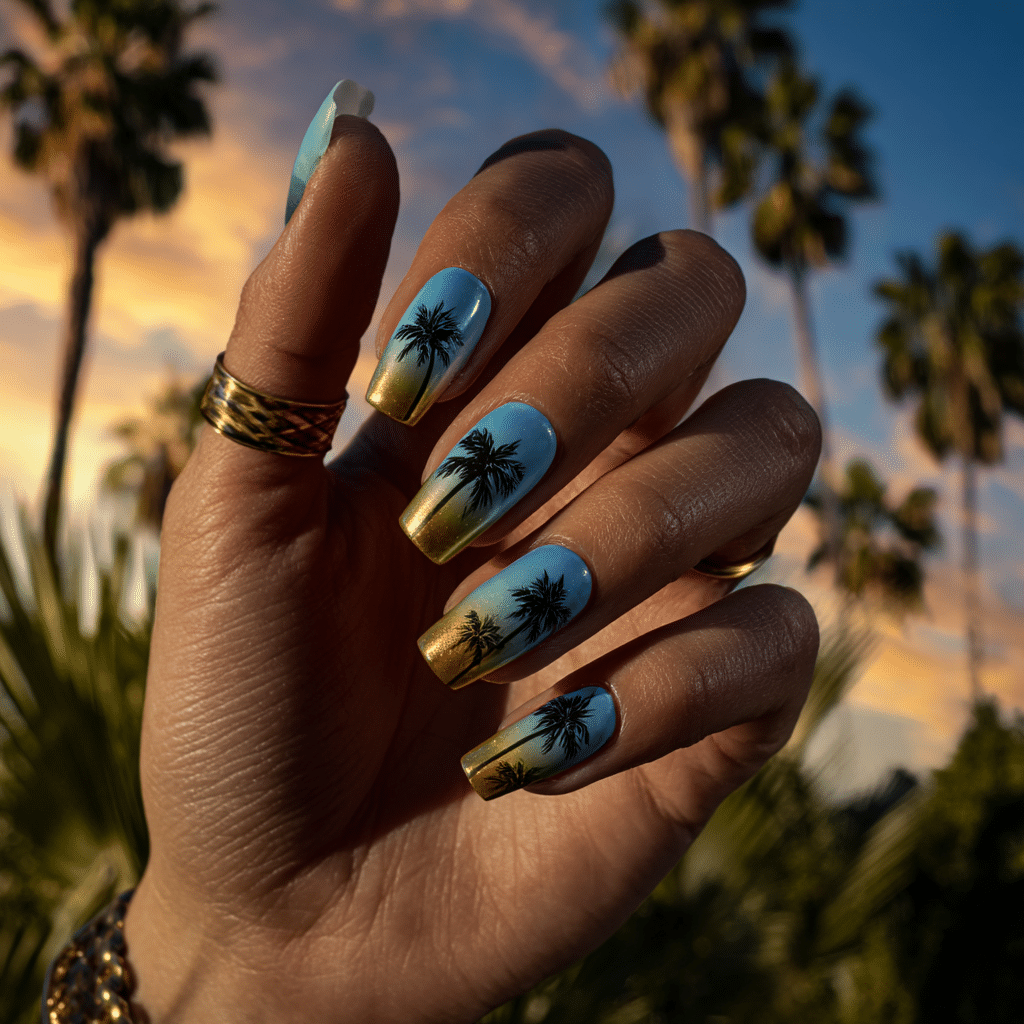
Palm Silhouette Over Gradient Skies features a gradient from sky blue to golden yellow with black palm tree silhouettes, evoking tropical sunsets. Perfect for island vacations, this design radiates summery serenity.
Tools Needed
- Sky blue and yellow nail polishes
- Black nail polish
- Makeup sponge and fine brush
- Base coat and glossy top coat
- Acetone for cleanup
Step-by-Step Guide
- Apply a base coat and let dry.
- Paint nails with a nude base; let dry.
- Dab blue and yellow polish onto a sponge, blending.
- Press sponge onto nails for a gradient sky effect.
- Use a fine brush to paint black palm silhouettes.
- Clean excess polish with acetone.
- Seal with a glossy top coat.
Color Suggestions
- Tropical Sky: Blue to yellow with black palms.
- Sunset Glow: Pink to yellow with black palms.
- Cool Fade: Blue to white with black palms.
Tips for Success
- Use a sponge for smooth blending.
- Practice palm shapes on paper.
- Apply thin layers for clarity.
- Use a glossy top coat for shine.
Creative Variations
- Add palms to accent nails only.
- Use gold polish for palm silhouettes.
- Create a vertical gradient.
- Pair with tiny star decals.
This manicure pairs with tropical outfits or gold jewelry, adding summery elegance. Maintain by touching up silhouettes and refreshing the top coat. Palm Silhouette Over Gradient Skies is a serene vacation choice.
Mint Mojito Green Base
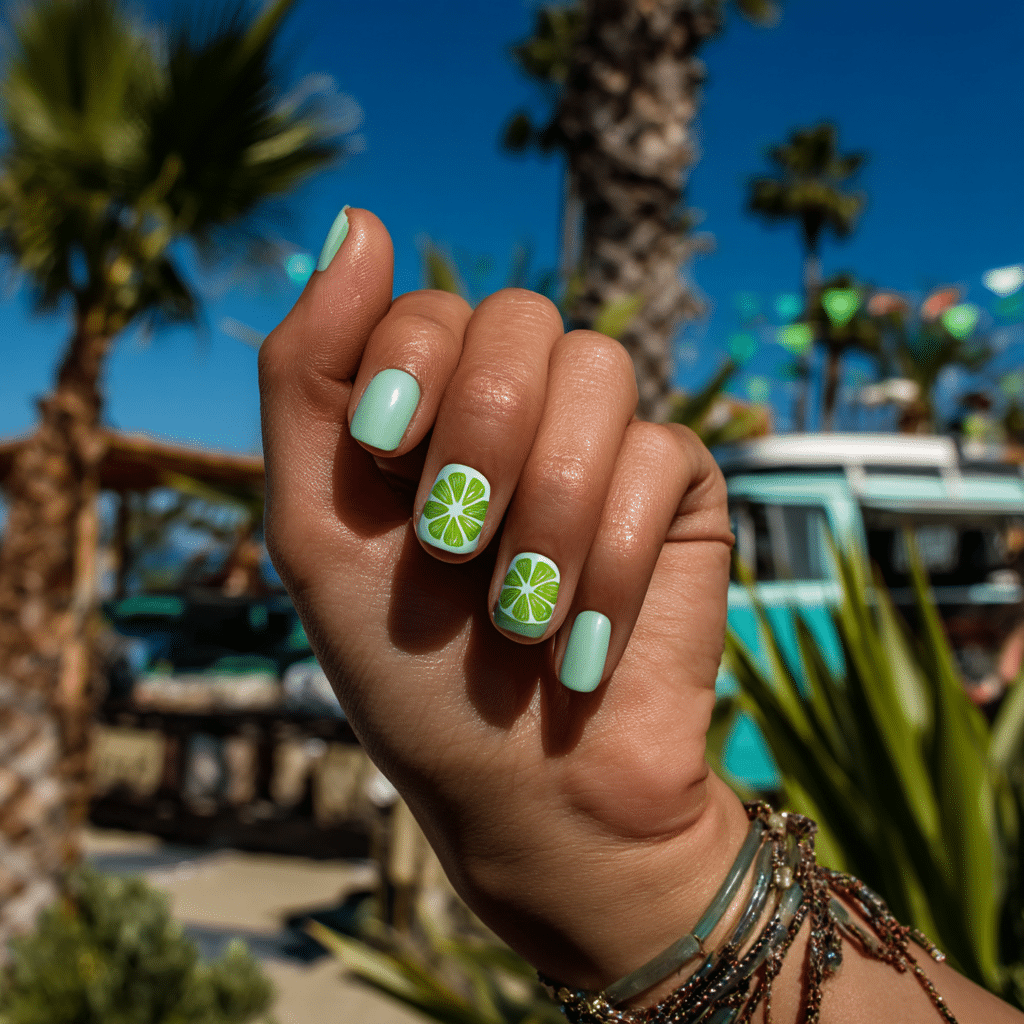
Mint Mojito Green Base features a cool mint green polish with tiny lime slice stickers, inspired by tropical drinks. Perfect for beach vacations, this playful manicure adds a refreshing, summery vibe.
Tools Needed
- Mint green nail polish
- Lime slice nail stickers
- Tweezers
- Base coat and glossy top coat
- Acetone for cleanup
Step-by-Step Guide
- Apply a base coat and let dry.
- Paint nails with mint green polish, using two coats; let dry.
- Use tweezers to place lime slice stickers on accent nails.
- Press gently to secure stickers.
- Clean excess polish with acetone.
- Seal with a glossy top coat.
Color Suggestions
- Mojito Pop: Mint green with lime slices.
- Soft Glow: Light mint with lemon slices.
- Bold Contrast: Teal with orange slices.
Tips for Success
- Apply stickers on dry polish.
- Use tweezers for precise placement.
- Practice sticker placement on paper.
- Use a glossy top coat for shine.
Creative Variations
- Add stickers to all nails.
- Use glitter polish as a base.
- Create a gradient mint base.
- Pair with tiny mint leaf decals.
This manicure pairs with beachwear or silver accessories, radiating summer fun. Maintain by checking sticker adhesion and refreshing the top coat. Mint Mojito Green Base is a lively vacation choice.
Frangipani Floral French Tips
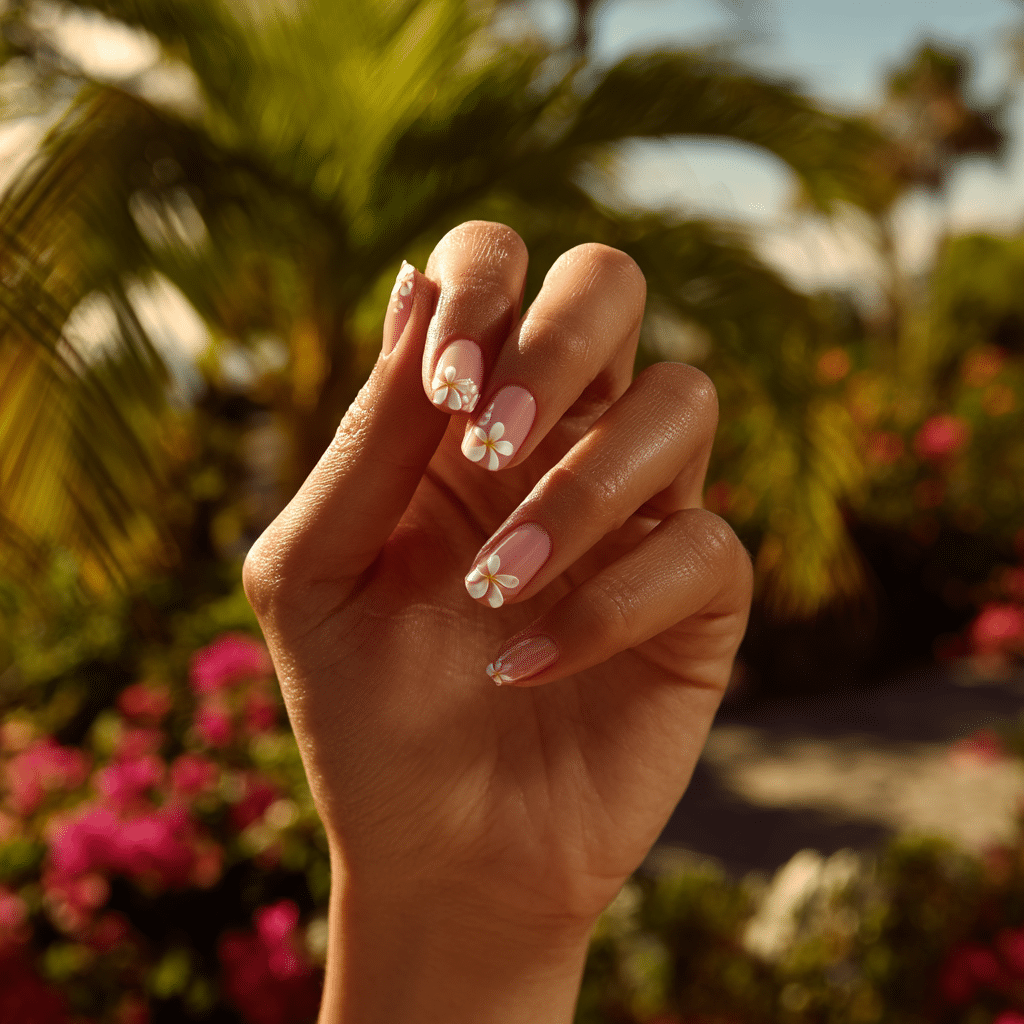
Frangipani Floral French Tips feature a soft pink or nude base with delicate frangipani flowers at the tips, creating a chic, romantic manicure. Perfect for tropical vacations, this design blooms with summery elegance.
Tools Needed
- Pink or nude nail polish
- White and yellow nail polishes
- Fine nail art brush
- Base coat and glossy top coat
- Acetone for cleanup
Step-by-Step Guide
- Apply a base coat and let dry.
- Paint nails with pink or nude polish, using two coats; let dry.
- Use a fine brush to paint white frangipani flowers at the tips.
- Add yellow centers for detail.
- Clean excess polish with acetone.
- Seal with a glossy top coat.
Color Suggestions
- Romantic Bloom: Pink with white frangipani.
- Soft Pop: Nude with ivory frangipani.
- Bold Contrast: Beige with pink frangipani.
Tips for Success
- Practice frangipani shapes on paper.
- Use a fine brush for precision.
- Keep flowers delicate for elegance.
- Use a glossy top coat for shine.
Creative Variations
- Add frangipani to all nails.
- Use glitter in flower centers.
- Create a gradient pink base.
- Pair with tiny leaf details.
This manicure pairs with floral dresses or gold jewelry, adding summery romance. Maintain by touching up flowers and refreshing the top coat. Frangipani Floral French Tips are a chic vacation choice.
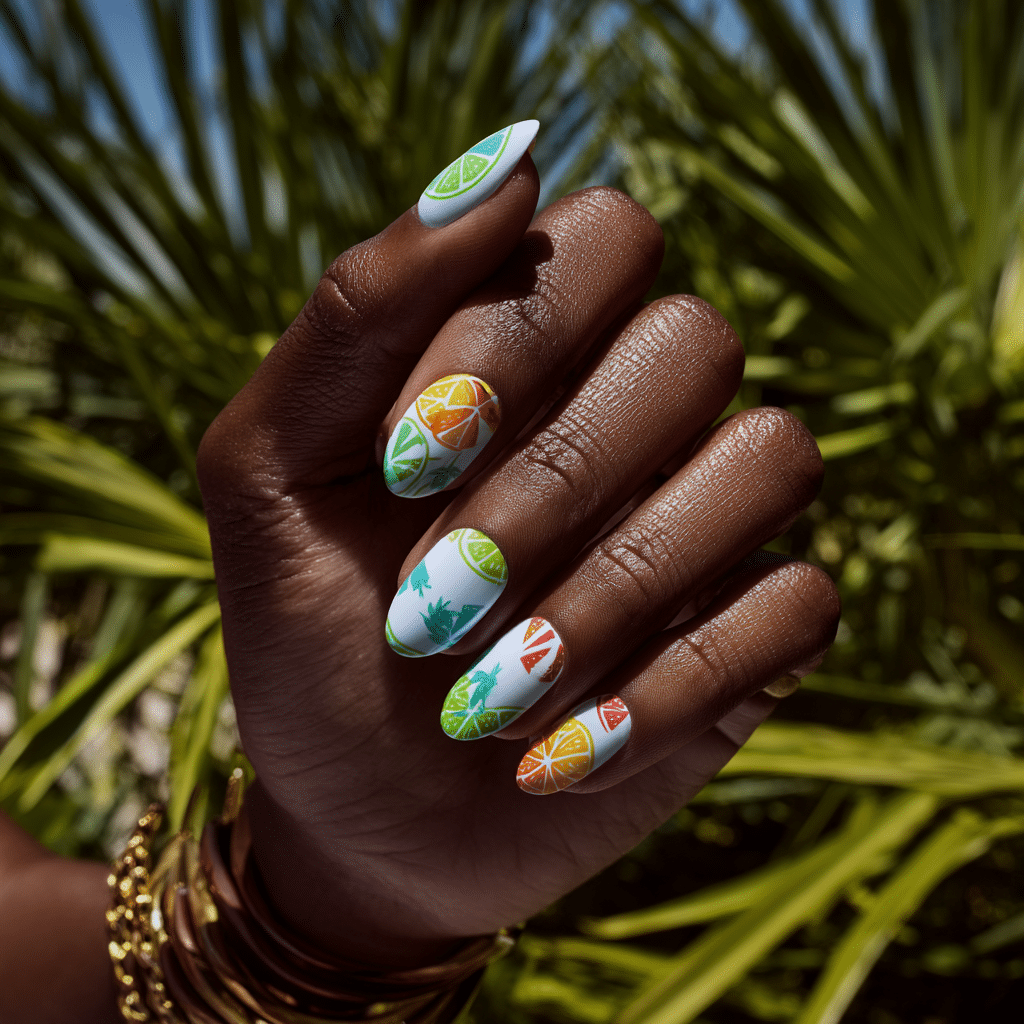
Tropical Fruit Medley Nails
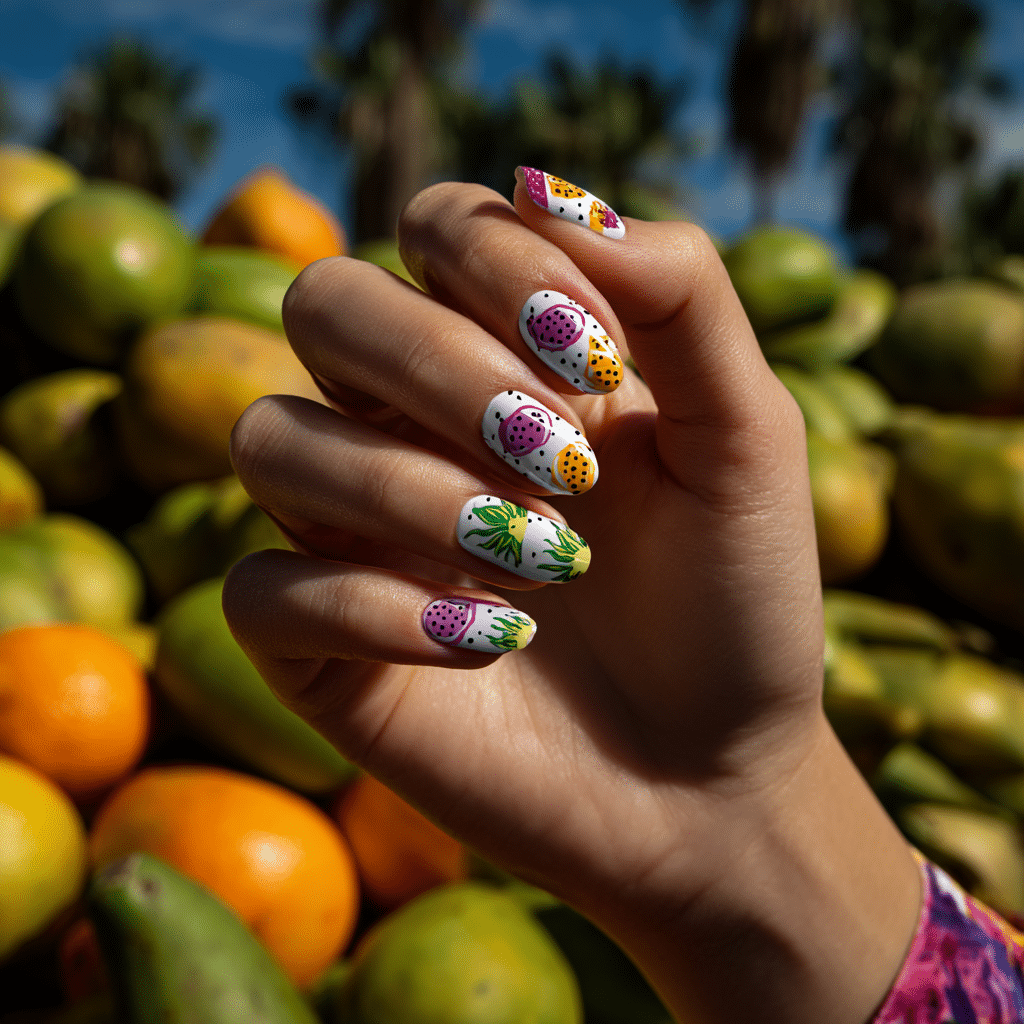
Tropical Fruit Medley Nails feature colorful fruits like papaya, kiwi, and dragon fruit painted on each nail, each one unique. Perfect for tropical vacations, this vibrant manicure bursts with summery fun.
Tools Needed
- White nail polish
- Multicolored nail polishes (orange, green, pink)
- Fine nail art brush
- Base coat and glossy top coat
- Acetone for cleanup
Step-by-Step Guide
- Apply a base coat and let dry.
- Paint nails with white polish, using two coats; let dry.
- Use a fine brush to paint different fruits (papaya, kiwi, dragon fruit) on each nail.
- Add details like seeds or leaves.
- Clean excess polish with acetone.
- Seal with a glossy top coat.
Color Suggestions
- Fruity Mix: Orange papaya, green kiwi, pink dragon fruit.
- Soft Pop: Pastel orange, mint, coral fruits.
- Bold Contrast: Neon orange, green, red fruits.
Tips for Success
- Practice fruit shapes on paper.
- Use a fine brush for precision.
- Keep designs small for detail.
- Use a glossy top coat for shine.
Creative Variations
- Add fruits to accent nails only.
- Use glitter polish for fruits.
- Create a gradient white base.
- Pair with tiny flower details.
This manicure pairs with tropical prints or bright accessories, radiating summer energy. Maintain by touching up fruits and refreshing the top coat. Tropical Fruit Medley Nails are a lively vacation choice.
Clear Nails with Gold Leaf Accents
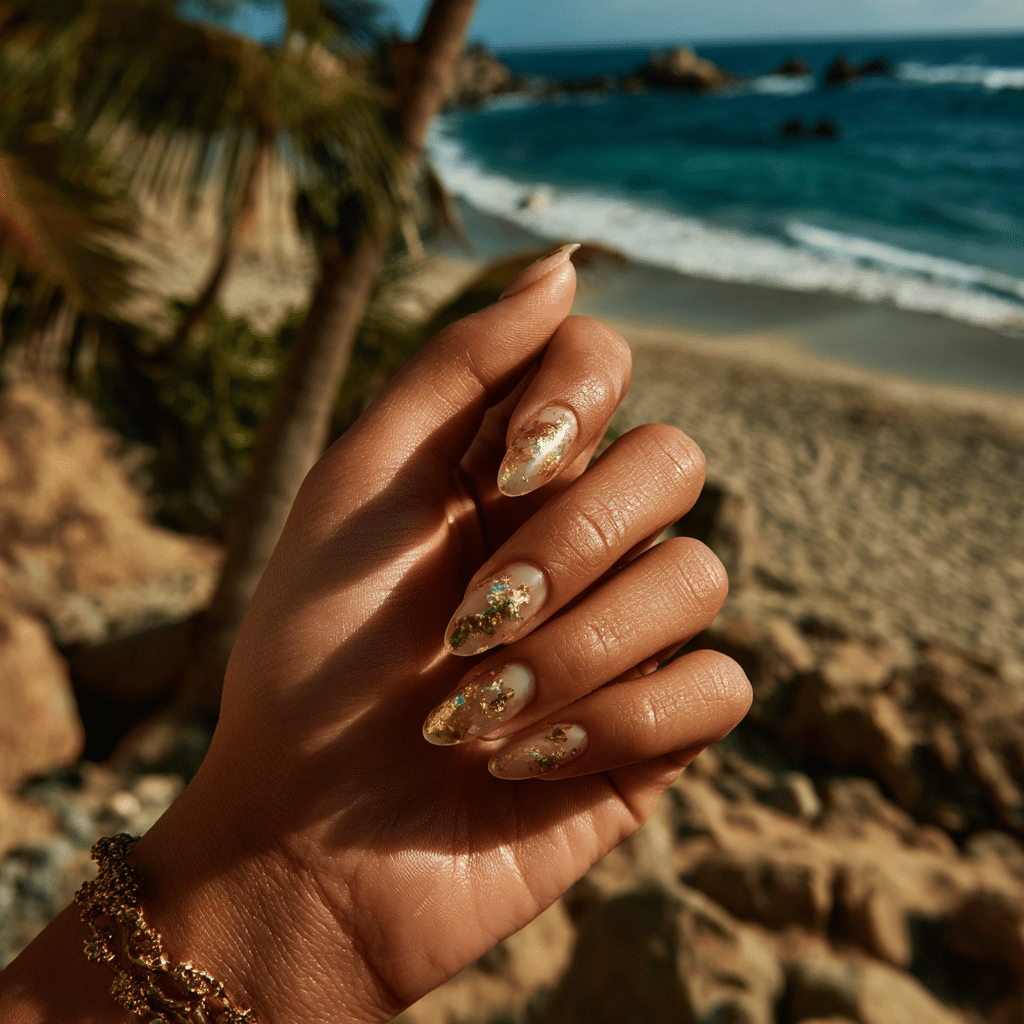
Clear Nails with Gold Leaf Accents feature a transparent base with fragments of gold foil, creating a luxe beachside look. Perfect for tropical vacations, this elegant manicure shimmers with summery sophistication.
Tools Needed
- Clear nail polish
- Gold foil and foil glue
- Tweezers
- Base coat and glossy top coat
- Acetone for cleanup
Step-by-Step Guide
- Apply a base coat and let dry.
- Paint nails with clear polish, using 2-3 coats; let dry.
- Apply foil glue in random patterns.
- Wait until glue is tacky; press gold foil with tweezers.
- Peel back foil to reveal the design.
- Clean excess polish with acetone.
- Seal with a glossy top coat.
Color Suggestions
- Luxe Shine: Clear with gold foil.
- Soft Pop: Clear with silver foil.
- Warm Glow: Clear with rose gold foil.
Tips for Success
- Apply foil glue sparingly for subtlety.
- Practice foil placement on paper.
- Use a glossy top coat for shine.
- Handle foil gently to avoid tearing.
Creative Variations
- Add foil to accent nails only.
- Use a matte top coat for contrast.
- Create a gradient clear base.
- Pair with a single rhinestone.
This manicure pairs with beachwear or gold jewelry, adding summery glamour. Maintain by reapplying the top coat. Clear Nails with Gold Leaf Accents are a refined vacation choice.
Pastel Rainbow Waves
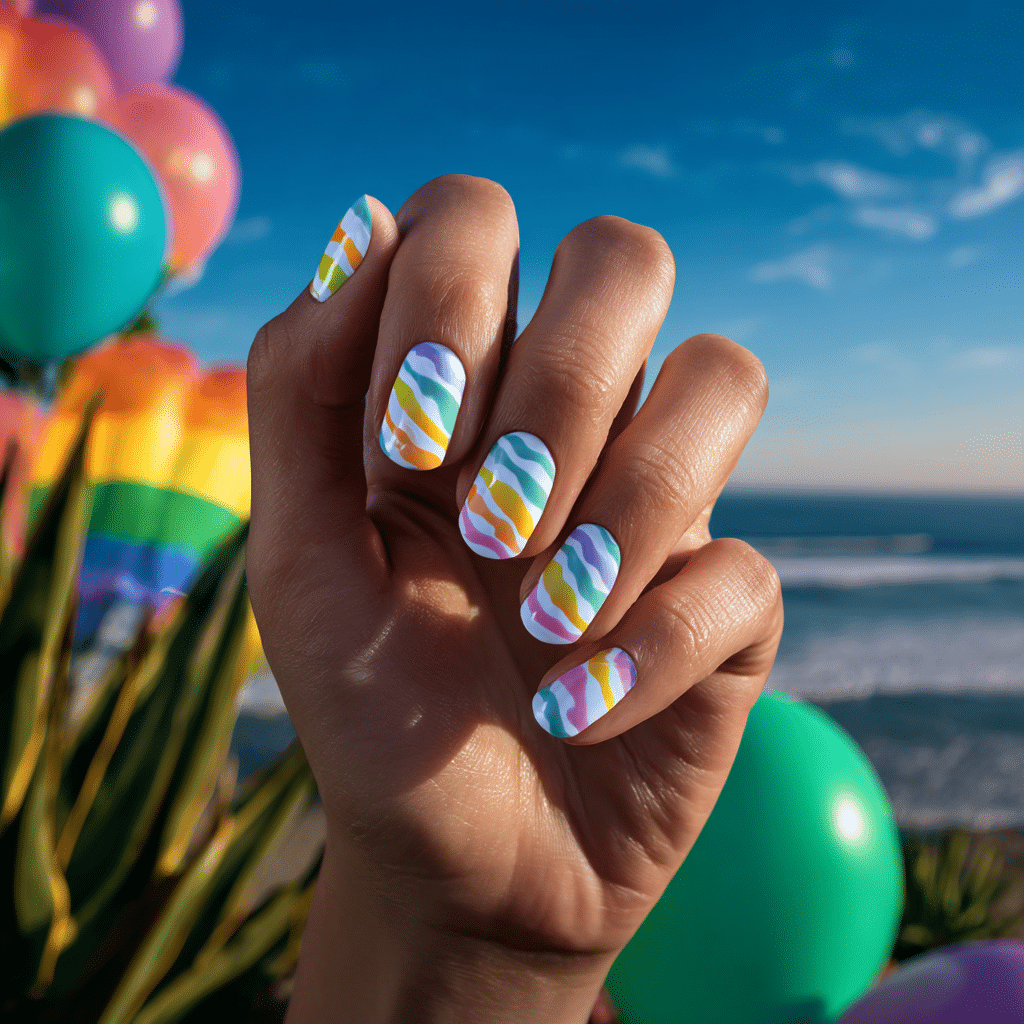
Pastel Rainbow Waves feature wavy pastel stripes in rainbow order on each nail, creating a whimsical summer manicure. Perfect for tropical vacations, this design adds a playful, colorful touch to your nails.
Tools Needed
- White nail polish
- Pastel nail polishes (pink, blue, yellow, green, purple)
- Fine nail art brush
- Base coat and glossy top coat
- Acetone for cleanup
Step-by-Step Guide
- Apply a base coat and let dry.
- Paint nails with white polish, using two coats; let dry.
- Use a fine brush to paint wavy pastel stripes in rainbow order.
- Keep waves varied and fluid.
- Clean excess polish with acetone.
- Seal with a glossy top coat.
Color Suggestions
- Rainbow Pop: Pink, blue, yellow, green, purple waves.
- Soft Glow: Pastel peach, mint, lavender, lemon, coral waves.
- Cool Mix: Blue, green, lavender, pink, mint waves.
Tips for Success
- Practice wave patterns on paper.
- Use a fine brush for precision.
- Keep stripes thin for clarity.
- Use a glossy top coat for shine.
Creative Variations
- Add waves to accent nails only.
- Use glitter polish for waves.
- Create a gradient white base.
- Pair with tiny star decals.
This manicure pairs with pastel outfits or colorful accessories, radiating summer joy. Maintain by touching up waves and refreshing the top coat. Pastel Rainbow Waves are a vibrant vacation choice.
Shell Embellishment Art
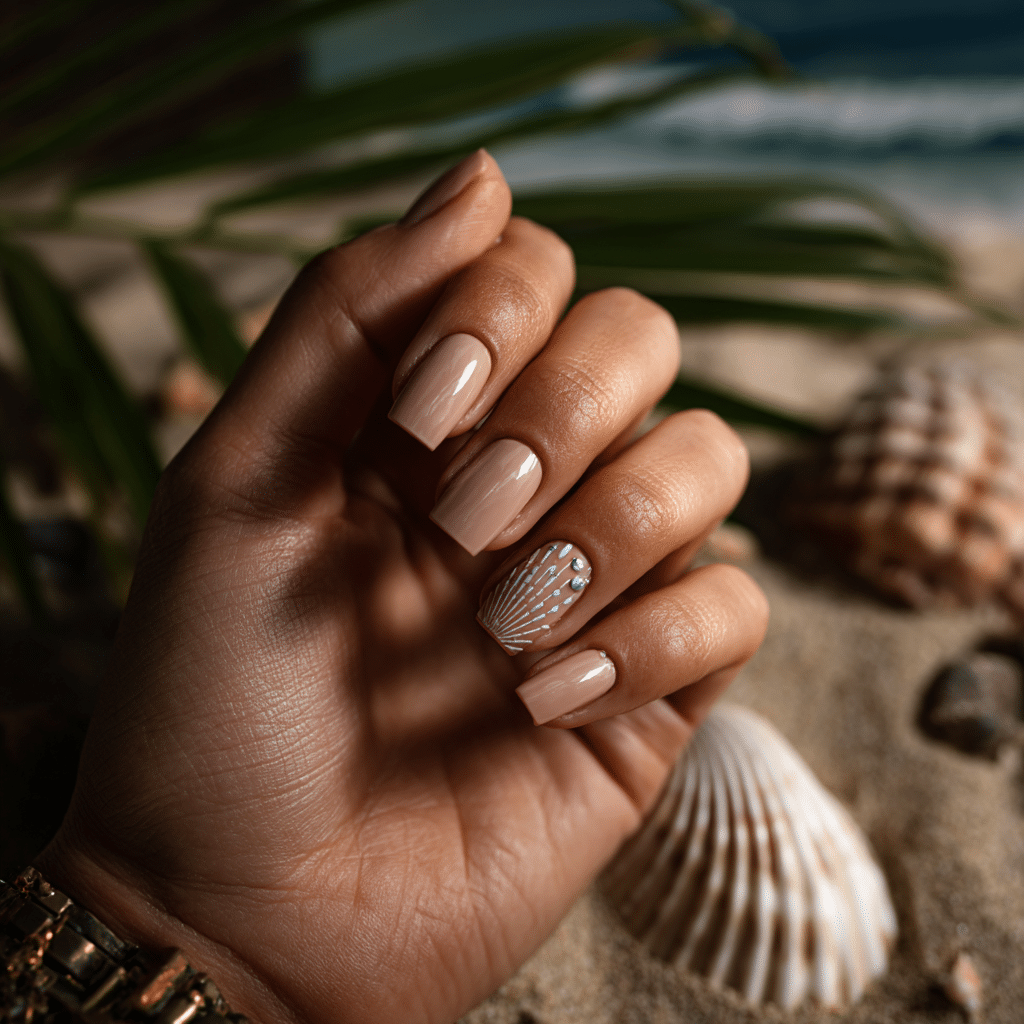
Shell Embellishment Art features tiny shell decals or 3D embellishments on sandy-colored polish, evoking beachside treasures. Perfect for coastal vacations, this tactile manicure adds a unique, summery charm.
Tools Needed
- Sandy beige nail polish
- Shell decals or 3D embellishments
- Tweezers and nail glue
- Base coat and glossy top coat
- Acetone for cleanup
Step-by-Step Guide
- Apply a base coat and let dry.
- Paint nails with sandy beige polish, using two coats; let dry.
- Apply a dot of glue on accent nails.
- Use tweezers to place shell decals or 3D embellishments.
- Press gently to secure; let dry.
- Clean excess polish with acetone.
- Seal with a glossy top coat.
Color Suggestions
- Beachy Glow: Sandy beige with white shells.
- Soft Pop: Golden beige with pearl shells.
- Bold Contrast: Taupe with gold shells.
Tips for Success
- Use small shells for subtlety.
- Apply glue sparingly to avoid mess.
- Practice placement on paper.
- Secure embellishments with top coat.
Creative Variations
- Add shells to all nails.
- Use glitter polish as a base.
- Create a gradient sandy base.
- Pair with tiny pearl accents.
This manicure pairs with beachwear or earthy accessories, evoking coastal beauty. Maintain by checking embellishment adhesion and refreshing the top coat. Shell Embellishment Art is a unique vacation choice.
Bright Fuchsia Matte Nails
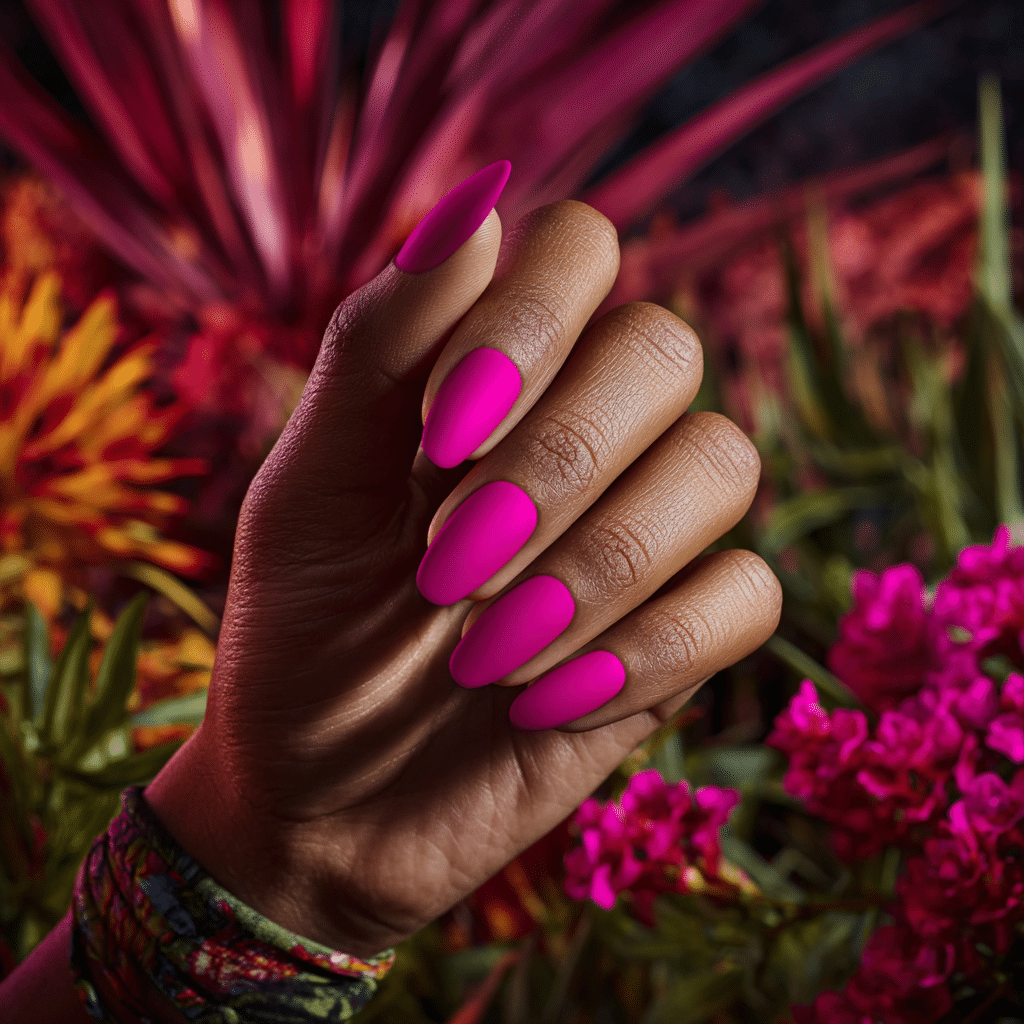
Bright Fuchsia Matte Nails feature a bold matte pink polish, making a strong statement on tanned skin. Perfect for tropical vacations, this vibrant manicure radiates summery confidence and glamour.
Tools Needed
- Fuchsia nail polish
- Matte top coat
- Base coat
- Nail file
- Acetone for cleanup
Step-by-Step Guide
- File nails to desired shape; apply a base coat and let dry.
- Paint nails with fuchsia polish, using two coats; let dry.
- Apply a matte top coat evenly across all nails.
- Let dry completely for a velvety finish.
- Clean excess polish with acetone.
- Check for even matte coverage.
Color Suggestions
- Bold Pop: Bright fuchsia with matte finish.
- Soft Glow: Coral pink with matte finish.
- Cool Tone: Magenta with matte finish.
Tips for Success
- Apply thin polish layers for smoothness.
- Use a matte top coat sparingly.
- Clean cuticles for a polished look.
- File nails evenly for uniformity.
Creative Variations
- Add a glossy top coat to one nail.
- Use a gradient fuchsia shade.
- Apply a single rhinestone.
- Create a subtle pattern on one nail.
This manicure pairs with bold outfits or gold jewelry, radiating summer energy. Maintain by refreshing the matte top coat. Bright Fuchsia Matte Nails are a striking vacation choice.
Tropical Drink-Inspired Nails
Tropical Drink-Inspired Nails feature designs inspired by piña coladas, daiquiris, and mojitos, using color-blocking with straws or citrus slices. Perfect for beach vacations, this playful manicure captures summery cocktail vibes.
Tools Needed
- White nail polish
- Multicolored nail polishes (yellow, pink, green)
- Fine nail art brush
- Base coat and glossy top coat
- Acetone for cleanup
Step-by-Step Guide
- Apply a base coat and let dry.
- Paint nails with white polish, using two coats; let dry.
- Use a fine brush to paint drink-inspired designs (e.g., yellow piña colada, pink daiquiri, green mojito).
- Add details like straws or citrus slices.
- Clean excess polish with acetone.
- Seal with a glossy top coat.
Color Suggestions
- Cocktail Mix: Yellow piña colada, pink daiquiri, green mojito.
- Soft Pop: Pastel yellow, coral, mint drinks.
- Bold Contrast: Neon yellow, red, green drinks.
Tips for Success
- Practice drink designs on paper.
- Use a fine brush for precision.
- Keep designs small for detail.
- Use a glossy top coat for shine.
Creative Variations
- Add drinks to accent nails only.
- Use glitter polish for drinks.
- Create a gradient white base.
- Pair with tiny umbrella decals.
This manicure pairs with beachwear or bright accessories, radiating summer fun. Maintain by touching up designs and refreshing the top coat. Tropical Drink-Inspired Nails are a lively vacation choice.
Your summer vacation isn’t complete without a nail design that reflects your mood, your destination, and your sense of adventure. Whether you choose bold tropical prints, ocean-inspired textures, or elegant neutral tones with a twist, your nails can bring that vacation mindset with you everywhere.
In a world that often moves too fast, summer invites us to pause, indulge, and express ourselves freely. Nail art is a small yet meaningful way to do just that. So as you pack your bags and plan your itinerary, don’t forget the polish—you never know when the perfect nail design might become your favorite memory.