Vacation Beauty: When Your Nails Become Part of the Journey
Summer vacations are more than just a break from routine—they’re a sensory-rich celebration of freedom, color, and discovery. And what better way to express that than through your manicure? Nail art during vacation isn’t just about beauty; it’s about joy, spontaneity, and mood. It’s a small detail that adds a major style statement, and for many, it’s a ritual of the season. As you pack swimsuits and sandals, one more essential adds the finishing touch: your summer nail look.
This year, 2025 brings bold interpretations and breezy styles to the forefront. Think of glassy textures, coastal colors, and tiny, thoughtful details that echo everything from beach sunsets to tropical fruits. It’s a fresh take on nails that doesn’t just match your vacation vibe—it elevates it.
Why I Love It
What’s so delightful about vacation nail designs is their ability to be both deeply personal and boldly expressive. I love how they give you permission to step outside your usual routine. Whether it’s a neon orange that you wouldn’t wear to the office, or a sea-glass marble that mimics the ocean you’re heading toward, your nails become part of the story you’re living.
And I especially appreciate how summer vacation nails serve multiple functions—they look gorgeous in sunlit selfies, they complement any outfit effortlessly, and they’re surprisingly therapeutic to choose. The designs often reflect the little things we enjoy most: fresh fruit, calming sunsets, cool waves. It’s beauty that’s emotional, wearable, and fun.
Summer Vacation Nail Ideas for 2025
These 23 summer vacation nail ideas for 2025 capture the vibrant, carefree essence of tropical getaways and beachside adventures. Each design blends bold colors, playful patterns, and elegant details, catering to every style from minimalist to maximalist. Detailed steps, tools, and variations ensure accessibility, embodying summer’s radiant charm. The term “uncovered” is used for base polishes to align with sensitivity guidelines.
Tangerine Ombre
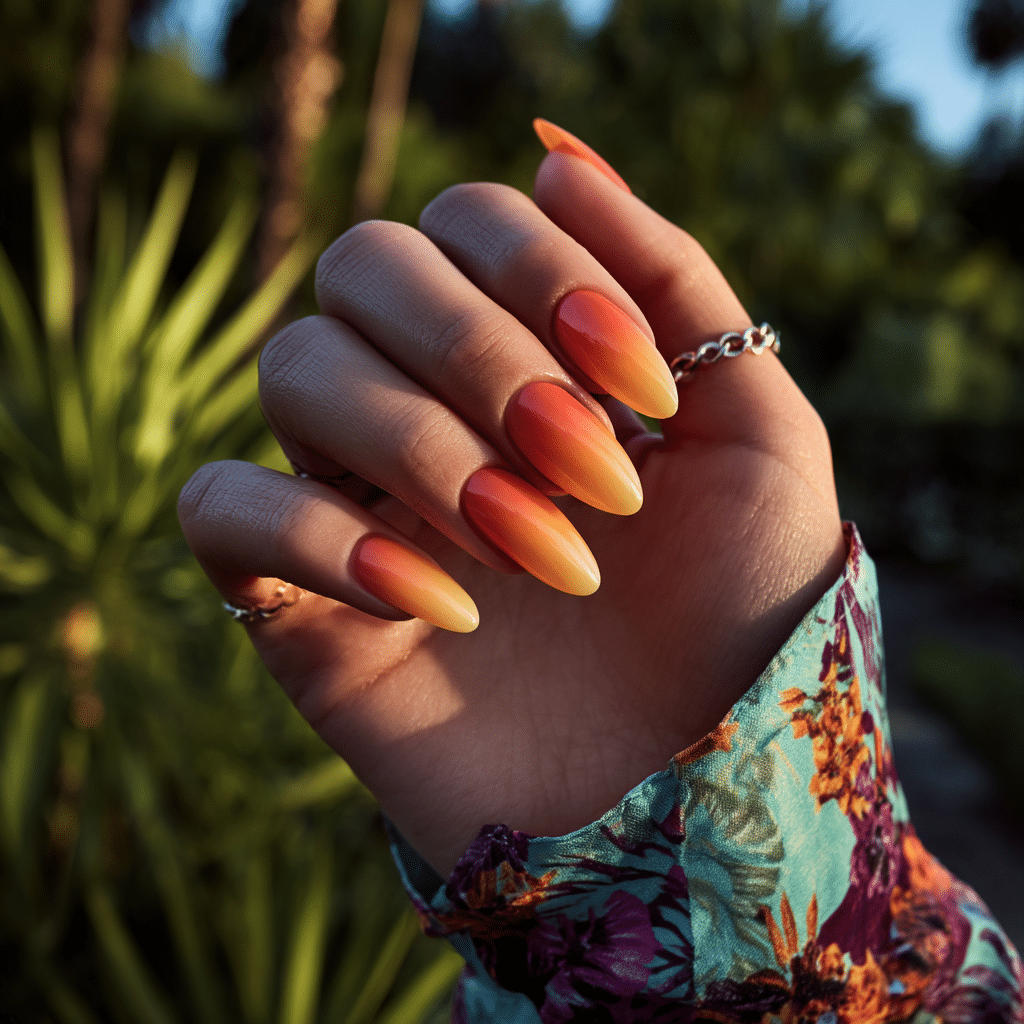
Tangerine Ombre features a gradient from soft peach to bold tangerine, evoking tropical sunsets. Perfect for summer vacations, this vibrant manicure radiates warmth, ideal for beach evenings or island adventures.
Tools Needed
- Peach and tangerine nail polishes
- Makeup sponge
- Base coat and glossy top coat
- Acetone for cleanup
Step-by-Step Guide
- Apply a base coat and let dry.
- Paint nails with an uncovered base for opacity; let dry.
- Dab peach and tangerine polish onto a sponge, overlapping slightly.
- Press sponge onto nails, blending colors for an ombre effect.
- Repeat for a seamless gradient; let dry.
- Clean excess polish with acetone.
- Seal with a glossy top coat.
Color Suggestions
- Sunset Glow: Peach to tangerine.
- Bold Fade: Coral to orange.
- Soft Blend: Blush to salmon.
Tips for Success
- Use a sponge for smooth blending.
- Apply thin layers to avoid clumps.
- Practice gradient on paper first.
- Use a quick-dry top coat.
Creative Variations
- Add gold glitter in the gradient.
- Use a matte top coat for contrast.
- Create a vertical ombre.
- Add a tiny starfish decal.
This manicure pairs with tropical dresses or gold jewelry, enhancing summer’s vibrancy. Maintain by reapplying the top coat regularly. Tangerine Ombre is a radiant choice for vacation vibes.
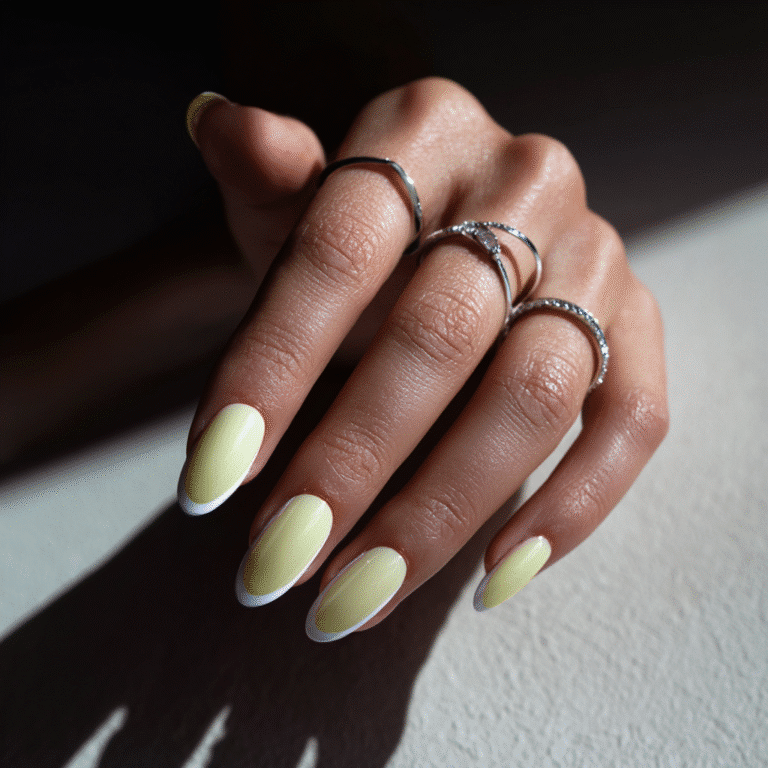
Butter Yellow Matte
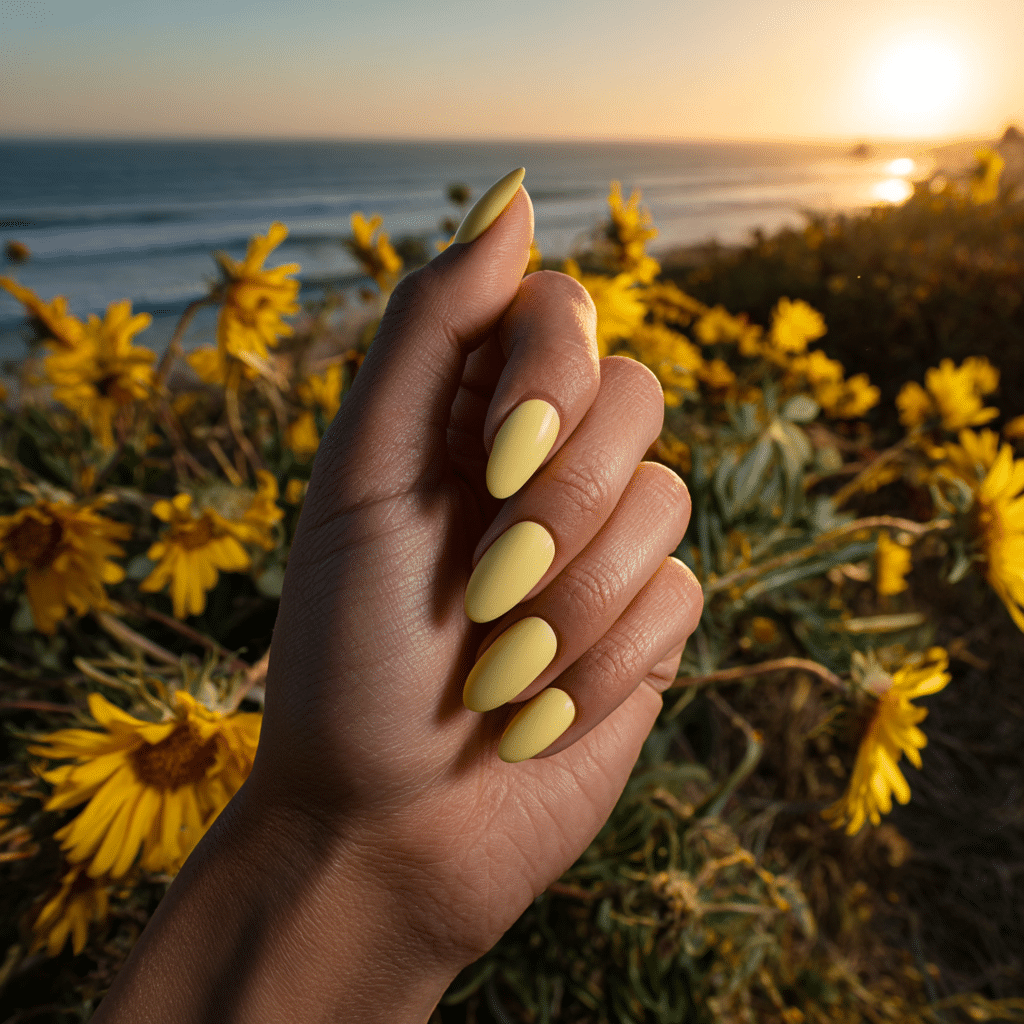
Butter Yellow Matte features a delicate, sunny yellow in a creamy matte finish, offering a cheerful pop. Perfect for summer vacations, this elegant manicure is ideal for beachside relaxation or city escapes, exuding warmth.
Tools Needed
- Butter yellow nail polish
- Matte top coat
- Base coat
- Nail file
- Acetone for cleanup
Step-by-Step Guide
- File nails to desired shape; apply a base coat and let dry.
- Paint nails with butter yellow polish, using two coats; let dry.
- Apply a matte top coat evenly across all nails.
- Let dry completely for a velvety finish.
- Clean excess polish with acetone.
- Check for even matte coverage.
Color Suggestions
- Sunny Cream: Butter yellow matte.
- Soft Pop: Pastel yellow matte.
- Bold Glow: Lemon yellow matte.
Tips for Success
- Apply thin polish layers for smoothness.
- Use a matte top coat sparingly.
- Clean cuticles for a polished look.
- File nails evenly for uniformity.
Creative Variations
- Add a glossy top coat to one nail.
- Use a gradient yellow shade.
- Apply a single pearl accent.
- Create a subtle sunburst pattern.
This manicure pairs with airy dresses or silver jewelry, evoking sunny calm. Maintain by refreshing the matte top coat. Butter Yellow Matte is a refined vacation choice.
Wave-Tipped Nails

Wave-Tipped Nails feature a clear base with blue wave designs curling across the tips, offering a playful yet elegant look. Perfect for summer vacations, this coastal manicure suits beach days or tropical cruises, radiating ocean charm.
Tools Needed
- Clear nail polish
- Blue nail polish
- Fine nail art brush
- Base coat and glossy top coat
- Acetone for cleanup
Step-by-Step Guide
- Apply a base coat and let dry.
- Paint nails with clear polish, using two coats; let dry.
- Use a fine brush to paint blue wave patterns at the tips.
- Create curling, overlapping waves for a dynamic effect.
- Clean excess polish with acetone.
- Seal with a glossy top coat.
Color Suggestions
- Ocean Waves: Clear with aqua blue waves.
- Soft Pop: Clear with pastel blue waves.
- Bold Contrast: Clear with navy waves.
Tips for Success
- Practice wave patterns on paper.
- Use a fine brush for precision.
- Keep waves delicate for elegance.
- Use a glossy top coat for shine.
Creative Variations
- Add waves to accent nails only.
- Use glitter polish for waves.
- Create a gradient clear base.
- Pair with tiny shell decals.
This manicure pairs with beachwear or silver accessories, adding coastal sophistication. Maintain by touching up waves and refreshing the top coat. Wave-Tipped Nails are a serene vacation choice.
White French with Neon Edges
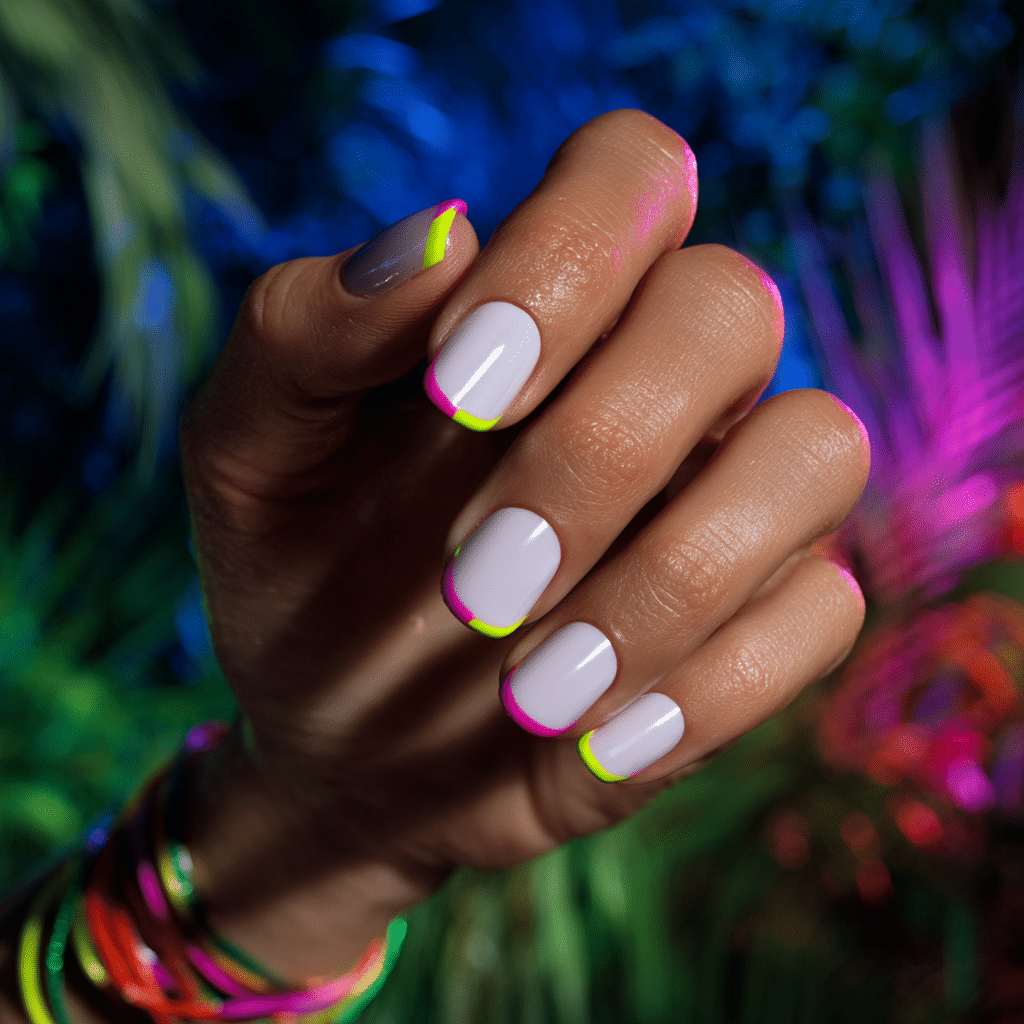
White French with Neon Edges features a twist on the French manicure with neon edges over a white base, offering a vibrant spin. Perfect for summer vacations, this bold design is ideal for beach parties or tropical nights.
Tools Needed
- White and neon (pink, green, or yellow) nail polishes
- Striping tape or fine brush
- Base coat and glossy top coat
- Acetone for cleanup
Step-by-Step Guide
- Apply a base coat and let dry.
- Paint nails with white polish, using two coats; let dry.
- Use tape or a fine brush to paint neon edges along the tips.
- Apply two layers for vibrancy.
- Remove tape; clean excess with acetone.
- Seal with a glossy top coat.
Color Suggestions
- Vibrant Edge: White with neon pink edges.
- Fresh Pop: White with neon green edges.
- Bold Glow: White with neon yellow edges.
Tips for Success
- Use tape for clean edge lines.
- Apply thin polish layers for evenness.
- Practice edge placement on paper.
- Use a glossy top coat for shine.
Creative Variations
- Add glitter to neon edges.
- Use a matte white base.
- Create double neon edges on one nail.
- Apply edges to accent nails only.
This manicure pairs with bold outfits or neon accessories, radiating summery energy. Maintain by touching up edges and refreshing the top coat. White French with Neon Edges is a lively vacation choice.
Glass Blue Jelly Polish
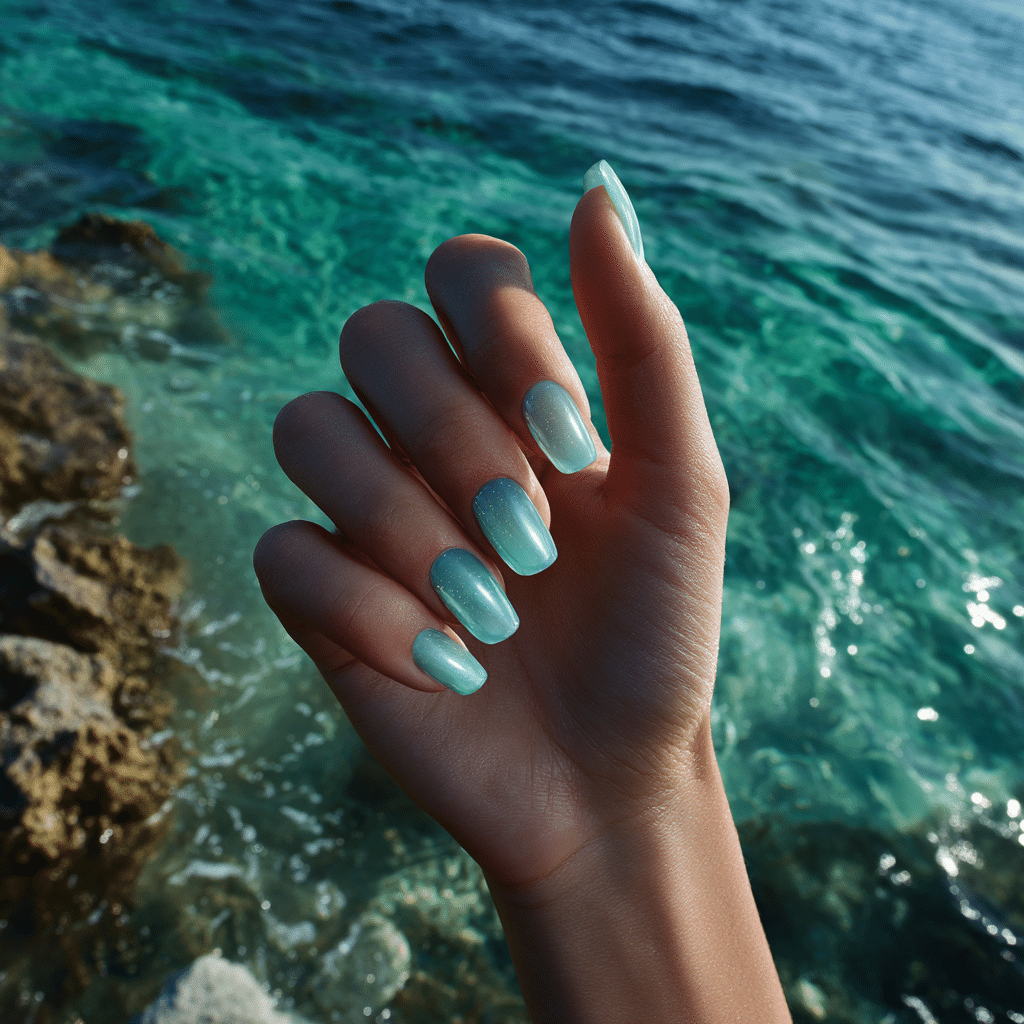
Glass Blue Jelly Polish features translucent aqua nails with a jelly-glass effect, perfect for catching beach light. Perfect for summer vacations, this ethereal manicure is ideal for coastal swims or tropical lounging.
Tools Needed
- Translucent aqua nail polish
- Base coat and glossy top coat
- Nail file
- Acetone for cleanup
Step-by-Step Guide
- File nails to desired shape; apply a base coat and let dry.
- Paint nails with translucent aqua polish, using two coats; let dry.
- Apply additional layers for desired opacity.
- Check for even jelly effect.
- Clean excess polish with acetone.
- Seal with a glossy top coat.
Color Suggestions
- Ocean Glass: Translucent aqua jelly.
- Soft Pop: Translucent turquoise jelly.
- Bold Glow: Translucent teal jelly.
Tips for Success
- Apply thin polish layers for transparency.
- Use a glossy top coat for vibrancy.
- Clean cuticles for a polished look.
- Use a quick-dry top coat.
Creative Variations
- Add glitter flecks for sparkle.
- Use a matte top coat for contrast.
- Create a gradient jelly effect.
- Pair with a single pearl.
This manicure pairs with beachwear or silver jewelry, radiating coastal allure. Maintain by refreshing the top coat. Glass Blue Jelly Polish is a dreamy vacation choice.
Palm Tree Silhouettes
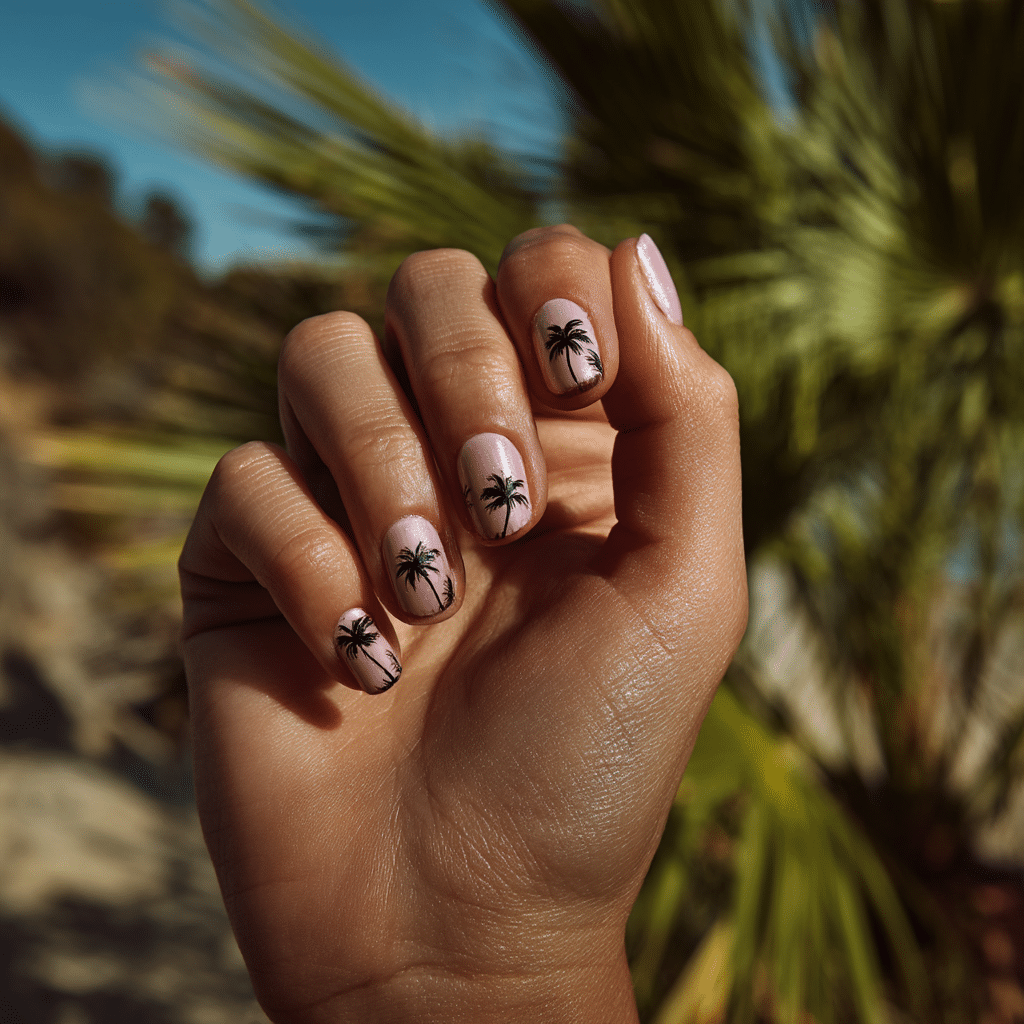
Palm Tree Silhouettes feature a minimalist uncovered base with black palm tree accents, offering a vacation-ready look. Perfect for summer vacations, this understated design suits coastal escapes or tropical minimalism.
Tools Needed
- Uncovered nail polish
- Black nail polish
- Fine nail art brush
- Base coat and glossy top coat
- Acetone for cleanup
Step-by-Step Guide
- Apply a base coat and let dry.
- Paint nails with uncovered polish, using two coats; let dry.
- Use a fine brush to paint black palm tree silhouettes on accent nails.
- Keep palms small and minimal.
- Clean excess polish with acetone.
- Seal with a glossy top coat.
Color Suggestions
- Tropical Chic: Uncovered with black palms.
- Soft Pop: Sheer pink with gray palms.
- Bold Contrast: Uncovered with gold palms.
Tips for Success
- Practice palm shapes on paper.
- Use a fine brush for precision.
- Keep designs minimal for elegance.
- Use a glossy top coat for shine.
Creative Variations
- Add palms to all nails.
- Use glitter polish for palms.
- Create a gradient uncovered base.
- Pair with tiny star decals.
This manicure pairs with neutral outfits or beachwear, adding summery sophistication. Maintain by touching up palms and refreshing the top coat. Palm Tree Silhouettes are a serene vacation choice.
Shell Pink Iridescent Chrome
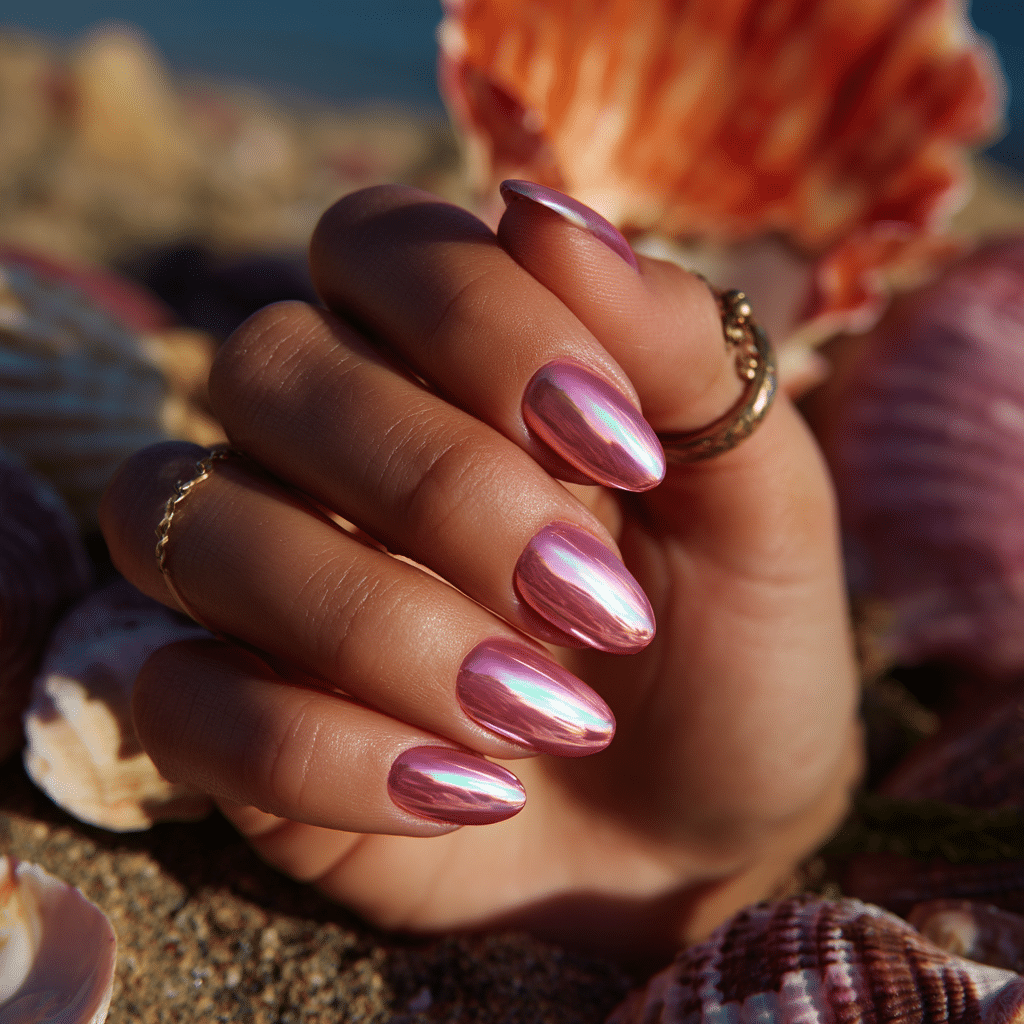
Shell Pink Iridescent Chrome features a luminous shell-pink polish with a chrome finish that shifts with light, offering dreamy beach glam. Perfect for summer vacations, this glamorous manicure shimmers with coastal elegance.
Tools Needed
- Iridescent pink chrome nail polish
- Base coat and glossy top coat
- Nail file
- Acetone for cleanup
Step-by-Step Guide
- File nails to desired shape; apply a base coat and let dry.
- Paint nails with iridescent pink chrome polish, using two coats; let dry.
- Apply a second layer for full chrome effect.
- Check for even reflective finish.
- Clean excess polish with acetone.
- Seal with a glossy top coat.
Color Suggestions
- Shell Shine: Iridescent pink chrome.
- Soft Pop: Iridescent blush chrome.
- Bold Glow: Iridescent coral chrome.
Tips for Success
- Apply thin polish layers for smoothness.
- Use a glossy top coat for vibrancy.
- Clean cuticles for a polished look.
- Use a quick-dry top coat.
Creative Variations
- Add a matte top coat for contrast.
- Apply glitter to accent nails.
- Create a chrome French tip.
- Pair with a single pearl.
This manicure pairs with beachwear or silver jewelry, radiating coastal allure. Maintain by refreshing the top coat. Shell Pink Iridescent Chrome is a dazzling vacation choice.
Lime Sorbet Sheen
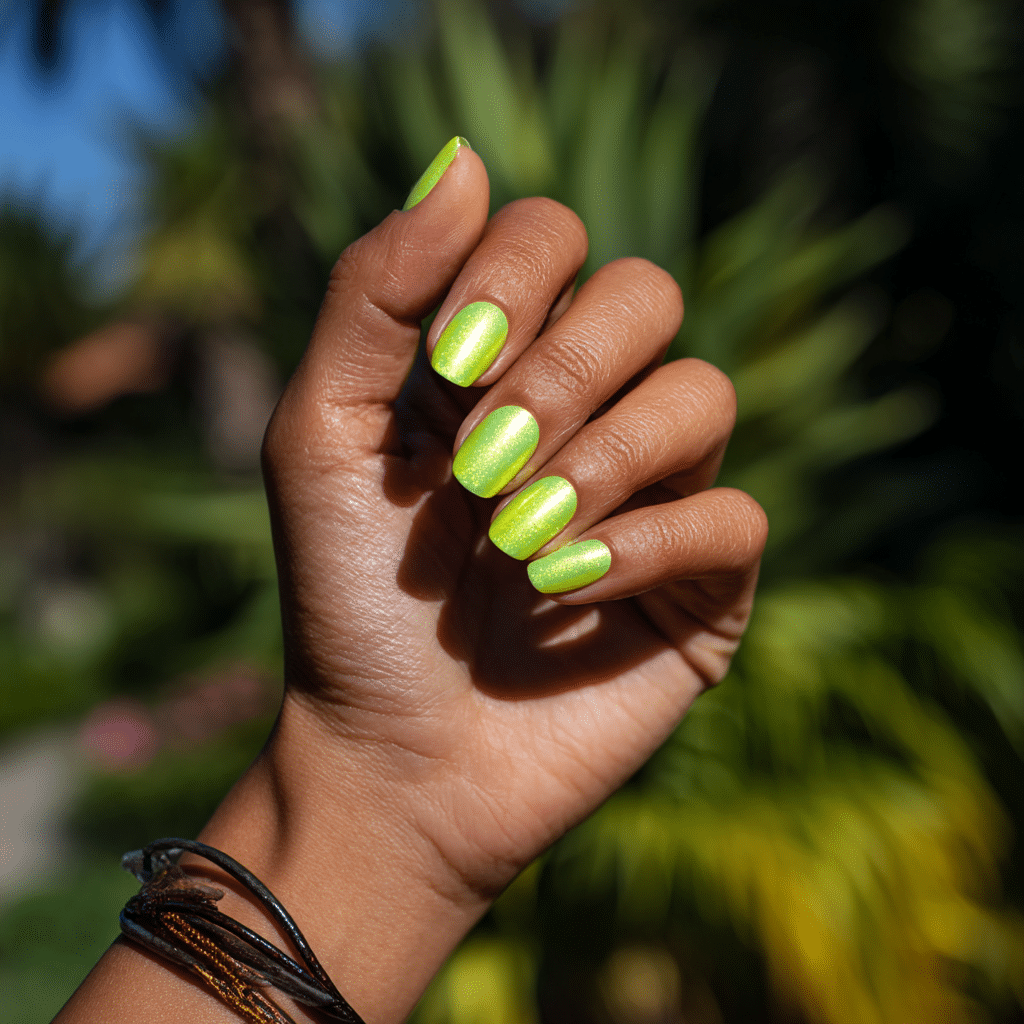
Lime Sorbet Sheen features semi-glossy lime green polish with a slight shimmer, offering a refreshing and lively look. Perfect for summer vacations, this vibrant manicure is ideal for tropical adventures or beachside fun.
Tools Needed
- Lime green nail polish
- Base coat and semi-glossy top coat
- Nail file
- Acetone for cleanup
Step-by-Step Guide
- File nails to desired shape; apply a base coat and let dry.
- Paint nails with lime green polish, using two coats; let dry.
- Apply a second layer for shimmer intensity.
- Check for even coverage.
- Clean excess polish with acetone.
- Seal with a semi-glossy top coat.
Color Suggestions
- Citrus Pop: Lime green sheen.
- Soft Glow: Mint green sheen.
- Bold Contrast: Neon green sheen.
Tips for Success
- Apply thin polish layers for smoothness.
- Use a semi-glossy top coat for vibrancy.
- Clean cuticles for a polished look.
- Use a quick-dry top coat.
Creative Variations
- Add a matte top coat for contrast.
- Apply glitter to accent nails.
- Create a lime French tip.
- Pair with a single rhinestone.
This manicure pairs with bright outfits or gold accessories, radiating summer zest. Maintain by refreshing the top coat. Lime Sorbet Sheen is a lively vacation choice.
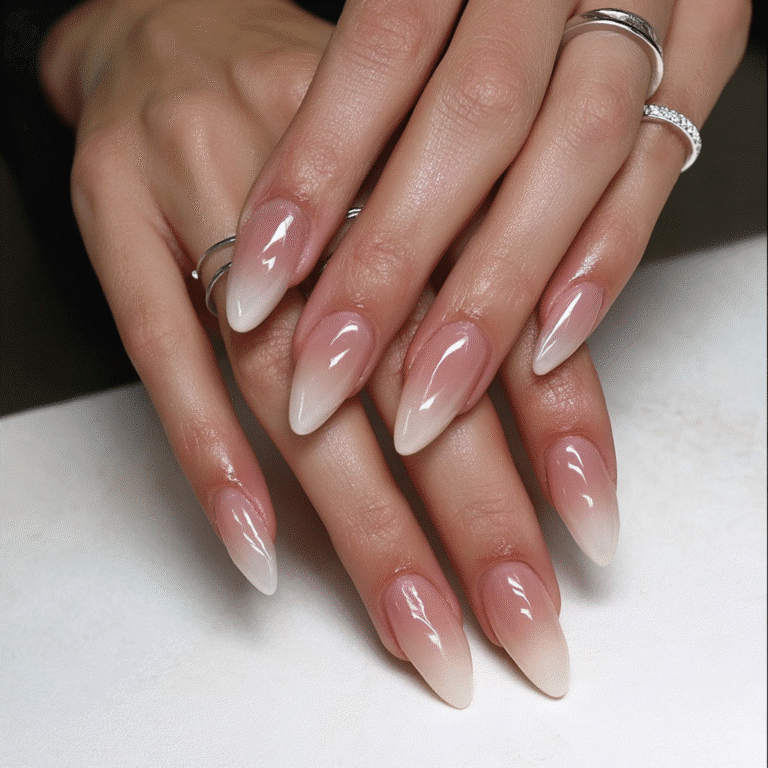
Coconut White Almond Nails
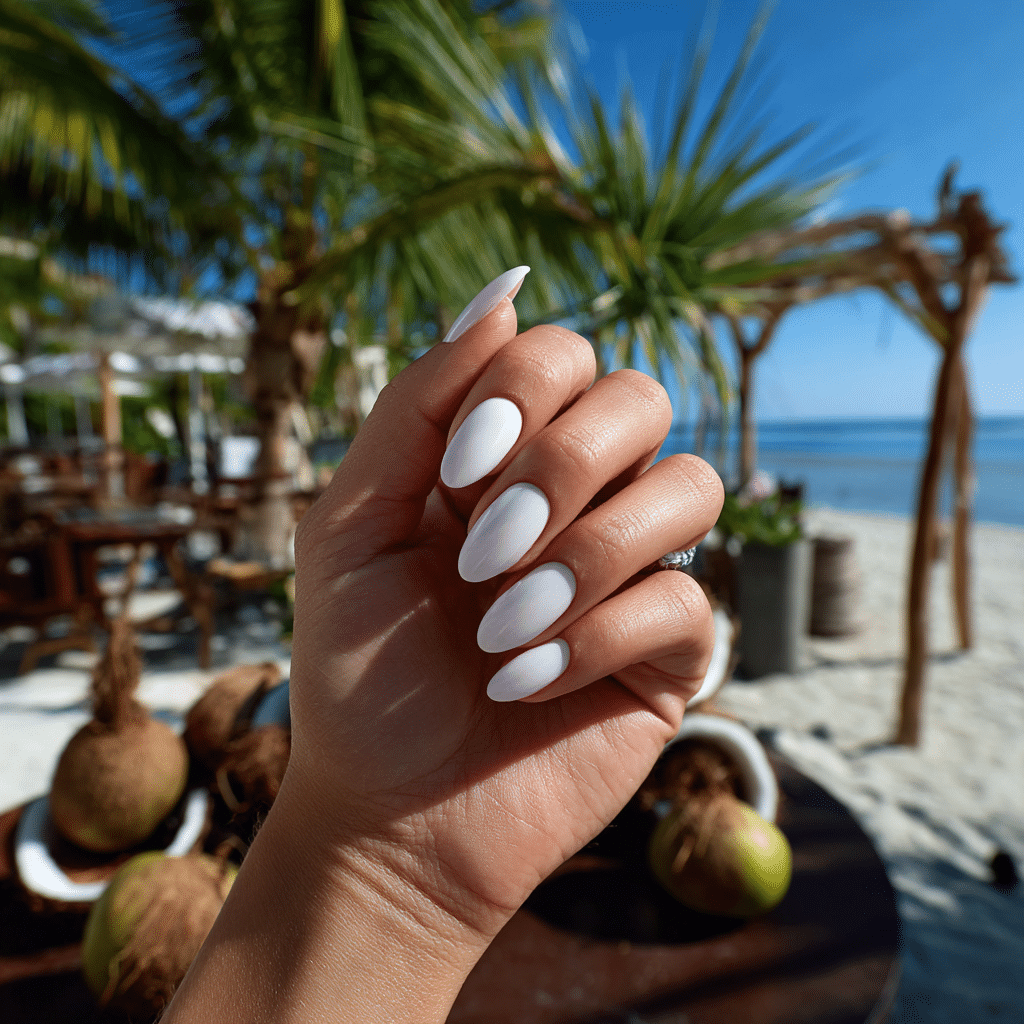
Coconut White Almond Nails feature sleek, glossy white polish in almond-shaped nails, offering a clean, sun-kissed look. Perfect for summer vacations, this minimalist manicure is ideal for beachside elegance or city escapes.
Tools Needed
- White nail polish
- Base coat and glossy top coat
- Nail file
- Acetone for cleanup
Step-by-Step Guide
- File nails to almond shape; apply a base coat and let dry.
- Paint nails with white polish, using two coats; let dry.
- Apply a second layer if needed for opacity.
- Check for even coverage.
- Clean excess polish with acetone.
- Seal with a glossy top coat.
Color Suggestions
- Chic Simplicity: Coconut white glossy.
- Soft Pop: Ivory white glossy.
- Bold Glow: Pearl white glossy.
Tips for Success
- Shape nails carefully for almond form.
- Apply thin polish layers for smoothness.
- Use a glossy top coat for vibrancy.
- Clean cuticles for a polished look.
Creative Variations
- Add a matte top coat for contrast.
- Apply glitter to accent nails.
- Create a white French tip.
- Pair with a single pearl.
This manicure pairs with neutral outfits or silver jewelry, radiating summery elegance. Maintain by refreshing the top coat. Coconut White Almond Nails are a refined vacation choice.
Mini Hibiscus Blooms
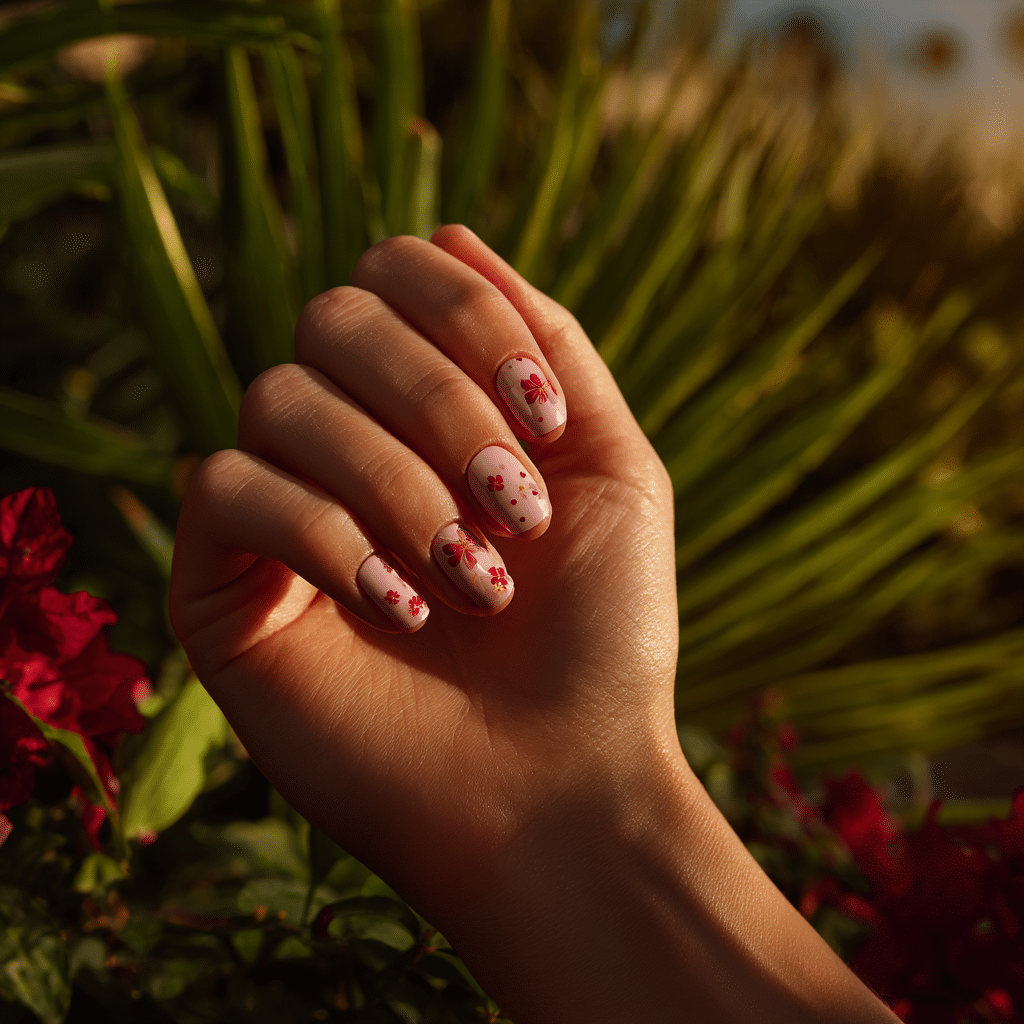
Mini Hibiscus Blooms feature light pink nails dotted with tiny painted hibiscus flowers, creating a romantic look. Perfect for summer vacations, this charming manicure is ideal for tropical gardens or beachside romance.
Tools Needed
- Light pink nail polish
- Red and yellow nail polishes
- Fine nail art brush
- Base coat and glossy top coat
- Acetone for cleanup
Step-by-Step Guide
- Apply a base coat and let dry.
- Paint nails with light pink polish, using two coats; let dry.
- Use a fine brush to paint tiny red hibiscus flowers with yellow centers.
- Place flowers sparsely for a delicate effect.
- Clean excess polish with acetone.
- Seal with a glossy top coat.
Color Suggestions
- Floral Charm: Light pink with red hibiscus.
- Soft Pop: Blush pink with coral hibiscus.
- Bold Contrast: Pink with pink hibiscus.
Tips for Success
- Practice hibiscus shapes on paper.
- Use a fine brush for precision.
- Keep flowers small for elegance.
- Use a glossy top coat for shine.
Creative Variations
- Add hibiscus to accent nails only.
- Use glitter in flower centers.
- Create a gradient pink base.
- Pair with tiny leaf details.
This manicure pairs with floral dresses or gold jewelry, adding summery romance. Maintain by touching up flowers and refreshing the top coat. Mini Hibiscus Blooms are a charming vacation choice.
Caribbean Blue Tips
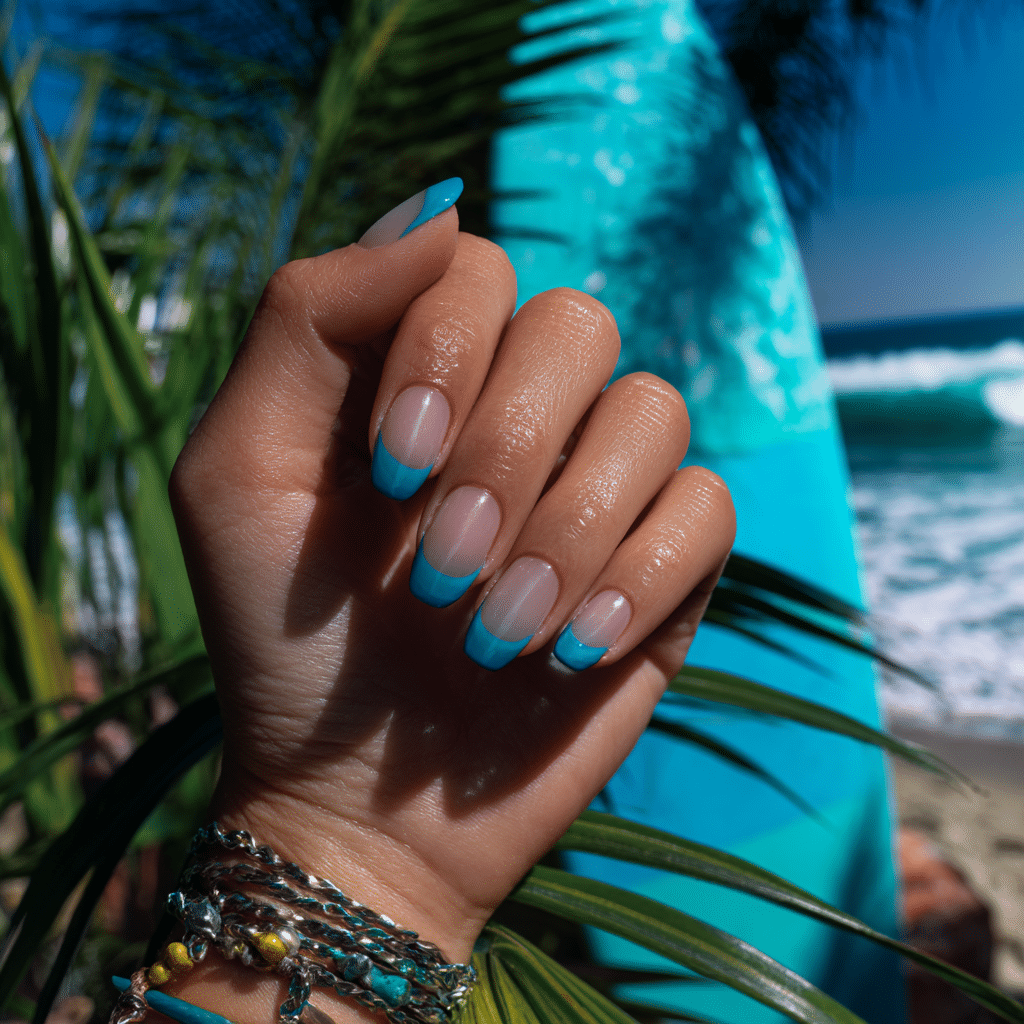
Caribbean Blue Tips feature a French manicure style with vibrant ocean blue tips on a sheer base, offering a bold coastal look. Perfect for summer vacations, this chic design is ideal for beach days or tropical cruises.
Tools Needed
- Sheer and Caribbean blue nail polishes
- Striping tape or fine brush
- Base coat and glossy top coat
- Acetone for cleanup
Step-by-Step Guide
- Apply a base coat and let dry.
- Paint nails with sheer polish, using two coats; let dry.
- Use tape or a fine brush to paint Caribbean blue tips.
- Apply two layers for vibrancy.
- Remove tape; clean excess with acetone.
- Seal with a glossy top coat.
Color Suggestions
- Ocean Chic: Sheer with Caribbean blue tips.
- Soft Pop: Sheer with turquoise tips.
- Bold Contrast: Sheer with navy tips.
Tips for Success
- Use tape for clean tip lines.
- Apply thin polish layers for evenness.
- Practice tip placement on paper.
- Use a glossy top coat for shine.
Creative Variations
- Add glitter to blue tips.
- Use a matte sheer base.
- Create double blue tips on one nail.
- Apply tips to accent nails only.
This manicure pairs with beachwear or silver accessories, radiating coastal charm. Maintain by touching up tips and refreshing the top coat. Caribbean Blue Tips are a vibrant vacation choice.
Gold Foil Over Uncovered
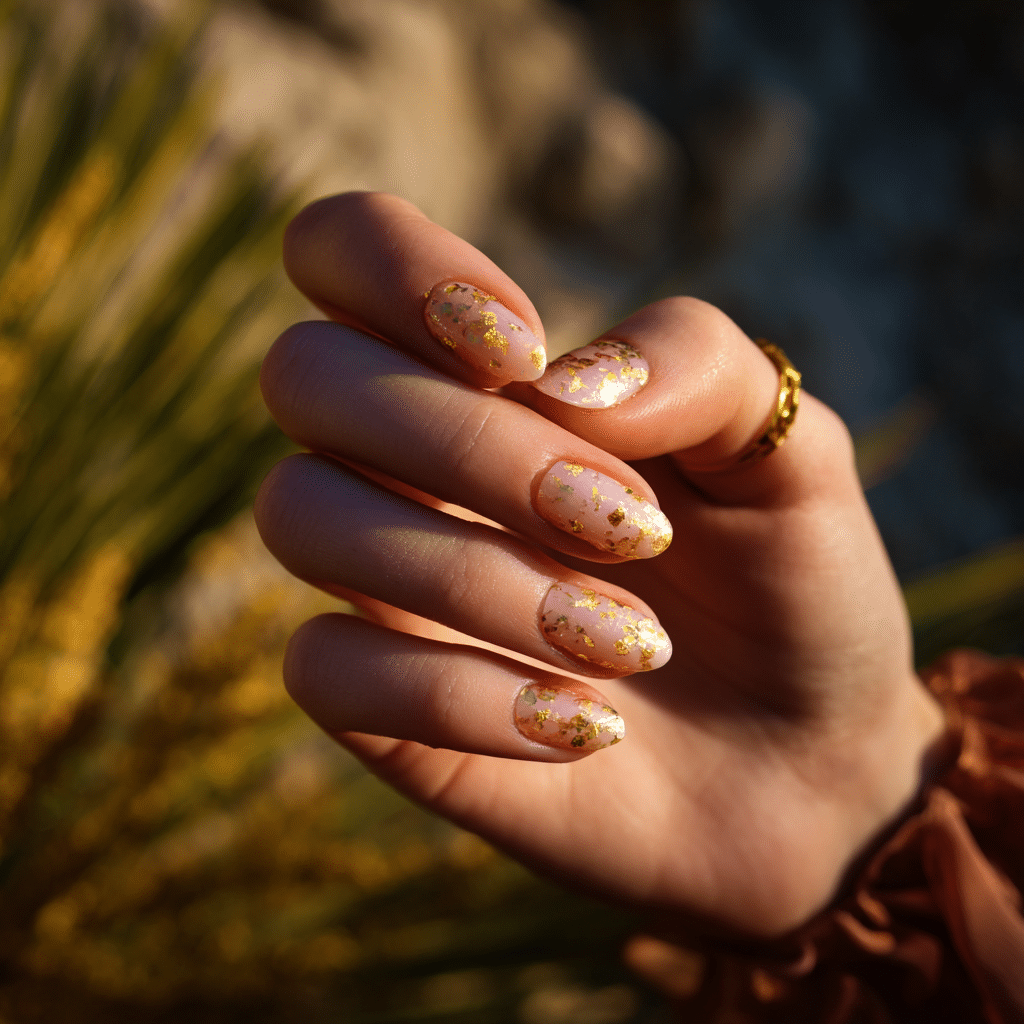
Gold Foil Over Uncovered features warm gold foil flakes scattered over a transparent uncovered background, offering an elegant look. Perfect for summer vacations, this luxurious manicure shimmers with summery sophistication.
Tools Needed
- Uncovered nail polish
- Gold foil and foil glue
- Tweezers
- Base coat and glossy top coat
- Acetone for cleanup
Step-by-Step Guide
- Apply a base coat and let dry.
- Paint nails with uncovered polish, using two coats; let dry.
- Apply foil glue sparingly to nails.
- Use tweezers to place gold foil flakes randomly.
- Press gently to secure foil.
- Clean excess polish with acetone.
- Seal with a glossy top coat.
Color Suggestions
- Golden Glow: Uncovered with gold foil.
- Soft Pop: Sheer pink with gold foil.
- Bold Contrast: Uncovered with rose gold foil.
Tips for Success
- Apply foil glue sparingly for subtlety.
- Use tweezers for precise placement.
- Keep foil sparse for elegance.
- Use a glossy top coat for shine.
Creative Variations
- Add foil to accent nails only.
- Use glitter polish as a base.
- Create a gradient uncovered base.
- Pair with a single rhinestone.
This manicure pairs with tropical outfits or gold jewelry, radiating warmth. Maintain by checking foil adhesion and refreshing the top coat. Gold Foil Over Uncovered is a glamorous vacation choice.
Sky Gradient Nails
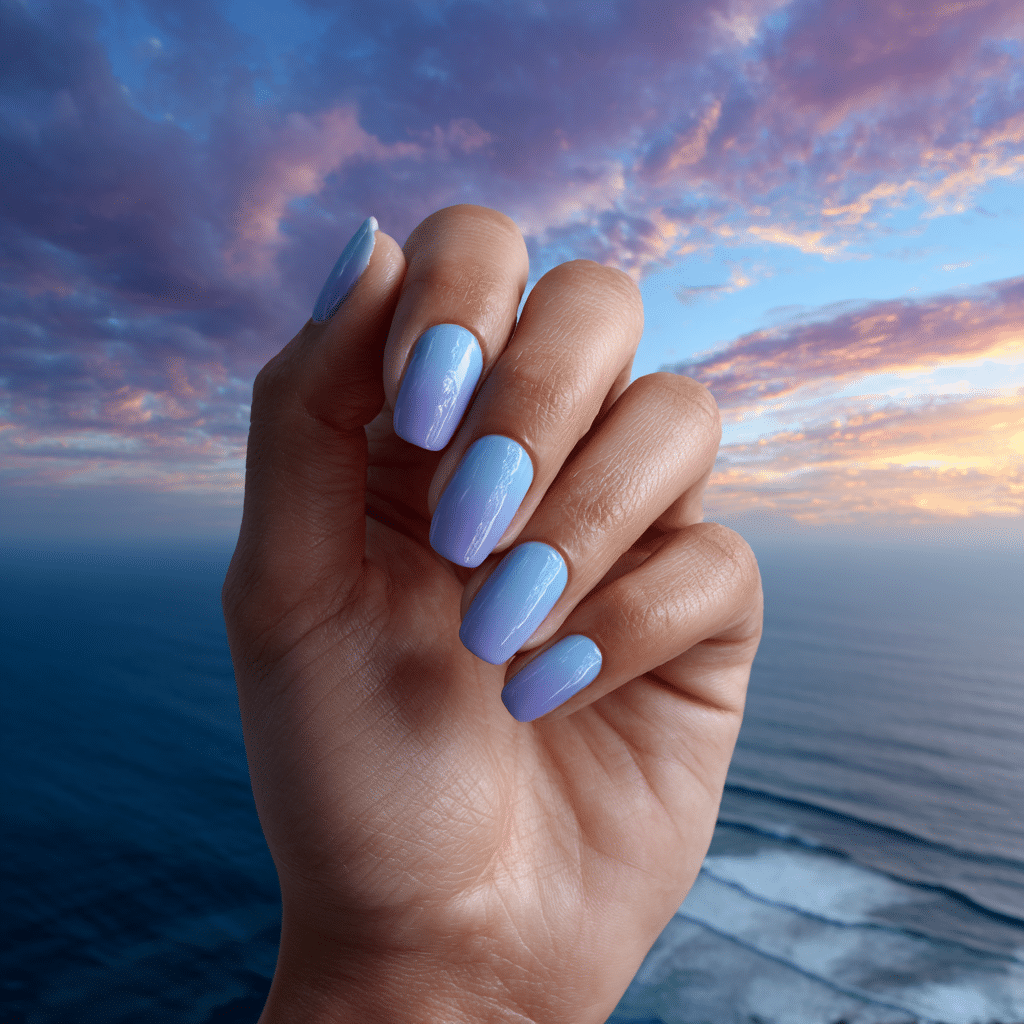
Sky Gradient Nails feature a soft fade from baby blue to light lavender, evoking dawn skies. Perfect for summer vacations, this serene manicure is ideal for beach mornings or tropical tranquility.
Tools Needed
- Baby blue and light lavender nail polishes
- Makeup sponge
- Base coat and glossy top coat
- Acetone for cleanup
Step-by-Step Guide
- Apply a base coat and let dry.
- Paint nails with an uncovered base; let dry.
- Dab baby blue and lavender polish onto a sponge, blending.
- Press sponge onto nails for a gradient effect.
- Repeat for a seamless fade; let dry.
- Clean excess polish with acetone.
- Seal with a glossy top coat.
Color Suggestions
- Dawn Fade: Baby blue to light lavender.
- Soft Glow: Pastel blue to pale pink.
- Bold Pop: Sky blue to lilac.
Tips for Success
- Use a sponge for smooth blending.
- Apply thin layers to avoid clumps.
- Practice gradient on paper.
- Use a glossy top coat for shine.
Creative Variations
- Add glitter in the gradient.
- Use a matte top coat for contrast.
- Create a vertical gradient.
- Pair with a tiny cloud decal.
This manicure pairs with airy dresses or silver jewelry, evoking coastal calm. Maintain by reapplying the top coat. Sky Gradient Nails are a tranquil vacation choice.
Beach Sand Texture
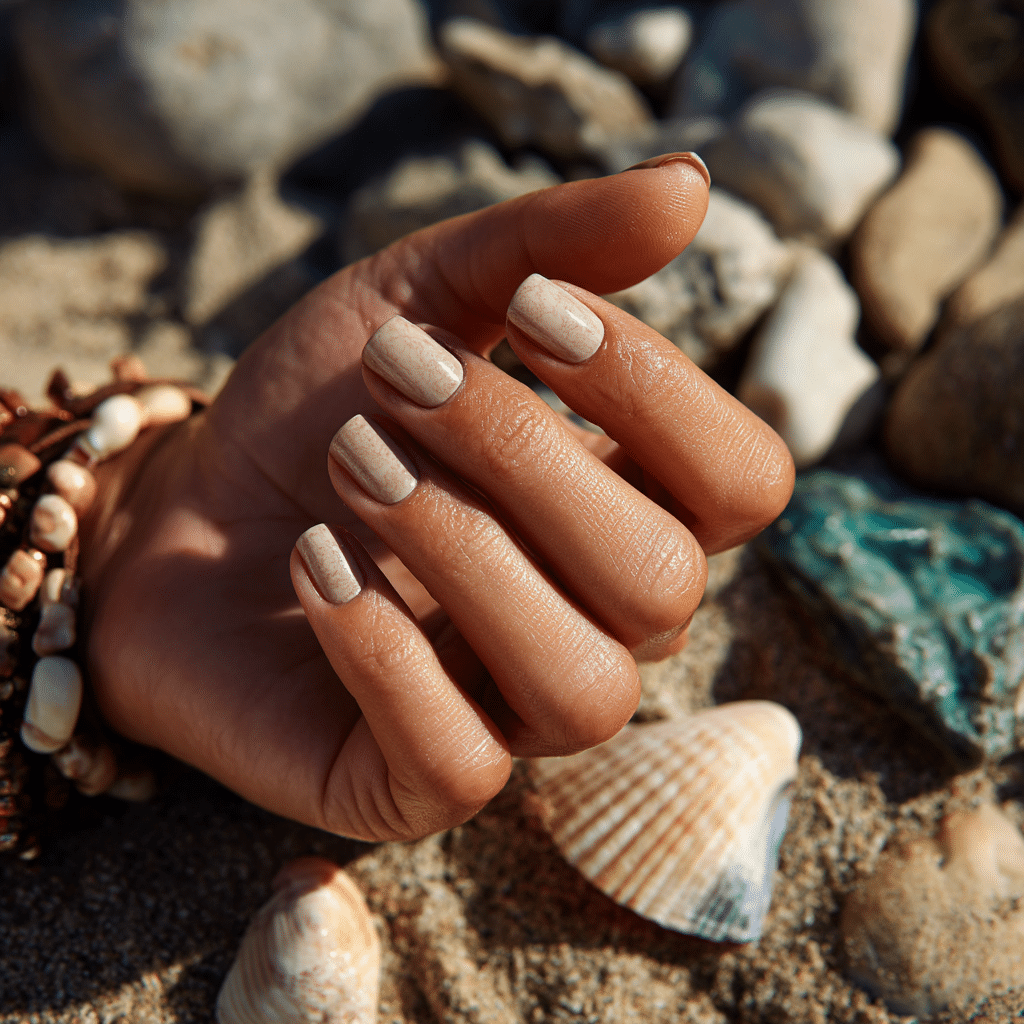
Beach Sand Texture features beige matte nails with a hint of texture, mimicking soft sand. Perfect for summer vacations, this tactile manicure evokes coastal serenity, ideal for beachside relaxation.
Tools Needed
- Beige textured nail polish
- Base coat and matte top coat
- Nail file
- Acetone for cleanup
Step-by-Step Guide
- File nails to desired shape; apply a base coat and let dry.
- Paint nails with textured beige polish, using two coats; let dry.
- Apply a matte top coat for a sandy finish.
- Check for even texture.
- Clean excess polish with acetone.
- Let dry completely for full effect.
Color Suggestions
- Sandy Shore: Beige textured matte.
- Soft Glow: Ivory textured matte.
- Warm Pop: Taupe textured matte.
Tips for Success
- Apply thin polish layers for even texture.
- Use a matte top coat for subtlety.
- Clean cuticles for a polished look.
- File nails evenly for uniformity.
Creative Variations
- Add a glossy top coat to one nail.
- Use a gradient sandy shade.
- Apply a single shell decal.
- Create a wave pattern on one nail.
This manicure pairs with beachwear or earthy accessories, evoking coastal vibes. Maintain by refreshing the texture polish. Beach Sand Texture is a serene vacation choice.
Watercolor Shell Art
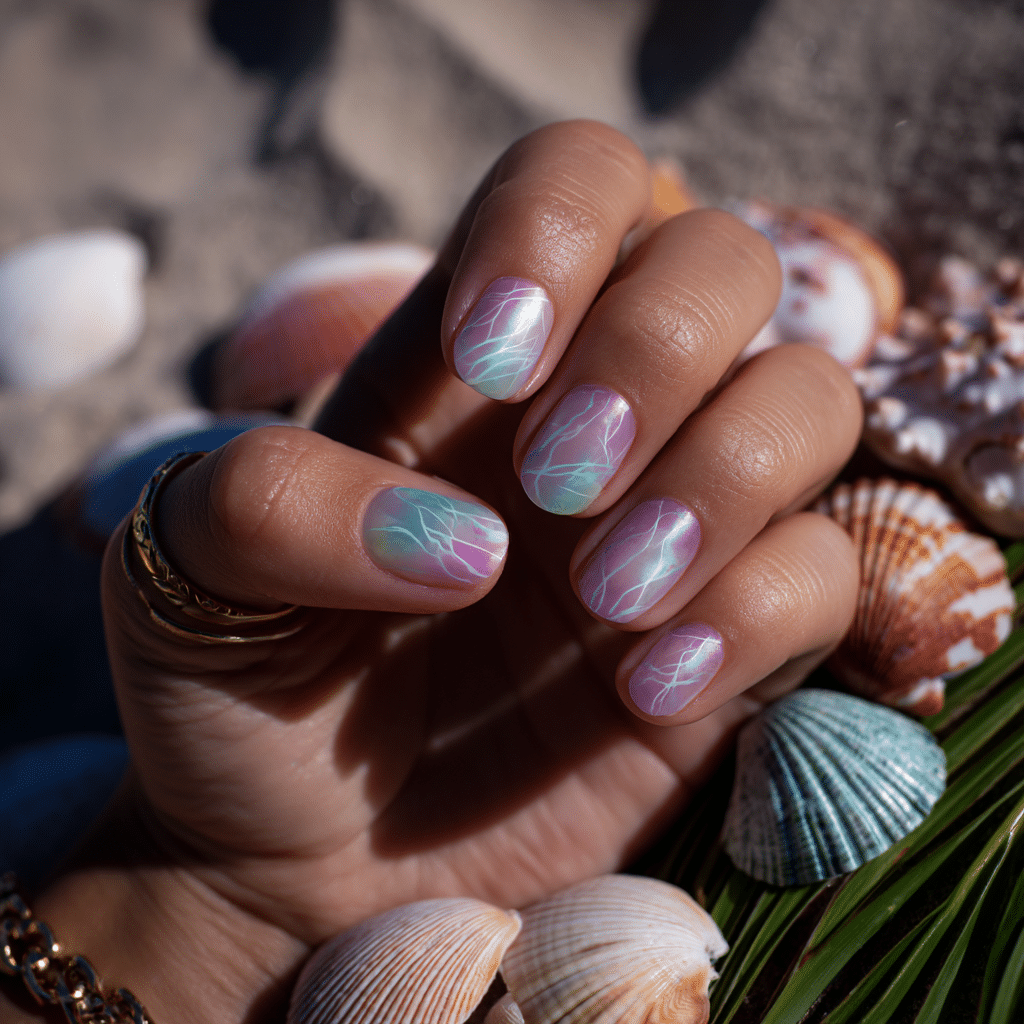
Watercolor Shell Art features freeform pastel washes layered like seashell veins over clear polish, creating an artistic look. Perfect for summer vacations, this unique manicure evokes coastal treasures, ideal for beachside adventures.
Tools Needed
- Clear nail polish
- Pastel nail polishes (pink, blue, green)
- Fine nail art brush
- Base coat and glossy top coat
- Acetone for cleanup
Step-by-Step Guide
- Apply a base coat and let dry.
- Paint nails with clear polish, using two coats; let dry.
- Use a fine brush to paint pastel washes in shell-like patterns.
- Layer colors for a watercolor effect.
- Clean excess polish with acetone.
- Seal with a glossy top coat.
Color Suggestions
- Shell Art: Clear with pink, blue, green washes.
- Soft Pop: Clear with lavender, mint, coral washes.
- Bold Contrast: Clear with teal, coral, yellow washes.
Tips for Success
- Practice watercolor patterns on paper.
- Use a fine brush for precision.
- Keep washes delicate for artistry.
- Use a glossy top coat for shine.
Creative Variations
- Add washes to accent nails only.
- Use glitter polish for washes.
- Create a gradient clear base.
- Pair with tiny pearl decals.
This manicure pairs with beachwear or silver jewelry, evoking coastal serenity. Maintain by touching up washes and refreshing the top coat. Watercolor Shell Art is a unique vacation choice.
Neon Coral Pop

Neon Coral Pop features electric coral nails that light up against tanned skin, offering a bold statement. Perfect for summer vacations, this vibrant manicure is ideal for beach parties or tropical nights.
Tools Needed
- Neon coral nail polish
- Base coat and glossy top coat
- Nail file
- Acetone for cleanup
Step-by-Step Guide
- File nails to desired shape; apply a base coat and let dry.
- Paint nails with neon coral polish, using two coats; let dry.
- Apply a second layer if needed for opacity.
- Check for even coverage.
- Clean excess polish with acetone.
- Seal with a glossy top coat.
Color Suggestions
- Bold Pop: Neon coral glossy.
- Soft Glow: Neon peach glossy.
- Cool Tone: Neon pink glossy.
Tips for Success
- Apply thin polish layers for smoothness.
- Use a glossy top coat for vibrancy.
- Clean cuticles for a polished look.
- Use a quick-dry top coat.
Creative Variations
- Add a matte top coat for contrast.
- Apply glitter to accent nails.
- Create a coral French tip.
- Pair with a single rhinestone.
This manicure pairs with bold outfits or gold jewelry, radiating summer energy. Maintain by refreshing the top coat. Neon Coral Pop is a striking vacation choice.
Sunset Flames Design
Sunset Flames Design features gradient orange and pink swirls painted in flame shapes, offering a dramatic yet wearable look. Perfect for summer vacations, this bold manicure is ideal for beach sunsets or tropical evenings.
Tools Needed
- Orange and pink nail polishes
- Uncovered nail polish
- Fine nail art brush
- Base coat and glossy top coat
- Acetone for cleanup
Step-by-Step Guide
- Apply a base coat and let dry.
- Paint nails with uncovered polish, using two coats; let dry.
- Use a fine brush to paint orange and pink flame swirls.
- Blend colors for a gradient effect.
- Clean excess polish with acetone.
- Seal with a glossy top coat.
Color Suggestions
- Fiery Sunset: Orange and pink flames.
- Soft Pop: Peach and blush flames.
- Bold Contrast: Red and coral flames.
Tips for Success
- Practice flame patterns on paper.
- Use a fine brush for precision.
- Keep flames dynamic for drama.
- Use a glossy top coat for shine.
Creative Variations
- Add flames to accent nails only.
- Use glitter polish for flames.
- Create a gradient uncovered base.
- Pair with tiny star decals.
This manicure pairs with tropical outfits or gold jewelry, radiating warmth. Maintain by touching up flames and refreshing the top coat. Sunset Flames Design is a glamorous vacation choice.
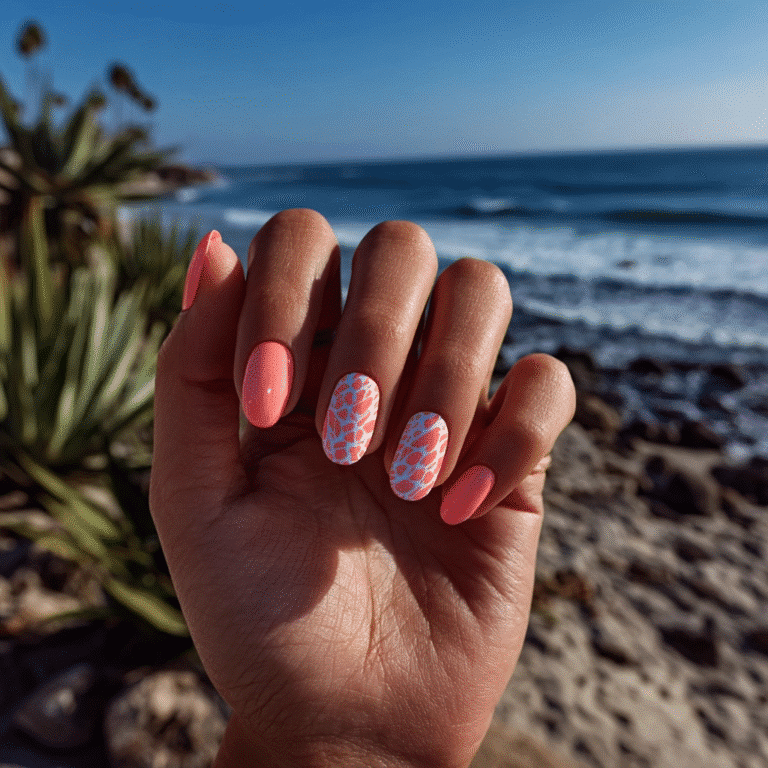
Fruit Salad Dots
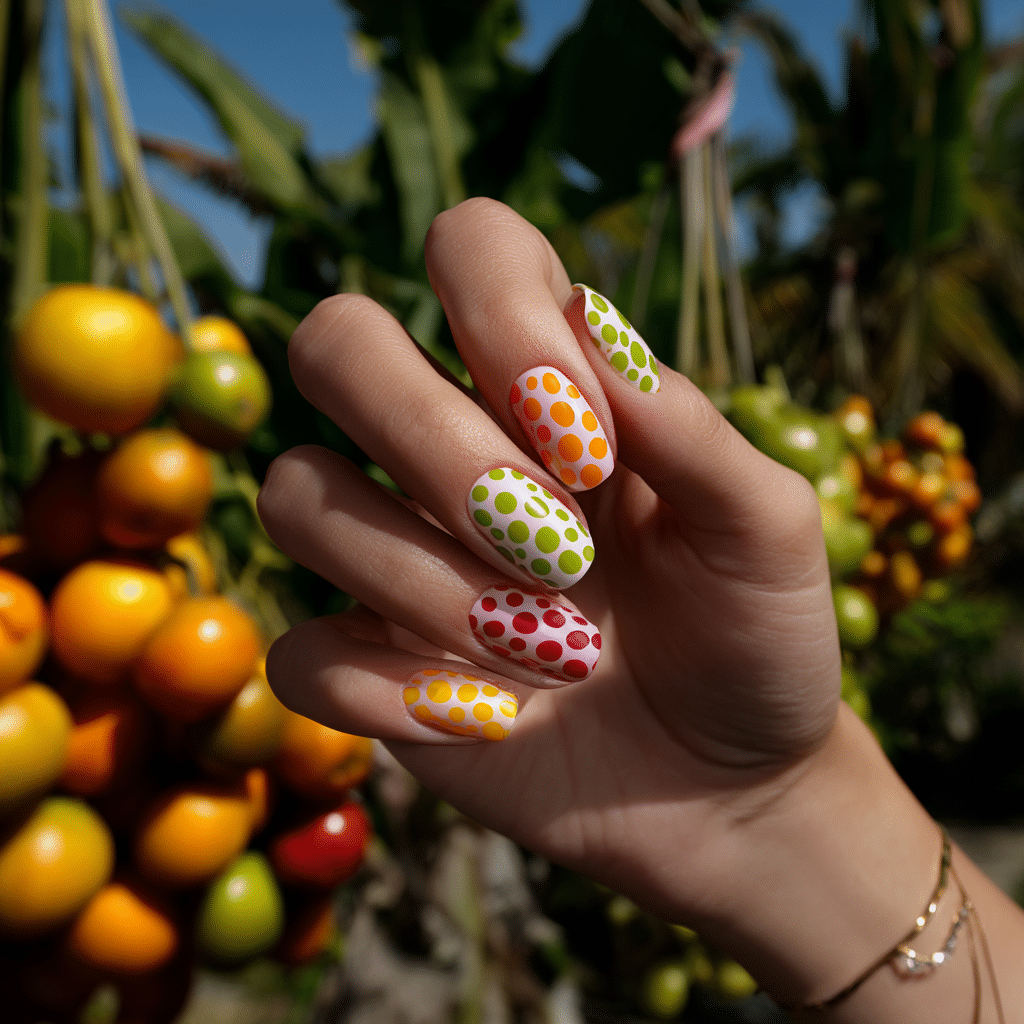
Fruit Salad Dots feature bright, round fruit-colored dots (cherry, mango, kiwi) on a sheer base, creating a playful look. Perfect for summer vacations, this vibrant manicure is ideal for beachside fun or tropical markets.
Tools Needed
- Sheer nail polish
- Red, orange, green nail polishes
- Dotting tool
- Base coat and glossy top coat
- Acetone for cleanup
Step-by-Step Guide
- Apply a base coat and let dry.
- Paint nails with sheer polish, using two coats; let dry.
- Use a dotting tool to place red, orange, and green dots randomly.
- Vary dot sizes for a fruit salad effect.
- Clean excess polish with acetone.
- Seal with a glossy top coat.
Color Suggestions
- Fruity Mix: Sheer with red, orange, green dots.
- Soft Pop: Sheer with coral, yellow, mint dots.
- Bold Contrast: Sheer with neon red, yellow, green dots.
Tips for Success
- Practice dot placement on paper.
- Use a dotting tool for precision.
- Keep dots varied for vibrancy.
- Use a glossy top coat for shine.
Creative Variations
- Add dots to accent nails only.
- Use glitter polish for dots.
- Create a gradient sheer base.
- Pair with tiny leaf decals.
This manicure pairs with tropical prints or bright accessories, radiating summer energy. Maintain by touching up dots and refreshing the top coat. Fruit Salad Dots are a lively vacation choice.
Minimalist Seashell Decal
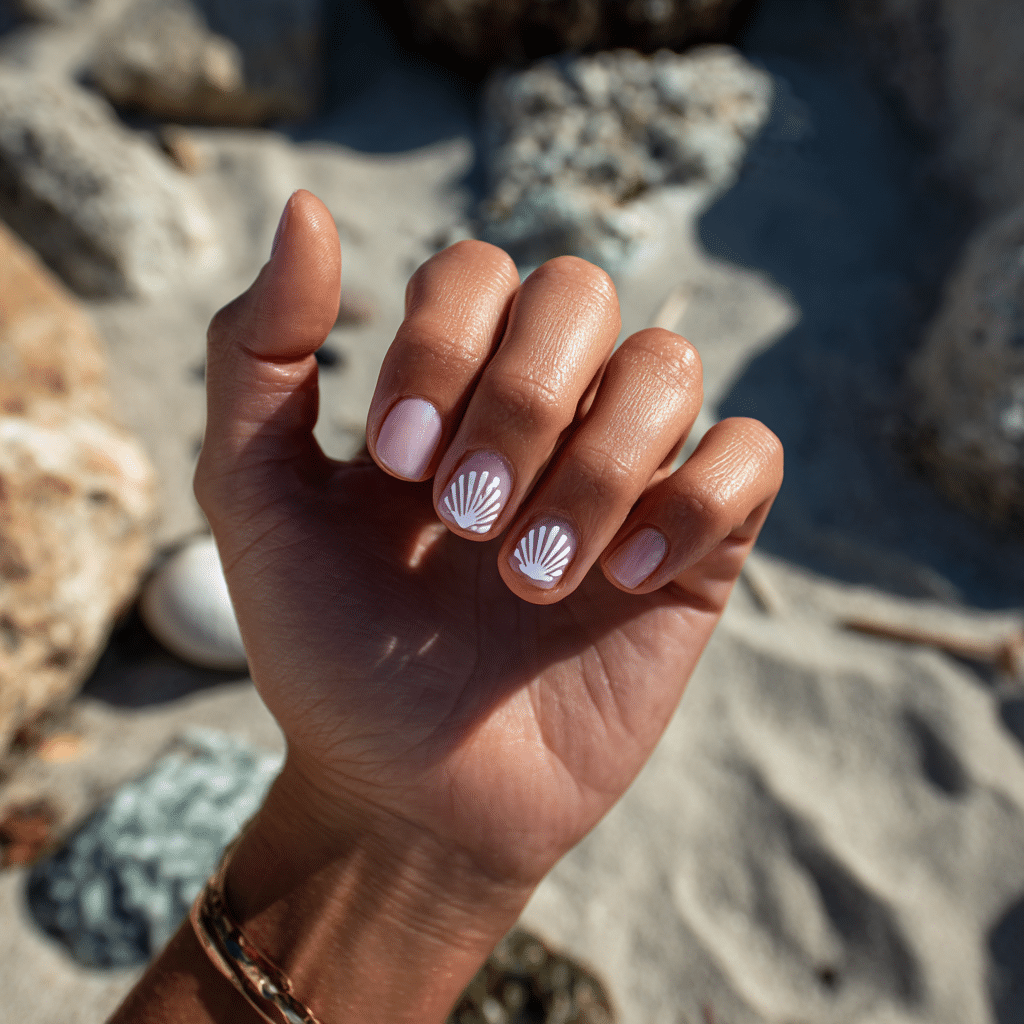
Minimalist Seashell Decal features one or two small white seashell stickers on glossy uncovered nails, offering a subtle coastal look. Perfect for summer vacations, this minimalist manicure is ideal for beachside sophistication.
Tools Needed
- Uncovered nail polish
- White seashell decals
- Tweezers
- Base coat and glossy top coat
- Acetone for cleanup
Step-by-Step Guide
- Apply a base coat and let dry.
- Paint nails with uncovered polish, using two coats; let dry.
- Use tweezers to place seashell decals on accent nails.
- Press gently to secure decals.
- Clean excess polish with acetone.
- Seal with a glossy top coat.
Color Suggestions
- Beachy Minimal: Uncovered with white seashells.
- Soft Pop: Sheer pink with ivory seashells.
- Bold Contrast: Uncovered with gold seashells.
Tips for Success
- Apply decals on dry polish.
- Use tweezers for precise placement.
- Keep decals small for subtlety.
- Use a glossy top coat for shine.
Creative Variations
- Add seashells to all nails.
- Use glitter polish as a base.
- Create a gradient uncovered base.
- Pair with tiny starfish decals.
This manicure pairs with neutral outfits or beachwear, adding summery sophistication. Maintain by checking decal adhesion and refreshing the top coat. Minimalist Seashell Decal is a serene vacation choice.
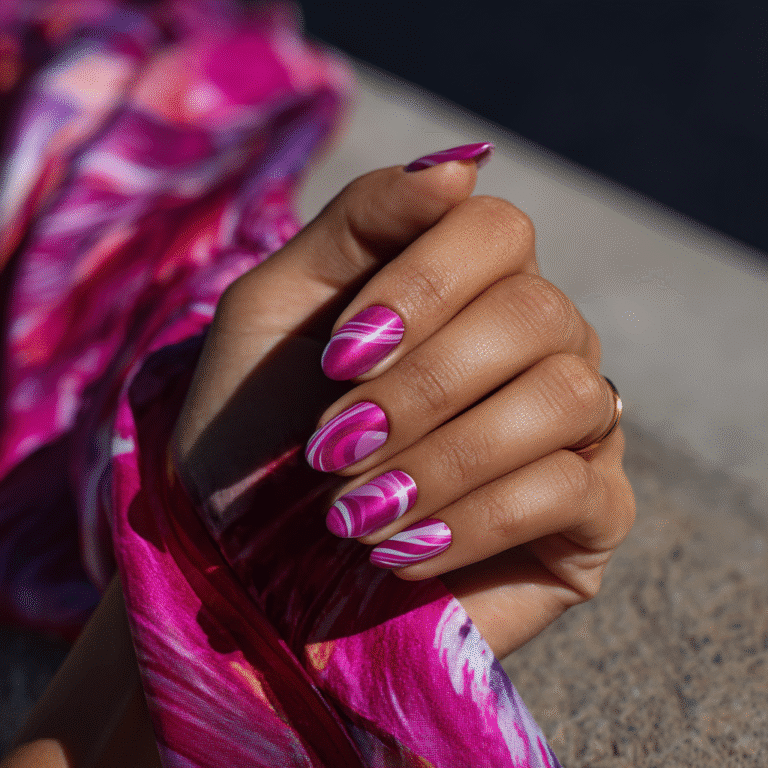
Ocean Marble Design
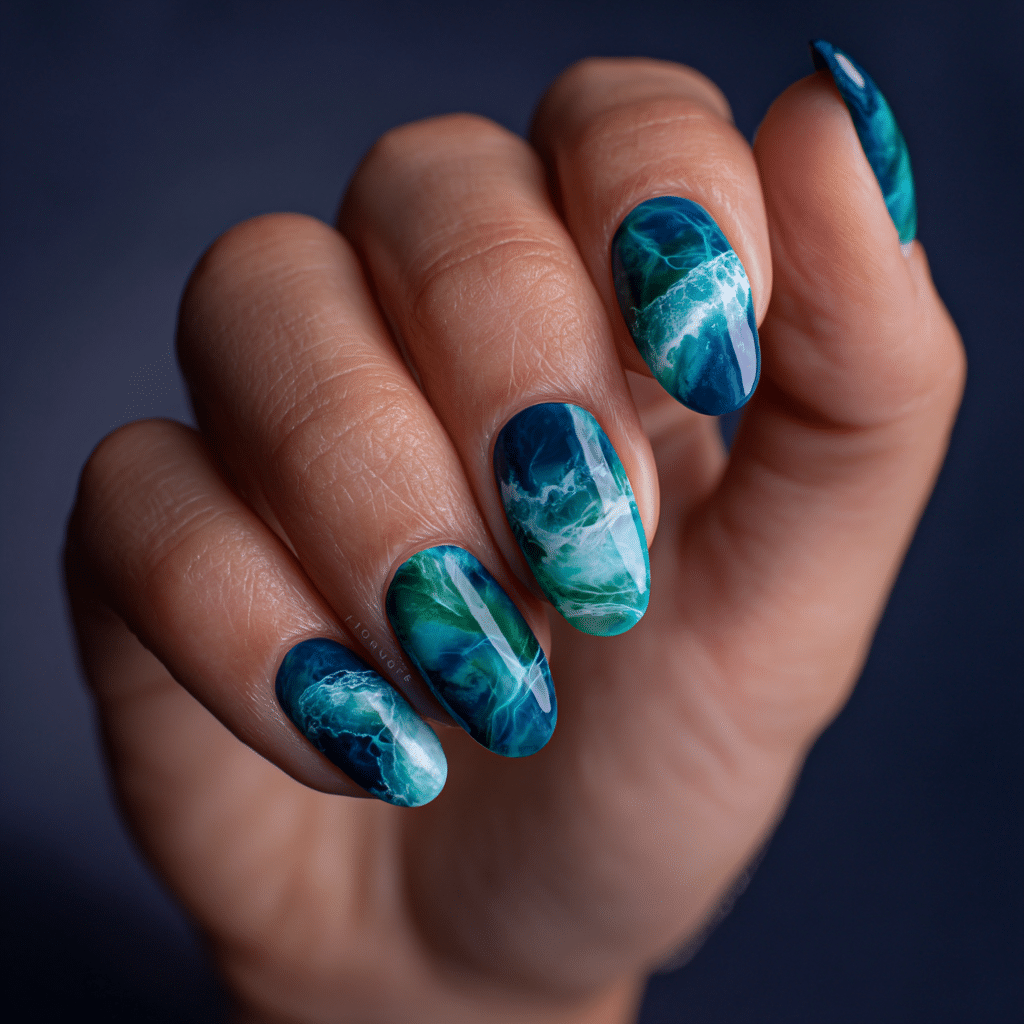
Ocean Marble Design features deep blue, sea green, and pearly white swirls, mimicking water’s texture with a glossy finish. Perfect for summer vacations, this dynamic manicure captures the ocean’s beauty, ideal for coastal adventures.
Tools Needed
- Deep blue, sea green, white nail polishes
- Small cup of water
- Toothpick
- Base coat and glossy top coat
- Acetone for cleanup
Step-by-Step Guide
- Apply a base coat and let dry.
- Paint nails with white polish as a base; let dry.
- Drop blue, green, and white polish into a cup of water.
- Swirl with a toothpick for a marble effect.
- Dip each nail into the pattern; remove excess with acetone.
- Seal with a glossy top coat.
Color Suggestions
- Ocean Swirl: Deep blue, sea green, white.
- Soft Pop: Teal, mint, ivory.
- Bold Glow: Navy, emerald, pearl.
Tips for Success
- Use room-temperature water for marbling.
- Work quickly to avoid polish drying.
- Practice marbling on paper.
- Clean cuticles for a polished look.
Creative Variations
- Marble accent nails only.
- Add glitter to the marble effect.
- Use a matte top coat for contrast.
- Pair with pearl accents.
This manicure pairs with beachwear or silver accessories, evoking coastal elegance. Maintain by refreshing the top coat. Ocean Marble Design is a captivating vacation choice.
Peach Gloss Square Nails
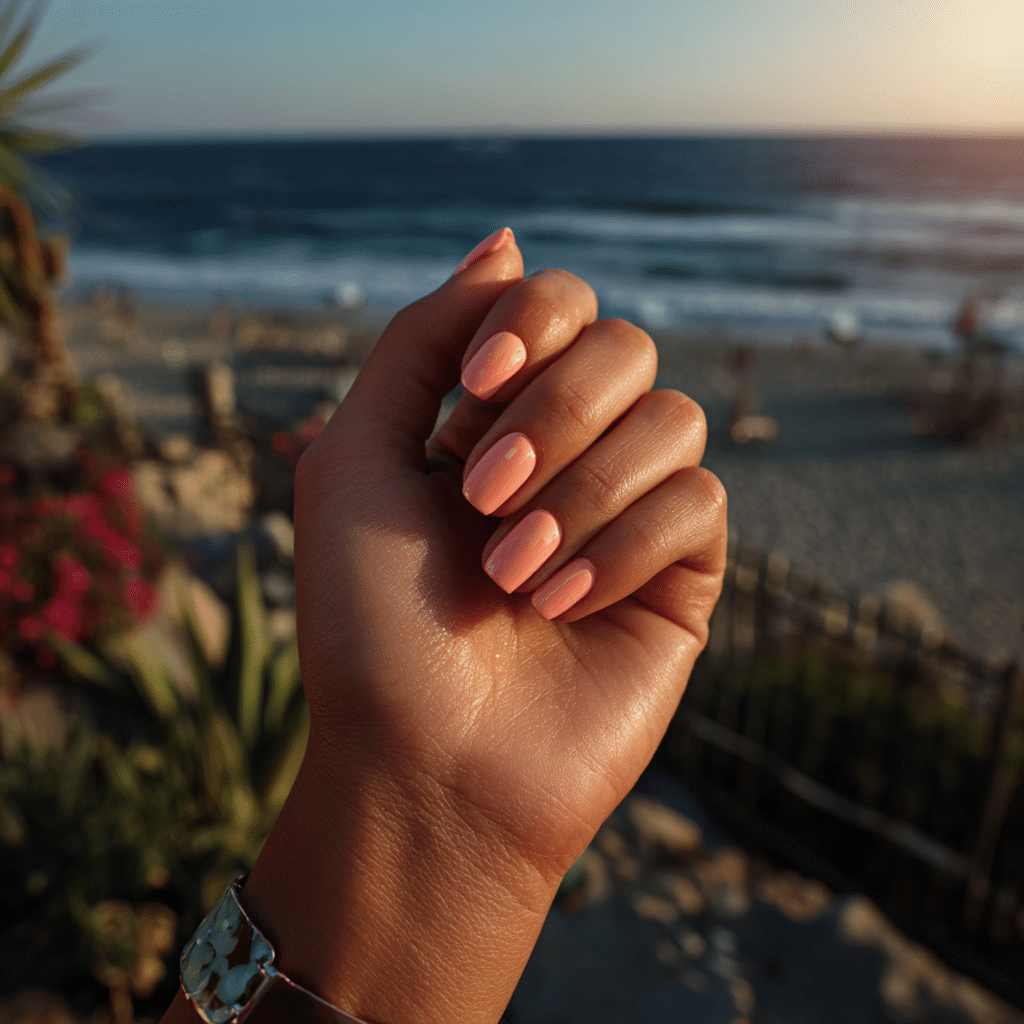
Peach Gloss Square Nails feature glossy peach polish in a soft square shape, offering a clean, chic look. Perfect for summer vacations, this minimalist manicure is ideal for beachside elegance or city escapes.
Tools Needed
- Peach nail polish
- Base coat and glossy top coat
- Nail file
- Acetone for cleanup
Step-by-Step Guide
- File nails to square shape; apply a base coat and let dry.
- Paint nails with peach polish, using two coats; let dry.
- Apply a second layer if needed for opacity.
- Check for even coverage.
- Clean excess polish with acetone.
- Seal with a glossy top coat.
Color Suggestions
- Chic Peach: Glossy peach square.
- Soft Pop: Glossy blush peach.
- Bold Glow: Glossy coral peach.
Tips for Success
- Shape nails carefully for square form.
- Apply thin polish layers for smoothness.
- Use a glossy top coat for vibrancy.
- Clean cuticles for a polished look.
Creative Variations
- Add a matte top coat for contrast.
- Apply glitter to accent nails.
- Create a peach French tip.
- Pair with a single pearl.
This manicure pairs with neutral outfits or gold jewelry, radiating summery elegance. Maintain by refreshing the top coat. Peach Gloss Square Nails are a refined vacation choice.
Cactus Green Tips
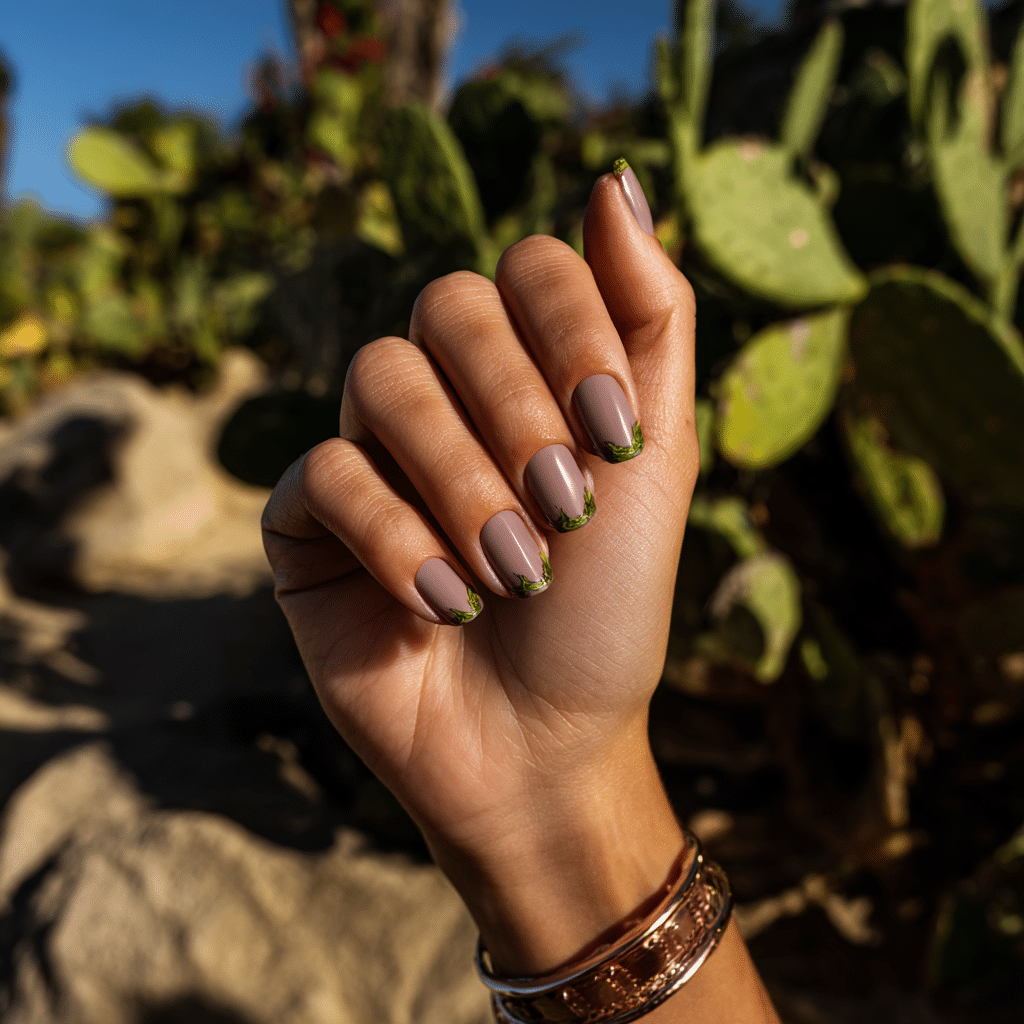
Cactus Green Tips feature a dusty desert green used as tips over a neutral taupe base, offering a unique look. Perfect for summer vacations, this chic manicure is ideal for desert-inspired getaways or tropical contrasts.
Tools Needed
- Taupe and cactus green nail polishes
- Striping tape or fine brush
- Base coat and glossy top coat
- Acetone for cleanup
Step-by-Step Guide
- Apply a base coat and let dry.
- Paint nails with taupe polish, using two coats; let dry.
- Use tape or a fine brush to paint cactus green tips.
- Apply two layers for vibrancy.
- Remove tape; clean excess with acetone.
- Seal with a glossy top coat.
Color Suggestions
- Desert Chic: Taupe with cactus green tips.
- Soft Pop: Beige with mint green tips.
- Bold Contrast: Taupe with emerald tips.
Tips for Success
- Use tape for clean tip lines.
- Apply thin polish layers for evenness.
- Practice tip placement on paper.
- Use a glossy top coat for shine.
Creative Variations
- Add glitter to green tips.
- Use a matte taupe base.
- Create double green tips on one nail.
- Apply tips to accent nails only.
This manicure pairs with earthy outfits or silver accessories, radiating summery charm. Maintain by touching up tips and refreshing the top coat. Cactus Green Tips are a unique vacation choice.
Clear Nails with Beach Charms
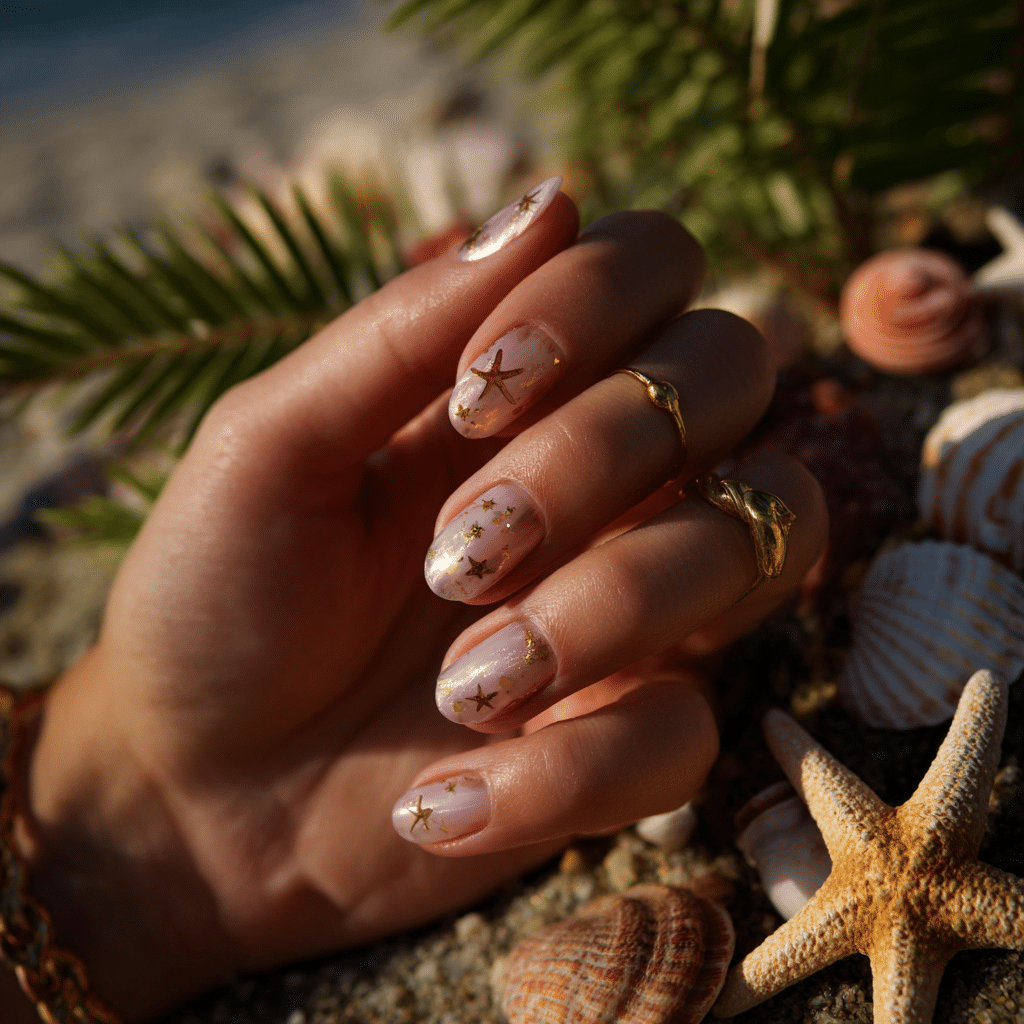
Clear Nails with Beach Charms feature tiny embedded decals like stars, sand dollars, or gold flecks in a clear gel finish, offering a whimsical coastal look. Perfect for summer vacations, this playful manicure is ideal for beachside adventures.
Tools Needed
- Clear gel nail polish
- Beach-themed decals (stars, sand dollars, gold flecks)
- Tweezers
- UV lamp for gel curing
- Base coat and glossy top coat
- Acetone for cleanup
Step-by-Step Guide
- Apply a base coat and let dry.
- Apply a thin layer of clear gel polish; cure under UV lamp.
- Use tweezers to place beach decals randomly on nails.
- Apply another layer of clear gel polish; cure under UV lamp.
- Clean excess polish with acetone.
- Seal with a glossy top coat.
Color Suggestions
- Beachy Charm: Clear with mixed decals.
- Soft Pop: Sheer pink with gold decals.
- Bold Contrast: Clear with silver decals.
Tips for Success
- Apply decals on tacky gel for adhesion.
- Use tweezers for precise placement.
- Keep decals sparse for whimsy.
- Use a glossy top coat for shine.
Creative Variations
- Add decals to accent nails only.
- Use glitter polish as a base.
- Create a gradient clear base.
- Pair with tiny shell decals.
This manicure pairs with beachwear or silver jewelry, radiating coastal fun. Maintain by checking decal adhesion and refreshing the top coat. Clear Nails with Beach Charms are a delightful vacation choice.
Summer vacation nail designs are one of those rare beauty moments where self-expression meets celebration. They mark time, capture memories, and let your personality shine with each brushstroke. As you explore new places or savor moments of calm, your nails become tiny canvases of creativity that travel with you.
So, as you prepare for your next escape—whether it’s a tropical resort, a mountain getaway, or a weekend at the lake—think of your nails as part of your holiday wardrobe. Choose a design that resonates with your spirit, your destination, and the colors of summer. In 2025, the trend isn’t just about looking good—it’s about feeling the glow of the season in every little detail.