Vacation-Ready Nails That Travel in Style
Vacations are not just about where you go—they’re about how you feel, and the energy you bring with you. This is especially true for 2025, where vacation nail trends are as lively and diverse as the destinations on your travel list. Whether you’re escaping to a coastal hideaway, jet-setting to a cosmopolitan city, or simply taking a well-deserved staycation, your nails are the perfect canvas to express your mood, style, and season.
This year’s vacation nail ideas balance vivid expression with breezy sophistication. The 2025 trends are playful yet polished: they capture sunset skies, beach textures, and fruity colors without going over the top. Think mini palm leaves, sunset fades, abstract waves, and a whole lot of feel-good energy.
Why I Love It
Vacation nails are the kind of beauty ritual that go beyond polish—they reflect intention. I love how a bright coral or soft lavender instantly puts me in a vacation mindset, even before my suitcase is packed. These trendy 2025 designs offer the chance to try something fresh and different, and I often find they reflect not just my travel plans, but my personality in that moment.
They also bring versatility—some are bold enough to make a statement poolside, while others are neutral and classy enough to wear to dinner. There’s also a sense of freedom in choosing a design that’s not bound by the office or routine life. It’s pure fun, elevated.
25 Trendy Vacation Nail Ideas For 2025
These 25 trendy vacation nail ideas for 2025 capture the essence of tropical escapes with vibrant colors, artistic patterns, and chic minimalism. Perfect for beach getaways, island adventures, or summer festivals, each design blends bold trends with vacation-ready flair. Detailed steps, tools, and variations ensure accessibility for all skill levels, embodying summer’s radiant spirit. The term “uncovered” is used for base polishes to align with sensitivity guidelines.
Ocean Mist Gradient
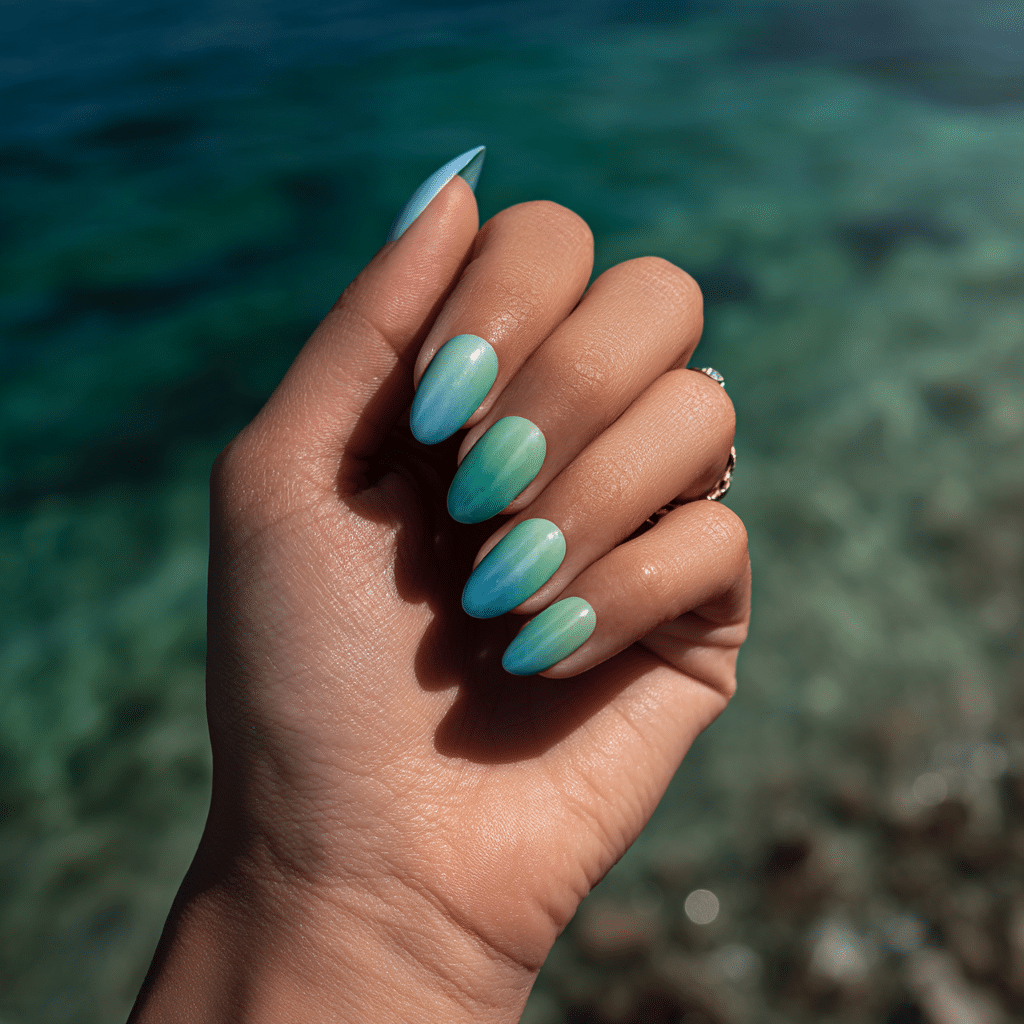
Ocean Mist Gradient features a soft blue-to-seafoam green ombré, channeling beach breezes. This serene manicure is ideal for coastal vacations or tropical retreats, evoking tranquil waves.
Tools Needed
- Light blue and seafoam green nail polishes
- Makeup sponge
- Base coat and glossy top coat
- Acetone for cleanup
Step-by-Step Guide
- Apply a base coat and let dry.
- Paint nails with a clear base for opacity; let dry.
- Dab light blue and seafoam green polish onto a sponge, blending slightly.
- Press sponge onto nails, creating a smooth gradient.
- Repeat for a seamless ombré effect; let dry.
- Clean excess polish with acetone.
- Seal with a glossy top coat.
Color Suggestions
- Coastal Fade: Light blue to seafoam green.
- Soft Glow: Aqua to mint green.
- Bold Blend: Turquoise to emerald.
Tips for Success
- Use a sponge for smooth blending.
- Apply thin layers to avoid clumps.
- Practice gradient on paper first.
- Use a quick-dry top coat for shine.
Creative Variations
- Add silver glitter in the gradient.
- Use a matte top coat for contrast.
- Create a vertical ombré.
- Add a tiny starfish decal on one nail.
This manicure pairs with beachwear or silver jewelry, enhancing summer’s calm. Maintain by reapplying the top coat every few days. Ocean Mist Gradient is a refreshing choice for vacation vibes.
Coconut Milk White Gloss
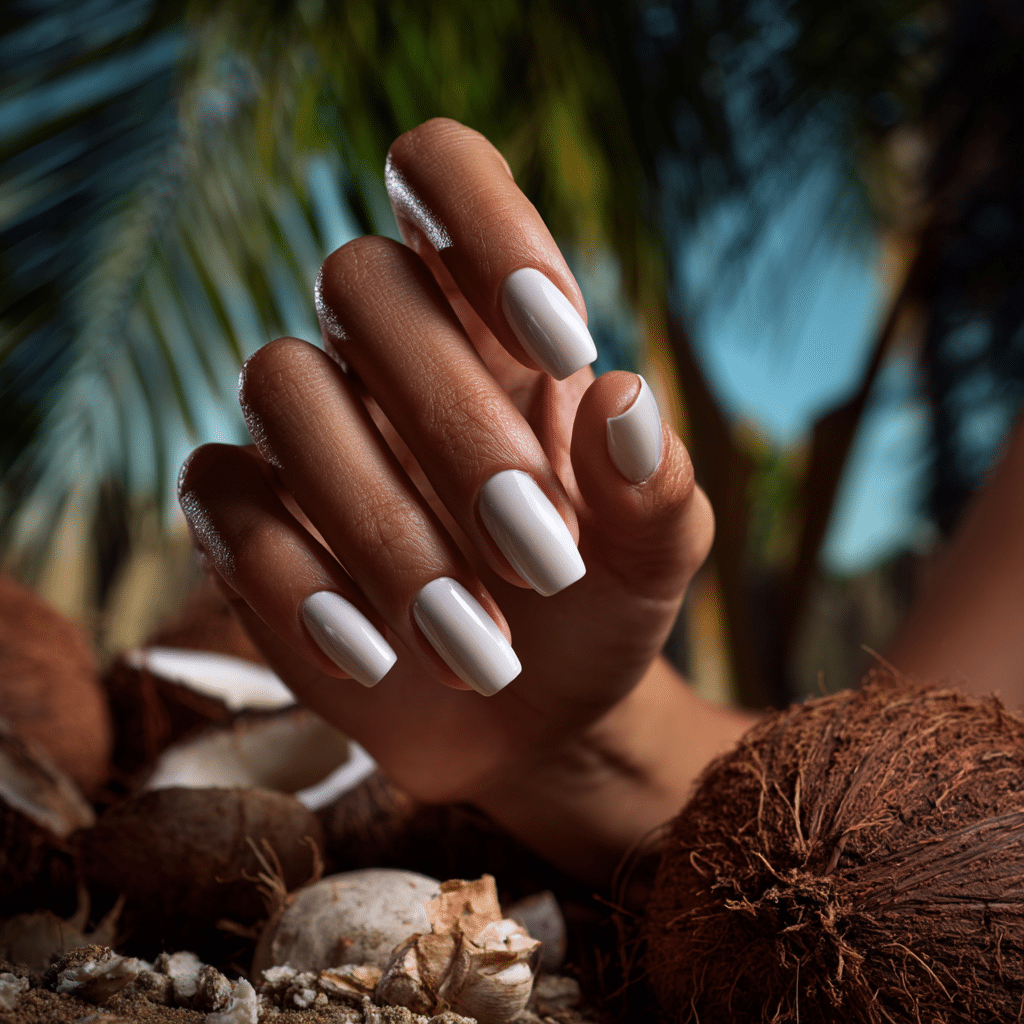
Coconut Milk White Gloss features clean, creamy white polish with high-gloss shine, embodying tropical minimalism. Perfect for beach weddings or island escapes, this chic manicure radiates elegance.
Tools Needed
- Creamy white nail polish
- Base coat and glossy top coat
- Nail file
- Acetone for cleanup
Step-by-Step Guide
- File nails to desired shape; apply a base coat and let dry.
- Paint nails with creamy white polish, using two coats; let dry.
- Apply a second layer if needed for opacity.
- Check for even, glossy coverage.
- Clean excess polish with acetone.
- Seal with a glossy top coat.
Color Suggestions
- Tropical Chic: Creamy white gloss.
- Soft Pop: Ivory white gloss.
- Bold Shine: Pearl white gloss.
Tips for Success
- Apply thin polish layers for smoothness.
- Use a glossy top coat for vibrancy.
- Clean cuticles for a polished look.
- File nails evenly for uniformity.
Creative Variations
- Add a matte top coat for contrast.
- Apply gold glitter to accent nails.
- Create a white French tip.
- Pair with a single pearl decal.
This manicure pairs with neutral outfits or gold accessories, radiating summery sophistication. Maintain by refreshing the top coat. Coconut Milk White Gloss is a timeless vacation choice.
Abstract Coral Swirls
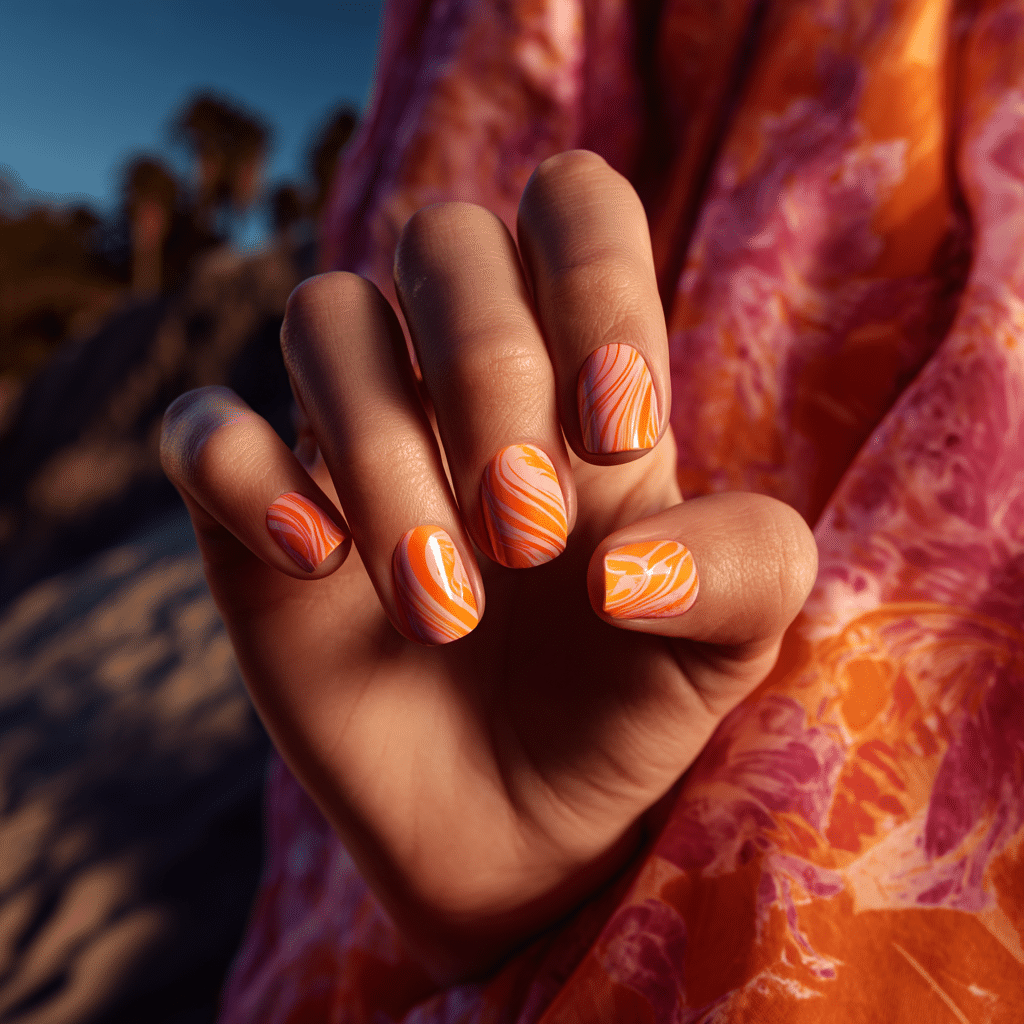
Abstract Coral Swirls feature freeform orange and coral swirls on an uncovered base, delivering an artistic punch. Perfect for tropical festivals or beach parties, this bold manicure exudes creativity.
Tools Needed
- Uncovered nail polish
- Orange and coral nail polishes
- Fine nail art brush
- Base coat and glossy top coat
- Acetone for cleanup
Step-by-Step Guide
- Apply a base coat and let dry.
- Paint nails with uncovered polish, using two coats; let dry.
- Use a fine brush to paint freeform orange and coral swirls across nails.
- Create overlapping, curvy patterns for an abstract effect.
- Clean excess polish with acetone.
- Seal with a glossy top coat.
Color Suggestions
- Vibrant Art: Uncovered with orange and coral swirls.
- Soft Pop: Uncovered with peach and blush swirls.
- Bold Contrast: Uncovered with neon orange and pink swirls.
Tips for Success
- Practice swirl patterns on paper.
- Use a fine brush for precision.
- Keep swirls dynamic for artistry.
- Use a glossy top coat for shine.
Creative Variations
- Add swirls to accent nails only.
- Use glitter polish for swirls.
- Create a gradient uncovered base.
- Pair with tiny star decals.
This manicure pairs with colorful outfits or gold jewelry, adding summery flair. Maintain by touching up swirls and refreshing the top coat. Abstract Coral Swirls are a vibrant vacation choice.
Sunset Chrome Fade
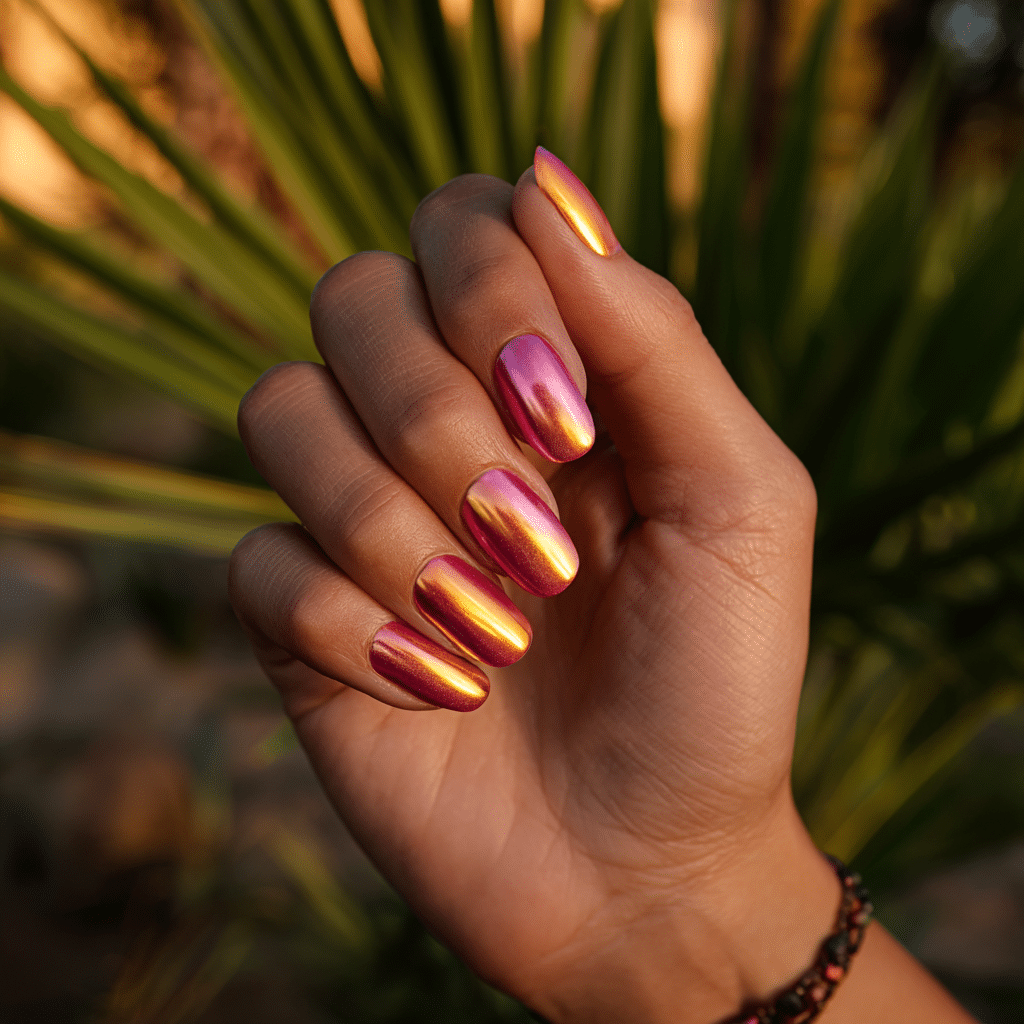
Sunset Chrome Fade features a metallic blend of pink, tangerine, and gold with a smooth chrome finish, evoking tropical sunsets. Perfect for beach evenings or island galas, this glamorous manicure shines.
Tools Needed
- Pink, tangerine, and gold chrome nail polishes
- Makeup sponge
- Base coat and glossy top coat
- Acetone for cleanup
Step-by-Step Guide
- Apply a base coat and let dry.
- Paint nails with a clear base; let dry.
- Dab pink, tangerine, and gold chrome polish onto a sponge, blending.
- Press sponge onto nails for a metallic gradient effect.
- Repeat for a seamless chrome fade; let dry.
- Clean excess polish with acetone.
- Seal with a glossy top coat.
Color Suggestions
- Sunset Glow: Pink to tangerine to gold chrome.
- Soft Pop: Blush to peach to rose gold chrome.
- Bold Shine: Coral to orange to yellow chrome.
Tips for Success
- Use a sponge for smooth blending.
- Apply thin layers for metallic sheen.
- Practice gradient on paper.
- Use a glossy top coat for vibrancy.
Creative Variations
- Add glitter in the fade.
- Use a matte top coat for contrast.
- Create a vertical chrome fade.
- Pair with a single rhinestone.
This manicure pairs with evening dresses or gold jewelry, radiating luxury. Maintain by refreshing the top coat. Sunset Chrome Fade is a dazzling vacation choice.
Palm Leaf Line Art
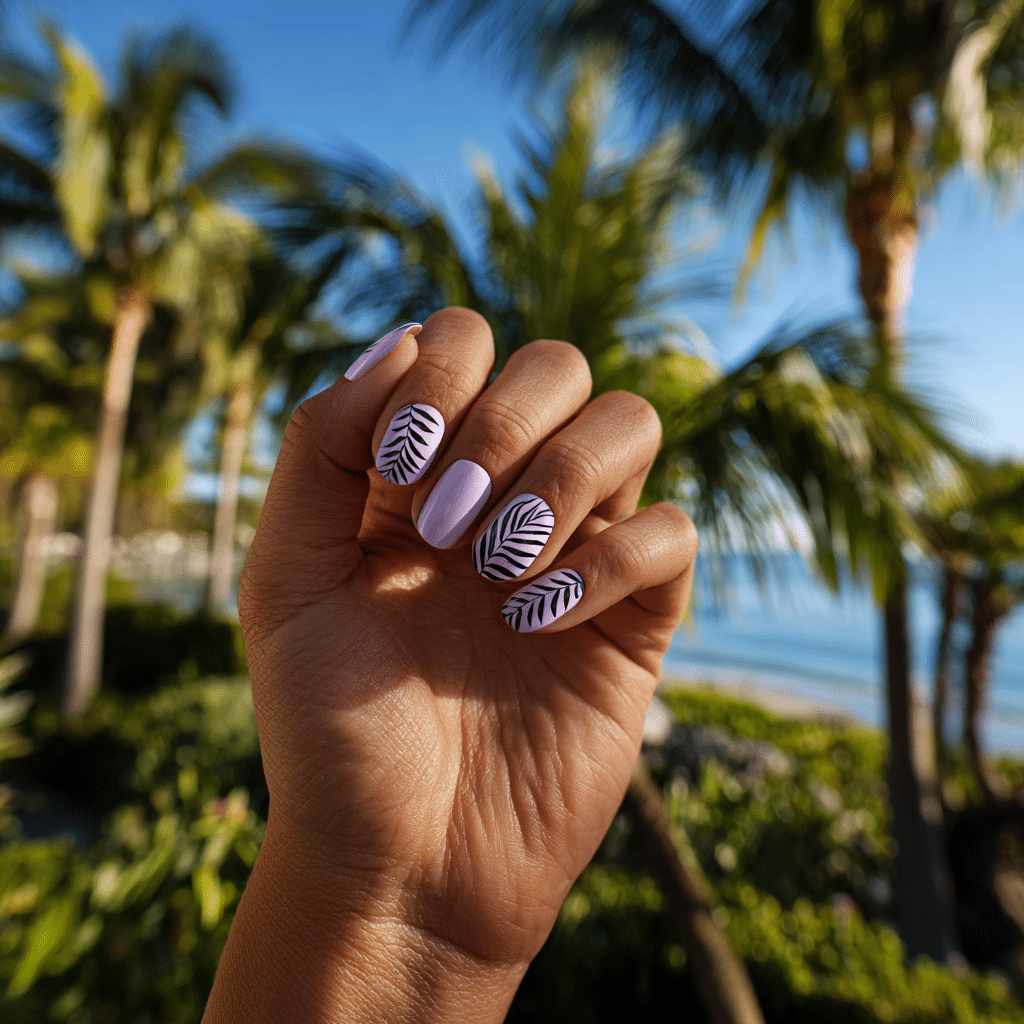
Palm Leaf Line Art features fine black line drawings of palm leaves over pastel bases, offering a minimalist tropical look. Perfect for beach strolls or island brunches, this chic manicure exudes elegance.
Tools Needed
- Pastel nail polish (pink, mint, or lavender)
- Black nail polish
- Fine nail art brush
- Base coat and glossy top coat
- Acetone for cleanup
Step-by-Step Guide
- Apply a base coat and let dry.
- Paint nails with pastel polish, using two coats; let dry.
- Use a fine brush to draw black palm leaf outlines on accent nails.
- Keep lines thin and delicate for minimalism.
- Clean excess polish with acetone.
- Seal with a glossy top coat.
Color Suggestions
- Tropical Chic: Pastel pink with black palm leaves.
- Soft Pop: Mint with gray palm leaves.
- Bold Contrast: Lavender with gold palm leaves.
Tips for Success
- Practice palm leaf shapes on paper.
- Use a fine brush for precision.
- Keep designs minimal for elegance.
- Use a glossy top coat for shine.
Creative Variations
- Add palm leaves to all nails.
- Use glitter polish for leaves.
- Create a gradient pastel base.
- Pair with tiny starfish decals.
This manicure pairs with airy outfits or silver accessories, adding summery sophistication. Maintain by touching up lines and refreshing the top coat. Palm Leaf Line Art is a refined vacation choice.
Sky Blue Squovals
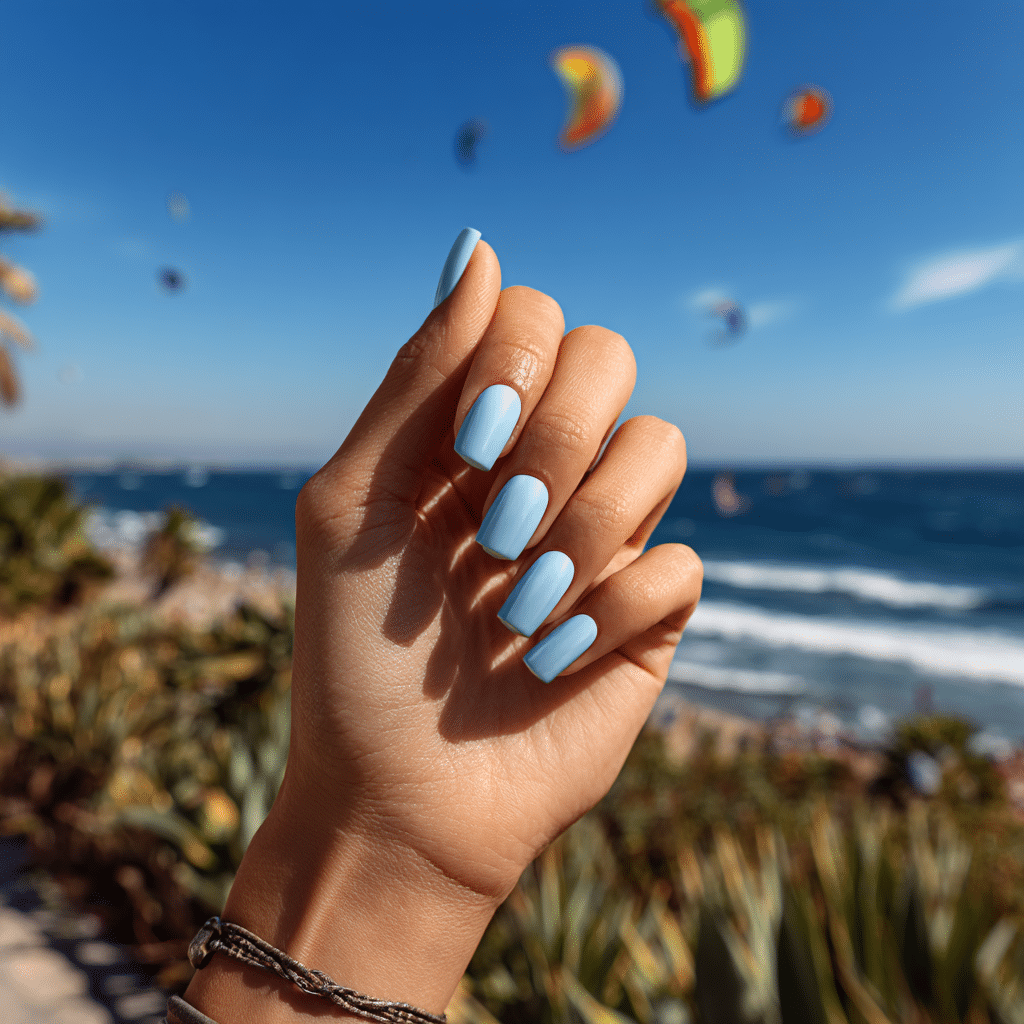
Sky Blue Squovals feature sky blue polish in a square-oval shape, delivering a clean, classic look. Perfect for beach days or tropical cruises, this fresh manicure radiates simplicity and charm.
Tools Needed
- Sky blue nail polish
- Base coat and glossy top coat
- Nail file
- Acetone for cleanup
Step-by-Step Guide
- File nails to squoval shape; apply a base coat and let dry.
- Paint nails with sky blue polish, using two coats; let dry.
- Apply a second layer if needed for opacity.
- Check for even coverage.
- Clean excess polish with acetone.
- Seal with a glossy top coat.
Color Suggestions
- Ocean Breeze: Sky blue gloss.
- Soft Pop: Pastel blue gloss.
- Bold Shine: Aqua blue gloss.
Tips for Success
- Shape nails carefully for squoval form.
- Apply thin polish layers for smoothness.
- Use a glossy top coat for vibrancy.
- Clean cuticles for a polished look.
Creative Variations
- Add a matte top coat for contrast.
- Apply silver glitter to accent nails.
- Create a blue French tip.
- Pair with a single star decal.
This manicure pairs with beachwear or silver jewelry, radiating coastal charm. Maintain by refreshing the top coat. Sky Blue Squovals are a timeless vacation choice.
Mini Pineapple Icons
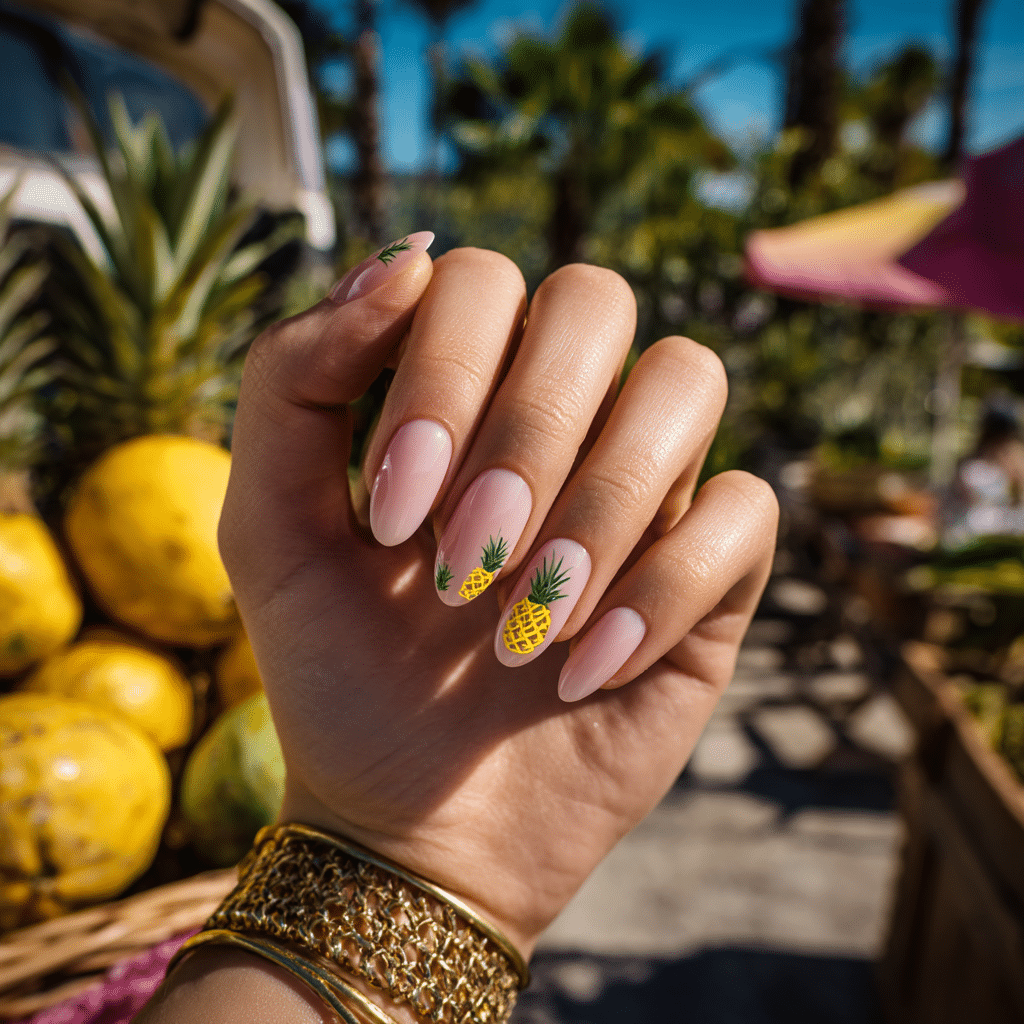
Mini Pineapple Icons feature tiny pineapple motifs painted over sheer or baby pink polish, offering a playful tropical vibe. Perfect for beach picnics or island festivals, this cute manicure bursts with charm.
Tools Needed
- Sheer or baby pink nail polish
- Yellow, green, brown nail polishes
- Fine nail art brush
- Base coat and glossy top coat
- Acetone for cleanup
Step-by-Step Guide
- Apply a base coat and let dry.
- Paint nails with sheer or baby pink polish, using two coats; let dry.
- Use a fine brush to paint mini pineapples with yellow bodies on accent nails.
- Add green tops and brown crosshatch details.
- Clean excess polish with acetone.
- Seal with a glossy top coat.
Color Suggestions
- Tropical Pop: Sheer pink with pineapples.
- Soft Glow: Baby pink with pineapples.
- Bold Contrast: Sheer with neon yellow pineapples.
Tips for Success
- Practice pineapple shapes on paper.
- Use a fine brush for precision.
- Keep pineapples small for cuteness.
- Use a glossy top coat for shine.
Creative Variations
- Add pineapples to all nails.
- Use glitter in pineapple bodies.
- Create a gradient pink base.
- Pair with tiny palm decals.
This manicure pairs with tropical outfits or gold accessories, adding summer zest. Maintain by touching up pineapples and refreshing the top coat. Mini Pineapple Icons are a delightful vacation choice.
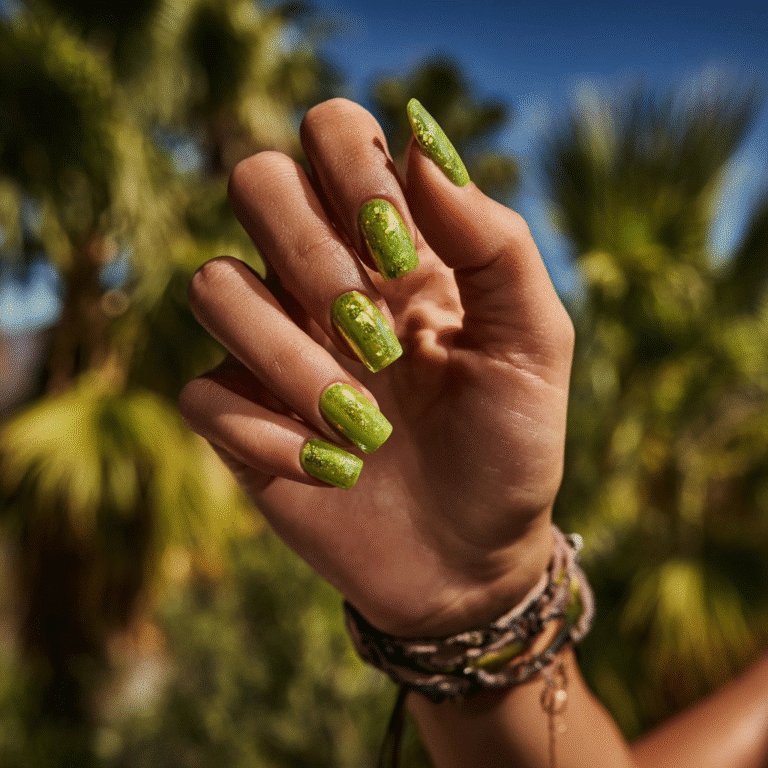
Glossy Sea Green Short Nails
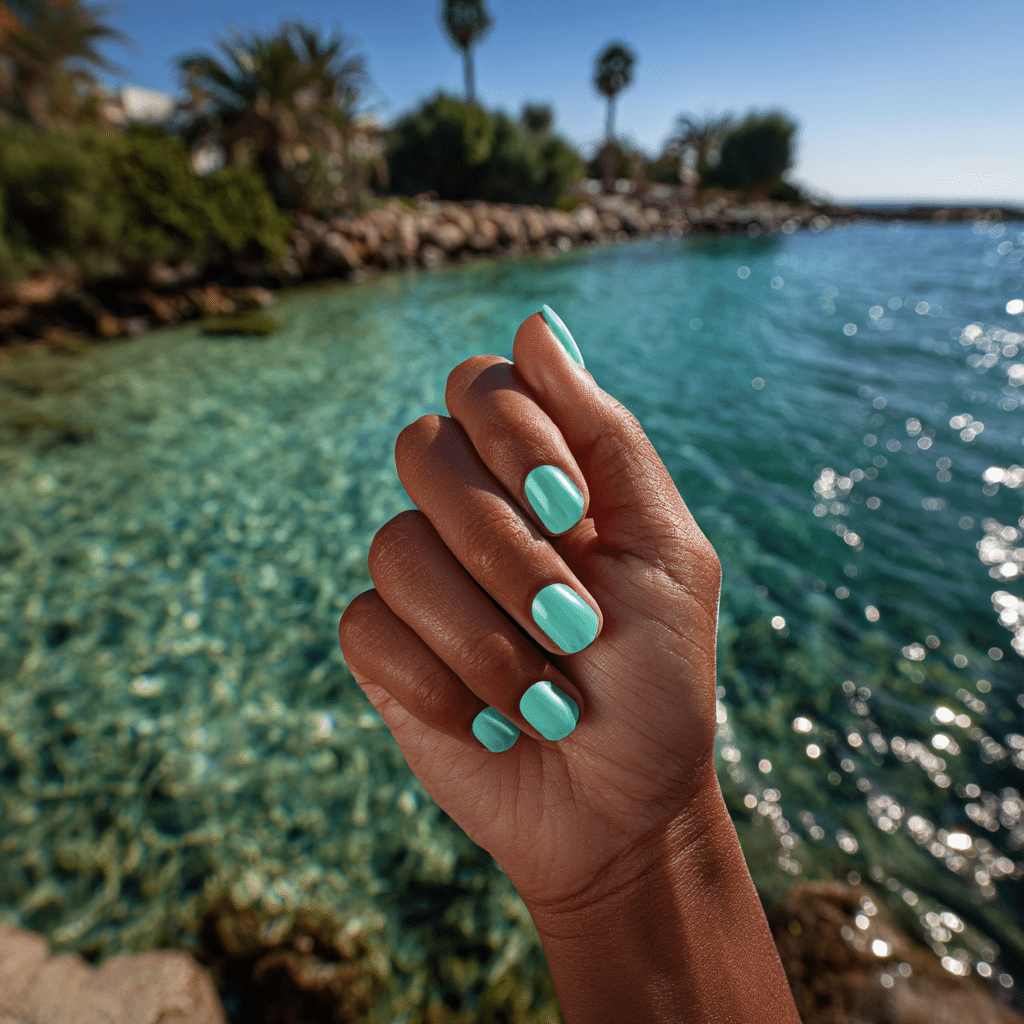
Glossy Sea Green Short Nails feature short, chic nails in a refreshing, glassy teal hue. Perfect for beach swims or tropical lounging, this vibrant manicure radiates coastal energy.
Tools Needed
- Sea green nail polish
- Base coat and glossy top coat
- Nail file
- Acetone for cleanup
Step-by-Step Guide
- File nails to short, rounded shape; apply a base coat and let dry.
- Paint nails with sea green polish, using two coats; let dry.
- Apply a second layer if needed for opacity.
- Check for even, glossy coverage.
- Clean excess polish with acetone.
- Seal with a glossy top coat.
Color Suggestions
- Ocean Pop: Sea green gloss.
- Soft Glow: Mint green gloss.
- Bold Shine: Teal gloss.
Tips for Success
- Shape nails carefully for short form.
- Apply thin polish layers for smoothness.
- Use a glossy top coat for vibrancy.
- Clean cuticles for a polished look.
Creative Variations
- Add a matte top coat for contrast.
- Apply silver glitter to accent nails.
- Create a sea green French tip.
- Pair with a single shell decal.
This manicure pairs with swimwear or silver jewelry, radiating coastal allure. Maintain by refreshing the top coat. Glossy Sea Green Short Nails are a chic vacation choice.
Sunbeam Yellow Matte
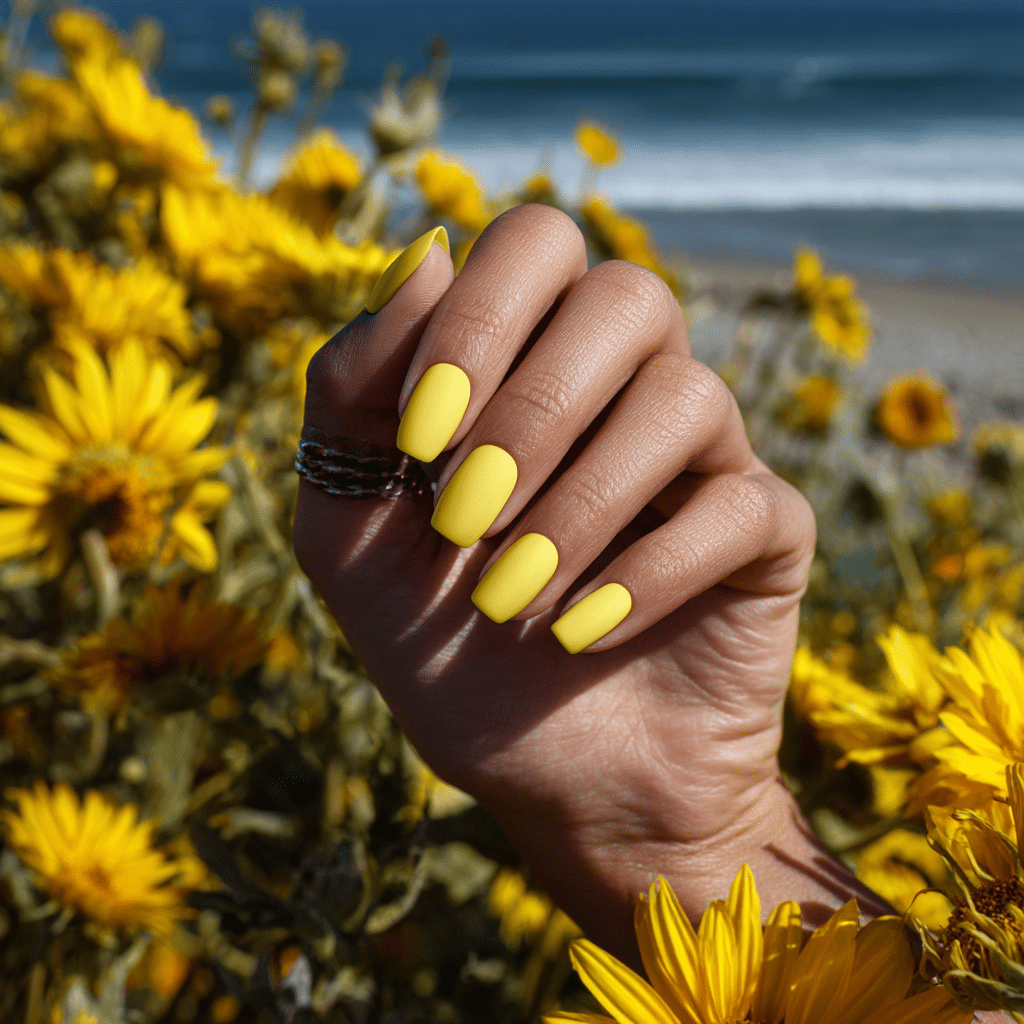
Sunbeam Yellow Matte features a solid matte yellow that brightens any vacation outfit. Perfect for beach days or summer festivals, this cheerful manicure exudes sunny joy.
Tools Needed
- Yellow nail polish
- Matte top coat
- Base coat
- Nail file
- Acetone for cleanup
Step-by-Step Guide
- File nails to desired shape; apply a base coat and let dry.
- Paint nails with yellow polish, using two coats; let dry.
- Apply a matte top coat evenly across all nails.
- Let dry completely for a velvety finish.
- Clean excess polish with acetone.
- Check for even matte coverage.
Color Suggestions
- Sunny Glow: Bright yellow matte.
- Soft Pop: Pastel yellow matte.
- Bold Shine: Neon yellow matte.
Tips for Success
- Apply thin polish layers for smoothness.
- Use a matte top coat sparingly.
- Clean cuticles for a polished look.
- File nails evenly for uniformity.
Creative Variations
- Add a glossy top coat to one nail.
- Use a gradient yellow shade.
- Apply a single star decal.
- Create a subtle sunburst pattern.
This manicure pairs with bright outfits or gold accessories, evoking summer cheer. Maintain by refreshing the matte top coat. Sunbeam Yellow Matte is a vibrant vacation choice.
Iridescent Pearl Nails

Iridescent Pearl Nails feature shimmery white polish that shifts in lighting, perfect for ocean reflections. Ideal for beach weddings or tropical evenings, this glamorous manicure radiates ethereal beauty.
Tools Needed
- Iridescent white nail polish
- Base coat and glossy top coat
- Nail file
- Acetone for cleanup
Step-by-Step Guide
- File nails to desired shape; apply a base coat and let dry.
- Paint nails with iridescent white polish, using two coats; let dry.
- Apply a second layer for full shimmer effect.
- Check for even reflective finish.
- Clean excess polish with acetone.
- Seal with a glossy top coat.
Color Suggestions
- Pearl Shine: Iridescent white pearl.
- Soft Pop: Iridescent pink pearl.
- Bold Glow: Iridescent silver pearl.
Tips for Success
- Apply thin polish layers for smoothness.
- Use a glossy top coat for vibrancy.
- Clean cuticles for a polished look.
- Use a quick-dry top coat.
Creative Variations
- Add a matte top coat for contrast.
- Apply glitter to accent nails.
- Create a pearl French tip.
- Pair with a single pearl decal.
This manicure pairs with evening dresses or silver jewelry, radiating coastal allure. Maintain by refreshing the top coat. Iridescent Pearl Nails are a dreamy vacation choice.
Wavy Beach Stripes
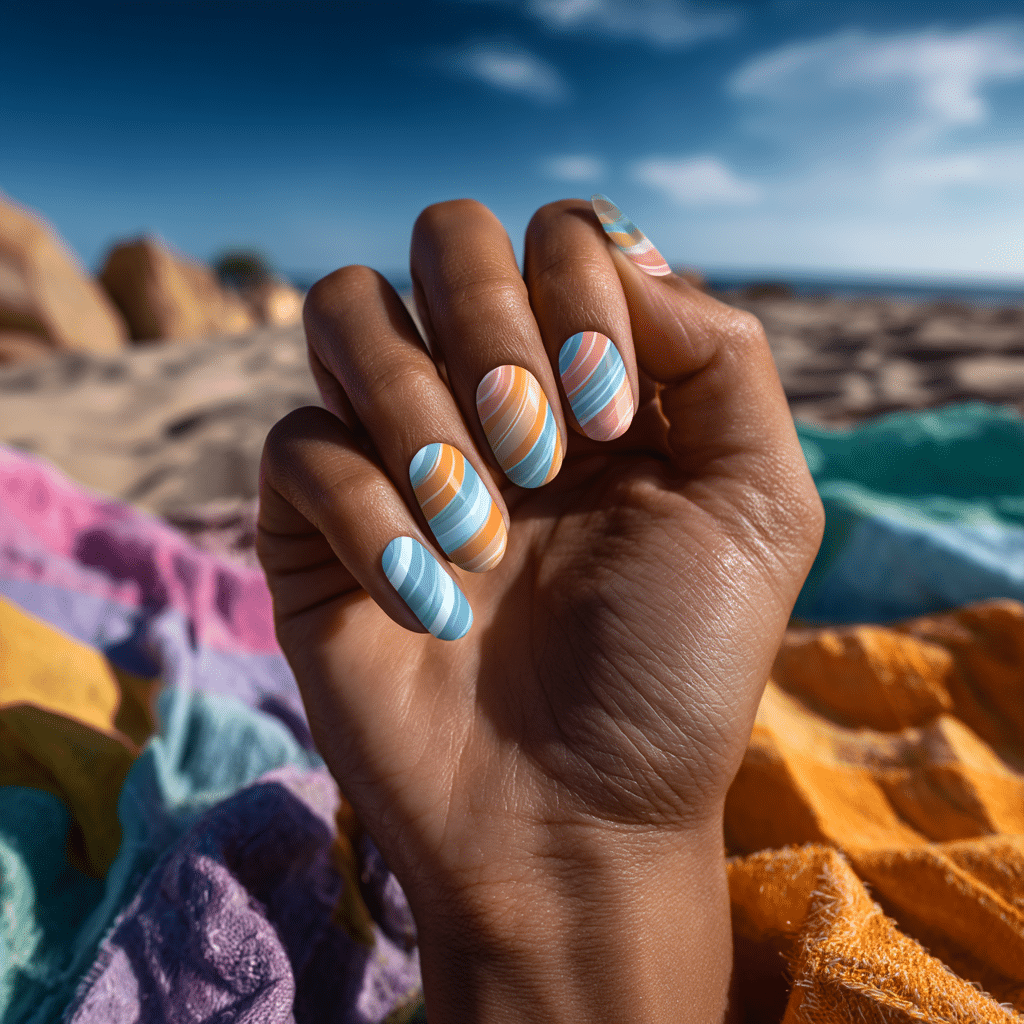
Wavy Beach Stripes feature curved stripes in sand, blue, and peach, mimicking towels and umbrellas. Perfect for beach picnics or coastal lounging, this playful manicure exudes summery charm.
Tools Needed
- Sand, blue, peach nail polishes
- Fine nail art brush
- Base coat and glossy top coat
- Acetone for cleanup
Step-by-Step Guide
- Apply a base coat and let dry.
- Paint nails with a clear base, using two coats; let dry.
- Use a fine brush to paint wavy sand, blue, and peach stripes across nails.
- Create curved, overlapping patterns for a beachy effect.
- Clean excess polish with acetone.
- Seal with a glossy top coat.
Color Suggestions
- Beachy Vibes: Sand, blue, peach stripes.
- Soft Pop: Beige, aqua, coral stripes.
- Bold Contrast: Tan, navy, orange stripes.
Tips for Success
- Practice stripe patterns on paper.
- Use a fine brush for precision.
- Keep stripes wavy for playfulness.
- Use a glossy top coat for shine.
Creative Variations
- Add stripes to accent nails only.
- Use glitter polish for stripes.
- Create a gradient base.
- Pair with tiny shell decals.
This manicure pairs with beachwear or gold accessories, adding summery flair. Maintain by touching up stripes and refreshing the top coat. Wavy Beach Stripes are a lively vacation choice.
Flamingo Pink Pop
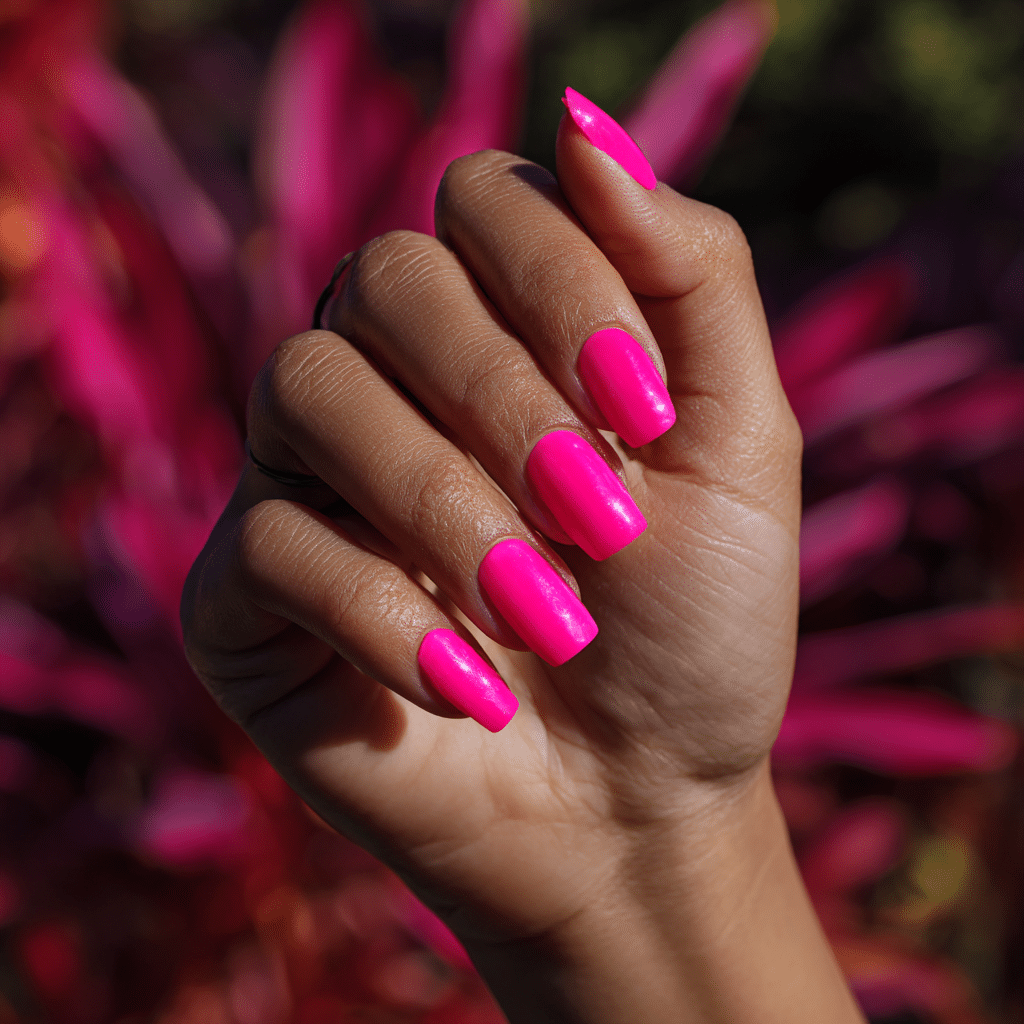
Flamingo Pink Pop features bold, hot pink polish that screams beach fun. Perfect for tropical parties or beach festivals, this vibrant manicure radiates playful energy.
Tools Needed
- Hot pink nail polish
- Base coat and glossy top coat
- Nail file
- Acetone for cleanup
Step-by-Step Guide
- File nails to desired shape; apply a base coat and let dry.
- Paint nails with hot pink polish, using two coats; let dry.
- Apply a second layer if needed for opacity.
- Check for even, glossy coverage.
- Clean excess polish with acetone.
- Seal with a glossy top coat.
Color Suggestions
- Bold Pop: Hot pink gloss.
- Soft Glow: Bubblegum pink gloss.
- Neon Shine: Neon pink gloss.
Tips for Success
- Apply thin polish layers for smoothness.
- Use a glossy top coat for vibrancy.
- Clean cuticles for a polished look.
- Use a quick-dry top coat.
Creative Variations
- Add a matte top coat for contrast.
- Apply silver glitter to accent nails.
- Create a pink French tip.
- Pair with a single heart decal.
This manicure pairs with bold outfits or gold jewelry, radiating summer energy. Maintain by refreshing the top coat. Flamingo Pink Pop is a striking vacation choice.
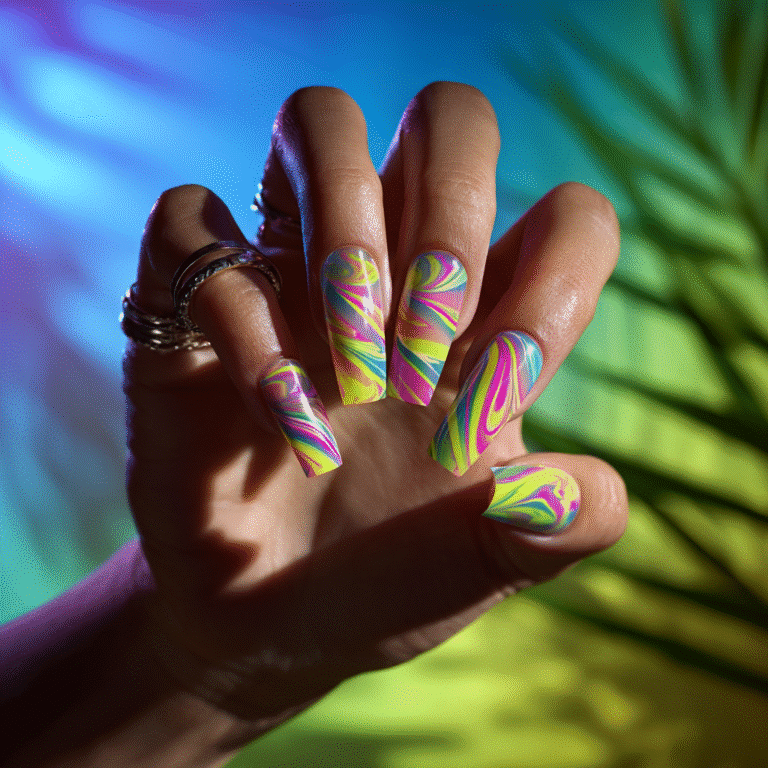
Neon Tip Reverse French
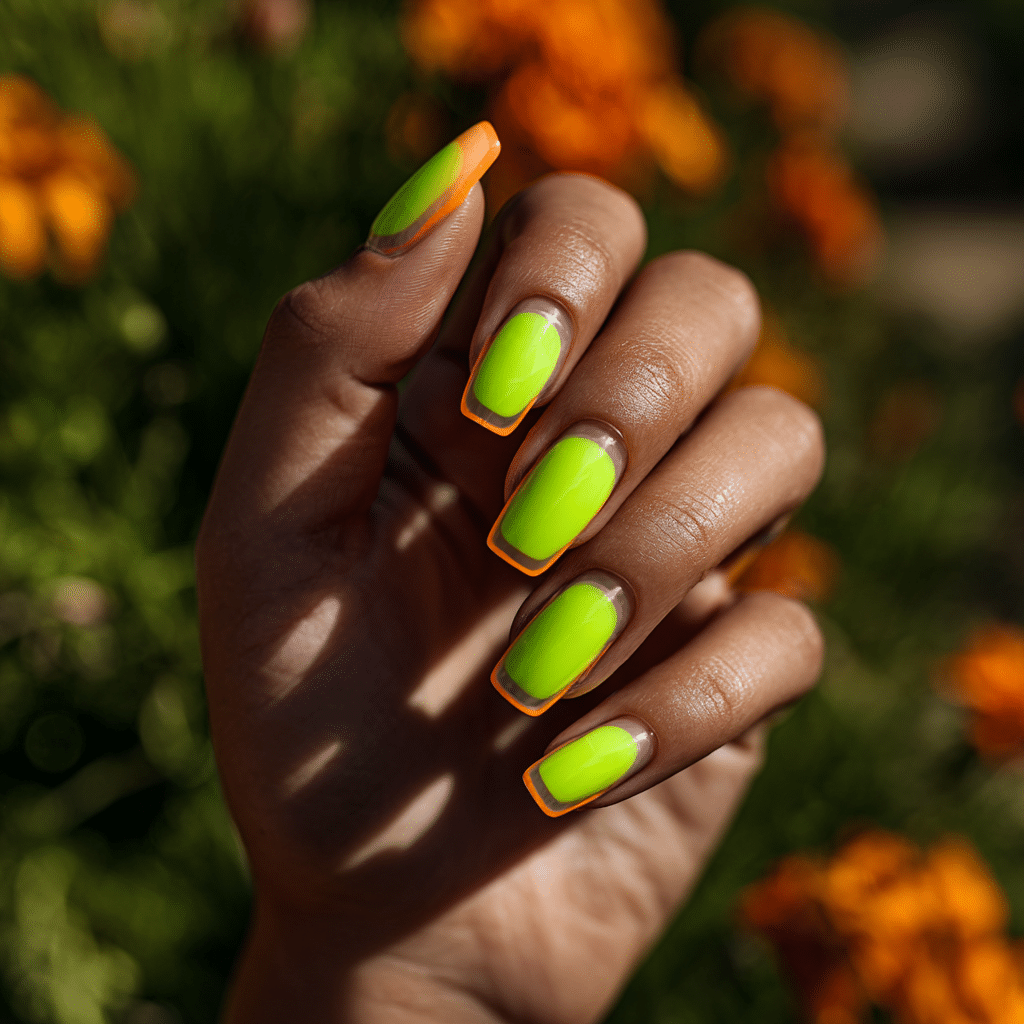
Neon Tip Reverse French features a neon green or orange base with clear tips, offering a modern twist. Perfect for beach raves or tropical nightlife, this bold manicure pops with vibrancy.
Tools Needed
- Neon green or orange nail polish
- Clear nail polish
- Striping tape or fine brush
- Base coat and glossy top coat
- Acetone for cleanup
Step-by-Step Guide
- Apply a base coat and let dry.
- Paint nails with neon green or orange polish, leaving tips clear; let dry.
- Use tape or a fine brush to define clear tips precisely.
- Apply two layers of neon polish for vibrancy.
- Clean excess polish with acetone.
- Seal with a glossy top coat.
Color Suggestions
- Vibrant Twist: Neon green with clear tips.
- Bold Pop: Neon orange with clear tips.
- Cool Glow: Neon yellow with clear tips.
Tips for Success
- Use tape for clean tip lines.
- Apply thin polish layers for evenness.
- Practice tip placement on paper.
- Use a glossy top coat for shine.
Creative Variations
- Add glitter to neon base.
- Use a matte neon base.
- Create double clear tips on one nail.
- Pair with a single star decal.
This manicure pairs with neon outfits or silver accessories, radiating party vibes. Maintain by touching up tips and refreshing the top coat. Neon Tip Reverse French is a trendy vacation choice.
Pastel Rainbow Arcs
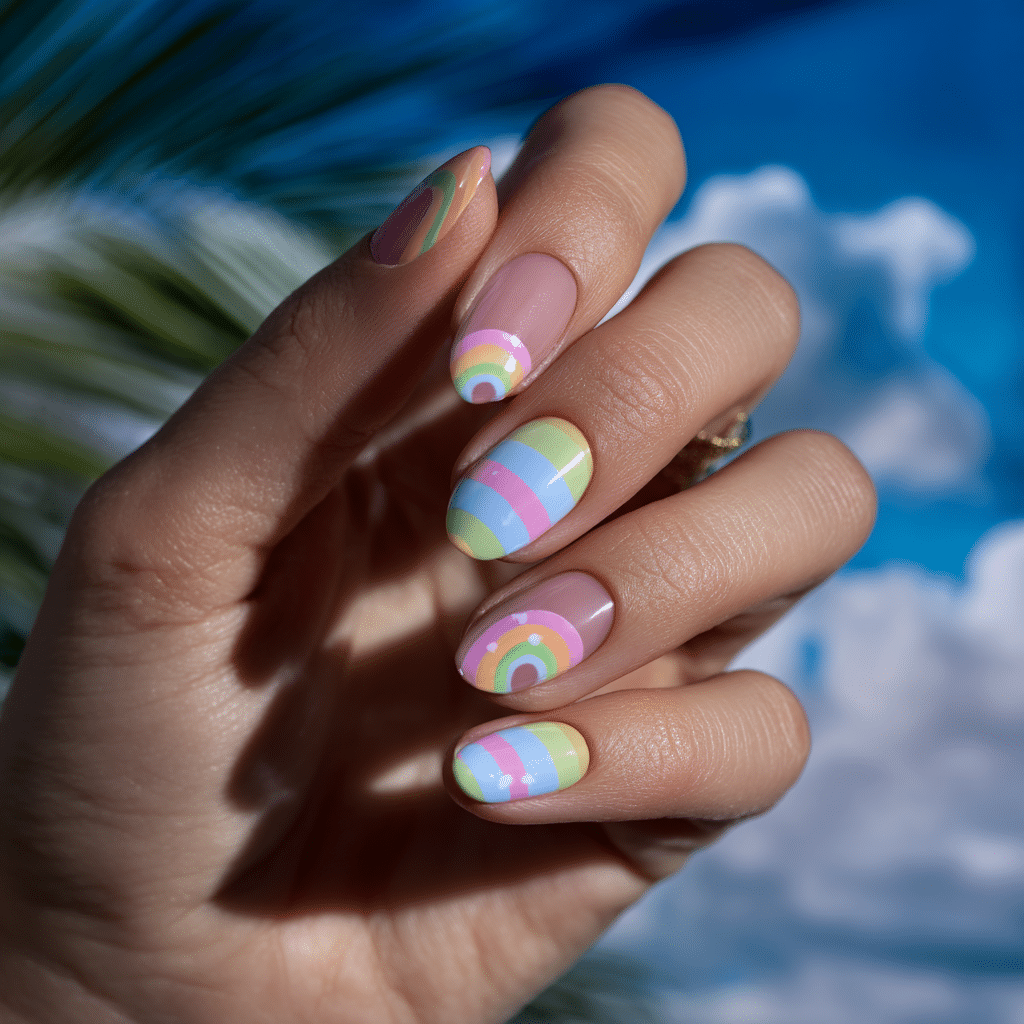
Pastel Rainbow Arcs feature small rainbows painted as half-arcs on one or two accent nails, offering a playful, summery look. Perfect for beach festivals or picnics, this manicure exudes youthful charm.
Tools Needed
- Pastel nail polishes (pink, blue, yellow, green)
- Fine nail art brush
- Base coat and glossy top coat
- Acetone for cleanup
Step-by-Step Guide
- Apply a base coat and let dry.
- Paint nails with a clear or pastel base, using two coats; let dry.
- Use a fine brush to paint small pastel rainbow arcs on accent nails.
- Layer pink, blue, yellow, and green arcs carefully.
- Clean excess polish with acetone.
- Seal with a glossy top coat.
Color Suggestions
- Rainbow Charm: Pastel pink, blue, yellow, green arcs.
- Soft Pop: Pastel coral, aqua, lemon, mint arcs.
- Bold Mix: Neon pastel pink, blue, yellow, green arcs.
Tips for Success
- Practice arc shapes on paper.
- Use a fine brush for precision.
- Keep arcs small for cuteness.
- Use a glossy top coat for shine.
Creative Variations
- Add arcs to all nails.
- Use glitter polish for arcs.
- Create a gradient base.
- Pair with tiny cloud decals.
This manicure pairs with pastel outfits or silver accessories, adding summery fun. Maintain by touching up arcs and refreshing the top coat. Pastel Rainbow Arcs are a delightful vacation choice.
Starfish Dot Nails
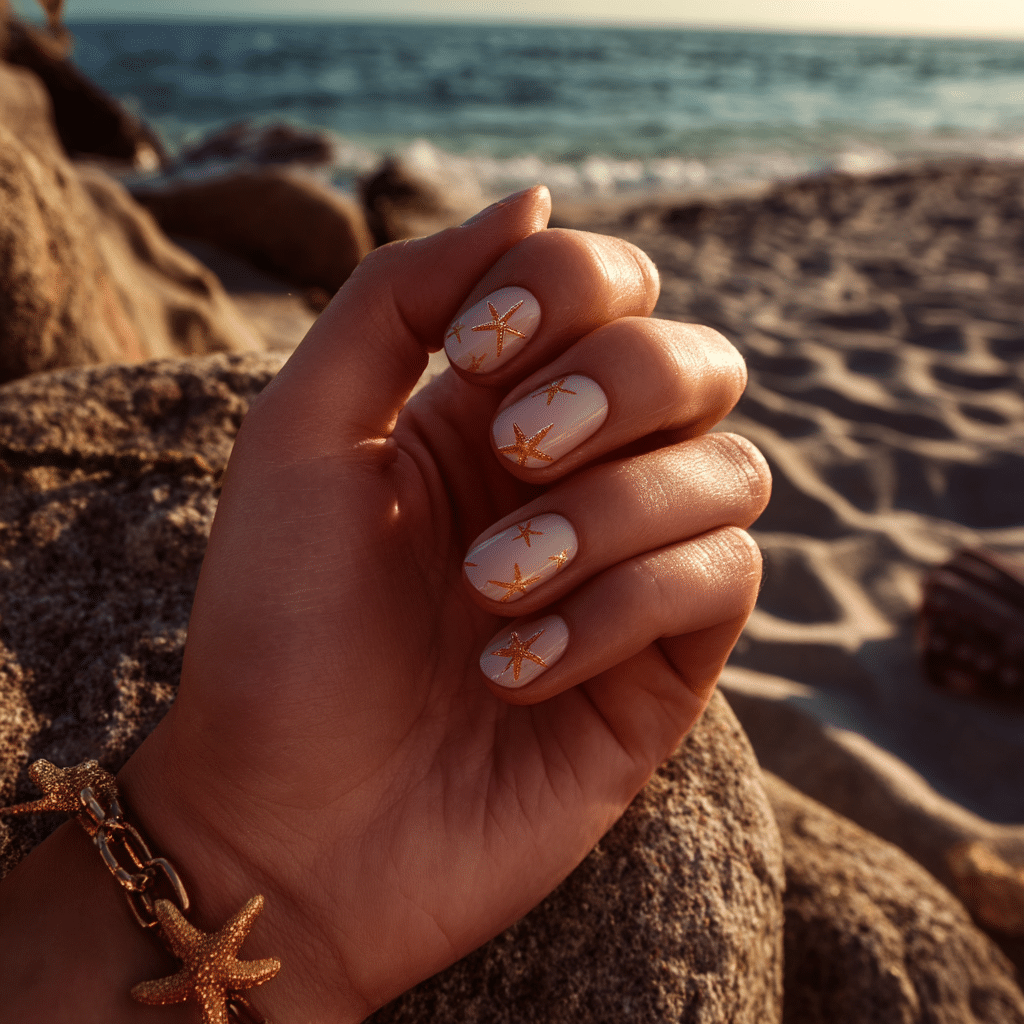
Starfish Dot Nails feature a neutral background with tiny star shapes in soft orange or gold, offering a subtle coastal look. Perfect for beach strolls or tropical dinners, this manicure radiates understated charm.
Tools Needed
- Neutral nail polish
- Soft orange or gold nail polish
- Dotting tool or fine brush
- Base coat and glossy top coat
- Acetone for cleanup
Step-by-Step Guide
- Apply a base coat and let dry.
- Paint nails with neutral polish, using two coats; let dry.
- Use a dotting tool or fine brush to create small starfish shapes in orange or gold.
- Place starfish sparsely for a delicate effect.
- Clean excess polish with acetone.
- Seal with a glossy top coat.
Color Suggestions
- Coastal Charm: Neutral with soft orange starfish.
- Soft Pop: Beige with gold starfish.
- Bold Contrast: Taupe with neon orange starfish.
Tips for Success
- Practice starfish shapes on paper.
- Use a dotting tool for precision.
- Keep starfish small for subtlety.
- Use a glossy top coat for shine.
Creative Variations
- Add starfish to accent nails only.
- Use glitter polish for starfish.
- Create a gradient neutral base.
- Pair with tiny shell decals.
This manicure pairs with neutral outfits or gold jewelry, adding summery sophistication. Maintain by touching up starfish and refreshing the top coat. Starfish Dot Nails are a serene vacation choice.
Water Ripple Designs
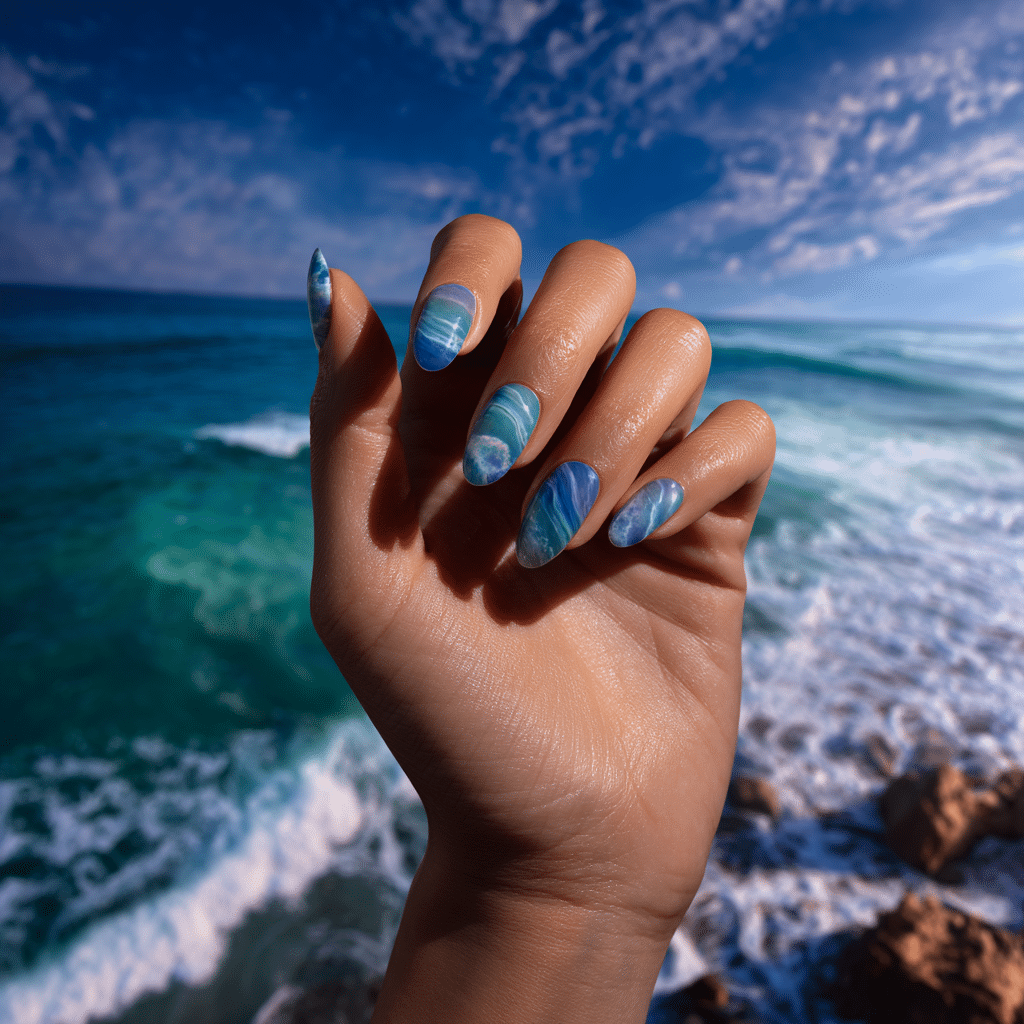
Water Ripple Designs feature hand-painted ripples in shades of blue over jelly nails, evoking ocean waves. Perfect for beach swims or coastal adventures, this artistic manicure radiates aquatic beauty.
Tools Needed
- Translucent jelly nail polish
- Light and dark blue nail polishes
- Fine nail art brush
- Base coat and glossy top coat
- Acetone for cleanup
Step-by-Step Guide
- Apply a base coat and let dry.
- Paint nails with translucent jelly polish, using two coats; let dry.
- Use a fine brush to paint light and dark blue ripples across nails.
- Create wavy, overlapping patterns for a water effect.
- Clean excess polish with acetone.
- Seal with a glossy top coat.
Color Suggestions
- Ocean Ripple: Jelly with light and dark blue ripples.
- Soft Pop: Jelly with aqua and teal ripples.
- Bold Contrast: Jelly with navy and turquoise ripples.
Tips for Success
- Practice ripple patterns on paper.
- Use a fine brush for precision.
- Keep ripples fluid for artistry.
- Use a glossy top coat for shine.
Creative Variations
- Add ripples to accent nails only.
- Use glitter polish for ripples.
- Create a gradient jelly base.
- Pair with tiny bubble decals.
This manicure pairs with swimwear or silver accessories, radiating coastal allure. Maintain by touching up ripples and refreshing the top coat. Water Ripple Designs are a captivating vacation choice.
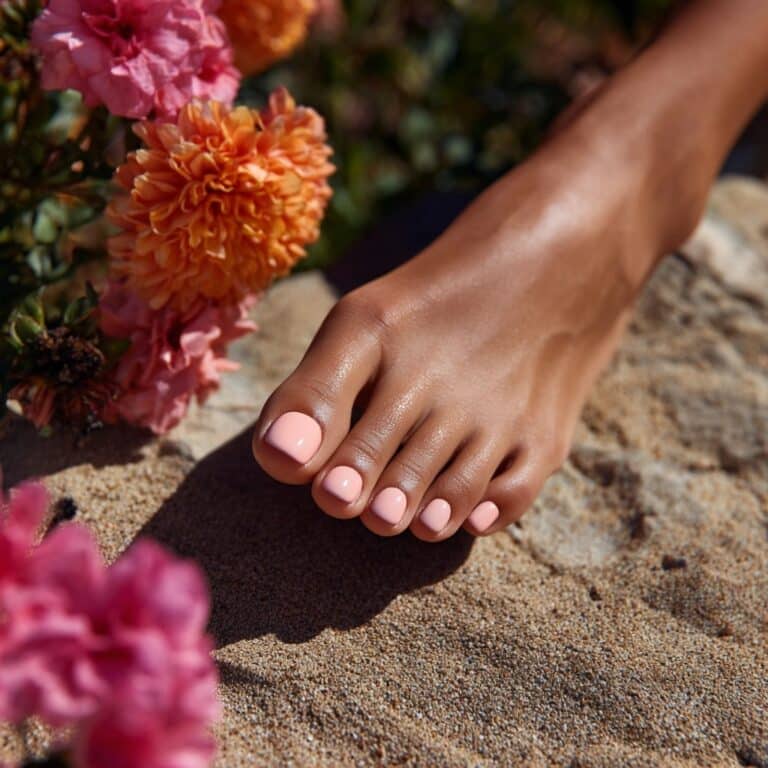
Peach Gloss Almonds

Peach Gloss Almonds feature almond-shaped nails in creamy peach with a high-gloss finish, offering a chic, summery look. Perfect for beach weddings or tropical brunches, this manicure exudes elegance.
Tools Needed
- Peach nail polish
- Base coat and glossy top coat
- Nail file
- Acetone for cleanup
Step-by-Step Guide
- File nails to almond shape; apply a base coat and let dry.
- Paint nails with peach polish, using two coats; let dry.
- Apply a second layer if needed for opacity.
- Check for even, glossy coverage.
- Clean excess polish with acetone.
- Seal with a glossy top coat.
Color Suggestions
- Chic Peach: Creamy peach gloss.
- Soft Pop: Blush peach gloss.
- Bold Shine: Coral peach gloss.
Tips for Success
- Shape nails carefully for almond form.
- Apply thin polish layers for smoothness.
- Use a glossy top coat for vibrancy.
- Clean cuticles for a polished look.
Creative Variations
- Add a matte top coat for contrast.
- Apply gold glitter to accent nails.
- Create a peach French tip.
- Pair with a single pearl decal.
This manicure pairs with neutral outfits or gold jewelry, radiating summery elegance. Maintain by refreshing the top coat. Peach Gloss Almonds are a refined vacation choice.
Citrus Mix Color Block
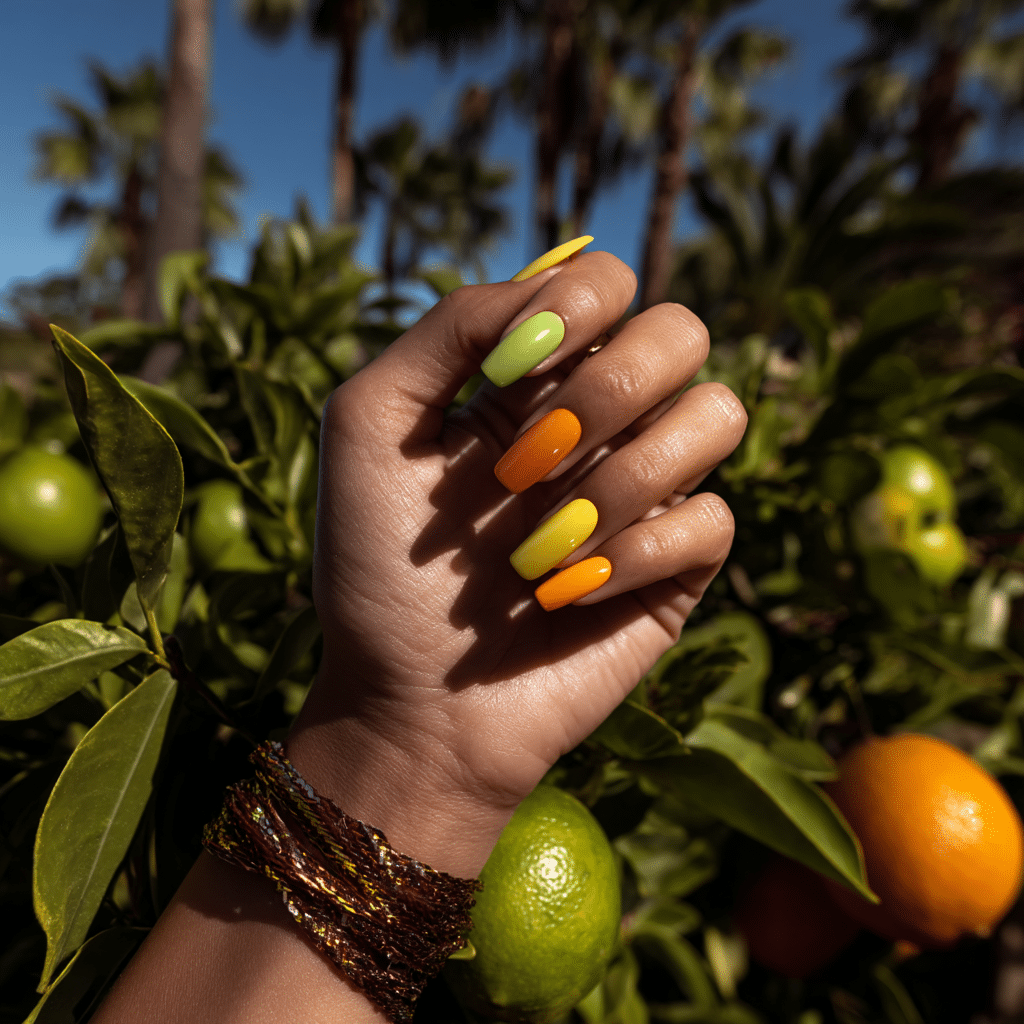
Citrus Mix Color Block features divided nails in lemon, lime, and tangerine, creating a juicy palette. Perfect for beach picnics or tropical festivals, this bold manicure radiates summery energy.
Tools Needed
- Lemon, lime, tangerine nail polishes
- Striping tape
- Base coat and glossy top coat
- Acetone for cleanup
Step-by-Step Guide
- Apply a base coat and let dry.
- Use striping tape to divide nails into three sections.
- Paint each section with lemon, lime, or tangerine polish; let dry.
- Remove tape carefully to reveal clean lines.
- Clean excess polish with acetone.
- Seal with a glossy top coat.
Color Suggestions
- Juicy Pop: Lemon, lime, tangerine blocks.
- Soft Pop: Pastel yellow, mint, peach blocks.
- Bold Mix: Neon yellow, green, orange blocks.
Tips for Success
- Use tape for clean color divisions.
- Apply thin polish layers for evenness.
- Practice blocking on paper.
- Use a glossy top coat for shine.
Creative Variations
- Add glitter to one color block.
- Use a matte top coat for contrast.
- Create diagonal color blocks.
- Pair with a single fruit decal.
This manicure pairs with bright outfits or silver accessories, radiating summer zest. Maintain by touching up blocks and refreshing the top coat. Citrus Mix Color Block is a lively vacation choice.
Translucent Lavender Gloss
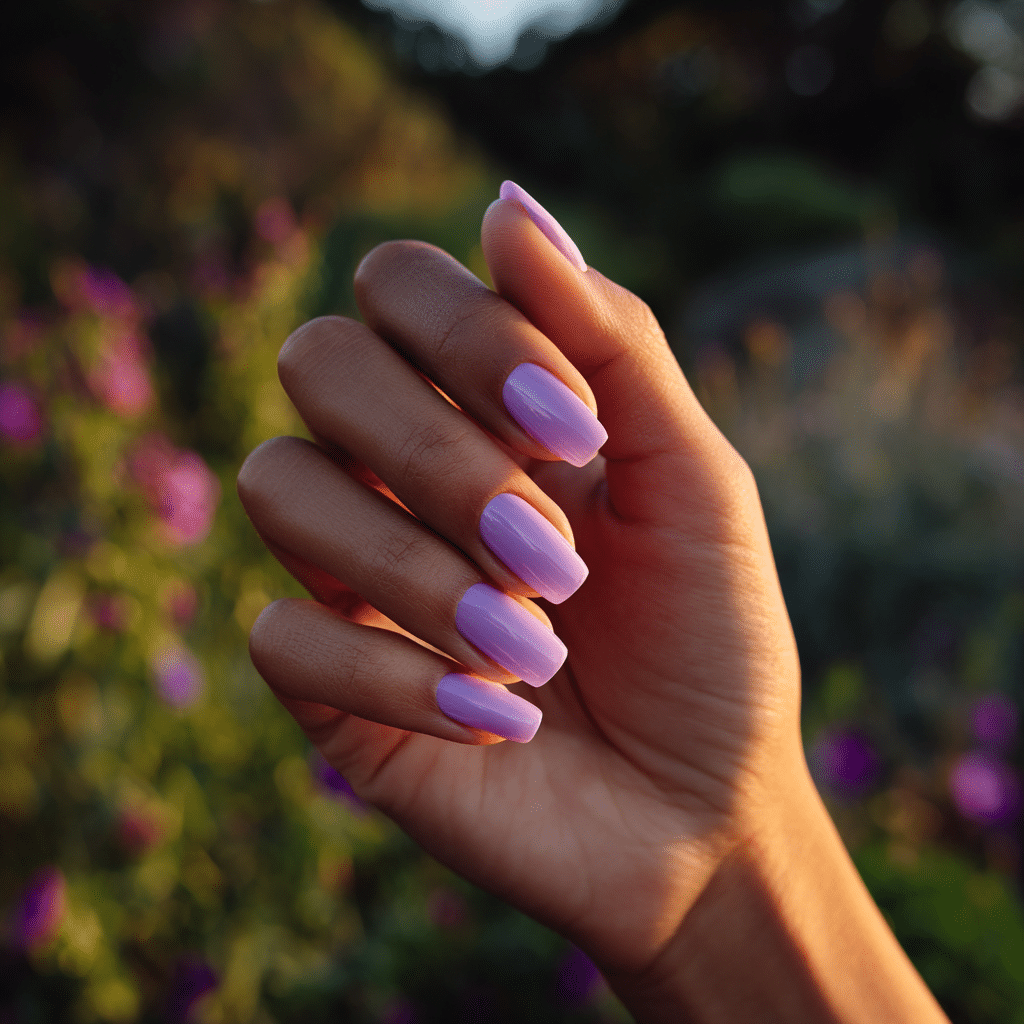
Translucent Lavender Gloss features a glass-like lavender polish for a dreamy, airy feel. Perfect for beach sunsets or tropical evenings, this ethereal manicure radiates serene beauty.
Tools Needed
- Translucent lavender nail polish
- Base coat and glossy top coat
- Nail file
- Acetone for cleanup
Step-by-Step Guide
- File nails to desired shape; apply a base coat and let dry.
- Paint nails with translucent lavender polish, using two coats; let dry.
- Apply additional layers for desired opacity.
- Check for even, glassy effect.
- Clean excess polish with acetone.
- Seal with a glossy top coat.
Color Suggestions
- Dreamy Glow: Translucent lavender gloss.
- Soft Pop: Translucent lilac gloss.
- Bold Shine: Translucent purple gloss.
Tips for Success
- Apply thin polish layers for transparency.
- Use a glossy top coat for vibrancy.
- Clean cuticles for a polished look.
- Use a quick-dry top coat.
Creative Variations
- Add glitter flecks for sparkle.
- Use a matte top coat for contrast.
- Create a gradient lavender effect.
- Pair with a single heart decal.
This manicure pairs with airy dresses or silver jewelry, radiating coastal charm. Maintain by refreshing the top coat. Translucent Lavender Gloss is a dreamy vacation choice.
Sand Beige with Gold Foil
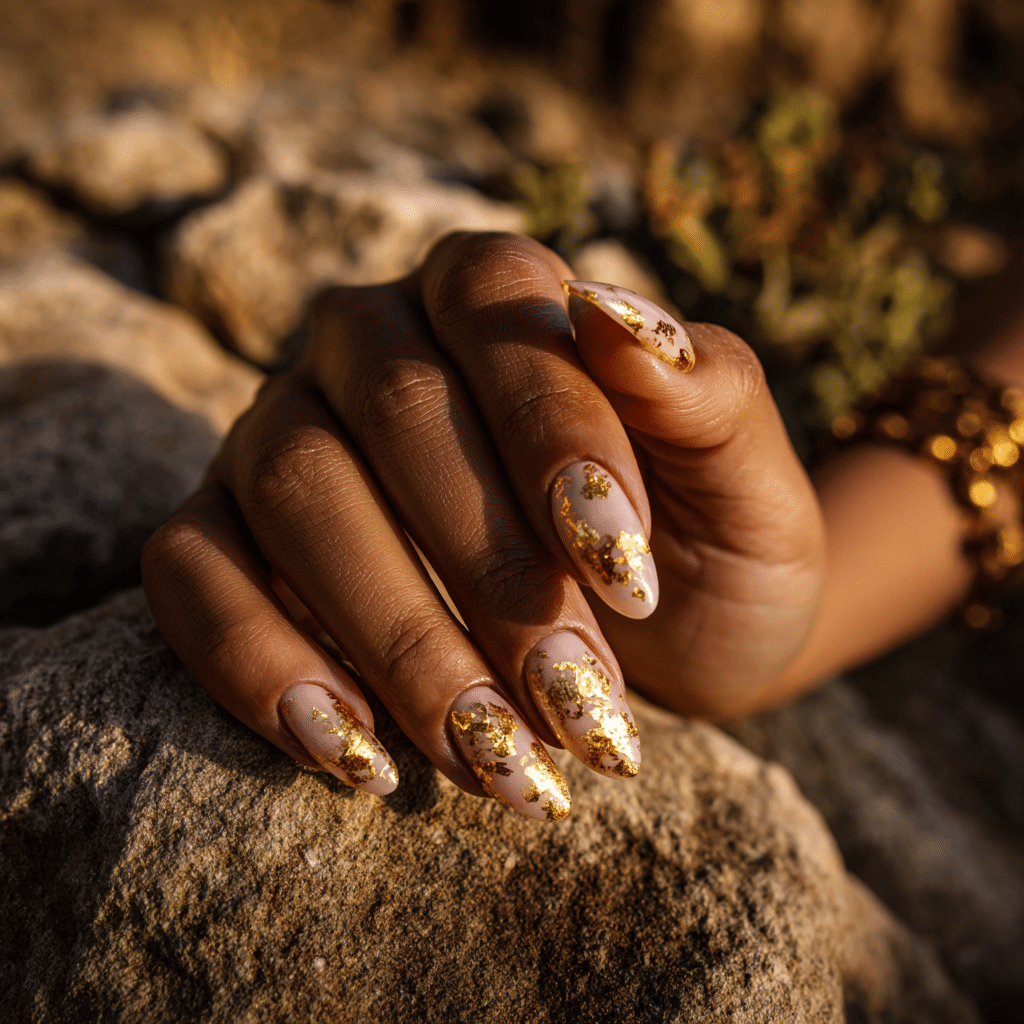
Sand Beige with Gold Foil features natural beige polish with flakes of gold, offering an earthy glam vibe. Perfect for beach dinners or tropical retreats, this chic manicure exudes understated luxury.
Tools Needed
- Beige nail polish
- Gold foil and foil glue
- Tweezers
- Base coat and glossy top coat
- Acetone for cleanup
Step-by-Step Guide
- Apply a base coat and let dry.
- Paint nails with beige polish, using two coats; let dry.
- Apply foil glue sparingly to nails.
- Use tweezers to place gold foil flakes randomly.
- Press gently to secure foil.
- Clean excess polish with acetone.
- Seal with a glossy top coat.
Color Suggestions
- Earthy Glam: Beige with gold foil.
- Soft Pop: Taupe with rose gold foil.
- Bold Contrast: Sand with silver foil.
Tips for Success
- Apply foil glue sparingly for subtlety.
- Use tweezers for precise placement.
- Keep foil sparse for elegance.
- Use a glossy top coat for shine.
Creative Variations
- Add foil to accent nails only.
- Use glitter polish as a base.
- Create a gradient beige base.
- Pair with a single pearl decal.
This manicure pairs with neutral outfits or gold jewelry, radiating summery sophistication. Maintain by checking foil adhesion and refreshing the top coat. Sand Beige with Gold Foil is a glamorous vacation choice.
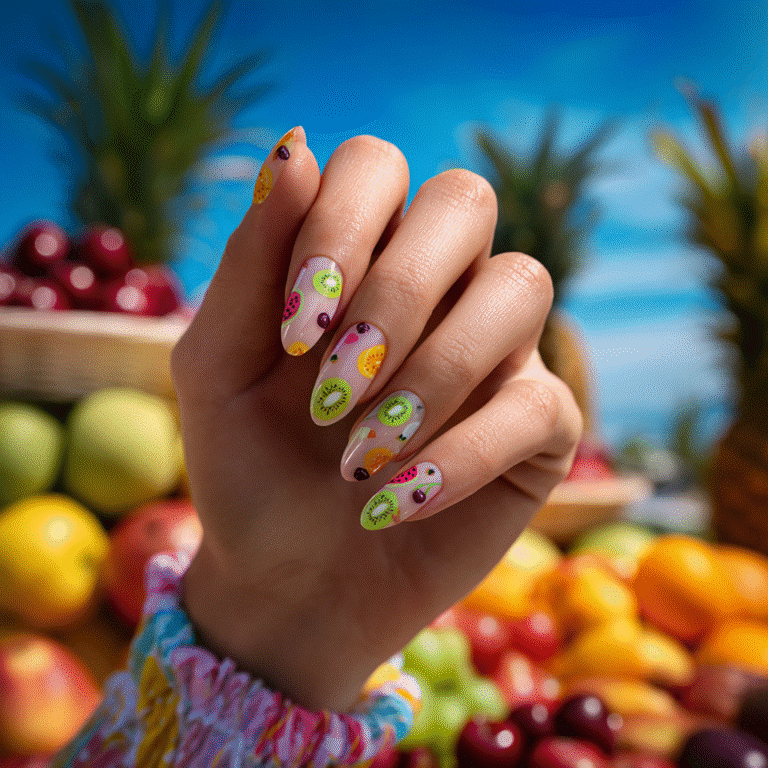
Tropical Fruit Nail Art
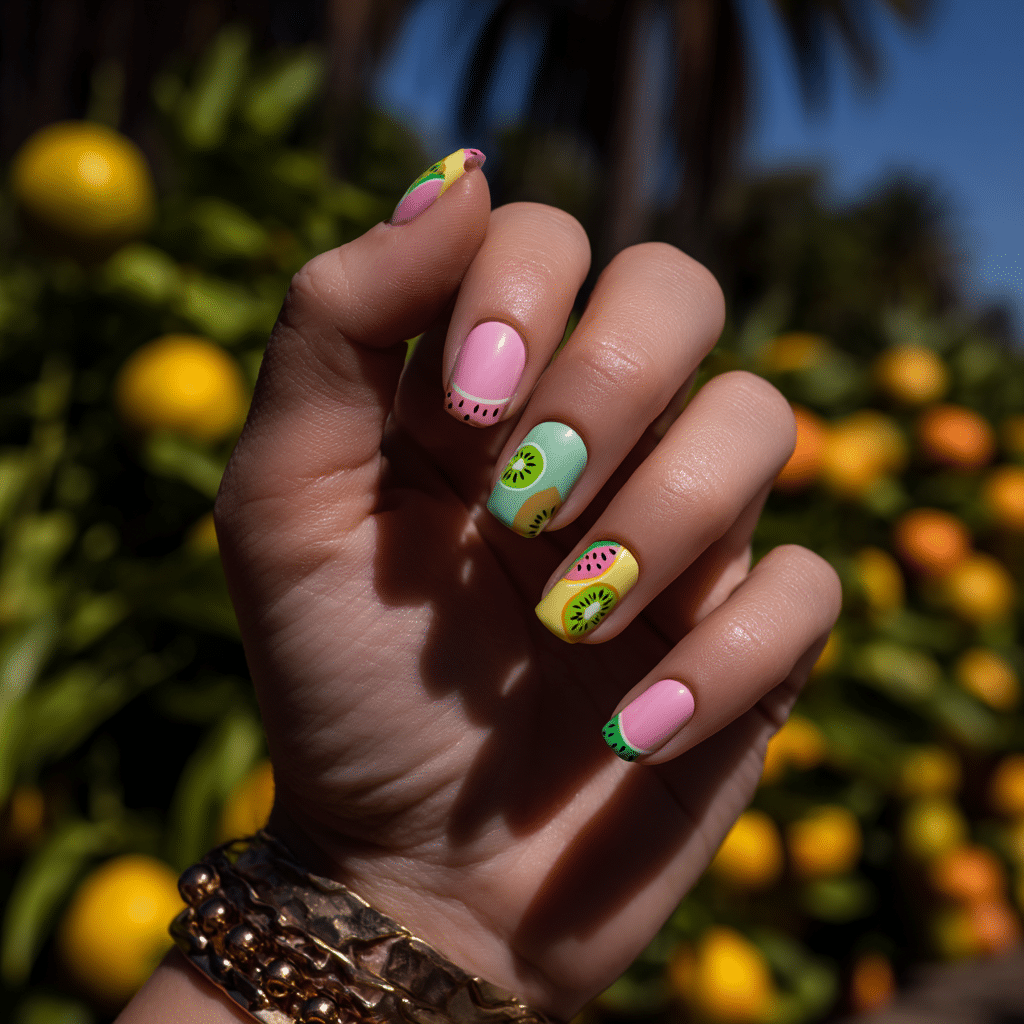
Tropical Fruit Nail Art features hand-painted kiwis, watermelons, and mangoes on pastel backgrounds, offering a playful, summery look. Perfect for beach picnics or tropical markets, this manicure bursts with fruity charm.
Tools Needed
- Pastel nail polish (pink, yellow, or mint)
- Green, pink, yellow, black nail polishes
- Fine nail art brush
- Base coat and glossy top coat
- Acetone for cleanup
Step-by-Step Guide
- Apply a base coat and let dry.
- Paint nails with pastel polish, using two coats; let dry.
- Use a fine brush to paint kiwis, watermelons, and mangoes on accent nails.
- Add green, pink, yellow, and black details for realism.
- Clean excess polish with acetone.
- Seal with a glossy top coat.
Color Suggestions
- Fruity Pop: Pastel pink with kiwi, watermelon, mango.
- Soft Glow: Pastel yellow with fruit art.
- Bold Contrast: Pastel mint with neon fruit art.
Tips for Success
- Practice fruit shapes on paper.
- Use a fine brush for precision.
- Keep fruit designs small for cuteness.
- Use a glossy top coat for shine.
Creative Variations
- Add fruit to all nails.
- Use glitter in fruit designs.
- Create a gradient pastel base.
- Pair with tiny leaf decals.
This manicure pairs with tropical outfits or silver accessories, radiating summer fun. Maintain by touching up fruit and refreshing the top coat. Tropical Fruit Nail Art is a lively vacation choice.
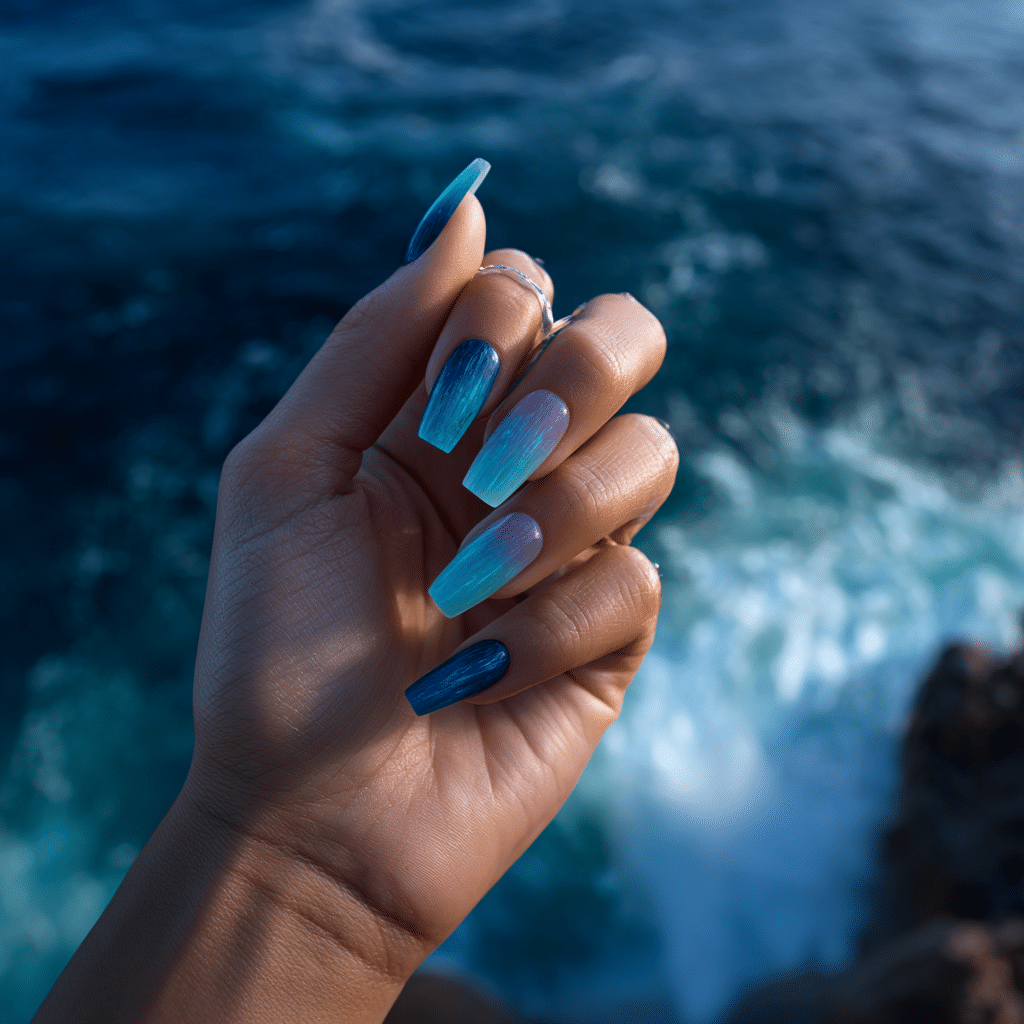
Ocean Blue French Fade
Ocean Blue French Fade features a soft ombré from a clear base to deep marine tips, evoking coastal waves. Perfect for beach cruises or tropical adventures, this chic manicure radiates serene beauty.
Tools Needed
- Clear and deep blue nail polishes
- Makeup sponge
- Base coat and glossy top coat
- Acetone for cleanup
Step-by-Step Guide
- Apply a base coat and let dry.
- Paint nails with clear polish, using two coats; let dry.
- Dab clear and deep blue polish onto a sponge, blending slightly.
- Press sponge onto nail tips, creating a gradient fade.
- Repeat for a seamless ombré effect; let dry.
- Clean excess polish with acetone.
- Seal with a glossy top coat.
Color Suggestions
- Marine Fade: Clear to deep blue.
- Soft Pop: Clear to aqua blue.
- Bold Blend: Clear to navy blue.
Tips for Success
- Use a sponge for smooth blending.
- Apply thin layers to avoid clumps.
- Practice gradient on paper.
- Use a glossy top coat for shine.
Creative Variations
- Add glitter to the blue tips.
- Use a matte top coat for contrast.
- Create a full-nail ombré.
- Pair with a tiny shell decal.
This manicure pairs with beachwear or silver jewelry, radiating coastal charm. Maintain by reapplying the top coat. Ocean Blue French Fade is a tranquil vacation choice.
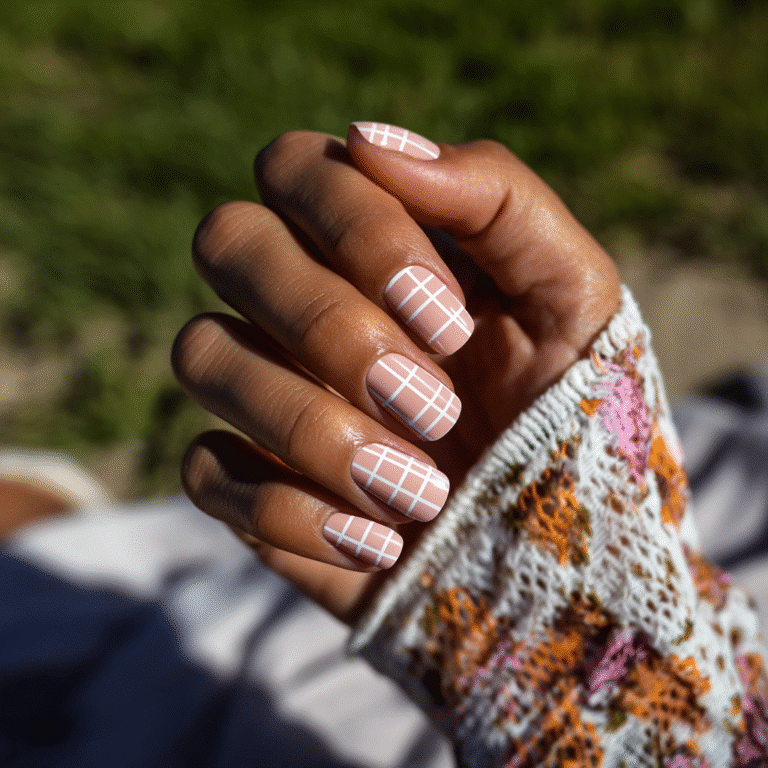
Minimalist Nautical Stripe
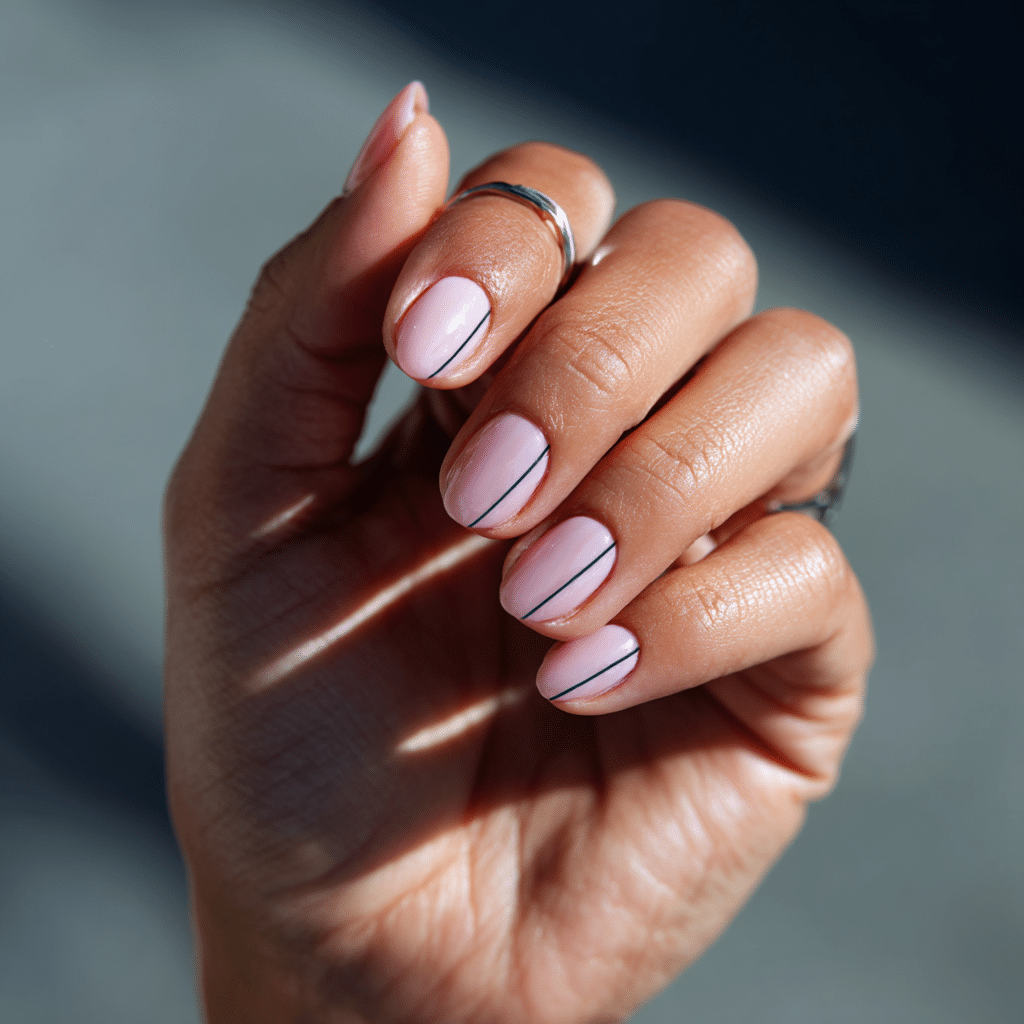
Minimalist Nautical Stripe features one thin navy stripe down the center of an uncovered or pink nail, offering a sleek, coastal look. Perfect for beach dinners or yacht trips, this manicure exudes understated elegance.
Tools Needed
- Uncovered or pink nail polish
- Navy nail polish
- Fine nail art brush
- Base coat and glossy top coat
- Acetone for cleanup
Step-by-Step Guide
- Apply a base coat and let dry.
- Paint nails with uncovered or pink polish, using two coats; let dry.
- Use a fine brush to paint a thin navy stripe down the center of each nail.
- Keep stripes straight and minimal.
- Clean excess polish with acetone.
- Seal with a glossy top coat.
Color Suggestions
- Nautical Chic: Uncovered with navy stripe.
- Soft Pop: Pink with white stripe.
- Bold Contrast: Uncovered with gold stripe.
Tips for Success
- Practice stripe lines on paper.
- Use a fine brush for precision.
- Keep stripes thin for minimalism.
- Use a glossy top coat for shine.
Creative Variations
- Add stripes to accent nails only.
- Use glitter polish for stripes.
- Create a diagonal stripe.
- Pair with a tiny anchor decal.
This manicure pairs with neutral outfits or silver accessories, adding summery sophistication. Maintain by touching up stripes and refreshing the top coat. Minimalist Nautical Stripe is a refined vacation choice.
Shell-Inspired Chrome

Shell-Inspired Chrome features pearlescent chrome nails with subtle shell textures, evoking coastal treasures. Perfect for beach weddings or tropical evenings, this glamorous manicure radiates ethereal beauty.
Tools Needed
- Pearlescent chrome nail polish
- Textured top coat (optional)
- Base coat and glossy top coat
- Nail file
- Acetone for cleanup
Step-by-Step Guide
- File nails to desired shape; apply a base coat and let dry.
- Paint nails with pearlescent chrome polish, using two coats; let dry.
- Apply a textured top coat for subtle shell effect, if desired.
- Check for even chrome finish.
- Clean excess polish with acetone.
- Seal with a glossy top coat.
Color Suggestions
- Shell Shine: Pearlescent chrome.
- Soft Pop: Iridescent pink chrome.
- Bold Glow: Iridescent silver chrome.
Tips for Success
- Apply thin polish layers for smoothness.
- Use a glossy top coat for vibrancy.
- Clean cuticles for a polished look.
- Use a quick-dry top coat.
Creative Variations
- Add a matte top coat for contrast.
- Apply glitter to accent nails.
- Create a chrome French tip.
- Pair with a single pearl decal.
This manicure pairs with evening dresses or silver jewelry, radiating coastal allure. Maintain by refreshing the top coat. Shell-Inspired Chrome is a dreamy vacation choice.
Gold Shell Decals
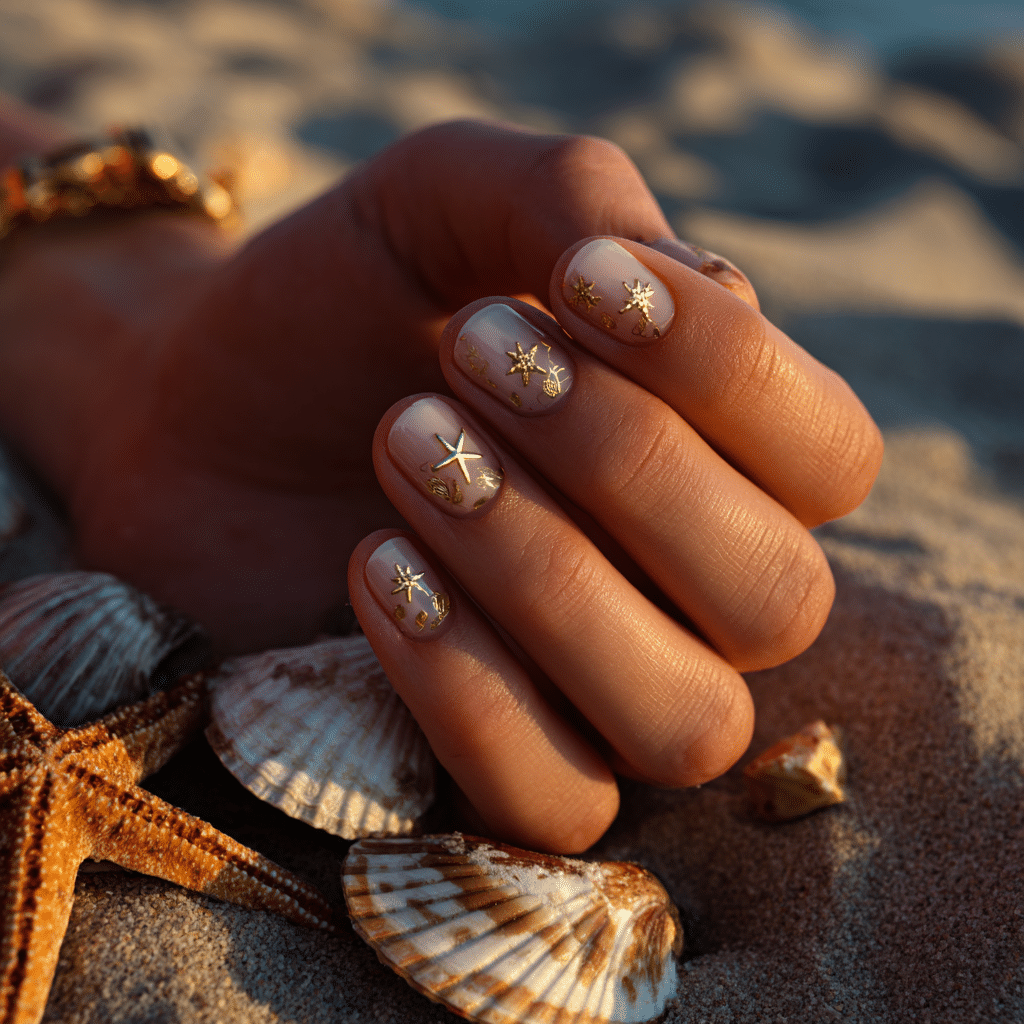
Gold Shell Decals feature a clear or uncovered base with mini gold shell and starfish embellishments, offering a luxurious coastal look. Perfect for beach galas or tropical dinners, this chic manicure exudes elegance.
Tools Needed
- Clear or uncovered nail polish
- Gold shell and starfish decals
- Tweezers
- Base coat and glossy top coat
- Acetone for cleanup
Step-by-Step Guide
- Apply a base coat and let dry.
- Paint nails with clear or uncovered polish, using two coats; let dry.
- Use tweezers to place gold shell and starfish decals on accent nails.
- Press gently to secure decals.
- Clean excess polish with acetone.
- Seal with a glossy top coat.
Color Suggestions
- Coastal Luxe: Clear with gold shell decals.
- Soft Pop: Uncovered with rose gold decals.
- Bold Contrast: Sheer pink with silver decals.
Tips for Success
- Apply decals on dry polish.
- Use tweezers for precise placement.
- Keep decals sparse for elegance.
- Use a glossy top coat for shine.
Creative Variations
- Add decals to all nails.
- Use glitter polish as a base.
- Create a gradient clear base.
- Pair with tiny pearl decals.
This manicure pairs with neutral outfits or gold jewelry, radiating summery sophistication. Maintain by checking decal adhesion and refreshing the top coat. Gold Shell Decals are a glamorous vacation choice.
Vacation nails for 2025 are about capturing the feeling of escape—whether it’s the warm sun on your skin, the glow of a beach sunset, or the serenity of turquoise waters. These trendy ideas make every gesture feel a bit more joyful, and every outfit feel complete. They’re a celebration of where you’re going, and who you’re becoming while you’re there.
So before you board the plane or hit the road, take a moment to pick a nail design that resonates with your journey. Let your fingertips tell the story of your vacation—fun, free-spirited, and full of summer glow.